Custom Object Detection with YOLO V5
Machine Learning courses with 100+ Real-time projects Start Now!!
Object detection is one of the most common tasks of computer vision. It is the basis of understanding and working with the scene.
From simple applications like identifying objects to complex tasks like self-driving cars all make use of object detection for understanding different scenarios and making decisions based on them. Security cameras and even modern-day smartphones all have these capabilities built-in with them for various tasks.
What is Object Detection
- The task of knowing what’s present in an image is classification.
- The task of knowing where a certain thing is present in an image is localization
- Finally, the task of knowing what is present in the screen and also where it is present is known as object detection. You can call it the combination of both image classification and localization.
Understanding YOLO Object Detection system
So now that we know what we are gonna do, why do we choose yolo for this task. It is obviously fast and reliable as we know, but let us understand a little background detail about it before we begin to implement yolo object detection.
There are a lot of available types of algorithms for this task but the following three kinds are what you need to know about and most techniques will fall under one of these.
The first one being traditional feature extraction and matching techniques like SIFT and HOG.
The next two convolutional neural network based methods: Here the first one being a reign-based proposal, with implementations like RCNN, FRCNN, Resnet, FPN. These work by sliding a window across the image and predicting object bound and objectness score at each position. Second being regression or classification based methods with implementations like SSD, Mobilenet, YOLO. Single shot detectors like these do not use a sliding window, instead, they predict the bounding box and the object directly from the feature map in a single pass, but at multiple scales in some cases.
SSD type detectors are generally a little less accurate but a lot faster than RPN networks. YOLO is one of the most famous models in this category of object detection and is fast, reliable, and accurate.
Yolo v1 had a few drawbacks like, it does not perform well on smaller objects, and it does not generalize well when dimensions of the objects are not similar.
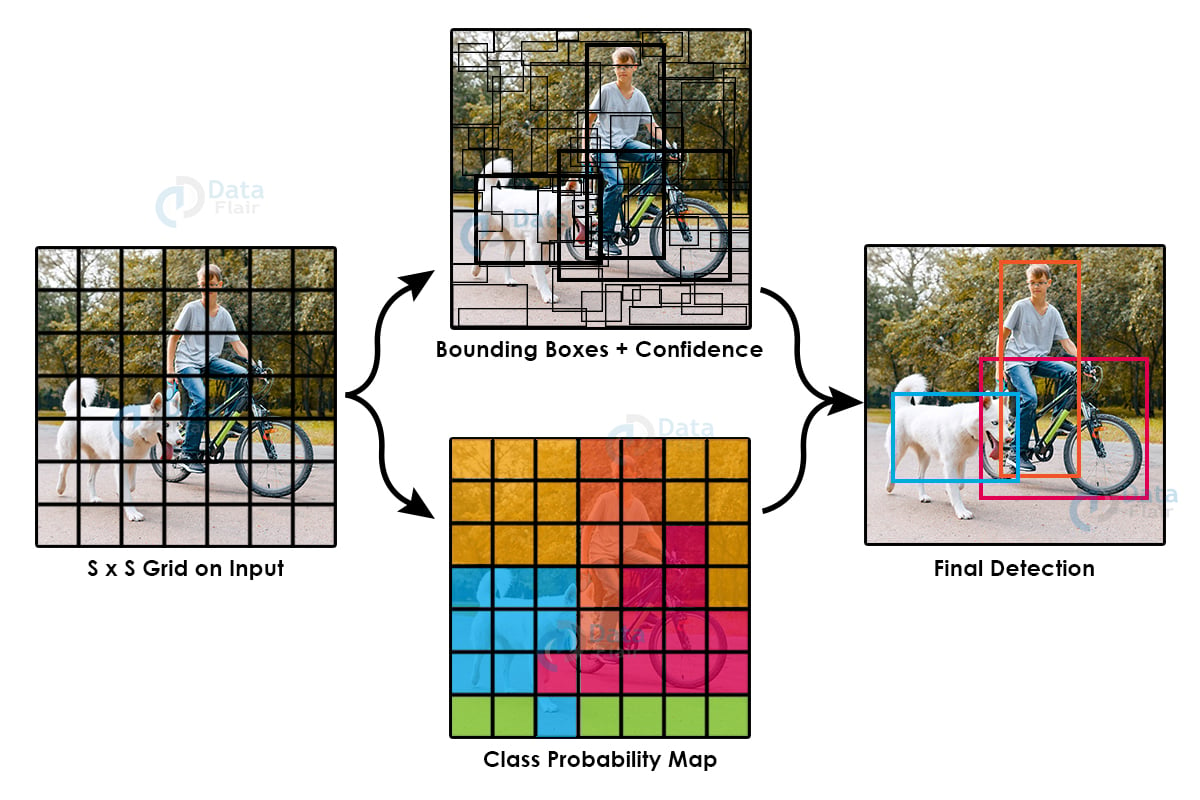
This is the image from the original yolo paper, depicting the working of yolo. It has come a long way since then and we are on version 5 of it. Although this one is not written by any of the original authors or contributors, it has the same core strategy. It is written in PyTorch which is a benefit of it. In this version of Yolo mosaic augmentation is used and a lot of several improvements come from augmentation and multiple scaling techniques.
Also unlike previous yolo models, it does not use darknet backbone in its architecture, like darknet 19 and darknet 53.
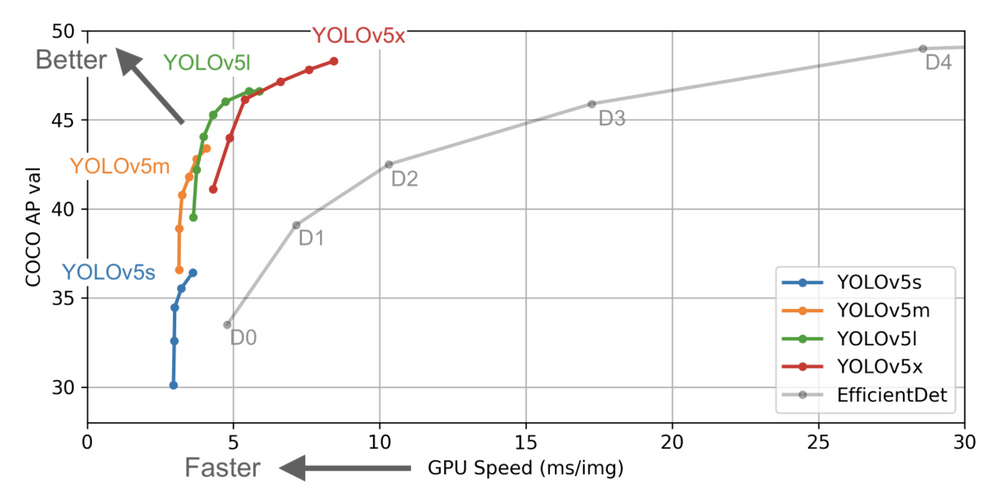
Yolov5 uses PAnet FPN or feature pyramid network as the network neck for feature extraction. The model head or the detection part of any cnn model is the same as YOLO v3 and YOLO v4, also the activation functions of choice are leaky relu and sigmoid. As you can see in the plot below yolo v5 is not only accurate but also faster than its competitors but also its earlier versions.
Source: Yolo
YOLO Object Detection Project Code
Please download the source code of the yolo object detection project (which is explained below): YOLO Object Detection Project Code
Steps to Develop YOLO Object Detection Model
This is going to be a four step process
- Getting the dataset.
- Installing the required libraries and getting the pre-trained model.
- Preparing the training files according to our dataset.
- Training and testing the model.
Getting the dataset
This step is customizable based on the requirements. Based on business needs you can choose the dataset, it depends on which types of objects you want to detect.
In this article, we are going to use a traffic sign dataset: Traffic Sign Dataset for Object Detection
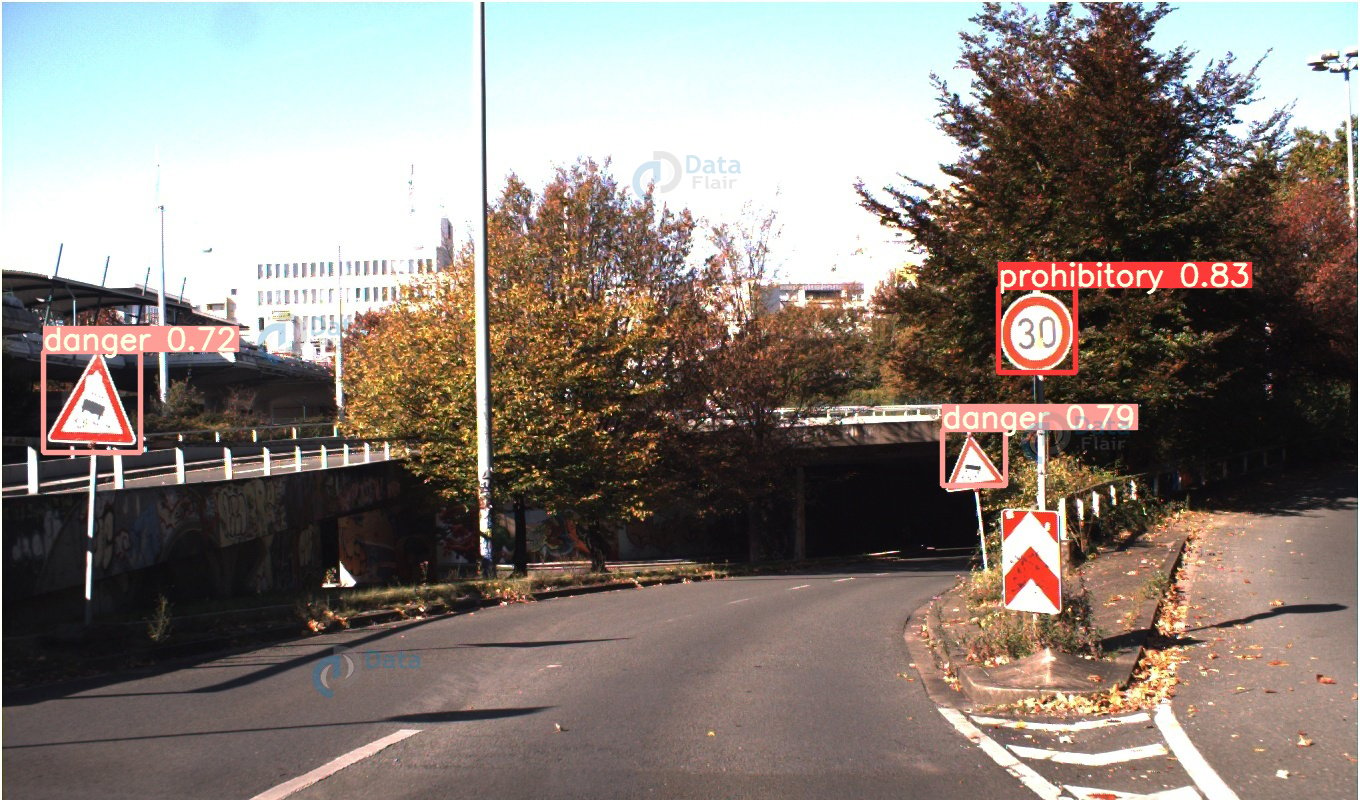
This dataset contains 741 images of different traffic signs categorized into four categories, namely prohibitory, danger, mandatory, and others.
It is a relatively simple dataset, after downloading unzip and place it in a relative location of other files and start working.
YOLO format dataset contains each image file with a text file of the same name. The text file contains the information about the annotations. The file contains each line for all the objects present in the image, if there are 3 objects then the file will contain 3 lines. Each line contains details about individual objects. The parameters or details are the class label for the object, the x and y position of the object, and the height and width of the object.
This is the yolo format and from the beginning of yolo this has been consistent. It is different from pascal or voc style datasets.
In case you are interested in creating your own dataset you may use labeling or superannotate for marking the dataset and getting the annotations in yolo format. Or you can convert dataset in pascal or voc format to yolo format as well.
YOLO Object Detection Project Code
Please download the source code of the yolo object detection project (which is explained below): YOLO Object Detection Python Code
Steps to Develop YOLO Object Detection Project
Installation and setup
I am working in a colab environment powered by google with the advantage of being able to use free GPUs.
Thanks to colab, most of the libraries and environmental setup has already been done for us so conveniently. The process, if you are working on your own system, will be the same except you will have to install torchvision, numpy, and matplotlib. Connect to a GPU runtime and connect to your google drive.
import os
from google.colab import drive
drive.mount('/content/drive')
os.chdir('/content/drive/My Drive/Custom Yolo')
!ls
Navigate to the folder where you have the required dataset. This will be the base location for our project, we will install the required libraries here and also store the result and experiments relative to this location.
!git clone https://github.com/ultralytics/yolov5
!pip install -U -r yolov5/requirements.txt
!pip install torch==1.6.0+cu101 torchvision==0.7.0+cu101 -f https://download.pytorch.org/whl/torch_stable.html
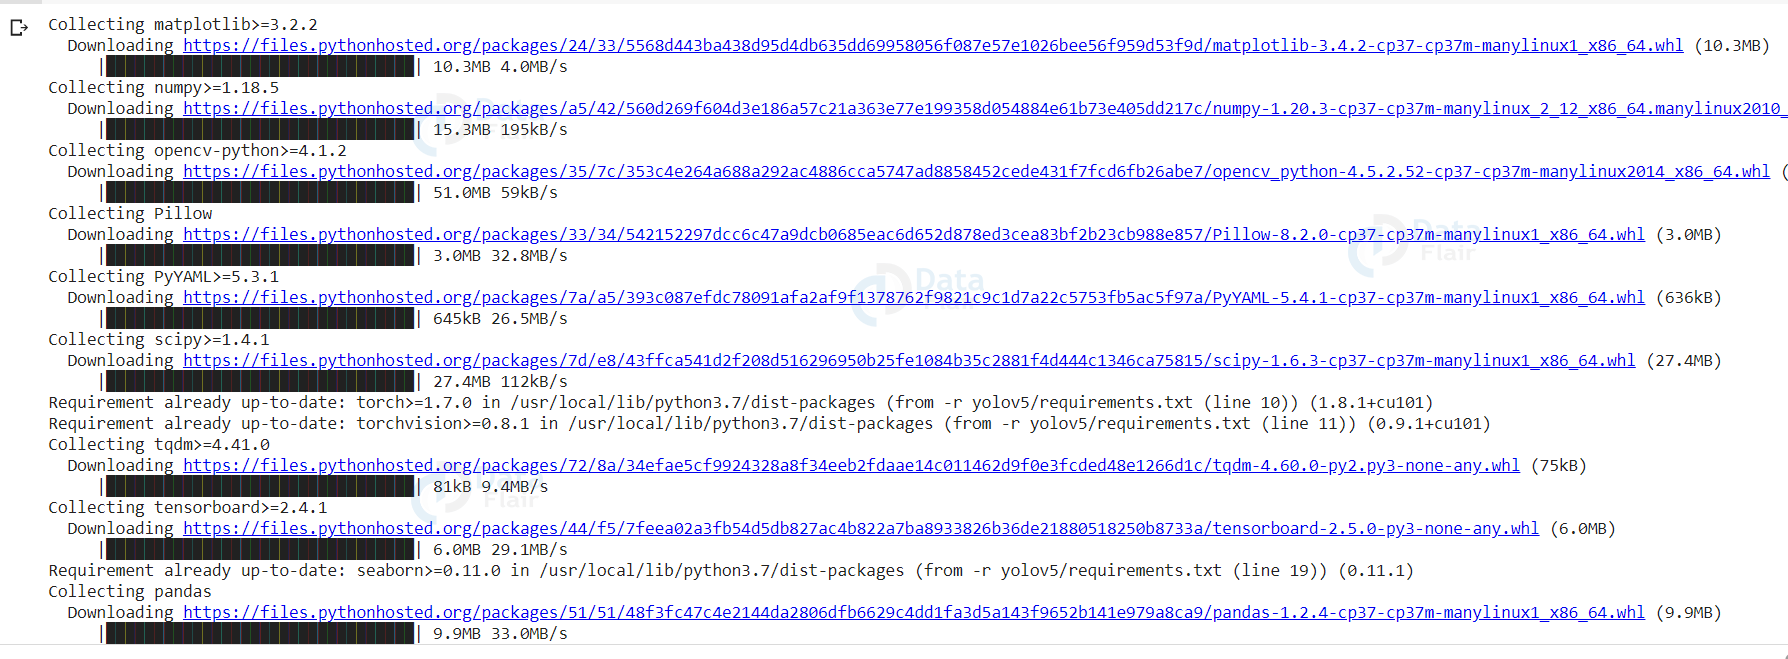
This will install the ultralytics yolov5 library with all the required scripts for training, testing, and saving the model. Using a pre-trained model is always a better way because it is faster and often more accurate than training from scratch. We will also install torch libraries.
Preparing files for Yolo model training
For training the model we generally need two files describing the data and the model. The classes.names file and the model.yaml file.
Prepare a classes.names file that has names for all the classes that we are training for. In our case, we have four classes: prohibitory, mandatory, danger, and others.
The model yaml file is the file that contains all the architectural details and also the details about the hyperparameters for training. In our case we do not want to change all that because we are using transfer learning, we will just change the names of the classes and the location of the training and test set according to our relative location with it.
From the ultralytics folder, which downloads when cloning the library, get the coco.yaml file and change some parameters according to our need, first we will change the number of classes to 4 and then add the classes names in the next line.
It should have these lines at appropriate position:
# number of classes
nc: 4
# class names
names: [ ‘prohibitory’ , ‘danger’ , ‘mandatory’ , ‘other’ ]
Next, in the same file change the relative location of the dataset folder for training and testing data, this will tell our model from where to load the training and validation data.
Save those files and place them in the yolov5 folder.
Training the model
We will now train the Yolo model on the dataset. The library that we installed from the ultralytics github has the training script all set up for us. Now, that we have made changes to the cfg and yaml file we can start training.
Img argument is the size of the training and testing images will be resized to, for training. A batch size of 80 is suitable for this image size when working on with a GPU environment. We train it for 50 epochs, which should be sufficient for our needs.
Increasing the image size and the number of epochs will increase the accuracy of the model, but will result in longer training time, but that won’t be required as you’ll see the model achieves a high accuracy score.
!python train.py --img 416 --batch 80 --epochs 50 --data './cust2.yaml' --cfg models/yolov5s.yaml
The data argument is the location of the yaml file that we created, and cfg file is the configuration of the model that we are gonna use in our case that is yolov5s or small, for fast training and inference. You can change just this parameter to yolov5m or yolov5l for better result, keeping in mind that it will increase the size of the model and also the inference time.
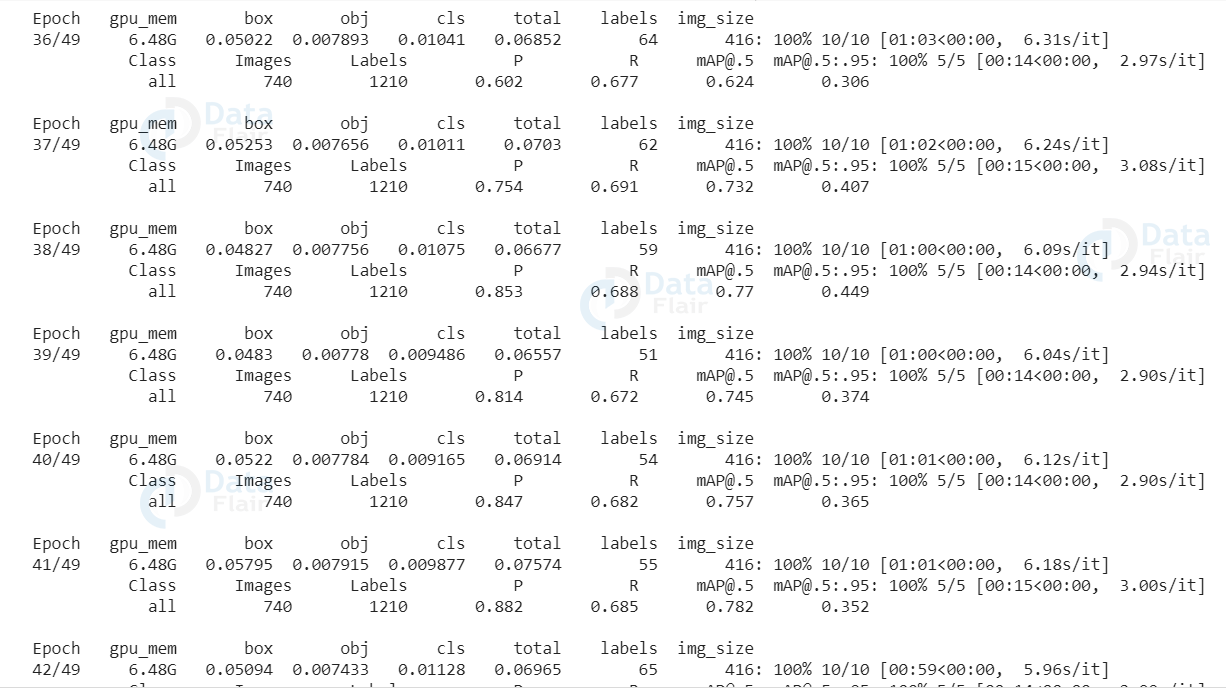
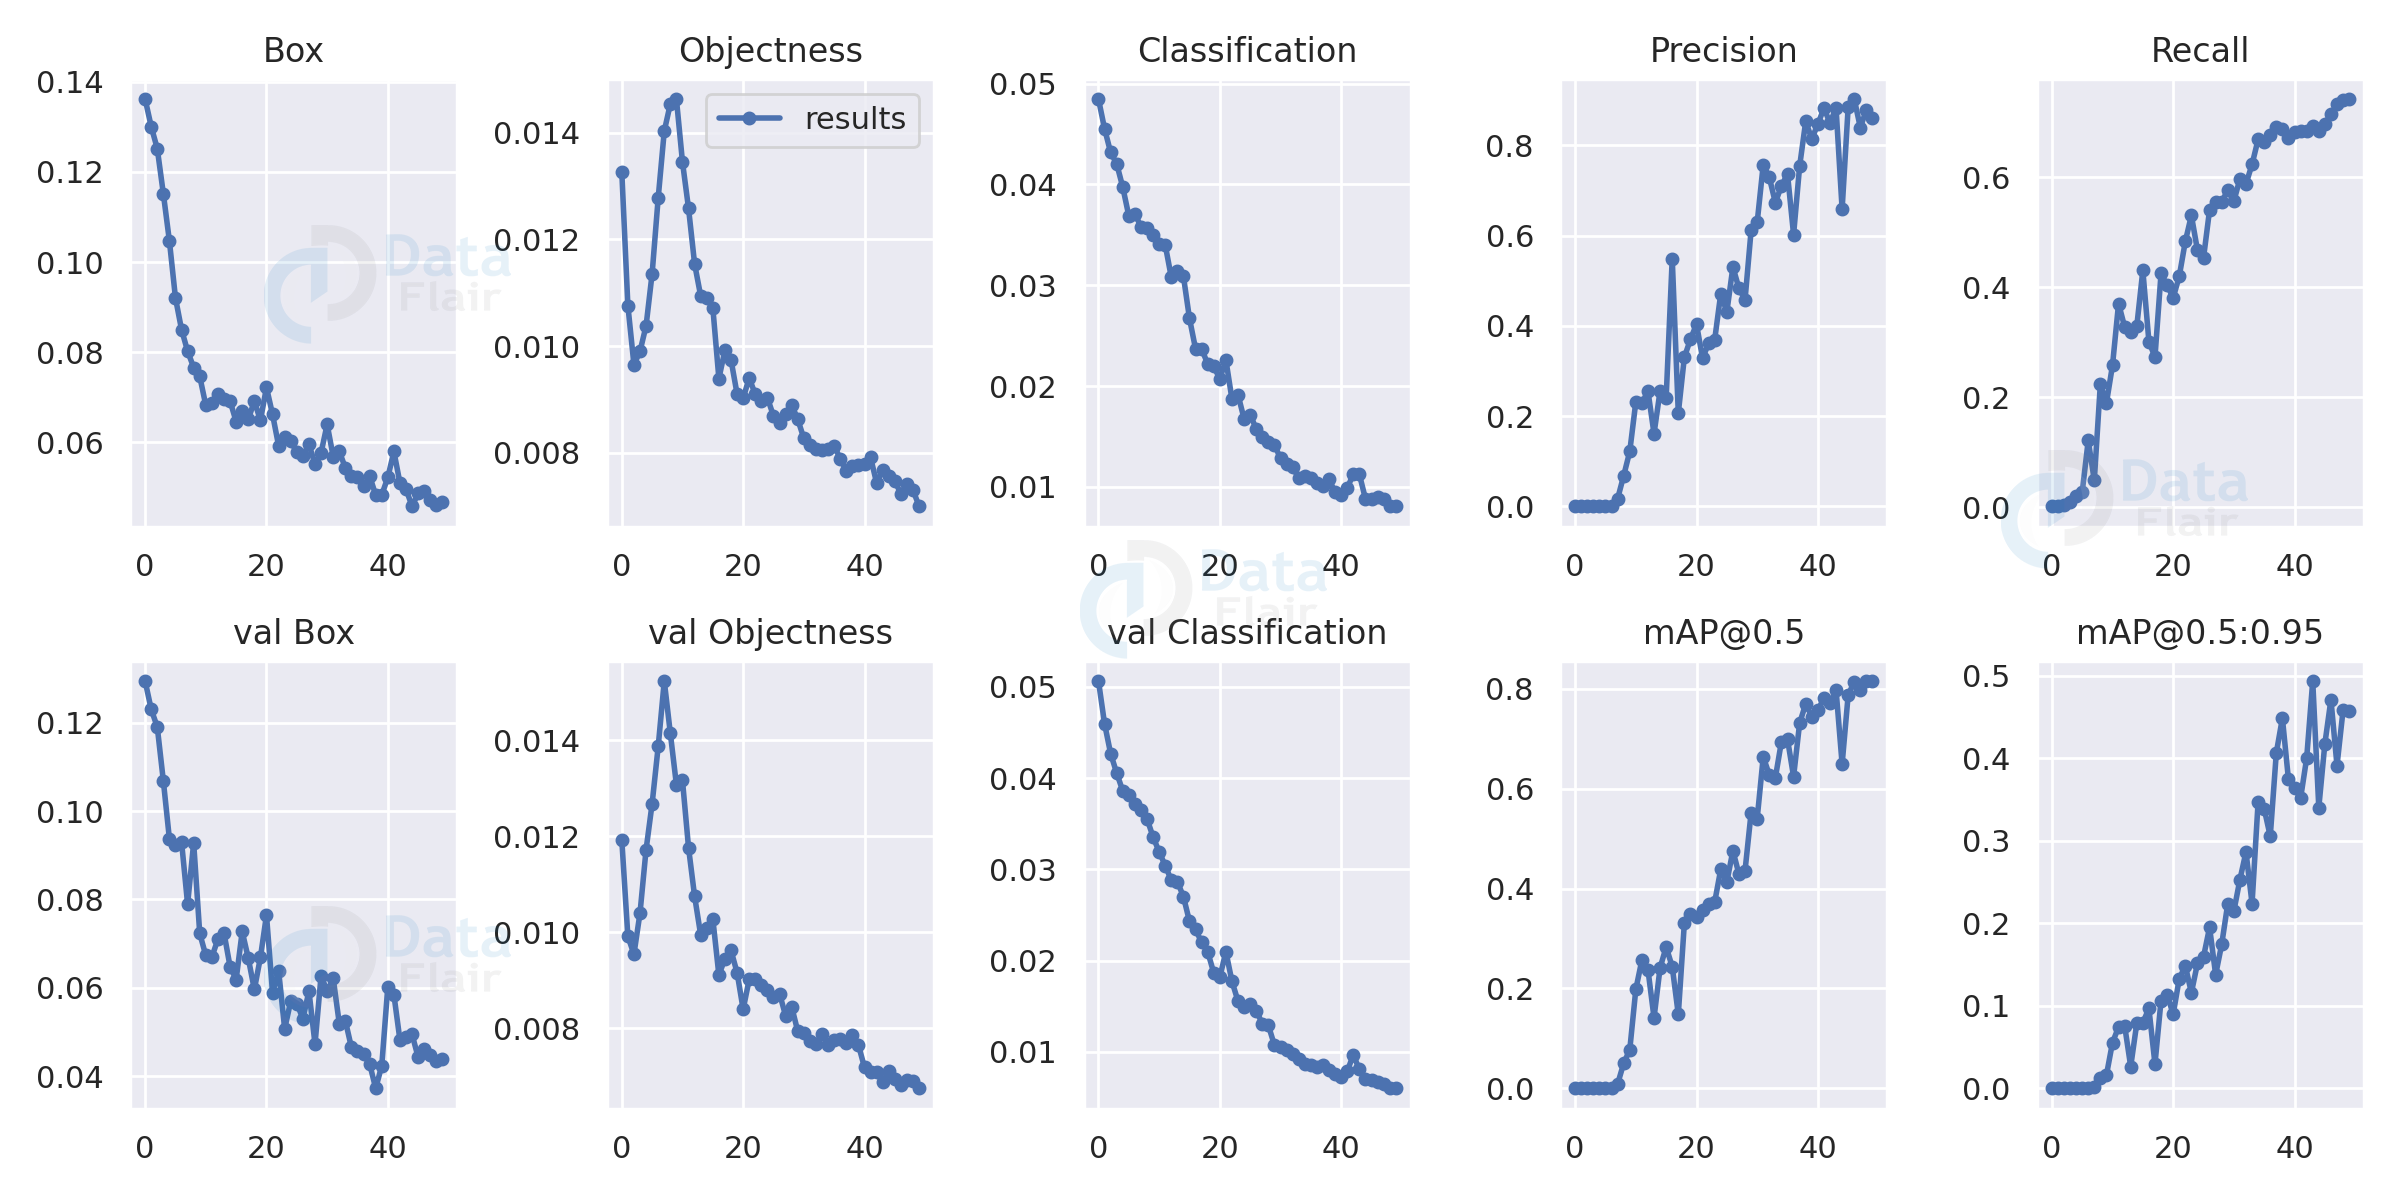
We can get the training graph from the respective runs/exp folder and can view the progress through the epochs. As we can see in the graphs below our precision and map are pretty good and our model has converged successfully.
Inference and prediction
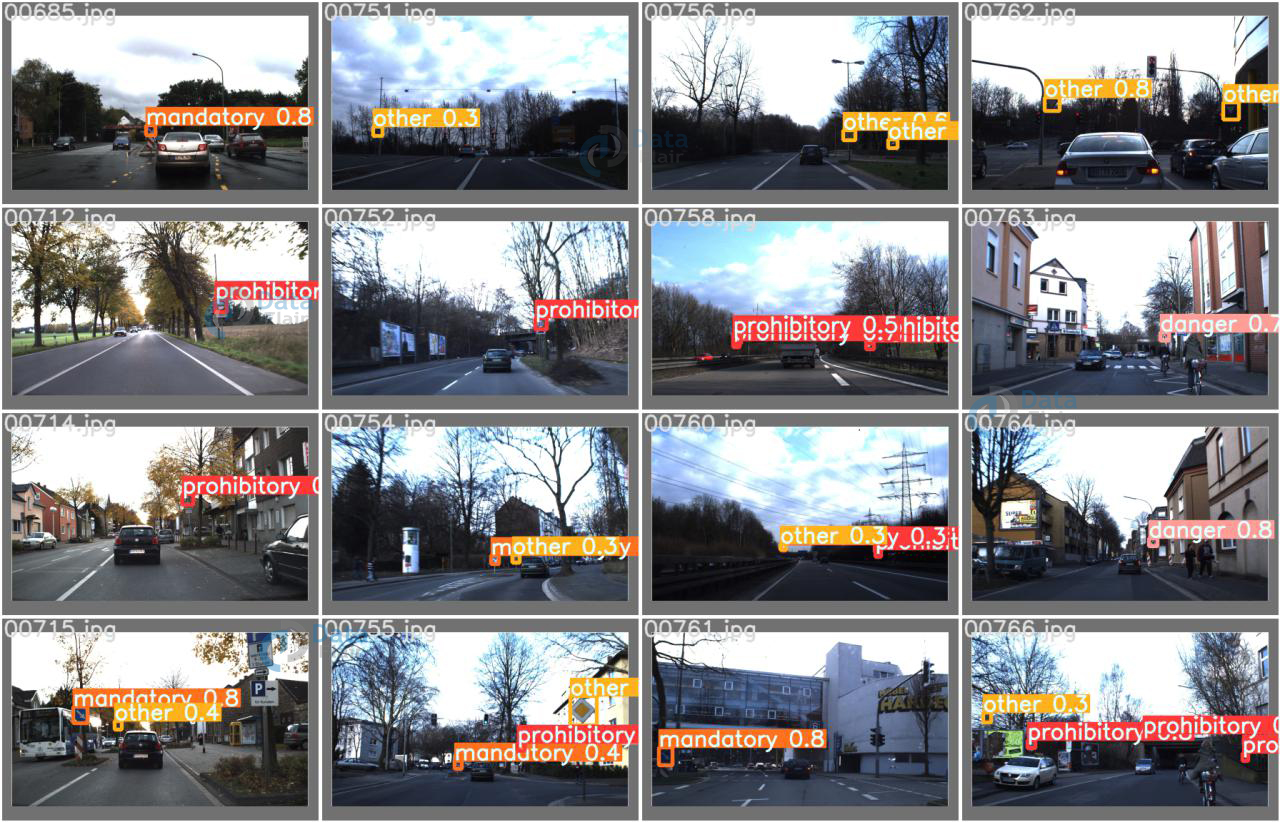
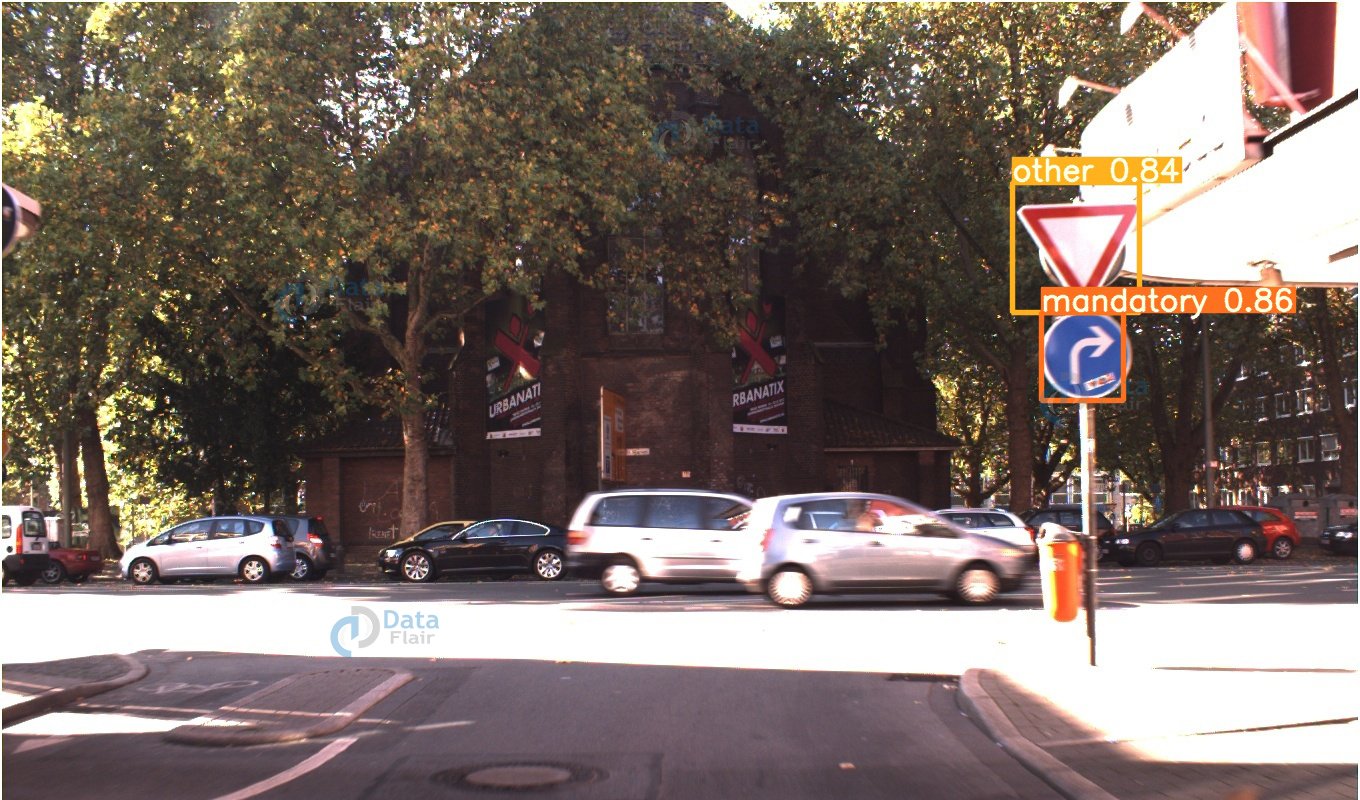
This is the test on batches performed during model training from the test dataset. But we can also perform on our own images, by keeping them in relative location and running the detect script. The yolov5 library that we installed thankfully already has a script for inference and testing. It will not only do predictions for us but also draw them on the images and save them.
Now we need to test our model to see if we get reliable results
!python detect.py --weights /content/yolov5/runs/train/exp2/weights/best.pt --img 416 --conf 0.4 --source tst.jpg
Weights argument is the saved weight for the model, automatically saved after training in the runs/train folder.
Each time you train a model a new exp folder is created and results saved in them.
The source argument is the image or folder of images that you want to test on, if the location of a folder is passed it will run predictions on all the images in that particular folder.
The results will be saved in the runs/detected folder by default.
YOLO Object Detection Output
Summary
We created a yolo v5 custom object detection model that can successfully recognize road signs into four categories.
You can create your own custom detection model with yolo in the same way for anything you want.
Yolo v5 is a major improvement in terms of speed and accuracy and it matches or even surpasses the level of RPN based models. The model is fast and pretty reliable and can now be deployed for anything you want.
Did we exceed your expectations?
If Yes, share your valuable feedback on Google


