Emojify – Create your own emoji with Deep Learning
Machine Learning courses with 100+ Real-time projects Start Now!!
Deep Learning project for beginners – Taking you closer to your Data Science dream
Emojis or avatars are ways to indicate nonverbal cues. These cues have become an essential part of online chatting, product review, brand emotion, and many more. It also lead to increasing data science research dedicated to emoji-driven storytelling.
With advancements in computer vision and deep learning, it is now possible to detect human emotions from images. In this deep learning project, we will classify human facial expressions to filter and map corresponding emojis or avatars.
About the Dataset
The FER2013 dataset ( facial expression recognition) consists of 48*48 pixel grayscale face images. The images are centered and occupy an equal amount of space. This dataset consist of facial emotions of following categories:
- 0:angry
- 1:disgust
- 2:feat
- 3:happy
- 4:sad
- 5:surprise
- 6:natural
Download Dataset: Facial Expression Recognition Dataset
Download Project Code
Before proceeding ahead, please download the source code: Emoji Creator Project Source Code
Create your emoji with Deep Learning
We will build a deep learning model to classify facial expressions from the images. Then we will map the classified emotion to an emoji or an avatar.
Facial Emotion Recognition using CNN
In the below steps will build a convolution neural network architecture and train the model on FER2013 dataset for Emotion recognition from images.
Download the dataset from the above link. Extract it in the data folder with separate train and test directories.
Make a file train.py and follow the steps:
1. Imports:
import numpy as np
import cv2

from keras.emotion_models import Sequential
from keras.layers import Dense, Dropout, Flatten
from keras.layers import Conv2D
from keras.optimizers import Adam
from keras.layers import MaxPooling2D
from keras.preprocessing.image import ImageDataGenerator
2. Initialize the training and validation generators:
train_dir = 'data/train'
val_dir = 'data/test'
train_datagen = ImageDataGenerator(rescale=1./255)
val_datagen = ImageDataGenerator(rescale=1./255)

train_generator = train_datagen.flow_from_directory(
        train_dir,
        target_size=(48,48),
        batch_size=64,
        color_mode="gray_framescale",
        class_mode='categorical')

validation_generator = val_datagen.flow_from_directory(
        val_dir,
        target_size=(48,48),
        batch_size=64,
        color_mode="gray_framescale",
        class_mode='categorical')
3. Build the convolution network architecture:
emotion_model = Sequential()

emotion_model.add(Conv2D(32, kernel_size=(3, 3), activation='relu', input_shape=(48,48,1)))
emotion_model.add(Conv2D(64, kernel_size=(3, 3), activation='relu'))
emotion_model.add(MaxPooling2D(pool_size=(2, 2)))
emotion_model.add(Dropout(0.25))

emotion_model.add(Conv2D(128, kernel_size=(3, 3), activation='relu'))
emotion_model.add(MaxPooling2D(pool_size=(2, 2)))
emotion_model.add(Conv2D(128, kernel_size=(3, 3), activation='relu'))
emotion_model.add(MaxPooling2D(pool_size=(2, 2)))
emotion_model.add(Dropout(0.25))

emotion_model.add(Flatten())
emotion_model.add(Dense(1024, activation='relu'))
emotion_model.add(Dropout(0.5))
emotion_model.add(Dense(7, activation='softmax'))
4. Compile and train the model:
emotion_model.compile(loss='categorical_crossentropy',optimizer=Adam(lr=0.0001, decay=1e-6),metrics=['accuracy'])

emotion_model_info = emotion_model.fit_generator(
        train_generator,
        steps_per_epoch=28709 // 64,
        epochs=50,
        validation_data=validation_generator,
        validation_steps=7178 // 64)
5. Save the model weights:
emotion_model.save_weights('model.h5')
6. Using openCV haarcascade xml detect the bounding boxes of face in the webcam and predict the emotions:
cv2.ocl.setUseOpenCL(False)

emotion_dict = {0: "Angry", 1: "Disgusted", 2: "Fearful", 3: "Happy", 4: "Neutral", 5: "Sad", 6: "Surprised"}

cap = cv2.VideoCapture(0)
while True:
    ret, frame = cap.read()
    if not ret:
        break
    bounding_box = cv2.CascadeClassifier('/home/shivam/.local/lib/python3.6/site-packages/cv2/data/haarcascade_frontalface_default.xml')
    gray_frame = cv2.cvtColor(frame, cv2.COLOR_BGR2gray_frame)
    num_faces = bounding_box.detectMultiScale(gray_frame,scaleFactor=1.3, minNeighbors=5)

    for (x, y, w, h) in num_faces:
        cv2.rectangle(frame, (x, y-50), (x+w, y+h+10), (255, 0, 0), 2)
        roi_gray_frame = gray_frame[y:y + h, x:x + w]
        cropped_img = np.expand_dims(np.expand_dims(cv2.resize(roi_gray_frame, (48, 48)), -1), 0)
        emotion_prediction = emotion_model.predict(cropped_img)
        maxindex = int(np.argmax(emotion_prediction))
        cv2.putText(frame, emotion_dict[maxindex], (x+20, y-60), cv2.FONT_HERSHEY_SIMPLEX, 1, (255, 255, 255), 2, cv2.LINE_AA)

    cv2.imshow('Video', cv2.resize(frame,(1200,860),interpolation = cv2.INTER_CUBIC))
    if cv2.waitKey(1) & 0xFF == ord('q'):
cap.release()
cv2.destroyAllWindows()
    break
Code for GUI and mapping with emojis
Create a folder named emojis and save the emojis corresponding to each of the seven emotions in the dataset.
Paste the below code in gui.py and run the file.
import tkinter as tk
from tkinter import *
import cv2
from PIL import Image, ImageTk
import os
import numpy as np
import cv2
from keras.models import Sequential
from keras.layers import Dense, Dropout, Flatten
from keras.layers import Conv2D
from keras.optimizers import Adam
from keras.layers import MaxPooling2D
from keras.preprocessing.image import ImageDataGenerator
emotion_model = Sequential()
emotion_model.add(Conv2D(32, kernel_size=(3, 3), activation='relu', input_shape=(48,48,1)))
emotion_model.add(Conv2D(64, kernel_size=(3, 3), activation='relu'))
emotion_model.add(MaxPooling2D(pool_size=(2, 2)))
emotion_model.add(Dropout(0.25))
emotion_model.add(Conv2D(128, kernel_size=(3, 3), activation='relu'))
emotion_model.add(MaxPooling2D(pool_size=(2, 2)))
emotion_model.add(Conv2D(128, kernel_size=(3, 3), activation='relu'))
emotion_model.add(MaxPooling2D(pool_size=(2, 2)))
emotion_model.add(Dropout(0.25))
emotion_model.add(Flatten())
emotion_model.add(Dense(1024, activation='relu'))
emotion_model.add(Dropout(0.5))
emotion_model.add(Dense(7, activation='softmax'))
emotion_model.load_weights('model.h5')
cv2.ocl.setUseOpenCL(False)
emotion_dict = {0: " Angry ", 1: "Disgusted", 2: " Fearful ", 3: " Happy ", 4: " Neutral ", 5: " Sad ", 6: "Surprised"}
emoji_dist={0:"./emojis/angry.png",2:"./emojis/disgusted.png",2:"./emojis/fearful.png",3:"./emojis/happy.png",4:"./emojis/neutral.png",5:"./emojis/sad.png",6:"./emojis/surpriced.png"}
global last_frame1
last_frame1 = np.zeros((480, 640, 3), dtype=np.uint8)
global cap1
show_text=[0]
def show_vid():
cap1 = cv2.VideoCapture(0)
if not cap1.isOpened():
print("cant open the camera1")
flag1, frame1 = cap1.read()
frame1 = cv2.resize(frame1,(600,500))
bounding_box = cv2.CascadeClassifier('/home/shivam/.local/lib/python3.6/site-packages/cv2/data/haarcascade_frontalface_default.xml')
gray_frame = cv2.cvtColor(frame1, cv2.COLOR_BGR2GRAY)
num_faces = bounding_box.detectMultiScale(gray_frame,scaleFactor=1.3, minNeighbors=5)
for (x, y, w, h) in num_faces:
cv2.rectangle(frame1, (x, y-50), (x+w, y+h+10), (255, 0, 0), 2)
roi_gray_frame = gray_frame[y:y + h, x:x + w]
cropped_img = np.expand_dims(np.expand_dims(cv2.resize(roi_gray_frame, (48, 48)), -1), 0)
prediction = emotion_model.predict(cropped_img)
maxindex = int(np.argmax(prediction))
cv2.putText(frame1, emotion_dict[maxindex], (x+20, y-60), cv2.FONT_HERSHEY_SIMPLEX, 1, (255, 255, 255), 2, cv2.LINE_AA)
show_text[0]=maxindex
if flag1 is None:
print ("Major error!")
elif flag1:
global last_frame1
last_frame1 = frame1.copy()
pic = cv2.cvtColor(last_frame1, cv2.COLOR_BGR2RGB)
img = Image.fromarray(pic)
imgtk = ImageTk.PhotoImage(image=img)
lmain.imgtk = imgtk
lmain.configure(image=imgtk)
lmain.after(10, show_vid)
if cv2.waitKey(1) & 0xFF == ord('q'):
exit()
def show_vid2():
frame2=cv2.imread(emoji_dist[show_text[0]])
pic2=cv2.cvtColor(frame2,cv2.COLOR_BGR2RGB)
img2=Image.fromarray(frame2)
imgtk2=ImageTk.PhotoImage(image=img2)
lmain2.imgtk2=imgtk2
lmain3.configure(text=emotion_dict[show_text[0]],font=('arial',45,'bold'))
lmain2.configure(image=imgtk2)
lmain2.after(10, show_vid2)
if __name__ == '__main__':
root=tk.Tk()
img = ImageTk.PhotoImage(Image.open("logo.png"))
heading = Label(root,image=img,bg='black')
heading.pack()
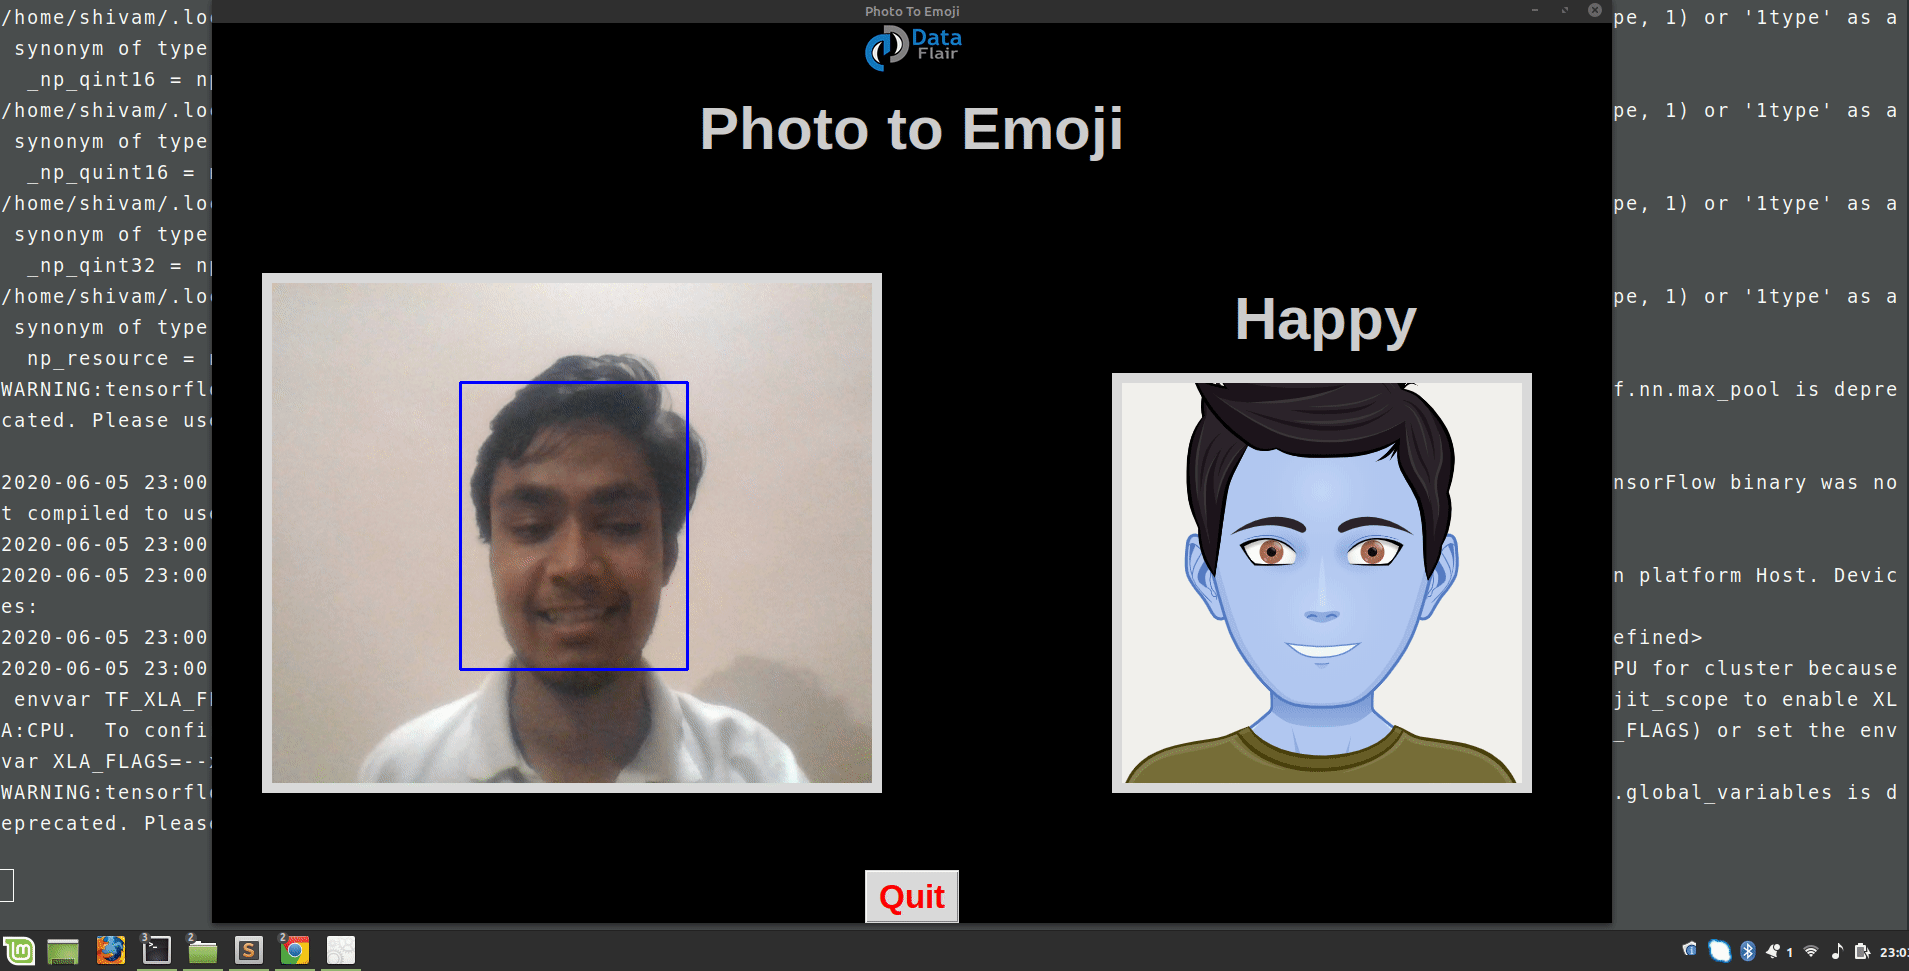
heading2=Label(root,text="Photo to Emoji",pady=20, font=('arial',45,'bold'),bg='black',fg='#CDCDCD')
heading2.pack()
lmain = tk.Label(master=root,padx=50,bd=10)
lmain2 = tk.Label(master=root,bd=10)
lmain3=tk.Label(master=root,bd=10,fg="#CDCDCD",bg='black')
lmain.pack(side=LEFT)
lmain.place(x=50,y=250)
lmain3.pack()
lmain3.place(x=960,y=250)
lmain2.pack(side=RIGHT)
lmain2.place(x=900,y=350)
root.title("Photo To Emoji")
root.geometry("1400x900+100+10")
root['bg']='black'
exitbutton = Button(root, text='Quit',fg="red",command=root.destroy,font=('arial',25,'bold')).pack(side = BOTTOM)
show_vid()
show_vid2()
root.mainloop()
Summary
In this deep learning project for beginners, we have built a convolution neural network to recognize facial emotions. We have trained our model on the FER2013 dataset. Then we are mapping those emotions with the corresponding emojis or avatars.
Using OpenCV’s haar cascade xml we are getting the bounding box of the faces in the webcam. Then we feed these boxes to the trained model for classification.
DataFlair is committed to provide all the resources to make you a data scientist, which includes detailed tutorials, practicals, use-cases as well as projects with source code.
Your opinion matters
Please write your valuable feedback about DataFlair on Google


Sir I have a problem please guide my how to save and where to save file
there are two image folders, “data” with “train” and “test” subdirectories which includes images for training and “emojis” folder with will include image with respect to each of the seven specified emotions.
sir, In this Module cv2 how to import
if you are having problem to import cv2, please install it again using “pip3 install opencv-python”
sir can you explain this code like importing part
In import section, we have just imported common libraries and modules which we need
sir please explain the GUI part, especially what is used in logo.png
it’s the logo of our company dataflair, skip that part or just use any custom image by naming it logo.png
sir please explain the gui part
First we are training the neural network the making predictions on camera frame input and the mapping the predictions to the images in emojis folder.
Where to get the “haarcascade_frontalface_default.xml” file? Can you please help me by uploading this file?
“haarcascade_frontalface_default.xml” is a pre-trained classifier which gets downloaded by default when you download opencv. Go to the directory where opencv is download, then search under “opencv/data/haarcascades/” folder.
What do you mean by the ‘data’ folder(To download the datasets)?
It says emotion_model doesn’t exist?
hi sir
please help us how do we save the codes and do we need anaconda to run or just python compiler?
runfile(‘C:/Users/goura/Desktop/Codings/Emojify/gui.py’, wdir=’C:/Users/goura/Desktop/Codings/Emojify’)
Traceback (most recent call last):
File “C:\Users\goura\Desktop\Codings\Emojify\gui.py”, line 28, in
emotion_model.load_weights(‘model.h5’)
File “C:\ProgramData\Anaconda3\lib\site-packages\tensorflow\python\keras\engine\training.py”, line 2204, in load_weights
with h5py.File(filepath, ‘r’) as f:
File “C:\ProgramData\Anaconda3\lib\site-packages\h5py\_hl\files.py”, line 406, in __init__
fid = make_fid(name, mode, userblock_size,
File “C:\ProgramData\Anaconda3\lib\site-packages\h5py\_hl\files.py”, line 173, in make_fid
fid = h5f.open(name, flags, fapl=fapl)
File “h5py\_objects.pyx”, line 54, in h5py._objects.with_phil.wrapper
File “h5py\_objects.pyx”, line 55, in h5py._objects.with_phil.wrapper
File “h5py\h5f.pyx”, line 88, in h5py.h5f.open
OSError: Unable to open file (unable to open file: name = ‘model.h5’, errno = 2, error message = ‘No such file or directory’, flags = 0, o_flags = 0)
I am getting this Error. How to resolve module.h5 error.
If solved then please help
Is it solved ? then please reply?
I m facing error in __init__.py file in try block as import RandomRotation.
How to fix this problem.
my webcam keeps togging on/off on executing the gui code my indentations are perfect I don’t know what the problem is
What is logo.png?
what is logo.png
same
cap1 = cv2.VideoCapture(0) under the golabel cap1 declaration. it is always used outside the loop
Before digging in, can you tell me the time estimation for the completion of this project? Thank you!
It shows ‘ModuleNotFoundError: No module named ‘keras.emotion_models”. How to fix this? sir
Pip install module
i think it is just models not emotion_models try it once
sir can u explin me how to execute and where to execute this one sir
i ran, it on i5-7th gen U processor(2gb 920mx), the 50 iterations of epochs took me 3hrs to run, it ran the code till “before GUI” part, worked fine till now,i had kernal issues while executing the GUI part, so approximately it takes 4hrs(excluding the time to install libraries)
Hello sir, I can’t open the GUI with the code you provided.only the camera light blinks.
Plzz can someone share the solution of this problem i am also facing a similar issue.Thanks Already.
please, mention the libraries that we must install and versions
keras, opencv, tensorflow(assuming you are running on anaconda)
could you please make a video tutorial on youtube explaining execution and running of this project files
WARNING:tensorflow:Model was constructed with shape (None, 48, 48, 1) for input Tensor(“conv2d_input:0”, shape=(None, 48, 48, 1), dtype=float32), but it was called on an input with incompatible shape (None, 48, 48, 3).
ValueError: Input 0 of layer conv2d is incompatible with the layer: expected axis -1 of input shape to have value 1 but received input with shape [None, 48, 48, 3]
error showing up…how to resolve?
hi, could you please explain how to open the cam on google colab?
Hello sir, I can’t open the GUI with the code you provided.only the camera light blinks.
Hello sir, I can’t open the GUI with the code you provided. The only thing happening is the camera light blinks. I am trying, again and again, still now getting it
C:\Python38\python.exe: can’t open file ‘C:/Users/ABC/PycharmProjects/Emoji Converter/main.py’: [Errno 2] No such file or directory
how to solve this
bro did you find the solution?
where is logo.png
why 50 epoch?