Python Shop Management System with Source Code
Master Python with 70+ Hands-on Projects and Get Job-ready - Learn Python
Shop management system helps to store the database of the shop including item name, item price, item quantity, item category, item discount. So we can easily find out if we need any data about the shop. It’s a very interesting project in python programming. Let’s develop shop management system using python modules.
Python Shop Management System- Project Details
Shop Management System is a GUI-based project using Tkinter and a message module used for storing the database of shops.
We can add new items that are bought by the customers, we can delete any particular item and we can search for any item. We can view all the databases that we have stored in the file.
Project Prerequisite
Shop management system requires good knowledge of python and the Tkinter library. Tkinter is the python binding to the Tk toolkit which is used across many programming languages for building the Graphical user interface which is a GUI, known about os library. Also known about the tkinter message box which is used to display the message box on the python game window. To work on this project basic understanding of the os module is also required.
Download Shop Management System Python Code
Please download the source code of Python Shop Management System project from the following link: Shop Management System Project
Steps to Build Python Shop Management System
Below are the steps to develop shop / store management system project in python
- Import Modules
- Initializing the window
- Function to add items
- Function to delete items
- Function for making list
- Function to search items
- Function to clear screen
- Exit function
- Define buttons labels and entry widget
Step 1- Importing Modules.
#DataFlair- import modules
from tkinter import *
import tkinter as tk
from tkinter import messagebox
import os
Code Explanation-
- Tkinter module – Tkinter module is used for creating Graphical user interface in python.
- tkinter import * – import everything from the module.
- from tkinter import messagebox – Import message box separately for showing messages on the screen.
- import os – This is the functional module in order to get the data from your computer.
Step 2- Initializing the window
f=open("Proj_Database",'a+')

root = Tk()
root.title("Shop Management System by DataFlair")
root.configure(width=1500,height=600,bg="#e3f4f1")
var=-1
Code Explanation-
- f – Variable for storing project database file
- open – Before doing any operation on a file we have to open the file. Open function opens a particular file.
- a+ – Opens a file in read and write mode
- root – Initializing the root window of Python shop management system Project.
- root.title – Use to set title to window.
- root.config – Used to configure attributes to the window, such as width, height, background color.
Step 3- Function to add items
def Add_Items():
    global variable
    Lines_no = 0
    with open("Proj_Database", 'r') as f10:
        for line in f10:
            Lines_no += 1
    variable=Lines_no-1
    EN1= Entry_1.get()
    EN2=Entry_2.get()
    EN3=Entry_3.get()
    EN4=Entry_4.get()
    EN5=Entry_5.get()
    f.write('{0} {1} {2} {3} {4}\n'.format(str(EN1),EN2,EN3,str(EN4),EN5))
    Entry_1.delete(0, END)
    Entry_2.delete(0, END)
    Entry_3.delete(0, END)
    Entry_4.delete(0, END)
    Entry_5.delete(0, END)
    messagebox.showinfo("ADD ITEM", "ITEM ADDED SUCCESSFULLY....!!!!!")
Code Explanation-
- Add_Items() – Function for adding new items.
- Declaring global function var
- r – Opens a file in read mode.
- .get() – It returns the value of the name and number with the specific key.
- .delete() – To remove a specific entry.
- After successful addition of a new item message will pop up on the screen that “Item added successfully!!”
Step 4- Function to delete items
def Delete_Items():
    E1=entry1.get()
    with open(r"Proj_Database") as f, open(r"Proj_Database1", "w") as working:
        for line in f:
            if str(E1) not in line:
                working.write(line)
    entry1.delete(0, END)
    entry2.delete(0, END)
    entry3.delete(0, END)
    entry4.delete(0, END)
    entry5.delete(0, END)
    os.remove(r"Proj_Database")
    os.rename(r"Proj_Database1", r"Proj_Database")
    messagebox.showinfo("DELETE ITEM", "ITEM DELETED SUCCESSFULLY....!!!!!")

    f.close()
    working.close()
Code Explanation-
- Delete_Items() – Function for deleting items.
- w – Opens a file in write mode.
- .get() – It returns the value of the name and number with the specific key.
- .write() – This method is used to write text in the file.
- os.remove() – To remove or delete file path
- os.rename() – Used to rename a file or directory.
- f.close() – Used to closes opened file
- After successful addition of a new item message will pop up on the screen that “Item deleted successfully!!”
Step 5- Function for making list
def list():
    global var
    var=0
    f.seek(var)
    root_1 = Tk()
    root_1.configure(bg="Gray")
    root_1.title("Stationary Store Database")
    scroll = Scrollbar(root_1)
    scroll.pack( side = RIGHT, fill = Y)
    My_text = Text(root_1, yscrollcommand = scroll.set ,width=24,height= 18 ,bg= "gray",fg="black", font=("Times", 16))
    string = f.read()
    My_text.insert(END,string)
    My_text.pack( side = LEFT, fill = BOTH )
    scroll.config( command = My_text.yview )
Code Explanation-
- list() – Function for making a list of items.
- f.seek() – seek() function is used to change the position of the File Handle to a given specific position.
- root_1 – Initializing the root window of Python shop management system Project.
- root_1.title – Use to set title to window.
- root_1.config – Used to configure attributes to the window, such as width, height, background color.
- scroll – Here we are creating a new window which will show a list of items. And the scrollbar controls the up and down moment of the listbox.
- We are making a listbox and setting their font background color, width, height, border width, and set command as scroll.
- .pack() – This puts the widget inside the frame. And declare the position of the widget in relation with each other.
- Mt_text – Variable for adding the text in the list.
- .insert()- Insert the elements in the list.
Step 6- Function to search items
def Search_Item():
    entry1.delete(0, END)
    entry2.delete(0, END)
    entry3.delete(0, END)
    entry4.delete(0, END)
    entry5.delete(0, END)
    i=0
    flag = 1
    E1 = entry6.get()
    with open(r"Proj_Database") as working:
        for line in working:
            i=i+1
            if str(E1) in line:
                flag = 0
                break
        try:
           if flag != 1:
                v = list(line.split(" "))
                entry1.delete(0, END)
                entry2.delete(0, END)
                entry3.delete(0, END)
                entry4.delete(0, END)
                entry5.delete(0, END)
                entry1.insert(0, str(v[0]))
                entry2.insert(0, str(v[1]))
                entry3.insert(0, str(v[2]))
                entry4.insert(0, str(v[3]))
                entry5.insert(0, str(v[4]))

        except:
            messagebox.showinfo("Title", "Error end of file")

        if flag !=0:
            messagebox.showinfo("Title", "NOT FOUND")
    working.close()
Code Explanation-
- Search_Item() – Function to search items.
- .get() – This method returns the value of the name and number with the specific key.
- open – Before doing any operation on a file we have to open the file. Open function opens a particular file.
- If item is present in the list message box will show “Error end of file” and if its not present in the list message box will show “NOT FOUND”
- .close() – Used to close an opened file.
Step 7- Function to clear screen
def Clear_Item():
    entry1.delete(0, END)
    entry2.delete(0, END)
    entry3.delete(0, END)
    entry4.delete(0, END)
    entry5.delete(0, END)
    entry6.delete(0, END)
Code Explanation-
- Clear_Item() – Function for clearing screen.
Step 8- Exit function
def Exit():
    Exit= messagebox.askyesno("Exit the System","Do you want to Exit(y/n)?")
    if Exit > 0:
        root.destroy()
        return
Code Explanation-
- Exit() – Function to exit the project window.
- If you press the exit button a message will pop up that says “Do you want to quit?” Yes or no. If the user presses yes then the window gets exit.
Step 9- Define buttons labels and entry widget
#All labels Entrys Button grid place
Label_0= Label(root,text="SHOP MANAGEMENT SYSTEM BY DATAFLAIR ",fg="black",font=("Times new roman", 30, 'bold'))
Label_0.grid(columnspan=6)

Label_1=Label(root,text="ENTER ITEM NAME",bg="#e8c1c7",fg="black",bd=8,font=("Times new roman", 12, 'bold'),width=25)
Label_1.grid(row=1,column=0)
Entry_1=Entry(root, font=("Times new roman", 14),bd=8,width=25)
Entry_1.grid(row=1,column=1)

Label_2=Label(root, text="ENTER ITEM PRICE",height="1",bg="#e8c1c7",bd=8,fg="black", font=("Times new roman", 12, 'bold'),width=25)
Label_2.grid(row=2,column=0)
Entry_2= Entry(root, font=("Times new roman", 14),bd=8,width=25)
Entry_2.grid(row=2,column=1)

Label_3=Label(root, text="ENTER ITEM QUANTITY",bg="#e8c1c7",bd=8,fg="black", font=("Times new roman", 12, 'bold'),width=25)
Label_3.grid(row=3,column=0)
Entry_3= Entry(root, font=("Times new roman", 14),bd=8,width=25)
Entry_3.grid(row=3,column=1)

Label_4=Label(root, text="ENTER ITEM CATEGORY",bg="#e8c1c7",bd=8,fg="black", font=("Times new roman", 12, 'bold'),width=25)
Label_4.grid(row=4,column=0)
Entry_4= Entry(root, font=("Times new roman", 14),bd=8,width=25)
Entry_4.grid(row=4,column=1)

Label_5=Label(root, text="ENTER ITEM DISCOUNT",bg="#e8c1c7",fg="black",bd=8, font=("Times new roman", 12, 'bold'),width=25)
Label_5.grid(row=5,column=0, padx=10, pady=10)
Entry_5= Entry(root, font=("Times new roman", 14),bd=8,width=25)
Entry_5.grid(row=5,column=1, padx=10, pady=10)

Button_1= Button(root,text="ADD ITEM",bd=8, bg="#49D810", fg="black", width=25, font=("Times new roman", 12),command=Add_Items)
Button_1.grid(row=6,column=0, padx=10, pady=10)
Button_2= Button(root, text="DELETE ITEM",bd=8, bg="#49D810", fg="black", width =25, font=("Times new roman", 12),command=Delete_Items)
Button_2.grid(row=6,column=1, padx=40, pady=10)
Button_3= Button(root, text="VIEW DATABASE",bd=8, bg="#49D810", fg="black", width =25, font=("Times new roman", 12),command=list)
Button_3.grid(row=3,column=3, padx=40, pady=10)
Button_4= Button(root, text="SEARCH ITEM",bd=8, bg="#49D810", fg="black", width =25, font=("Times new roman", 12),command=Search_Item)
Button_4.grid(row=2,column=3, padx=40, pady=10)
Button_5= Button(root, text="CLEAR SCREEN",bd=8, bg="#49D810", fg="black", width=25, font=("Times new roman", 12),command=Clear_Item)
Button_5.grid(row=4,column=3, padx=40, pady=10)
Button_6= Button(root,highlightcolor="blue",activebackground="red", text="Exit",bd=8, bg="#FF0000", fg="#EEEEF1", width=25, font=("Times", 40),command=Exit)
Button_6.place(x=635,y=337,height= 102,width=245)
Entry_6= Entry(root, font=("Times new roman", 14),justify='left',bd=8,width=25)
Entry_6.grid(row=1,column=3, padx=10, pady=10)

root.mainloop()
Code Explanation-
- label – In this variable, we use the label widget for displaying the box in which we give text. Then call configure to set font, font size, and background color.
- Here we are creating buttons ADD ITEM, DELETE ITEM, VIEW DATABASE, SEARCH ITEM, CLEAR SCREEN, EXIT and setting their font, background color, and setting proper position using the padding.
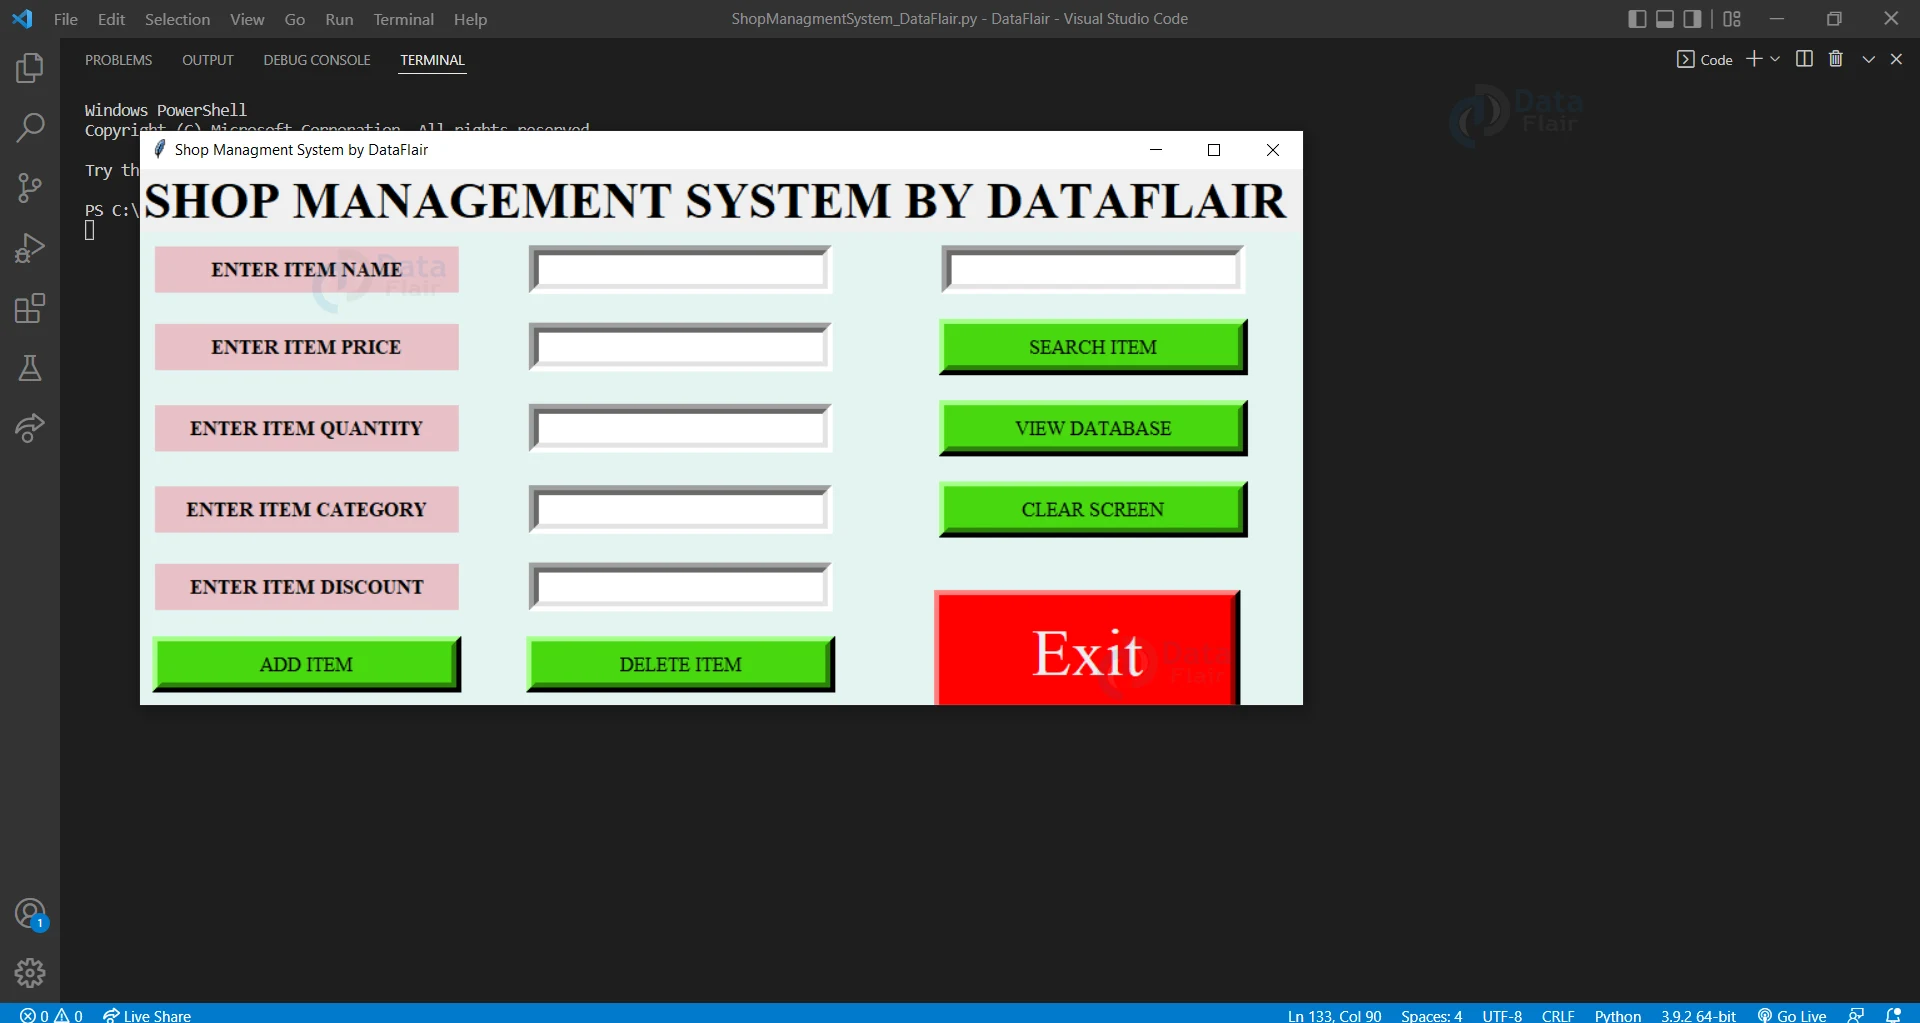
Python Shop Management System Output
Summary
We have successfully created a python contact book project using the Graphical user Interface(GUI). We have learned about the Tkinter module.
Your opinion matters
Please write your valuable feedback about DataFlair on Google


search button is not working could i get code for this same project
very usefull
search button do not work
can i get the complete code
how to connect this to a database