How to Send Messages on Telegram using Python
Master Python with 70+ Hands-on Projects and Get Job-ready - Learn Python
Telegram is a communication application used by millions of people across the world. Telegram also provides API support which enables us to create bots and automate sending messages as well. Thus in this project, we will send messages to a telegram user using python.
Python Telegram message sender project:
Here, we create a simple telegram message sender using tkinter and telethon
Project Prerequisites:
Telethon is a library that serves to use the API of Telegram. It is easy to follow and hence does not require any prerequisite knowledge. Tkinter contains widgets, thus we use it to create the GUI of the application.
It is available in python by default. Import to see if it is available
import tkinter
If the package is available for use, it will not show any error. If not, Linux users can install it using the command
sudo apt-get install python3-tkinter. Windows users can reinstall python.
Download Telegram Message Sender Project Code:
You can download the source code for the project to Send message to Telegram user using Python from the given link: Python Telegram Message Sender
Project File Structure:
Below is the flow of the Python project to Send message to Telegram user:
1. Obtaining the API ID and Hash code
2. Importing libraries
3. Creating the sender function
4. Creation of the application interface
1. Obtaining the API ID and Hash code:
To obtain the hash code and the API ID visit Telegram API link. In the resulting page, key in your phone number with the country code and provide the confirmation code or the passcode obtained through telegram after selecting the Next button.
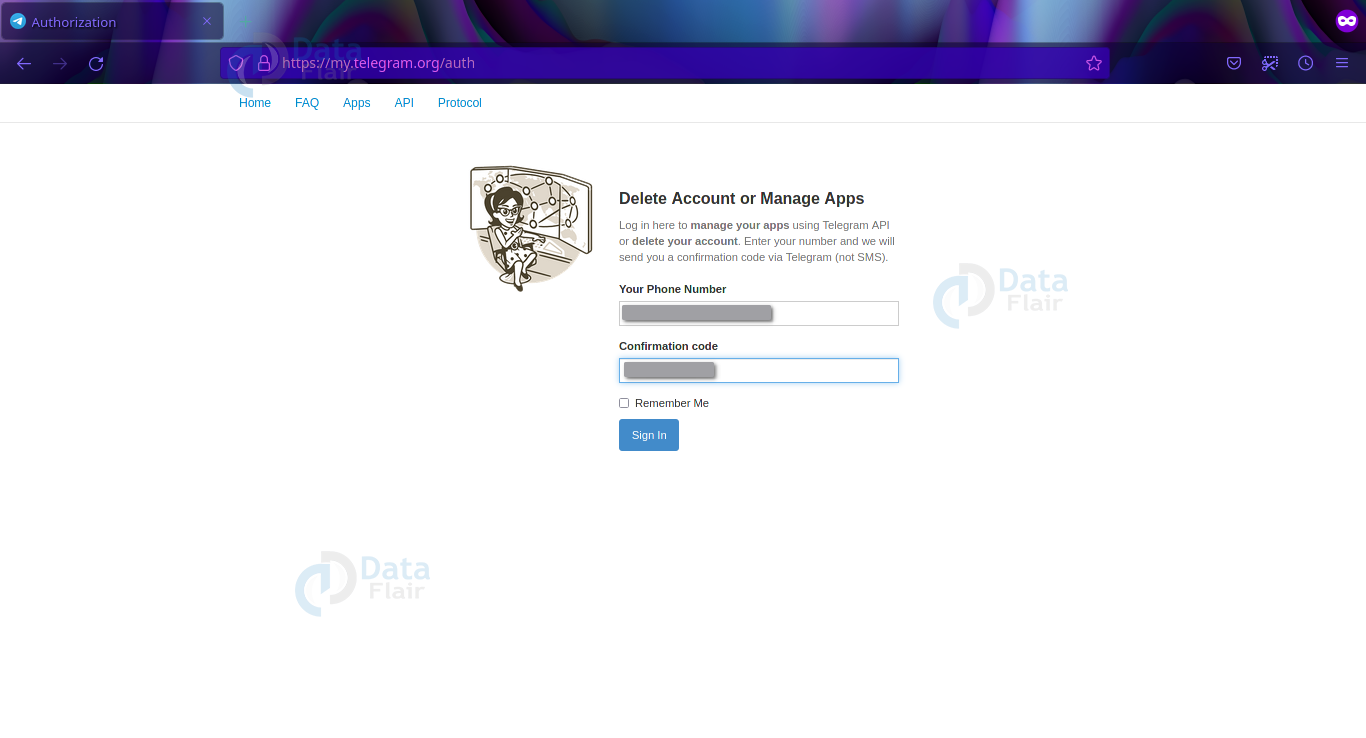
In the next page, type in the requested details. These details do not impact your API hash and ID values.
Finally you will obtain your API ID and Hash codes.

2. Importing libraries:
#DataFlair Tutorial for sending messages to telegram users using python
#Import necessary modules
from telethon import TelegramClient, events, sync
from tkinter import *
from tkinter import messagebox
Code Explanation:
- from telethon import TelegramClient, events, sync: Telethon allows us to send a message to a telegram user either by phone number or by the username. For further understanding of the python library, refer to Telethon Documentation
- from tkinter import *: To make use of tkinter widgets for creating the user interface, we import tkinter
- from tkinter import messagebox: Messagebox contains dialog boxes to prompt the user with some information, error or warning.
3. Creating the sender function:
#Sender function
def send_message():
   #API details
   user_details = user_entry.get()
   message_content = message_entry.get("1.0","end-1c")

   #Raise a warning if no input is given
   if (len(user_details) <=0) & (len(message_content)<=1):
       messagebox.showerror(message = "ENTER USER DETAILS" )
   else:
 #These API codes wont work, hence create your own
       api_id = 1234567
       api_hash = '1234567890abcdefghijklmopqrt123'
       #Initialise telegram client with API codes
       client = TelegramClient('session_name', api_id, api_hash)
       #Start the process
       client.start()
       #Send the message
       client.send_message(user_details, message_content)
       messagebox.showinfo(message = "MESSAGE SENT (:" )
Code explanation:
- def send_message(): Declaration of the sender function, send_message
- user_details = user_entry.get(): Since user_entry is an Entry widget, we use get() to obtain the user input.
- message_content = message_entry.get(“1.0″,”end-1c”): Message_entry is a Text widget. Thus we extract its contents by specifying the start index (“1.0”) and the finishing index (“end-1c”)
- if (len(user_details) <=0) & (len(message_content)<=1): The length of an empty entry widget is 0 and that of a text widget is 1. Here we check if the user provided all the necessary inputs.
- messagebox.showerror(message = “ENTER USER DETAILS” ): If the condition hold True ie. the user fails to provide either of the two or both the inputs, then we raise an error prompt. Showerror displays an error prompt and the parameter message contains the message the prompt must show.
- api_id and api_hash: API ID and API Hash are the results from step 1.
- client = TelegramClient(‘session_name’, api_id, api_hash): TelegramClient initialises a telegram client to communicate with the telegram API. Session_name is a name for the current interaction and api_is and api_hash are the initialised variables.
- client.start(): The client-API interaction commences here.
- client.send_message(user_details, message_content): To send the message to the desired user, you use either the username or the phone number with country code (user_details) and the message to be sent (message_content)
- messagebox.showinfo(message = “MESSAGE SENT (:” ): To notify the user of a successful message transmission.
4. Creation of the application interface:
#Define the user interface
telegram_mess = Tk()
telegram_mess.geometry("400x300")
telegram_mess.title("DataFlair's Telegram Message Sender")

bg_img = PhotoImage(file = "/home/deepika/Downloads/internship/telegram_deepika/pictures/bg_image.png")
 # Show image using label
label1 = Label(telegram_mess, image = bg_img, bd=0)
label1.pack()

#Application Title in the window
title_label  = Label(telegram_mess, text="DataFlair's Telegram Message Sender", bg="#1d8bd6")
title_label.place(x=80,y=10)

#Input for user entry
user_label = Label(telegram_mess, text="ENTER USER DETAILS:", bg="#2591D9")
info_label = Label(telegram_mess, text="Note: Phone number with code or username with @", bg="#2C99DC")
user_label.place(x=0,y=40)
info_label.place(x=0,y=70)
user_entry = Entry(telegram_mess, width=20)
user_entry.place(x=160,y=40)

#Message input
message_label = Label(telegram_mess, text="ENTER MESSAGE:", bg ="#35A1DF")
message_label.place(x=0,y=100)
message_entry = Text(telegram_mess, width=30, height=3)
message_entry.place(x=130,y=99)

#send button
send_button = Button(telegram_mess, text="Send Button", command=send_message, relief= RAISED)
send_button.place(relx=0.5,rely=0.59, anchor=CENTER)
telegram_mess.mainloop()
Code explanation:
- telegram_mess: To use the tkinter widgets, we call the constructor and assign it to telegram_mess. This is also the window of the application. Set the window dimensions using geometry(widthxheight) and set a title using title().
- bg_img = PhotoImage(): To add a background image, we use the PhotoImage function in tkinter. This function reads PNG images.
- label1: Display the image using a label. A label contains text and images that cannot be copied or edited. The parameter image contains the image and bd=0 implies no border. Pack() positions the element in the first row below the top margin.
- title_label, user_label, info_label, message_label: These labels are created using the Label() widget. It contains a text parameter where the text is added and the window of the application where it must reside, and bg: the background colour of the label. It defaults to gray85. Use a colour picker to get the codes for background colours
- title_label.place(), info_lable.place(), user_label.place(), message_label.place(): A widget can be shown only if it has a position. Thus we use place, another positioning function like pack(), to fix the position of the widget. The parameters are x and y, where x is the distance from the left margin and y is the distance from the top margin.
- user_entry: An Entry widget allows the user to provide the input. The window of the application and the width of the entry widget is given as parameters
- message_entry: We use text widgets to allow for multiple line user input. The parameters are the same as an entry widget with an additional height parameter
- send_button: Button() creates a button with the parameters, window of the application, text: name of the button, command: the function to call, relief: styling of the button. RAISED creates a shadow effect for the button. Besides positioning the widget with x and y parameters which are nothing but pixel values, we can use relx and rely. Relx and rely are distances from the left and y margins respectively, but they are in percentages. Thus relx=0.50 implies to place the widget at 50% of the distance from the left margin. This option is very useful because it positions the widget based on a set percentage of the window row and column size irrespective of the window size. Anchor tag is an alignment tag.
- telegram_mess.mainloop(): When the app is run, widgets and functions above mainloop() will be visible. The rest are simply ignored. Thus when a user selects exit, the control flows out of mainloop and the app terminates.
NOTE: Telegram will ask to provide a phone number and a code sent to this number to authorise access while running it for the first time. This will occur at the command line. You can also verify the added device containing the short name given for the application in the first step.
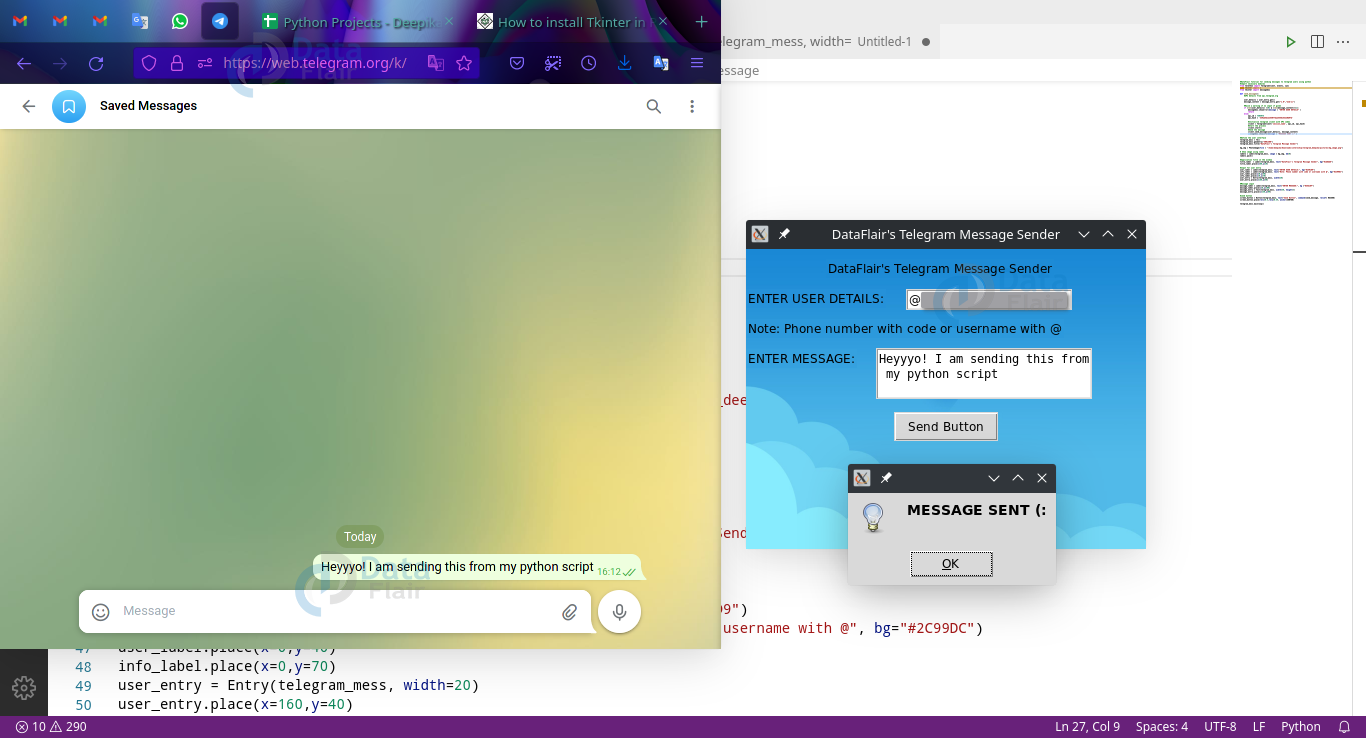
Python Telegram Message Sender Output:
Provide a username (with ‘@’) or phone number (with “+countrycode”) and view the message sent from your end to the user.
Summary
Thus we created a simple telegram message sender in python. The project introduces the use of Telegram APIs and one simple application of it. We also learnt tkinter to create GUI in python.
Your 15 seconds will encourage us to work even harder
Please share your happy experience on Google


I’ve followed the steps precisely and not getting results, python closes and no other window opens. API ids were replaced accordingly.