How to Send Emails with Python
Master Python with 70+ Hands-on Projects and Get Job-ready - Learn Python
We all send and receive multiple emails every day. When it comes to personal mail, it does not seem much tiresome. But when it comes to sending multiple emails like sending mail when users sign up’s etc., would be tiring when done manually. This is where coding helps you by automating this task of sending emails. In this article, we will be learning to sending emails with different options like formatting, attachments, etc with python. So, let’s get started.
What is SMTP Server?
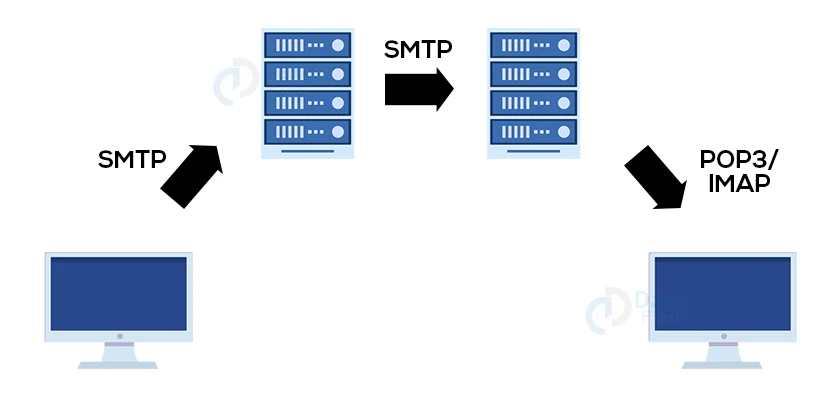
Simple Mail Transfer Protocol (SMTP) is an application layer protocol in the OSI model that lets a user send mail to another person. At the sender’s end it used SMTP connection and at the receiver, this mail is retrieved using protocols POP (Post Office Protocol) and IMAP (Internet Message Access Protocol). The following figure shows the working of SMTP server.
Before going to the coding part, let’s see some of the advantages and disadvantages of using SMTP.
Pros of using SMTP
- It is easy to set up
- It is highly cost-effective
- It is also platform agnostic
Cons of using SMTP
- It is less secure
- And has no built-in analytics
- It takes longer send times
- And long-term maintenance and uptime burden
Project Prerequisites
First of all it is a must for the developer to have a mail account for sending a mail.
Also, the Python library smtpib will be used to send the mails in this article and connect to the mail server.
Also, before running the code to login or send mail through Python it is important to give the code access to connect to mail and send emails. This can be done by going to the site https://myaccount.google.com on your browser logged in with the mail you are using to send the mail.
Starting connection
Using SMTP_SSL()
One way of connecting to start sending mails through Python is to use SSL connection. Here we create a secure SSL connection and then log in using appropriate credentials.
import smtplib, ssl

port = 465  # For SSL connection

# Create a secure SSL context
context = ssl.create_default_context()

with smtplib.SMTP_SSL("smtp.gmail.com", port, context=context) as server:
    server.login("your gmail id”, “password”)
    # TODO: Send email here
Here,
By default the port is zero, if not specified.SMTP_SSL() used standard port for SMTP over SSL (port 465).
smtplib.SMTP_SSL() as server: makes sure that the connection is automatically closed at the end. If port is zero, or not specified.
You can also use input() or getpass() methods to give the password at the runtime.
Using .starttls()
Another method of settingup the connection is by usng starttls().
import smtplib, ssl

sender_add='[email protected]' #the sender's mail id
receiver_add='[email protected]' #the receiver's mail id
password='password' #password to log in

# Try to log in to server and send email
try:
    smtp_server=smtplib.SMTP("smtp.gmail.com",587)
    smtp_server.ehlo() #setting up the ESMTP protocol

    smtp_server.starttls() #setting up the TLS connection
    smtp_server.ehlo() #calling the ehlo() as encryption happens on calling startttls()

    smtp_server.login(sender_add,password) #logging into the sender's email id

except Exception as e:
    # Print any error message
    print(e)
finally:
    server.quit()
In the above code,
- We first import the smtplib module
- Then, start by setting up the connection with gmail’s SMTP server by creating the SMTP() object. Here, if the port is zero, or not specified, the standard port for SMTP over SSL (port 465).
- Then we encrypt the SMTP server using .starttls().
- After this, we log in the mail using the correct credentials, gmail account and password.
Sending a Plain Text Email
Now, let’s discuss the coding part, starting by sending an email with some text.
Using SMTP_SSL():
Let’s first see the SMTP_SSL() method to send plain text.
import smtplib, ssl

port = 465  # For SSL
smtp_server = "smtp.gmail.com"
sender_add='[email protected]' #the sender's mail id
receiver_add='[email protected]' #the receiver's mail id
password='password' #password to log in

msg_to_be_sent ='''
Hello, receiver!
Hope you are doing well.
Welcome to DataFlair!
'''

context = ssl.create_default_context()
with smtplib.SMTP_SSL(smtp_server, port, context=context) as server:
    server.login(sender_add, password)
    server.sendmail(sender_add, receiver_add, msg_to_be_sent )
Here,
- login() method is used to log in to the email
- And sendmail() is used to send the mail from receiver_add to sender_add the required message.
Using .starttls()
import smtplib

sender_add='[email protected]' #the sender's mail id
receiver_add='[email protected]' #the receiver's mail id
password='password' #password to log in

 #creating the SMTP server object with SMPT server address and port number
smtp_server=smtplib.SMTP("smtp.gmail.com",587)
smtp_server.ehlo() #setting up the ESMTP protocol

smtp_server.starttls() #setting up the TLS connection
smtp_server.ehlo() #calling the ehlo() as encryption happens on calling startttls()

smtp_server.login(sender_add,password) #logging into the sender's email id

msg_to_be_sent ='''
Hello, receiver!
Hope you are doing well.
Welcome to DataFlair!
'''

#sending the mail from specified and to mentioned email address and the message
smtp_server.sendmail(sender_add,receiver_add,msg_to_be_sent)
smtp_server.quit()#terminating the server
Here,
- Here we login to the TLS connection.
- And then send the mail with a message using the .sendmail() function to the receiver and finally, quit the server setup.
Sending Fancy Mails with HTML
Sometimes we try to format the content we send with spaces, adding links, etc. This can be done again in coding with the help of HTML. Also, subject is an important part of an email. Here we use the MIMEMultipart() object.
import smtplib
from email.mime.text import MIMEText
from email.mime.multipart import MIMEMultipart

sender_add='[email protected]' #the sender's mail id
receiver_add='[email protected]' #the receiver's mail id
password='password' #password to log in

 #creating the SMTP server object with SMPT server address and port number
smtp_server=smtplib.SMTP("smtp.gmail.com",587)
smtp_server.ehlo() #setting up the ESMTP protocol

body = MIMEMultipart("alternative")
body["Subject"] = "Multiple messages"
body["From"] = sender_add
body["To"] = receiver_add

msg ='''
Hello, receiver!
Hope you are doing well.
Welcome to DataFlair!
'''

html_msg="""<html>
  <body>
    <p>Hello, receiver!<br>
       Hope you are doing well.<br>
       Welcome to <a href="https://data-flair.training">DataFlair</a> !
    </p>
  </body>
</html>"""

# Turn the above information into plain/html MIMEText objects
part1 = MIMEText(msg, "plain")
part2 = MIMEText(html_msg, "html")

# Add HTML/plain-text parts to MIMEMultipart message
# The email client will try to render the last part first
body.attach(part1)
body.attach(part2)


smtp_server.starttls() #setting up the TLS connection
smtp_server.ehlo() #calling the ehlo() as encryption happens on calling startttls()

smtp_server.login(sender_add,password) #logging into the sender's email id
#sending the mail from specified and to mentioned email address and the message
smtp_server.sendmail(sender_add,receiver_add,body.as_string())
smtp_server.quit()#terminating the server
In the above code, we follow a similar procedure we followed above.
- First, we set up the SMTP connection
- After this, we create the MIMEMultipart() object to combine the text of different format. And then set the subject, from and to address.
- Then create the html and plain text using MIMEText() object and combine the information.
- Finally, we login, send the mail with the MIMEMultipart() content as string and quit the server.
Sending Mail with an Attachment
Most of the mails have one/more attachment(s) like PDFs, images, etc. along with content. And this is what we will do now!
import email, smtplib, ssl
from email import encoders
from email.mime.base import MIMEBase
from email.mime.multipart import MIMEMultipart
from email.mime.text import MIMEText

sender_add='[email protected]' #the sender's mail id
receiver_add='[email protected]' #the receiver's mail id
password='password' #password to log in

 #creating the SMTP server object with SMPT server address and port number
smtp_server=smtplib.SMTP("smtp.gmail.com",587)
smtp_server.ehlo() #setting up the ESMTP protocol

body = MIMEMultipart("alternative")
body["Subject"] = "Sending an Attachment"
body["From"] = sender_add
body["To"] = receiver_add

msg ='''
Hello, receiver!
We are sending an attachment from  DataFlair!
'''

# Turn the above information into plain/html MIMEText objects
part1 = MIMEText(msg, "plain")

# Add HTML/plain-text parts to MIMEMultipart message
# The email client will try to render the last part first
body.attach(part1)
filepath = r"python.jfif"

# Open PDF file in binary mode
with open(filepath, "rb") as attachment:
    # Add file as application/octet-stream
    # Email client can usually download this automatically as attachment
    file = MIMEBase("application", "octet-stream")
    file.set_payload(attachment.read())

# Encode file in ASCII characters to send by email
encoders.encode_base64(file)

# Add header as key/value pair to attachment part
file.add_header(
    "Python Image",
    f"attachment; filename= {filepath}",
)

# Add attachment to message and convert message to string
body.attach(file)
text = body.as_string()

# Log in to server using secure context and send email
context = ssl.create_default_context()

smtp_server.starttls() #setting up the TLS connection
smtp_server.ehlo() #calling the ehlo() as encryption happens on calling startttls()

smtp_server.login(sender_add,password) #logging into the sender's email id
#sending the mail from specified and to mentioned email address and the message
smtp_server.sendmail(sender_add,receiver_add,body.as_string())
smtp_server.quit()#terminating the server
We again use the MIMEMultipart() object to combine the text and the file. Let’s look at the flow of the code to understand more:
- Starting with we setup the SMTP connection with the SMTP() object.
- Then we create the MIMEMultipart() object with subject, from and to address. And attach the content as MIMEText().
- After this, we open the file required to attach in binary mode and create the MIMEBase() object with this file.
- And then encode the file and attach it to the body.
- Then create the starttls() connection, login, send the main and quit the server.
Sending Multiple Mails
We also send mails to multiple people and it would obviously be hard to send the mails separately. And we will now learn to send multiple mails at a single shot!
import csv, smtplib, ssl

sender_add='[email protected]' #the sender's mail id
receiver_add='[email protected]' #the receiver's mail id
password='password' #password to log in


 #creating the SMTP server object with SMPT server address and port number
smtp_server=smtplib.SMTP("smtp.gmail.com",587)
smtp_server.ehlo() #setting up the ESMTP protocol

message = """Subject: Results

Hello {name}! Your grade for the exam is {grade}"""


context = ssl.create_default_context()

smtp_server.starttls() #setting up the TLS connection
smtp_server.ehlo() #calling the ehlo() as encryption happens on calling startttls()

smtp_server.login(sender_add,password) #logging into the sender's email id
#sending the mail from specified and to mentioned email address and the message mentioned in the csv
with open(r"C:\Users\DELL\Downloads\grades.csv") as file:
        reader = csv.reader(file)
        next(reader)  # Skip header row
        for name, email, grade in reader:
            smtp_server.sendmail(
                sender_add,
                email,
                message.format(name=name,grade=grade),
            )
smtp_server.quit()#terminating the server
Here,
- We set up the SMTP connection and then create the TLS connection.
- We use string formatting to send personalized emails.
- And then log in the mail with the sender’s address and password.
- We create a CSV file with the name, mail id, and any other information required. Here we store the grades of each user as shown in the figure below.
- And then open the file and loop every user and send the mail to every user in the CSV. Here we substitute the name and grade in the file in the formatted string in the place of {name} and {grade}.
- Finally, quit the server.
API Way
Using APIs is another simple approach to send emails. This type of service can be free. Let’s see a coding example to make it clear.
import requests

def send_simple_email():
  return requests.post(
    "CREDENTIALS GIVEN BY MAILGUN",
    auth=("api", "CREDENTIALS GIVEN BY MAILGUN"),
    data={"from": " <[email protected]>",
      "to": "François <[email protected]>",
      "subject": "Subject",
      "text": "Hello! This is a test email from Dataflair."})


send_simple_email()
Yagmail
Python provides multiple libraries to send emails with simple code. Yagmail is one of them, which is specifically for gmails. Let’s look into this library by sending a mail with content and an attachment.
import yagmail
sender_add='[email protected]' #the sender's mail id
receiver_add='[email protected]' #the receiver's mail id
password='password' #password to log in

msg ='''
Hello, receiver!
We are sending an attachment from  DataFlair!
'''
filename = r"python.jfif"

yag = yagmail.SMTP(sender_add,password)
yag.send(
    to=receiver_add,
    subject="Yagmail from DataFlair",
    contents=msg,
    attachments=filename,
)
Seems to be a simpler code right! The yagmail can be installed using the below command:
pip install yagmail
Then
- We import the library
- Then set up the SMTP connection with the sender’s address and password
- Then send the mail with the receiver’s address, subject, body, and the file path as an attachment.
Transactional Email Services
If you are someone who is planning to send a large volume of emails, see email statistics, and want to ensure reliable delivery, then transactional email services is a best option. Although all of these services have paid plans for sending large volumes of emails, they also avail free plans to try them out.
Pros of transactional email services
- It has features like analytics
- It has high delivery rates and speeds
- Scalable and reliable
Cons of transactional email services
- The learning curve for new API
- It is dependent on third-party intermediary
Conclusion
Finally we have learned to send secure emails using Python. We discussed setting up an SMTP connection, sending mail, formatting content, adding attachments, and sending multiple personalized emails. We also learned to use the yagmail library to send the mail. And then using transactional email services. Hope it was an informative article. Happy coding
Your 15 seconds will encourage us to work even harder
Please share your happy experience on Google


Can I get a video explained or a tutorial