School Management System Project in Python
Master Python with 70+ Hands-on Projects and Get Job-ready - Learn Python
In this Python project, we will build a GUI-based School Management System using the Tkinter, SQLite3, and TkCalender libraries and messagebox and Ttk modules of the Tkinter library. It is an intermediate level project, where you will learn how to use databases and make some great GUIs in Python and apply them in real life. Let’s start!😊
About School Management Systems:
School Management Systems manage all the information of the students and/or faculty in a particular school.
In our project, we will only use it to manage some basic personal information of the students of a school.
About the project:
The objective of this is to create a GUI based School Management System. To build this, you will need intermediate understanding of Tkinter library and SQLite API and basic understanding of TkCalender, Datetime libraries, messagebox and Ttk modules.
Project Prerequisites:
To build this project, we will need the following libraries:
1. Tkinter – To create the GUI.
2. SQLite3 – To connect the program to the database and store information in it.
3. TkCalender – To get the user to enter a date.
4. Datetime.date – To convert the date from the tree to a Datetime.date instance so that it can be set in.
5. Tkinter.messagebox – To show a display box, displaying some information or an error.
6. Tkinter.ttk – To create the tree where all the information will be displayed.
The TkCalender library and SQLite API do not come pre-installed with Python. So you will need to run the following command in your command terminal to install them:
python -m pip install sqlite tkcalender
Download School Management System Project
Please download the source code of python school students management system project: Python School Management System Project Code
Project File Structure:
Here are the steps you will need to execute to build this project:
1. Importing all the necessary libraries and modules.
2. Initializing the GUI window and placing the components in it.
3. Defining the functions to manipulate the data in the database and the tree.
Let’s take a closer look at these steps:
1. Importing all the necessary libraries and modules:
import datetime
from tkinter import *
import tkinter.messagebox as mb
from tkinter import ttk
from tkcalendar import DateEntry
import sqlite3
2. Initializing the GUI window and placing the components in it:
# Initializing the GUI window
main = Tk()
main.title('DataFlair School Management System')
main.geometry('1000x600')
main.resizable(0, 0)

# Creating the background and foreground color variables
lf_bg = 'MediumSpringGreen' # bg color for the left_frame
cf_bg = 'PaleGreen' # bg color for the center_frame

# Creating the StringVar or IntVar variables
name_strvar = StringVar()
email_strvar = StringVar()
contact_strvar = StringVar()
gender_strvar = StringVar()
stream_strvar = StringVar()

# Placing the components in the main window
Label(main, text="SCHOOL MANAGEMENT SYSTEM", font=headlabelfont, bg='SpringGreen').pack(side=TOP, fill=X)

left_frame = Frame(main, bg=lf_bg)
left_frame.place(x=0, y=30, relheight=1, relwidth=0.2)

center_frame = Frame(main, bg=cf_bg)
center_frame.place(relx=0.2, y=30, relheight=1, relwidth=0.2)

right_frame = Frame(main, bg="Gray35")
right_frame.place(relx=0.4, y=30, relheight=1, relwidth=0.6)

# Placing components in the left frame
Label(left_frame, text="Name", font=labelfont, bg=lf_bg).place(relx=0.375, rely=0.05)
Label(left_frame, text="Contact Number", font=labelfont, bg=lf_bg).place(relx=0.175, rely=0.18)
Label(left_frame, text="Email Address", font=labelfont, bg=lf_bg).place(relx=0.2, rely=0.31)
Label(left_frame, text="Gender", font=labelfont, bg=lf_bg).place(relx=0.3, rely=0.44)
Label(left_frame, text="Date of Birth (DOB)", font=labelfont, bg=lf_bg).place(relx=0.1, rely=0.57)
Label(left_frame, text="Stream", font=labelfont, bg=lf_bg).place(relx=0.3, rely=0.7)

Entry(left_frame, width=19, textvariable=name_strvar, font=entryfont).place(x=20, rely=0.1)
Entry(left_frame, width=19, textvariable=contact_strvar, font=entryfont).place(x=20, rely=0.23)
Entry(left_frame, width=19, textvariable=email_strvar, font=entryfont).place(x=20, rely=0.36)
Entry(left_frame, width=19, textvariable=stream_strvar, font=entryfont).place(x=20, rely=0.75)

OptionMenu(left_frame, gender_strvar, 'Male', "Female").place(x=45, rely=0.49, relwidth=0.5)

dob = DateEntry(left_frame, font=("Arial", 12), width=15)
dob.place(x=20, rely=0.62)

Button(left_frame, text='Submit and Add Record', font=labelfont, command=add_record, width=18).place(relx=0.025, rely=0.85)

# Placing components in the center frame
Button(center_frame, text='Delete Record', font=labelfont, command=remove_record, width=15).place(relx=0.1, rely=0.35)
Button(center_frame, text='View Record', font=labelfont, command=view_record, width=15).place(relx=0.1, rely=0.45)
Button(center_frame, text='Reset Fields', font=labelfont, command=reset_fields, width=15).place(relx=0.1, rely=0.55)

# Placing components in the right frame
Label(right_frame, text='Students Records', font=headlabelfont, bg='DarkGreen', fg='LightCyan').pack(side=TOP, fill=X)

tree = ttk.Treeview(right_frame, height=100, selectmode=BROWSE,
                   columns=('Student ID', "Name", "Email Address", "Contact Number", "Gender", "Date of Birth", "Stream"))

X_scroller = Scrollbar(tree, orient=HORIZONTAL, command=tree.xview)
Y_scroller = Scrollbar(tree, orient=VERTICAL, command=tree.yview)

X_scroller.pack(side=BOTTOM, fill=X)
Y_scroller.pack(side=RIGHT, fill=Y)

tree.config(yscrollcommand=Y_scroller.set, xscrollcommand=X_scroller.set)

tree.heading('Student ID', text='ID', anchor=CENTER)
tree.heading('Name', text='Name', anchor=CENTER)
tree.heading('Email Address', text='Email ID', anchor=CENTER)
tree.heading('Contact Number', text='Phone No', anchor=CENTER)
tree.heading('Gender', text='Gender', anchor=CENTER)
tree.heading('Date of Birth', text='DOB', anchor=CENTER)
tree.heading('Stream', text='Stream', anchor=CENTER)

tree.column('#0', width=0, stretch=NO)
tree.column('#1', width=40, stretch=NO)
tree.column('#2', width=140, stretch=NO)
tree.column('#3', width=200, stretch=NO)
tree.column('#4', width=80, stretch=NO)
tree.column('#5', width=80, stretch=NO)
tree.column('#6', width=80, stretch=NO)
tree.column('#7', width=150, stretch=NO)

tree.place(y=30, relwidth=1, relheight=0.9, relx=0)

display_records()
Explanation:
- In this step, we will create the GUI for our project.
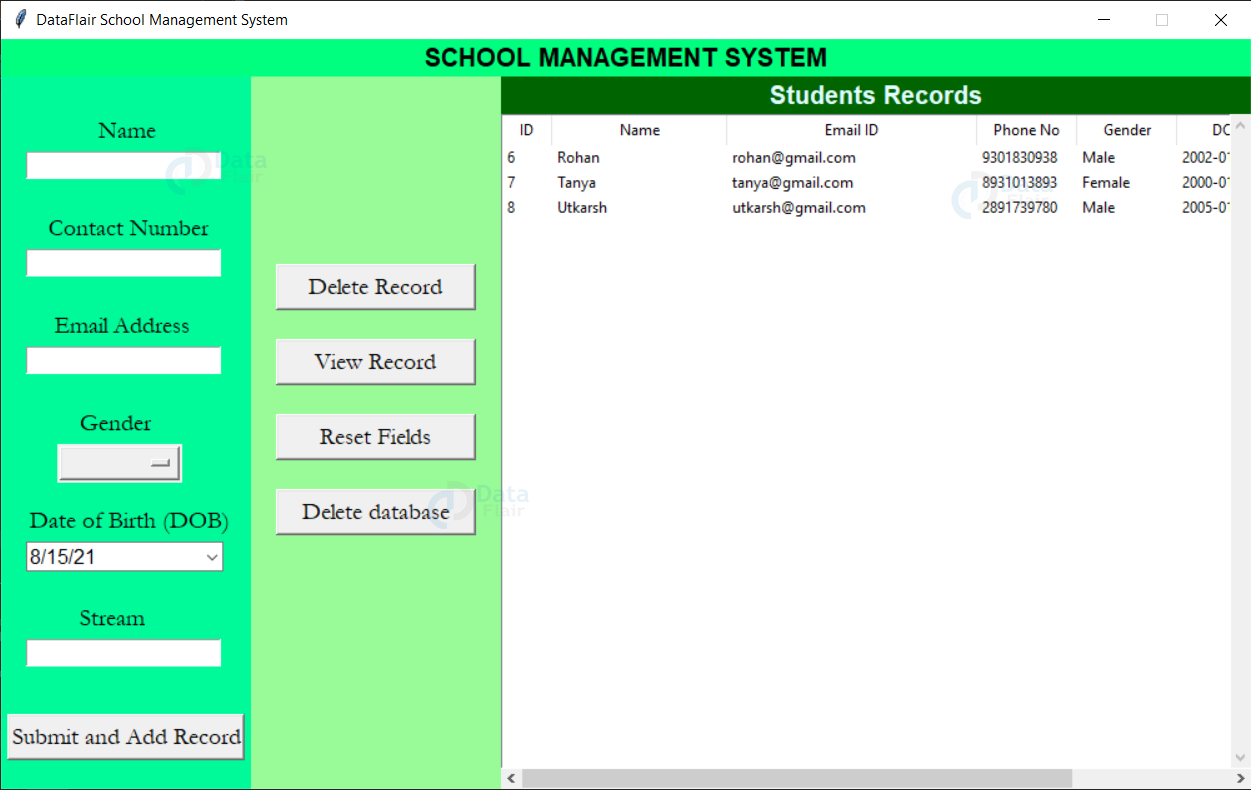
- We will start by defining the window and its attributes, packing the head label to the top and dividing the rest of the window in 3, as Frames.
- In the left frame, we have the Labels and Entry fields and DateEntry fields where the user will enter the data of the new record and a button at the bottom which adds the record to the database.
- The Label widgets denote what to enter in the next field.
- The Entry fields, which will be manipulated by StringVar or IntVar variables will take the input from the user.
- The DateEntry field will get a date from the user in the MM/DD/YY format. Since this field is not manipulated by another one, the functions to change the data in this field will be different from the ones used to change data in normal entry fields.
- In the center frame, there are all the buttons to perform certain actions on the fields in the left frame and/or records in the database.
- The right frame contains a label on the top of the frame, followed by a Tree (Table) with columns ID, Name, Email address, Contact number, Date of Birth, Gender and Stream (if student) which has two scrollbars, controlling the vertical and horizontal orientations of the said table.
- The column names of the table are defined when creating the Treeview instance.
- After creating the tree variable, we will set 2 Scrollbar objects to control the horizontal and vertical views of the table.
- Then, we will decide the text that will be displayed on the table’s first row as column headers and we will decide how much space we need to give to all those columns.
3. Defining the functions to manipulate the data in the database and the tree:
# Connecting to the Database where all information will be stored
connector = sqlite3.connect('SchoolManagement.db')
cursor = connector.cursor()

connector.execute(
"CREATE TABLE IF NOT EXISTS SCHOOL_MANAGEMENT (STUDENT_ID INTEGER PRIMARY KEY AUTOINCREMENT NOT NULL, NAME TEXT, EMAIL TEXT, PHONE_NO TEXT, GENDER TEXT, DOB TEXT, STREAM TEXT)"
)

# Creating the functions
def reset_fields():
   global name_strvar, email_strvar, contact_strvar, gender_strvar, dob, stream_strvar

   for i in ['name_strvar', 'email_strvar', 'contact_strvar', 'gender_strvar', 'stream_strvar']:
       exec(f"{i}.set('')")
   dob.set_date(datetime.datetime.now().date())


def reset_form():
   global tree
   tree.delete(*tree.get_children())

   connector.execute('DELETE FROM SCHOOL_MANAGEMENT')
   connector.commit()

   reset_fields()


def display_records():
   tree.delete(*tree.get_children())

   curr = connector.execute('SELECT * FROM SCHOOL_MANAGEMENT')
   data = curr.fetchall()

   for records in data:
       tree.insert('', END, values=records)


def add_record():
   global name_strvar, email_strvar, contact_strvar, gender_strvar, dob, stream_strvar

   name = name_strvar.get()
   email = email_strvar.get()
   contact = contact_strvar.get()
   gender = gender_strvar.get()
   DOB = dob.get_date()
   stream = stream_strvar.get()

   if not name or not email or not contact or not gender or not DOB or not stream:
       mb.showerror('Error!', "Please fill all the missing fields!!")
   else:
       try:
           connector.execute(
           'INSERT INTO SCHOOL_MANAGEMENT (NAME, EMAIL, PHONE_NO, GENDER, DOB, STREAM) VALUES (?,?,?,?,?,?)', (name, email, contact, gender, DOB, stream)
           )
           connector.commit()
           mb.showinfo('Record added', f"Record of {name} was successfully added")
           reset_fields()
           display_records()
       except:
           mb.showerror('Wrong type', 'The type of the values entered is not accurate. Pls note that the contact field can only contain numbers')


def remove_record():
   if not tree.selection():
       mb.showerror('Error!', 'Please select an item from the database')
   else:
       current_item = tree.focus()
       values = tree.item(current_item)
       selection = values["values"]

       tree.delete(current_item)

       connector.execute('DELETE FROM SCHOOL_MANAGEMENT WHERE STUDENT_ID=%d' % selection[0])
       connector.commit()

       mb.showinfo('Done', 'The record you wanted deleted was successfully deleted.')

       display_records()


def view_record():
   global name_strvar, email_strvar, contact_strvar, gender_strvar, dob, stream_strvar

   current_item = tree.focus()
   values = tree.item(current_item)
   selection = values["values"]

   date = datetime.date(int(selection[5][:4]), int(selection[5][5:7]), int(selection[5][8:]))

   name_strvar.set(selection[1]); email_strvar.set(selection[2])
   contact_strvar.set(selection[3]); gender_strvar.set(selection[4])
   dob.set_date(date); stream_strvar.set(selection[6])
Explanation:
- We will start off this step by creating a connector instance for the SQLite API. This will perform all operations on our database and a cursor instance.
- Then we will define the reset_fields() function, which will take all StringVar and IntVar variables which we will set to blank using their .set() method whereas we will use the .set_date() method of the DateEntry instance and to set it to the current date that we will get using the datetime.datetime.now().date() function.
- Next, in the reset_form() function, we will delete all the children (contents) from the Treeview instance and delete everything from the table using the connector’s .execute() and .commit() methods.
- After that, in the display_records() function, we will delete everything from the table where all information will be displayed using the tree.delete(*tree.get_children()) statement. Then we will have the connector execute the select all statement and fetch all the data from there. After that, we will take every shred of that data and keep on inserting them in the table using the .insert() method.
- In the add_record() function, we will get the data from all the StringVar and IntVar instances using their .set() method and from the DateEntry instance using its .get_date() method. If all those are full, we can move forward to adding it to the database using the INSERT command and using the display_records() function.
- In the remove_record() function, if there is no selection in the tree, then we will raise an error message and if there is a selection, we will get the contents of the selection and remove them from the tree and the database.
- In the view_record() function, we will get the values of the current selection in the table and then set the StringVar, IntVar, and DateEntry instances to the respective values.
Explanation of code lines:
current_item_selected = tree.focus()
values_in_selected_item = tree.item(current_item_selected)
selection = values_in_selected_item['values']
- tree.focus() – Gets the current selected item in the Treeview instance.
- tree.item(current_selected_item) – This takes the tree.focus() item as an argument and it returns all the values of it in the form of tuple.
- values_in_selected_item[‘values’] – This returns all the values of tree.focus()
date = datetime.date(int(selection[5][:4]), int(selection[5][5:7]), int(selection[5][8:]))
dob.set_date(date)
- selection[5] – This corresponds with the DoB of the student/teacher in the format: “YYYY-MM-DD”
- In this first line, we remove all the hyphens in the DoB and convert all the resulting strings into integers.
- When using the .set_date() method of the DateEntry instance, the argument must be a instance of datetime.datetime in the format of “YYYY-MM-DD” and that is what we are doing in the first line and we are setting the date in the DateEntry in the second line.
The final code:
import datetime
from tkinter import *
import tkinter.messagebox as mb
from tkinter import ttk
from tkcalendar import DateEntry  # pip install tkcalendar
import sqlite3

# Creating the universal font variables
headlabelfont = ("Noto Sans CJK TC", 15, 'bold')
labelfont = ('Garamond', 14)
entryfont = ('Garamond', 12)

# Connecting to the Database where all information will be stored
connector = sqlite3.connect('SchoolManagement.db')
cursor = connector.cursor()

connector.execute(
"CREATE TABLE IF NOT EXISTS SCHOOL_MANAGEMENT (STUDENT_ID INTEGER PRIMARY KEY AUTOINCREMENT NOT NULL, NAME TEXT, EMAIL TEXT, PHONE_NO TEXT, GENDER TEXT, DOB TEXT, STREAM TEXT)"
)

# Creating the functions
def reset_fields():
   global name_strvar, email_strvar, contact_strvar, gender_strvar, dob, stream_strvar

   for i in ['name_strvar', 'email_strvar', 'contact_strvar', 'gender_strvar', 'stream_strvar']:
       exec(f"{i}.set('')")
   dob.set_date(datetime.datetime.now().date())


def reset_form():
   global tree
   tree.delete(*tree.get_children())

   reset_fields()


def display_records():
   tree.delete(*tree.get_children())

   curr = connector.execute('SELECT * FROM SCHOOL_MANAGEMENT')
   data = curr.fetchall()

   for records in data:
       tree.insert('', END, values=records)


def add_record():
   global name_strvar, email_strvar, contact_strvar, gender_strvar, dob, stream_strvar

   name = name_strvar.get()
   email = email_strvar.get()
   contact = contact_strvar.get()
   gender = gender_strvar.get()
   DOB = dob.get_date()
   stream = stream_strvar.get()

   if not name or not email or not contact or not gender or not DOB or not stream:
       mb.showerror('Error!', "Please fill all the missing fields!!")
   else:
       try:
           connector.execute(
           'INSERT INTO SCHOOL_MANAGEMENT (NAME, EMAIL, PHONE_NO, GENDER, DOB, STREAM) VALUES (?,?,?,?,?,?)', (name, email, contact, gender, DOB, stream)
           )
           connector.commit()
           mb.showinfo('Record added', f"Record of {name} was successfully added")
           reset_fields()
           display_records()
       except:
           mb.showerror('Wrong type', 'The type of the values entered is not accurate. Pls note that the contact field can only contain numbers')


def remove_record():
   if not tree.selection():
       mb.showerror('Error!', 'Please select an item from the database')
   else:
       current_item = tree.focus()
       values = tree.item(current_item)
       selection = values["values"]

       tree.delete(current_item)

       connector.execute('DELETE FROM SCHOOL_MANAGEMENT WHERE STUDENT_ID=%d' % selection[0])
       connector.commit()

       mb.showinfo('Done', 'The record you wanted deleted was successfully deleted.')

       display_records()


def view_record():
   global name_strvar, email_strvar, contact_strvar, gender_strvar, dob, stream_strvar

   current_item = tree.focus()
   values = tree.item(current_item)
   selection = values["values"]

   date = datetime.date(int(selection[5][:4]), int(selection[5][5:7]), int(selection[5][8:]))

   name_strvar.set(selection[1]); email_strvar.set(selection[2])
   contact_strvar.set(selection[3]); gender_strvar.set(selection[4])
   dob.set_date(date); stream_strvar.set(selection[6])


# Initializing the GUI window
main = Tk()
main.title('DataFlair School Management System')
main.geometry('1000x600')
main.resizable(0, 0)

# Creating the background and foreground color variables
lf_bg = 'MediumSpringGreen' # bg color for the left_frame
cf_bg = 'PaleGreen' # bg color for the center_frame

# Creating the StringVar or IntVar variables
name_strvar = StringVar()
email_strvar = StringVar()
contact_strvar = StringVar()
gender_strvar = StringVar()
stream_strvar = StringVar()

# Placing the components in the main window
Label(main, text="SCHOOL MANAGEMENT SYSTEM", font=headlabelfont, bg='SpringGreen').pack(side=TOP, fill=X)

left_frame = Frame(main, bg=lf_bg)
left_frame.place(x=0, y=30, relheight=1, relwidth=0.2)

center_frame = Frame(main, bg=cf_bg)
center_frame.place(relx=0.2, y=30, relheight=1, relwidth=0.2)

right_frame = Frame(main, bg="Gray35")
right_frame.place(relx=0.4, y=30, relheight=1, relwidth=0.6)

# Placing components in the left frame
Label(left_frame, text="Name", font=labelfont, bg=lf_bg).place(relx=0.375, rely=0.05)
Label(left_frame, text="Contact Number", font=labelfont, bg=lf_bg).place(relx=0.175, rely=0.18)
Label(left_frame, text="Email Address", font=labelfont, bg=lf_bg).place(relx=0.2, rely=0.31)
Label(left_frame, text="Gender", font=labelfont, bg=lf_bg).place(relx=0.3, rely=0.44)
Label(left_frame, text="Date of Birth (DOB)", font=labelfont, bg=lf_bg).place(relx=0.1, rely=0.57)
Label(left_frame, text="Stream", font=labelfont, bg=lf_bg).place(relx=0.3, rely=0.7)

Entry(left_frame, width=19, textvariable=name_strvar, font=entryfont).place(x=20, rely=0.1)
Entry(left_frame, width=19, textvariable=contact_strvar, font=entryfont).place(x=20, rely=0.23)
Entry(left_frame, width=19, textvariable=email_strvar, font=entryfont).place(x=20, rely=0.36)
Entry(left_frame, width=19, textvariable=stream_strvar, font=entryfont).place(x=20, rely=0.75)

OptionMenu(left_frame, gender_strvar, 'Male', "Female").place(x=45, rely=0.49, relwidth=0.5)

dob = DateEntry(left_frame, font=("Arial", 12), width=15)
dob.place(x=20, rely=0.62)

Button(left_frame, text='Submit and Add Record', font=labelfont, command=add_record, width=18).place(relx=0.025, rely=0.85)

# Placing components in the center frame
Button(center_frame, text='Delete Record', font=labelfont, command=remove_record, width=15).place(relx=0.1, rely=0.25)
Button(center_frame, text='View Record', font=labelfont, command=view_record, width=15).place(relx=0.1, rely=0.35)
Button(center_frame, text='Reset Fields', font=labelfont, command=reset_fields, width=15).place(relx=0.1, rely=0.45)
Button(center_frame, text='Delete database', font=labelfont, command=reset_form, width=15).place(relx=0.1, rely=0.55)

# Placing components in the right frame
Label(right_frame, text='Students Records', font=headlabelfont, bg='DarkGreen', fg='LightCyan').pack(side=TOP, fill=X)

tree = ttk.Treeview(right_frame, height=100, selectmode=BROWSE,
                   columns=('Student ID', "Name", "Email Address", "Contact Number", "Gender", "Date of Birth", "Stream"))

X_scroller = Scrollbar(tree, orient=HORIZONTAL, command=tree.xview)
Y_scroller = Scrollbar(tree, orient=VERTICAL, command=tree.yview)

X_scroller.pack(side=BOTTOM, fill=X)
Y_scroller.pack(side=RIGHT, fill=Y)

tree.config(yscrollcommand=Y_scroller.set, xscrollcommand=X_scroller.set)

tree.heading('Student ID', text='ID', anchor=CENTER)
tree.heading('Name', text='Name', anchor=CENTER)
tree.heading('Email Address', text='Email ID', anchor=CENTER)
tree.heading('Contact Number', text='Phone No', anchor=CENTER)
tree.heading('Gender', text='Gender', anchor=CENTER)
tree.heading('Date of Birth', text='DOB', anchor=CENTER)
tree.heading('Stream', text='Stream', anchor=CENTER)

tree.column('#0', width=0, stretch=NO)
tree.column('#1', width=40, stretch=NO)
tree.column('#2', width=140, stretch=NO)
tree.column('#3', width=200, stretch=NO)
tree.column('#4', width=80, stretch=NO)
tree.column('#5', width=80, stretch=NO)
tree.column('#6', width=80, stretch=NO)
tree.column('#7', width=150, stretch=NO)

tree.place(y=30, relwidth=1, relheight=0.9, relx=0)

display_records()

# Finalizing the GUI window
main.update()
main.mainloop()
Python School Management System Output
Summary:
Congratulations! You have now created your own School Management System. Tkinter, TkCalender, DateTime libraries, SQLite3 API and messagebox and Ttk modules are useful here.
You can use this project for multiple purposes. It can be for managing the information of the students in your school, the information of teachers, etc.
Did you like this article? If Yes, please give DataFlair 5 Stars on Google


Where we have to run tkcalendar
I need help
Do u have any videos
School management system using python tkinter and backend mysql
Mam I am having a athlete domine and idea. If you please help me to create a softwere. My Name is Hussain, working as a school physical Director since 19 years. If you are interested please contact me +91 9150639785
waoooo, thanks so much , this is inndeed a great lecture, i am so much pleased
by the way how about using custom tkinter