Python Project – Real-time Human Detection & Counting
Master Python with 70+ Hands-on Projects and Get Job-ready - Learn Python
In this python project, we are going to build the Human Detection and Counting System through Webcam or you can give your own video or images. This is an intermediate level deep learning project on computer vision, which will help you to master the concepts and make you an expert in the field of Data Science. Let’s build an exciting project.
Human Detection with Computer Vision
Project Prerequisites
The project in Python requires you to have basic knowledge of python programming and the OpenCV library. We will be needing following libraries:
- OpenCV: A strong library used for machine learning
- Imutils: To Image Processing
- Numpy: Used for Scientific Computing. Image is stored in a numpy array.
- Argparse: Used to give input in command line.
To install the required library, run the following code in your terminal.
pip install opencv-python
pip install imutils
pip install numpy
Download Project Code
Before proceeding ahead, please download the source of real-time human detection project: Human Detection & Counting Project
Histogram of Oriented Gradient Descriptor
HOG is a feature descriptor used in computer vision and image processing for the purpose of object detection. This is one of the most popular techniques for object detection, to our fortune, OpenCV has already been implemented in an efficient way to combine the HOG Descriptor algorithm with Support Vector Machine or SVM.
Steps To Build Human Detection Project
1. Import the libraries:
import cv2
import imutils
import numpy as np
import argparse
2. Create a model which will detect Humans:
As discussed earlier, We will use HOGDescriptor with SVM already implemented in OpenCV. Below code will do this work:
HOGCV = cv2.HOGDescriptor()
HOGCV.setSVMDetector(cv2.HOGDescriptor_getDefaultPeopleDetector())
cv2.HOGDescriptor_getDefaultPeopleDetector() calls the pre-trained model for Human detection of OpenCV and then we will feed our support vector machine with it.
3. Detect() method:
Here, the actual magic will happen.
Video: A video combines a sequence of images to form a moving picture. We call these images as Frame. So in general we will detect the person in the frame. And show it one after another that it looks like a video.
That is exactly what our Detect() method will do. It will take a frame to detect a person in it. Make a box around a person and show the frame..and return the frame with person bounded by a green box.
def detect(frame):
    bounding_box_cordinates, weights =  HOGCV.detectMultiScale(frame, winStride = (4, 4), padding = (8, 8), scale = 1.03)

    person = 1
    for x,y,w,h in bounding_box_cordinates:
        cv2.rectangle(frame, (x,y), (x+w,y+h), (0,255,0), 2)
        cv2.putText(frame, f'person {person}', (x,y), cv2.FONT_HERSHEY_SIMPLEX, 0.5, (0,0,255), 1)
        person += 1

    cv2.putText(frame, 'Status : Detecting ', (40,40), cv2.FONT_HERSHEY_DUPLEX, 0.8, (255,0,0), 2)
    cv2.putText(frame, f'Total Persons : {person-1}', (40,70), cv2.FONT_HERSHEY_DUPLEX, 0.8, (255,0,0), 2)
    cv2.imshow('output', frame)

    return frame
Everything will be done by detectMultiScale(). It returns 2-tuple.
- List containing Coordinates of bounding Box of person.
Coordinates are in form X, Y, W, H.
Where x,y are starting coordinates of box and w, h are width and height of box respectively. - Confidence Value that it is a person.
Now, We have our detect method. Let’s Create a Detector.
4. HumanDetector() method
There are two ways of getting Video.
- Web Camera
- Path of file stored
In this deep learning project, we can take images also. So our method will check if a path is given then search for the video or image in the given path and operate. Otherwise, it will open the webCam.
def humanDetector(args):
    image_path = args["image"]
    video_path = args['video']
    if str(args["camera"]) == 'true' : camera = True
    else : camera = False

    writer = None
    if args['output'] is not None and image_path is None:
        writer = cv2.VideoWriter(args['output'],cv2.VideoWriter_fourcc(*'MJPG'), 10, (600,600))

    if camera:
        print('[INFO] Opening Web Cam.')
        detectByCamera(ouput_path,writer)
    elif video_path is not None:
        print('[INFO] Opening Video from path.')
        detectByPathVideo(video_path, writer)
    elif image_path is not None:
        print('[INFO] Opening Image from path.')
        detectByPathImage(image_path, args['output'])
5. DetectByCamera() method
def detectByCamera(writer):
    video = cv2.VideoCapture(0)
    print('Detecting people...')

    while True:
        check, frame = video.read()

        frame = detect(frame)
        if writer is not None:
            writer.write(frame)

        key = cv2.waitKey(1)
        if key == ord('q'):
            break

    video.release()
    cv2.destroyAllWindows()
cv2.VideoCapture(0) passing 0 in this function means we want to record from a webcam. video.read() read frame by frame. It returns a check which is True if this was able to read a frame otherwise False.
Now, For each Frame, we will call detect() method. Then we write the frame in our output file.
6. DetectByPathVideo() method
This method is very similar to the previous method except we will give a path to the Video. First, we check if the video on the provided path is found or not.
Note – A full path must be given.
def detectByPathVideo(path, writer):

    video = cv2.VideoCapture(path)
    check, frame = video.read()
    if check == False:
        print('Video Not Found. Please Enter a Valid Path (Full path of Video Should be Provided).')
        return

    print('Detecting people...')
    while video.isOpened():
        #check is True if reading was successful
        check, frame =  video.read()

        if check:
            frame = imutils.resize(frame , width=min(800,frame.shape[1]))
            frame = detect(frame)

            if writer is not None:
                writer.write(frame)

            key = cv2.waitKey(1)
            if key== ord('q'):
                break
        else:
            break
    video.release()
    cv2.destroyAllWindows()

def detectByCamera(writer):
    video = cv2.VideoCapture(0)
    print('Detecting people...')

    while True:
        check, frame = video.read()

        frame = detect(frame)
        if writer is not None:
            writer.write(frame)

        key = cv2.waitKey(1)
        if key == ord('q'):
                break

    video.release()
    cv2.destroyAllWindows()
The implementation is similar to the previous function except for each frame we will check that it successfully reads the frame or not. At the end when the frame is not read we will end the loop.
7. DetectByPathimage() method
This method is used if a person needs to be detected from an image.
def detectByPathImage(path, output_path):
    image = cv2.imread(path)

    image = imutils.resize(image, width = min(800, image.shape[1]))

    result_image = detect(image)

    if output_path is not None:
        cv2.imwrite(output_path, result_image)

    cv2.waitKey(0)
    cv2.destroyAllWindows()
8. Argparse() method
The function argparse() simply parses and returns as a dictionary the arguments passed through your terminal to our script. There will be Three arguments within the Parser:
- Image: The path to the image file inside your system
- Video: The path to the Video file inside your system
- Camera: A variable that if set to ‘true’ will call the cameraDetect() method.
def argsParser():
    arg_parse = argparse.ArgumentParser()
    arg_parse.add_argument("-v", "--video", default=None, help="path to Video File ")
    arg_parse.add_argument("-i", "--image", default=None, help="path to Image File ")
    arg_parse.add_argument("-c", "--camera", default=False, help="Set true if you want to use the camera.")
    arg_parse.add_argument("-o", "--output", type=str, help="path to optional output video file")
    args = vars(arg_parse.parse_args())

    return args
9. Main function
We have reached the end of our project.
if __name__ == "__main__":
    HOGCV = cv2.HOGDescriptor()
    HOGCV.setSVMDetector(cv2.HOGDescriptor_getDefaultPeopleDetector())

    args = argsParser()
    humanDetector(args)
Instead of declaring our model above, we can declare it in our main function.
Run the Human Detection Project
To run the human detection deep learning project, please run below-mentioned commands as per requirements
1. To give video file as input:
python main.py -v ‘Path_to_video’
2. To give image file as input:
python main.py -i ‘Path_to-image’
3. To use the camera:
python main.py -c True
4. To save the output:
Python main.py -c True -o ‘file_name’
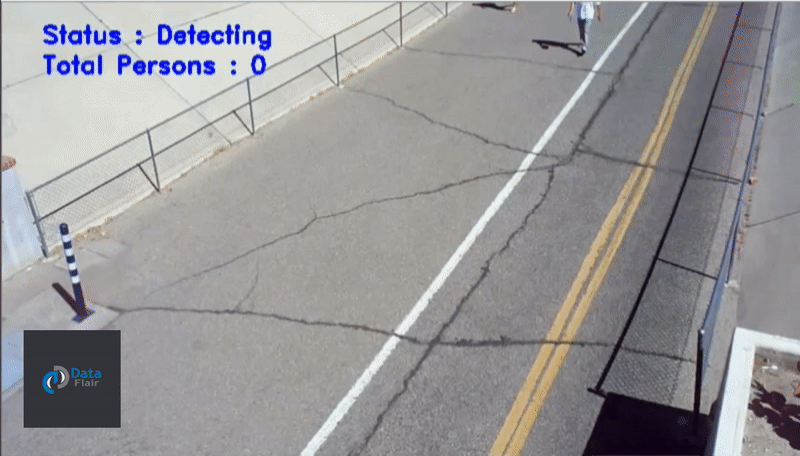
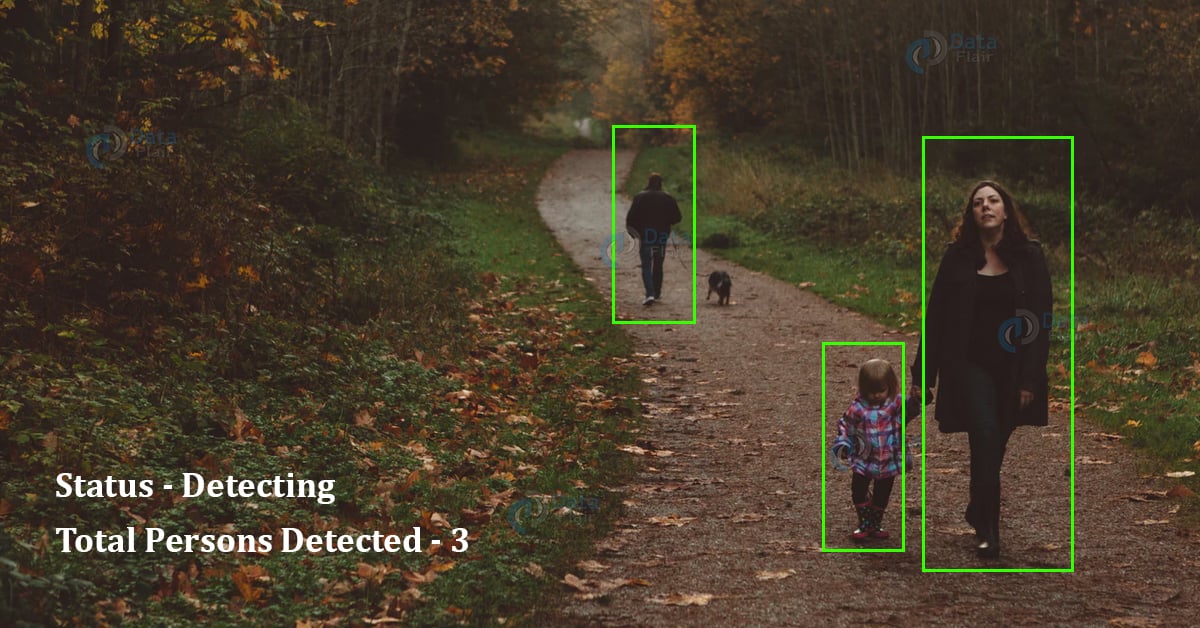
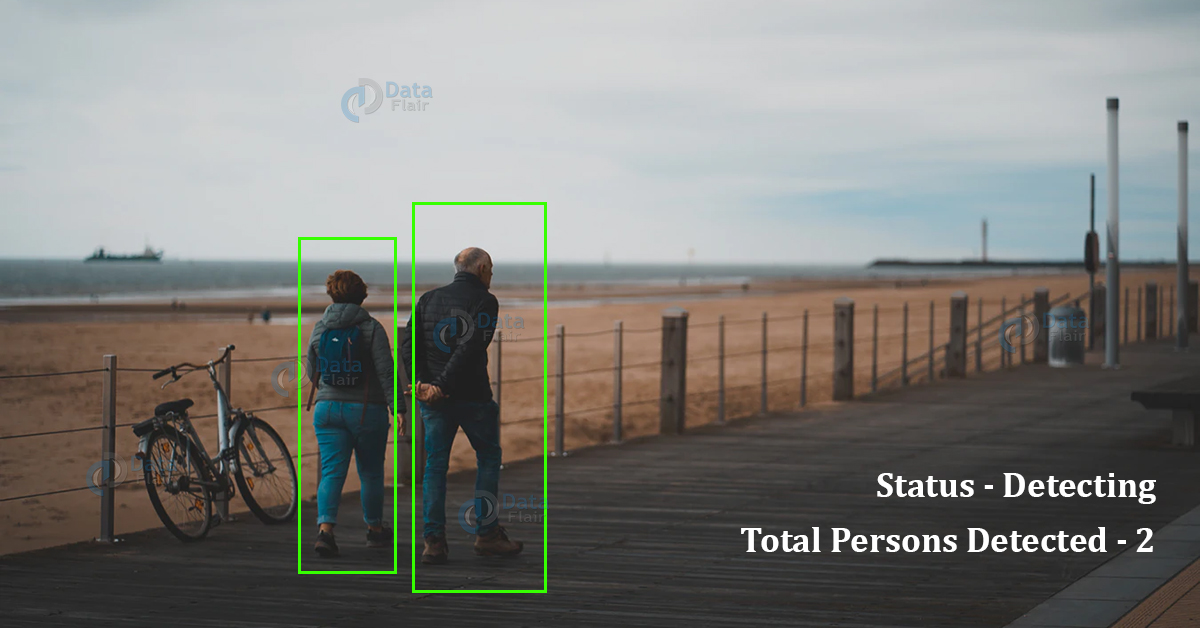
Project Output
Now, after running the human detection python project with multiple images and video, we will get:
Summary
In this deep learning project, we have learned how to create a people counter using HOG and OpenCV to generate an efficient people counter. We developed the project where you can supply the input as: video, image, or even live camera. This is an intermediate level project, which will surely help you in mastering python and deep learning libraries.
If you are Happy with DataFlair, do not forget to make us happy with your positive feedback on Google


Hi,
Thanks for sharing thisvery interestingand very compact object detection app with CV2.
I have tested it with some mp4 videos from the ring doorbel, and there are some errors though – a corner of the wall where the ring si installed, a light post, and a grabage bin – are all highlighted as persons.
How can this be fixed? Are there any “hyperparameters” that one can adjust / fine tune so errors are minimized ?
Thanks a lot
Can I get the whole project/source code?
convert the frame to grayscale and then use it in detectMultiScale function
This:
gray = cv2.cvtColor(frame, cv2.COLOR_BGR2GRAY)
bounding_box_coordinates, weights = HOGCV.detectMultiScale(gray, winStride=(8, 8), padding=(8, 8), scale=1.03)
python main.py -v ‘Path_to_video’ where should I write these line please tell me
Hi sorin, I am trying to execute the above project but it is not executing, can you please help by sharing your code.
Thanks.
i think there is some problem in source code..its not running..will you check again
hey, I am trying to execute the above project but it is not executing, can you please help by sharing your code.
Can I get the whole project/source code?
Hii, you’ve done fabulously. will you help me by sharing your code??
Hi,
Have you guys used your own video and/or image files. Or are there files available somewhere?
I am trying to use one with extension *.mov. But Its not working.
I got some error, can you help me out
Hello,
Thanks for sharing the code, but in step 9 there is an error encountering, can you help me out. waiting for the kind respond.
Your code is really useful. But the code doesn’t run. Please help by email
Hola muchas gracias por el proyecto , me sirvió, lo pude ejecutar, sin embargo al momento de pasarle un video lo procesa muy lento y creo que debería tener non_max_suppression y mejorar algunas cositas , pero en general muy bien , muchas gracias
Can I get full project and code
hi i am new to python,
getting this error after the complete execution of program can some buddy help me, to come this error
= RESTART: C:\Users\Anup Kumar\Downloads\human-counting-project-code(1)\human-counting-project-code.py
>>> python human-counting-project-code.py -c True
hi i am new to python,
getting this error after the complete execution of program can some buddy help me,
= RESTART: C:\Users\Anup Kumar\Downloads\human-counting-project-code(1)\human-counting-project-code.py
>>> python human-counting-project-code.py -c True
SyntaxError: invalid syntax
where u able to resolve this error?
i am also having same problem can anyone help please
you need to import all libraries first and only then write a code to run
Really Good one to start into Object Detection like understanding the architecture of the project, constructing relevant functions, etc, but the outputs are terrible when tried out with videos and webcams.
Are you guys executing this code from spyder , saving the code as main.py then run and giving the command.
I am getting
python main.py -i ‘C:\\Users\\kat\\Pictures\\Camera Roll\\IMG_6730.jpg’
^
SyntaxError: invalid syntax
hi,Did you solve the issue?Can you let me know how did the issue solved …i am also facing same issue
the file name is not main.py , it was human-counting-project-code.py
So change and try again. And the path name should be IMG_6730.jpg
TRY THIS: python human-counting-project-code.py -i IMG_6730.jpg
Can you share me the source code
#For Image You can try this code. This will a bit easy
import cv2
import imutils
HOGCV = cv2.HOGDescriptor()
HOGCV.setSVMDetector(cv2.HOGDescriptor_getDefaultPeopleDetector())
path = r’C:\Users\Pictures\walking.jpg’
output_path = r’C:\Users\Pictures\Walking3_out.jpg’
image = cv2.imread(path)
image = imutils.resize(image, width = min(800, image.shape[1]))
frame = image
bounding_box_cordinates, weights = HOGCV.detectMultiScale(frame, winStride = (4, 4), padding = (8, 8), scale = 1.03)
person = 1
for x,y,w,h in bounding_box_cordinates:
cv2.rectangle(frame, (x,y), (x+w,y+h), (0,255,0), 2)
cv2.putText(frame, f’person {person}’, (x,y), cv2.FONT_HERSHEY_SIMPLEX, 0.5, (0,0,255), 1)
person += 1
cv2.putText(frame, ‘Status : Detecting ‘, (40,40), cv2.FONT_HERSHEY_DUPLEX, 0.8, (255,0,0), 2)
cv2.putText(frame, f’Total Persons : {person-1}’, (40,70), cv2.FONT_HERSHEY_DUPLEX, 0.8, (255,0,0), 2)
# cv2.imshow(‘output’, frame)
number_person = {person-1}
result_image = frame
if output_path is not None:
cv2.imwrite(output_path, result_image)
else:
print(“Error Encountered”, 1/0)
cv2.waitKey(0)
cv2.destroyAllWindows()
Hi, did you execute the code from SPYDER?
1) saved code as main.py
2) run
3) executing the code with command python main.py -c True
4) getting invalid syntax error
i have been executing the above code but i am getting error can you please help me out
Traceback (most recent call last):
File “C:\Users\JAYASRI.RAYANA\PycharmProjects\pythonProject16\main.py”, line 123, in
humanDetector(args)
File “C:\Users\JAYASRI.RAYANA\PycharmProjects\pythonProject16\main.py”, line 104, in humanDetector
detectByPathImage(image_path, args[‘output’])
File “C:\Users\JAYASRI.RAYANA\PycharmProjects\pythonProject16\main.py”, line 73, in detectByPathImage
image = imutils.resize(image, width=min(800, image.shape[1]))
AttributeError: ‘NoneType’ object has no attribute ‘shape’
Cool project design but I tested it, and unfortunately, it does not work well in terms of detecting people. If anyone out there knows a good implementation of such a task, I would very much appreciate any tips.
1. python peopledetect_cam.py -c true – to run as webcam
2. detectByCamera(ouput_path,writer), remove the firstparameter
I have been executing the above code but i am getting error can you please help me out.
When I try to run the main function i am getting this error:
usage: ipykernel_launcher.py [-h] [-v VIDEO] [-i IMAGE] [-c CAMERA]
[-o OUTPUT]
ipykernel_launcher.py: error: unrecognized arguments: -f /root/.local/share/jupyter/runtime/kernel-77117b67-8ca3-4d7c-be56-2cdce49e9cc1.json
An exception has occurred, use %tb to see the full traceback.
SystemExit: 2
/usr/local/lib/python3.7/dist-packages/IPython/core/interactiveshell.py:2890: UserWarning: To exit: use ‘exit’, ‘quit’, or Ctrl-D.
warn(“To exit: use ‘exit’, ‘quit’, or Ctrl-D.”, stacklevel=1)
Please help me how to correct it.
Thank you
K xa gagan Sathi
mail me for the working source code
Please send the working source code
I am getting the same error . Did you find a solution?
I am getting this error, Kindly help me solve it:
File “/tmp/ipykernel_5064/1267181509.py”, line 1
python main.ipynb -i ‘download.jpg’
^
SyntaxError: invalid syntax
When i tried to run it with the camera as true, or other args, it does nothing, but like the video, image and output does make a file. And yes everything is right
What do i write in the arguments for detectByCamera(?, humanDetector(?), and detect(?):
process finished with exit code 0 not responding camera
this works for my error when i using video as an input
for you that using video as an input try this syntax
this my code before:
PS C:\Users\idha\Downloads\human-counting-projek-code> python human-counting-projek-code.py -v ‘people.mp4’
and this the result:
C:\Users\idha\AppData\Local\Programs\Python\Python311\python.exe: can’t open file ‘C:\\Users\\idha\\Downloads\\human-counting-projek-code\\human-counting-projek-code.py’: [Errno 2] No such file or directory
then i changed it into:
PS C:\Users\idha\Downloads\human-counting-projek-code> python human-counting-project-code.py -v people.mp4
[INFO] Opening Video from path.
Detecting people…
IT WORKS DUDE, THANKS!
Hi in frame from the camera, the video was really low so I tried to add a count and if the count%15 (meaning each 15 frames) then show me the rectangle but this doesn’t really work as expected and the rectangle stays only a second. Do you maybe have a solution?
code is not working
We are here to assist you with any code-related issues you may be experiencing, but please mention properly where does you are facing issues.