Online Shopping System Project in Python Django
Master Python with 70+ Hands-on Projects and Get Job-ready - Learn Python
Interactive Online Courses: Elevate Skills & Succeed Enroll Now!
Online Shopping is a very popular project in web development. It is mostly used as a business model to earn capital. Famous ecommerce websites are amazon, flipkart, etc. Let us develop Online Shopping System in Django.
About the Online Shopping System:
All the users can view various products, if they wish to buy any then they have to register and then login to add that product inside their cart. The users or customers can also read the reviews about a product posted by other users before buying it.
The users can add how many products he/she wants to their shopping cart. Then the users are able to set the quantity of each added product inside the cart. Finally, while checkout the users can give their address and the mode of payment and place the respective order. Then the admin can see the customer details with his/her order details and the address where the order should be delivered.
Python Online Shopping System project:
The main purpose of this project is to build a platform where the buyers and sellers can connect with each other online. These kinds of projects or websites are used to sell products and gain some money out of it.
Project Prerequisites and Features
Prerequisites to develop Online Shopping System in Django:
Html, Css, JavaScript, Bootstrap, Python Django.
Features:
- User Authentication (register and login)
- Session of each user is saved using cookies.
- All Products with their view, key features and reviews by other users.
- Users are able to search for any product.
- Cart Functionality.
- Proper Order Summary Before Placing Order.
- Change Password Facility.
- Contact Us.
Download Online Shopping System Django Project
Please download the source code of python online shopping system from the following link: Online Shopping System Python Django Project
Project File Structure
Steps for Online Shopping System Python Project:
Models.py :
class Customer(models.Model):
    user = models.OneToOneField(User, on_delete=models.CASCADE)
    name = models.CharField(max_length=100)
    email = models.CharField(max_length=100)
    phone_number = models.CharField(max_length=10, null=True, blank=True)

    def __str__(self):
        return self.name

class Product(models.Model):
    name = models.CharField(max_length=100)
    price = models.FloatField()
    image = models.ImageField(upload_to="images", default="")

    def __str__(self):
        return self.name

class Feature(models.Model):
    product = models.ForeignKey(Product, on_delete=models.CASCADE)
    feature = models.CharField(max_length=1000, null=True, blank=True)

    def __str__(self):
        return str(self.product) + " Feature: " + self.feature

class Review(models.Model):
    customer = models.ForeignKey(Customer, on_delete=models.CASCADE)
    product = models.ForeignKey(Product, on_delete=models.CASCADE)
    content = models.TextField()
    datetime = models.DateTimeField(default=now)

    def __str__(self):
        return str(self.customer) +  " Review: " + self.content

class Order(models.Model):
    customer = models.ForeignKey(Customer, on_delete=models.SET_NULL, null=True)
    date_ordered = models.DateTimeField(auto_now_add=True)
    complete = models.BooleanField(default=False)
    transaction_id = models.CharField(max_length=100)

    def __str__(self):
        return str(self.id)

    @property
    def get_cart_total(self):
        orderitems = self.orderitem_set.all()
        total = sum([item.get_total for item in orderitems])
        return total

    @property
    def get_cart_items(self):
        orderitems = self.orderitem_set.all()
        total = sum([item.quantity for item in orderitems])
        return total

class OrderItem(models.Model):
    product = models.ForeignKey(Product, on_delete=models.SET_NULL, null=True)
    order = models.ForeignKey(Order, on_delete=models.SET_NULL, null=True)
    quantity = models.IntegerField(default=0)
    date_added = models.DateTimeField(auto_now_add=True)

    def __str__(self):
        return str(self.order)

    @property
    def get_total(self):
        total = self.product.price * self.quantity
        return total

class CheckoutDetail(models.Model):
    customer = models.ForeignKey(Customer, on_delete=models.SET_NULL, null=True)
    order = models.ForeignKey(Order, on_delete=models.SET_NULL, null=True)
    phone_number = models.CharField(max_length=10, blank=True, null=True)
    total_amount = models.CharField(max_length=10, blank=True,null=True)
    address = models.CharField(max_length=300)
    city = models.CharField(max_length=100)
    state = models.CharField(max_length=100)
    zipcode = models.CharField(max_length=100)
    date_added = models.DateTimeField(auto_now_add=True)

    def __str__(self):
        return self.address
Code Explanation:
So, there are a total of 7 models created for this project.
Customer model:
It saves the basic data of the customers when they register themselves.
Product model:
It saves the data of the product. The admin can add a new product very easily using this model.
Feature model:
The admin can select the product and write any features about it. And all the features of that product will be visible to the users when they view a specific product.
Review model:
All the customers can write a review about a product which the customers can read before buying it.
Order model:
It stores the order details about the customer, mainly the order id.
OrderItems model:
It stores the order id of the customer from the order model and the products with their quantity.
Checkout Details model:
It stores mainly the exact address where the order is to be delivered.
Create superuser:
After creating the models, we need to go to the admin panel to access the created models. Hence, we need a superuser who can access the models from the admin panel. The superuser can make any changes inside the models.
Creating superuser :
For creating the superuser use the following command:
python manage.py createsuperuser
Then, you can give the username, email and password.
Urls.py file
from django.urls import path
from . import views
urlpatterns = [
    path("", views.index, name="index"),
    path("cart/", views.cart, name="cart"),
    path("checkout/", views.checkout, name="checkout"),
    path("update_item/", views.updateItem, name="update_item"),
    path("product_view/<int:myid>/", views.product_view, name="product_view"),
    path("search/", views.search, name="search"),
    path("contact/", views.contact, name="contact"),
    path("loggedin_contact/", views.loggedin_contact, name="loggedin_contact"),

    path("register/", views.register, name="register"),
    path("change_password/", views.change_password, name="change_password"),
    path("login/", views.Login, name="login"),
    path("logout/", views.Logout, name="logout"),
]
Code Explanation:
Above mentioned are the app urls. Hence, create a file for the urls inside the app. The last three urls are for the user authentication that is register, login and logout. The other urls consist of the entire project.
1. Home Page (index.html):
<div class="container mt-2 mb-3">
<div class="row">
{% for product in products %}
<div class="col-lg-4 my-4">
<div class="card shadow align-items-center" style="width: 20rem; height: 25rem;">
<img src="/media/{{product.image}}" class="card-img-top" style="width: 170px; height: 260px;" alt="...">
<div class="card-body">
<h5 class="card-title">{{product.name}}</h5>
<hr>
{% if request.user.is_authenticated %}
<button data-product="{{product.id}}" data-action="add" class="btn add-btn update-cart"
style="background-color: #8c5d4f; color: white;">Add To Cart</button>
<a href="/product_view/{{product.id}}/" class="btn btn-outline-secondary">View</a>
{% else %}
<button class="btn" style="background-color: #8c5d4f; color: white;">Login to add the item</button>
{% endif %}
<h4 style="display: inline-block; float: right;"> ₹{{product.price}}</h4>
</div>
</div>
</div>
{% endfor %}
</div>
</div>
Views.py:
def index(request):
    data = cartData(request)
    items = data['items']
    order = data['order']
    cartItems = data['cartItems']

    products = Product.objects.all()
    return render(request, "index.html", {'products':products, 'cartItems':cartItems})
Home page with the customer logged in:
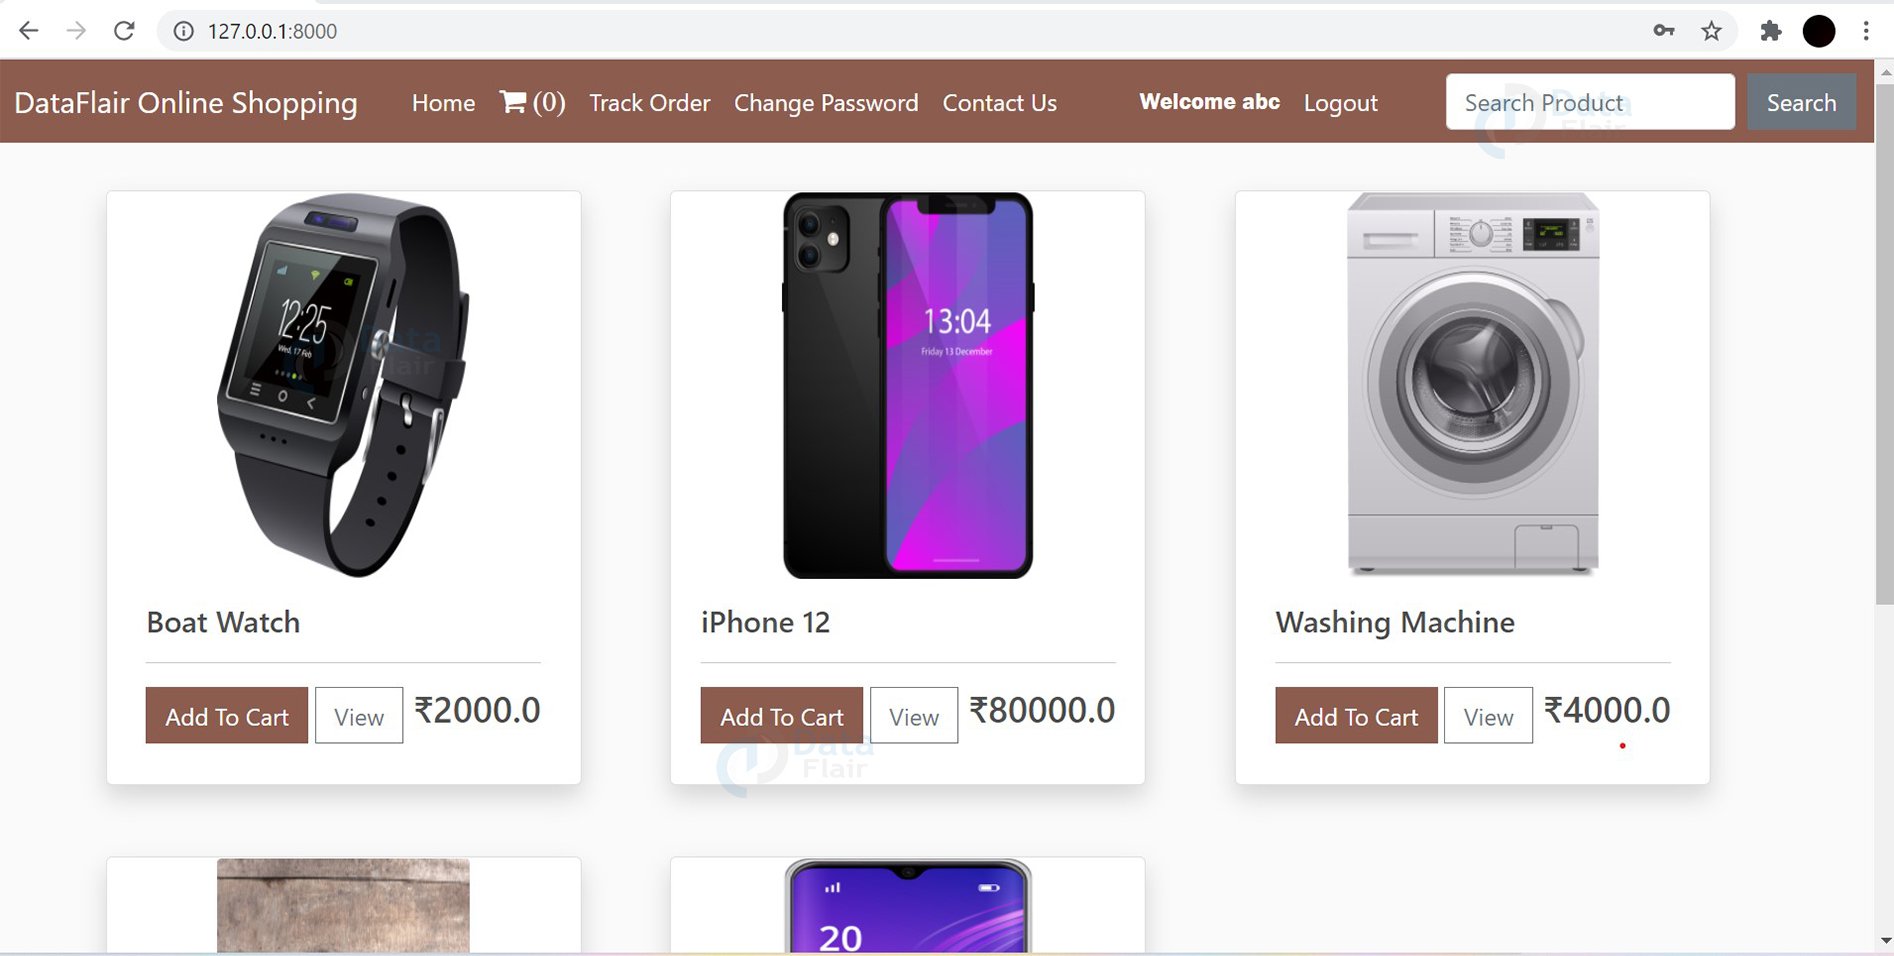
Code Explanation:
From the Product model, using a for loop all the products are displayed on the home screen with the image, name and price of the products. Two buttons are also created, one is for adding the item inside the cart and the other is to view the product. If the customers are not logged in then they are not able to add the item inside their cart. They can just see all the products. On the add to cart button, login to add the item will be written.
2. Search Product functionality (search.html):
<div class="container mt-2 mb-3">

    <div class="row">
        {% for product in products %}
        <div class="col-lg-4 my-4">
            <div class="card shadow" style="width: 20rem; height: 23rem;">
                <img src="/media/{{product.image}}" class="card-img-top" alt="..." height="230px">
                <div class="card-body">
                  <h5 class="card-title">{{product.name}}</h5>
                  <hr>
                  {% if request.user.is_authenticated %}
                  <button data-product="{{product.id}}" data-action="add" class="btn add-btn update-cart" style="background-color: #8c5d4f; color: white;">Add To Cart</button>
                  <a href="/product_view/{{product.id}}/" class="btn btn-outline-success">View</a>
                  {% else %}
                  <button class="btn" style="background-color: #8c5d4f; color: white;">Login to add the item</button>
                  {% endif %}
                  <h4 style="display: inline-block; float: right;">₹{{product.price}}</h4>
                </div>
              </div>
        </div>
        {% endfor %}
    </div>
</div>
{% else %}
<h1>You forgot to search</h1>
{% endif %}
Views.py:
def search(request):
    data = cartData(request)
    items = data['items']
    order = data['order']
    cartItems = data['cartItems']
    if request.method == "POST":
        search = request.POST['search']
        products = Product.objects.filter(name__contains=search)
        return render(request, "search.html", {'search':search, 'products':products, 'cartItems':cartItems})
    else:
        return render(request, "search.html")
Code Explanation:
The customers can directly search for the product that they want on the search option given on the navigation bar. Whatever the customers write on the search bar will be sent through a post request and then saved inside a variable.
search = request.POST['search']
       products = Product.objects.filter(name__contains=search)
Afterwards, from the Product model the product name is filtered to the search value. The result is then displayed in the same cards as on the home page.
3. Product View Page (product_view.html):
<div class="container mt-4">
    <div class="row">
    <div class="col-md-4">
    <div class="row">
<img src="/media/{{product.image}}" alt="" style="width: 300px; height: 400px;">
    </div>
    <br>
    <div class="row">
        <button data-product="{{product.id}}" data-action="add" class="btn add-btn update-cart"
        style="background-color: #8c5d4f; color: white; width: 15rem;">Add To Cart</button>    </div>
</div>
<div class="col-md-8">
    <h3>{{product.name}}</h3>
    <p style="font-size: 25px;"><b>₹ {{product.price}}</b></p>
    <br>
    <h5>Key Features:</h5>
    <ul>
        {% for i in feature %}
        <li>{{i.feature}}</li>
        {% endfor %}
    </ul>
    <br>
      <h2>Add Reviews Here</h2>
      <form method="POST" action="/product_view/{{product.id}}/"> {% csrf_token %}
            <div class="form-floating">
                  <textarea class="form-control" placeholder="Leave a comment here" id="floatingTextarea2"
                        style="height: 100px" id="content" name="content"></textarea>
                  <label for="floatingTextarea2">Leave a feedback about the {{product.name}} here.</label>
                  <br>
                  <button type="submit" class="btn btn-primary">Add Review</button>
            </div>
      </form>
</div>
</div>
<div class="container mt-2">
          <h2>All Reviews ({{reviews.count}})</h2>

          {% for review in reviews %}
          <div class="card">
                <div class="card-header">
                      <span style="font-size: 22px;">{{review.customer}} </span> <span
                            style="font-size: 12px;">{{review.datetime | naturaltime}}</span>
                </div>
                <div class="card-body">
                      <h6 class="card-text">{{review.content}}</h6>
                </div>
          </div>
          <br>
          {% endfor %}
    </div>
</div>
</div>
Views.py:
def product_view(request, myid):
    product = Product.objects.filter(id=myid).first()
    feature = Feature.objects.filter(product=product)
    reviews = Review.objects.filter(product=product)
    data = cartData(request)
    items = data['items']
    order = data['order']
    cartItems = data['cartItems']

    if request.method=="POST":
        content = request.POST['content']
        review = Review(customer=customer, content=content, product=product)
        review.save()
        return redirect(f"/product_view/{product.id}")
    return render(request, "product_view.html", {'product':product, 'cartItems':cartItems, 'feature':feature, 'reviews':reviews})
Product View:
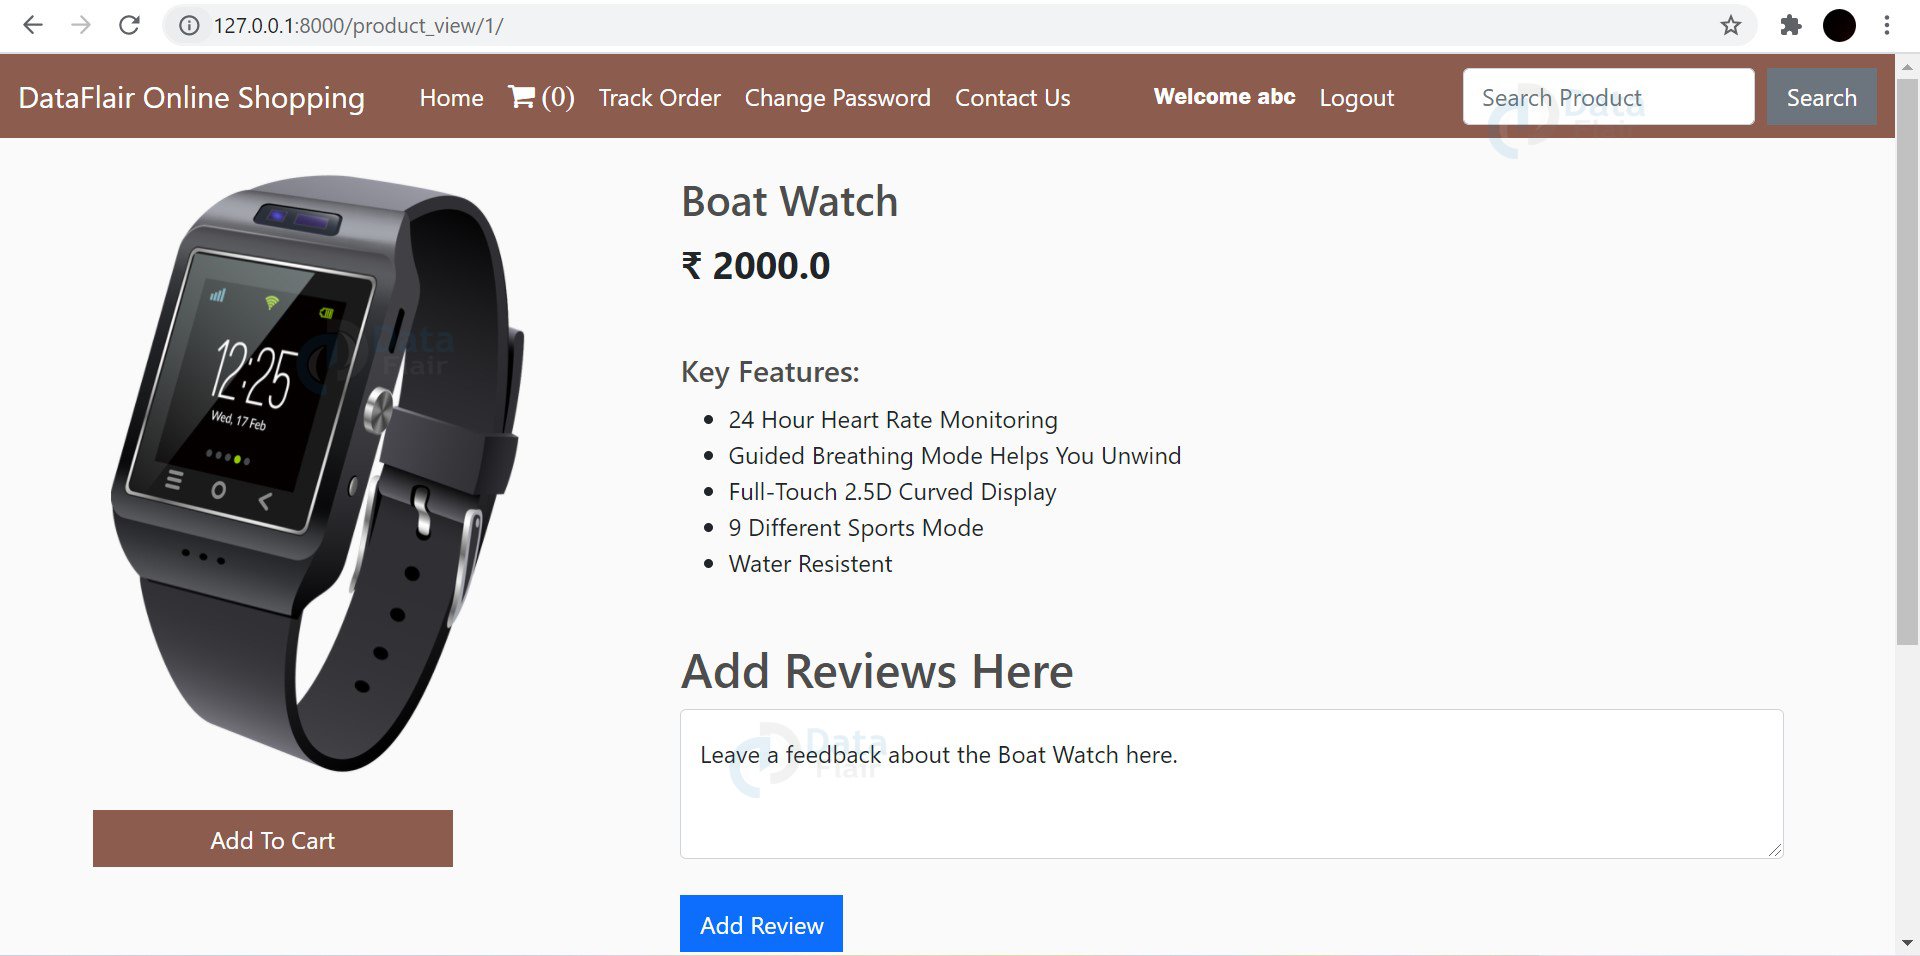
Code Explanation:
After clicking on the view button, the customers can view the specific product with their key features and reviews. After reading the key features and the reviews about the product, the customer can buy the product by clicking on the add to cart button. The customer who has brought that specific product can write their review about the product which the other customer is able to read.
4. Cart Page (cart.html):
<div class="container-fluid row">
<div class="col-lg-12">
<div class="box-element">
<a href="/" class="btn btn-outline-dark">← Continue Shopping</a>
<br><br>
<table class="table">
<tr>
<th>
<h5>Items: <strong>{{order.get_cart_items}}</strong></h5>
</th>
<th>
<h5>Total: <strong>₹{{order.get_cart_total}}</strong></h5>
</th>
<th><a href="/checkout/" class="btn btn-success" style="float: right; margin: 5px;">Checkout</a>
</th>
</tr>
</table>
</div>
<br>
<div class="box-element">
<div class="cart-row">
<div style="flex: 2;"><strong>Image</strong></div>
<div style="flex: 2;"><strong>Item</strong></div>
<div style="flex: 1;"><strong>Price</strong></div>
<div style="flex: 1;"><strong>Quantity</strong></div>
<div style="flex: 1;"><strong>Total</strong></div>
</div>
{% for item in items %}
<div class="cart-row">
<div style="flex: 2;"><img class="row-image" src="{{item.product.image.url}}" alt=""></div>
<div style="flex: 2;">{{item.product.name}}</div>
<div style="flex: 1;">₹{{item.product.price}}</div>
<div style="flex: 1;">
<p class="quantity">{{item.quantity}}</p>
<div class="quantity">
<img data-product="{{item.product.id}}" data-action="add" src="{% static 'up-arrow.png' %}" class="chg-quantity update-cart" alt="">
<img data-product="{{item.product.id}}" data-action="remove" src="{% static 'down-arrow.png' %}" class="chg-quantity update-cart" alt="">
</div>
</div>
<div style="flex: 1;">₹{{item.get_total}}</div>
</div>
{% endfor %}
</div>
</div>
</div>
Views.py:
def cart(request):
    data = cartData(request)
    items = data['items']
    order = data['order']
    cartItems = data['cartItems']
    try:
        cart = json.loads(request.COOKIES['cart'])
    except:
        cart = {}
    print('Cart:', cart)

    for i in cart:
        try:
            cartItems += cart[i]["quantity"]

            product = Product.objects.get(id=i)
            total = (product.price * cart[i]["quantity"])

            order["get_cart_total"] += total
            order["get_cart_items"] += cart[i]["quantity"]

            item = {
                'product':{
                    'id':product.id,
                    'name':product.name,
                    'price':product.price,
                    'image':product.image,
                },
                'quantity':cart[i]["quantity"],
                'get_total':total
            }
            items.append(item)
        except:
            pass
    return render(request, "cart.html", {'items':items, 'order':order, 'cartItems':cartItems})
Cart Page:
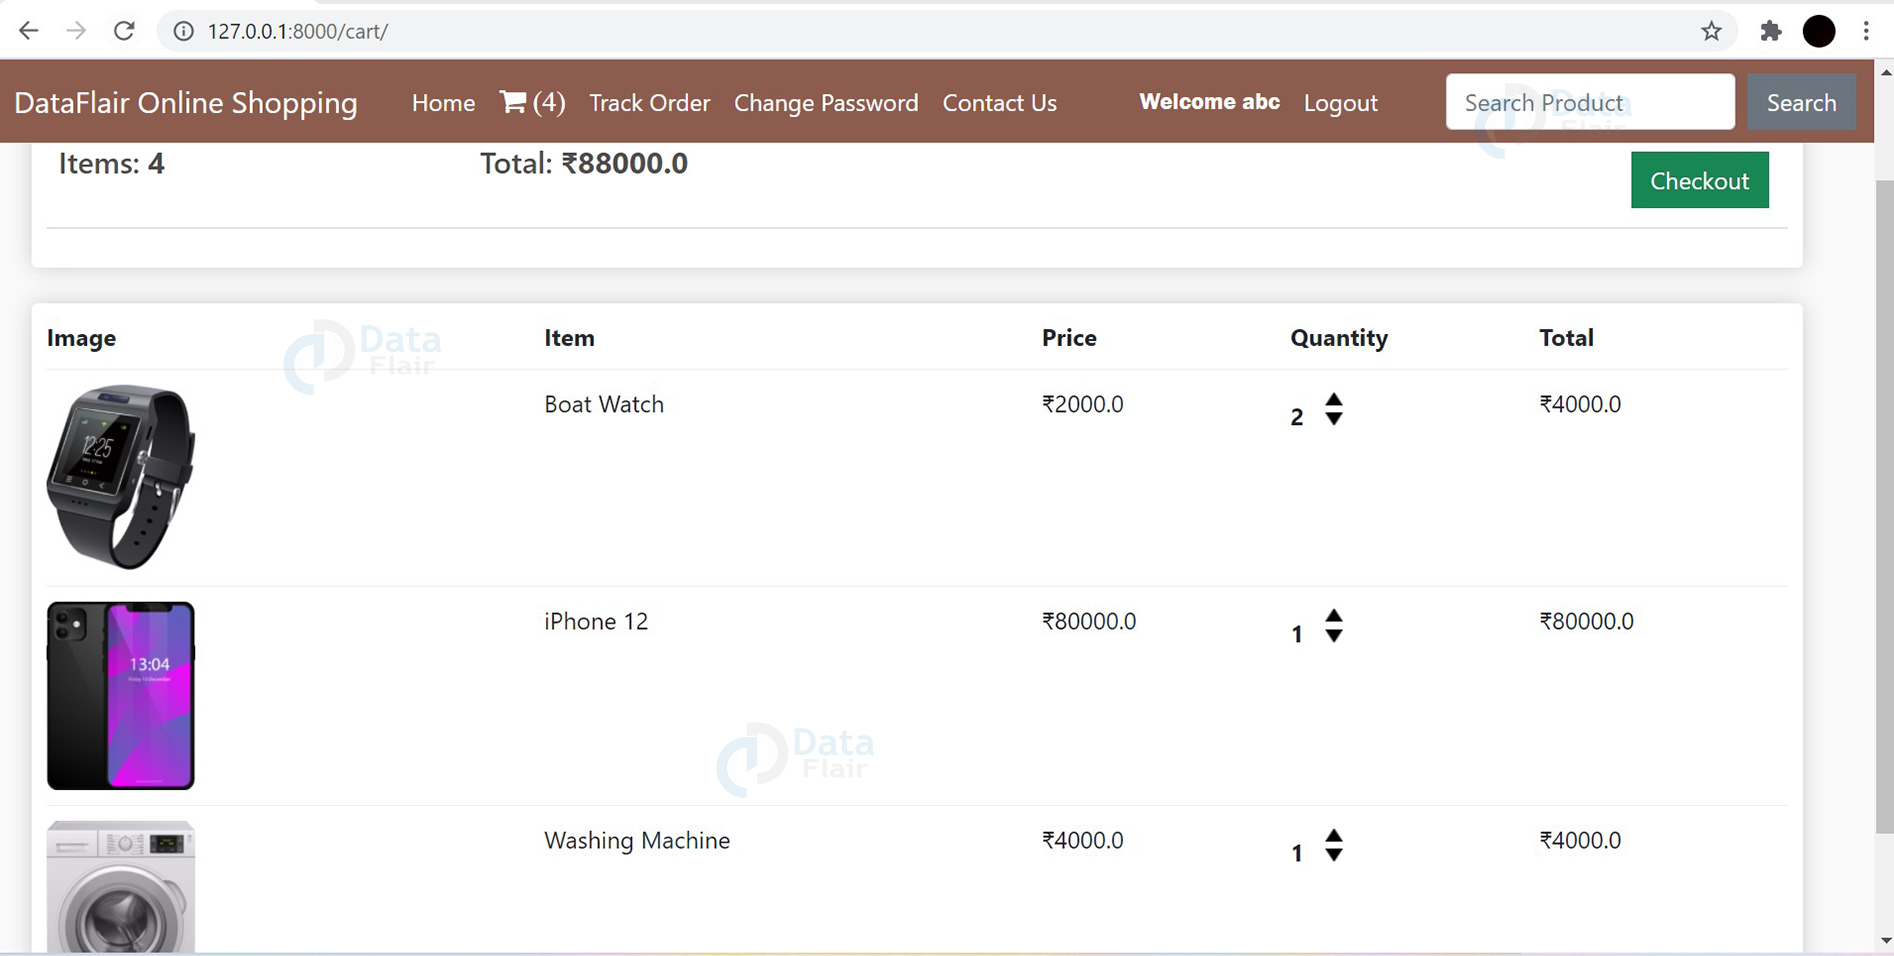
Code Explanation:
By clicking on the shopping cart icon on the navigation bar, customers can see all the added items in the cart. The users can then increase or decrease the quantity of the products according to their requirements.
5. Checkout Page (checkout.html):
<div class="container-fluid row">
    <div class="col-lg-12">
        <div class="box-element">
            <a class="btn btn-outline-dark" href="/cart/">← Back to Cart</a>
            <hr>
            <h3>Order Summary</h3>
            <hr>
            {% for item in items %}
            <div class="cart-row">
                <div style="flex:2"><img class="row-image" src="{{item.product.image.url}}"></div>
                <div style="flex:2">
                    <p>{{item.product.name}}</p>
                </div>
                <div style="flex:1">
                    <p>₹{{item.product.price}}</p>
                </div>
                <div style="flex:1">
                    <p>x{{item.quantity}}</p>
                </div>
            </div>
            {% endfor %}
            <h5>Items: {{order.get_cart_items}}</h5>
            <h5>Total: ₹{{order.get_cart_total}}</h5>
        </div>
    </div>
    <div class="col-lg-12">
        <div class="box-element" id="form-wrapper">
            <form method="POST"> {% csrf_token %}
                <div id="shipping-info">
                    <hr>
                    <h4>Checkout Details:</h4>
                    <hr>
                    <div class="">
                        <input class="form-control" type="text" name="address" placeholder="Address..">
                    </div>
                    <div class="form-field">
                        <input class="form-control" type="text" name="city" placeholder="City..">
                    </div>
                    <div class="form-field">
                        <input class="form-control" type="text" name="state" placeholder="State..">
                    </div>
                    <div class="form-field">
                        <input class="form-control" type="text" name="zipcode" placeholder="Zip code..">
                    </div>
                    <div class="form-field">
                        <input class="form-control" type="text" name="phone_number" placeholder="Phone Number..">
                    </div>
                </div>
                <hr>
                <input type="submit" value="Place Order" id="form-button" class="btn btn-success">
            </form>

        </div>
        <br>
    </div>
</div>
Views.py:
def checkout(request):
    data = cartData(request)
    items = data['items']
    order = data['order']
    cartItems = data['cartItems']
    total = order.get_cart_total
    if request.method == "POST":
        address = request.POST['address']
        city = request.POST['city']
        state = request.POST['state']
        zipcode = request.POST['zipcode']
        phone_number = request.POST['phone_number']
        payment = request.POST['payment']
        shipping_adress = CheckoutDetail.objects.create(address=address, city=city, phone_number=phone_number, state=state, zipcode=zipcode, customer=customer, total_amount=total, order=order, payment=payment)
        shipping_adress.save()
        if total == order.get_cart_total:
            order.complete = True
        order.save()
        alert = True
        return render(request, "checkout.html", {'alert':alert})
    return render(request, "checkout.html", {'items':items, 'order':order, 'cartItems':cartItems})
Code Explanation:
Then finally on the checkout page the customer can see their order summary before placing the order which is very much important. At last, the customers need to fill in the checkout details that includes the exact address, city, zip code etc and also choose the mode of payment. Then the customers can place their orders.
6. Change Password (change_password.html):
<form class="container mt-3" method="POST" name="change_password" onsubmit="return checkPassword()">
    {% csrf_token %}
    <div class="row mt-4">
        <div class="form-group col-md-6">
            <label><i style="font-weight: bold;">Username</i></label>
            <input type="text" class="form-control mt-2" name="username" value="{{request.user}}" readonly>
        </div>
        <div class="form-group col-md-6">
            <label><i style="font-weight: bold;">Current Password</i></label>
            <input type="password" class="form-control mt-2" name="current_password" placeholder="Current Password">
        </div>
    </div>

    <div class="row mt-4">
        <div class="form-group col-md-12">
            <label><i style="font-weight: bold;">New Password</i></label>
            <input type="password" class="form-control mt-2" name="new_password" placeholder="Enter the new password">
        </div>
    </div>

    <div class="row mt-4">
        <div class="form-group col-md-12">
            <label><i style="font-weight: bold;">Confirm Password</i></label>
            <input type="password" class="form-control mt-2" name="confirm_password" placeholder="Confirm the new password">
        </div>
    </div>
    <input type="submit" class="btn mt-3" style="background-color: #8c5d4f; color: white;">
</form>
Views.py:
def change_password(request):
    if not request.user.is_authenticated:
        return redirect('/login')
    data = cartData(request)
    items = data['items']
    order = data['order']
    cartItems = data['cartItems']
    if request.method == "POST":
        current_password = request.POST['current_password']
        new_password = request.POST['new_password']
        try:
            u = User.objects.get(id=request.user.id)
            if u.check_password(current_password):
                u.set_password(new_password)
                u.save()
                alert = True
                return render(request, "change_password.html", {'alert':alert})
            else:
                currpasswrong = True
                return render(request, "change_password.html", {'currpasswrong':currpasswrong})
        except:
            pass
    return render(request, "change_password.html", {'cartItems':cartItems})
Code Explanation:
All the customers can change their password by going to the change password option. To check the current password (check_password) method is used and (set_password) method is used to set the new password as current password.
7. Contact Us (contact.html):
<div class="container py-2 mt-3">
    <h2>Contact Us</h2>
    <form method="post">{% csrf_token %}
 <div class="form-group mt-2">
   <label>Name</label>
   <input type="text" class="form-control mt-2" id="name" name="name" placeholder="Enter Your Name">
 </div>
         <div class="form-group mt-2">
   <label>Email</label>
   <input type="email" class="form-control mt-2" id="email" name="email" placeholder="Enter Your Email">
 </div>
         <div class="form-group mt-2">
   <label>Phone</label>
   <input type="number" class="form-control mt-2" id="phone" name="phone" placeholder="Enter Your Phone Number">
 </div>
         <div class="form-group">
  <div class="form-group mt-2">
   <label>How May We Help You ?</label>
   <textarea class="form-control mt-2" id="desc" name="desc" rows="3"></textarea>
 </div>
 <button type="submit" style="background-color: #8c5d4f; color: white; width: 8rem;" class="btn mt-4">Submit</button>
</form>
Views.py:
def contact(request):
    if request.method=="POST":
        name = request.POST['name']
        email = request.POST['email']
        phone = request.POST['phone']
        desc = request.POST['desc']
        contact = Contact(name=name, email=email, phone=phone, desc=desc)
        contact.save()
        alert = True
        return render(request, 'contact.html', {'alert':alert})
    return render(request, "contact.html")
Code Explanation:
The customers can ask their queries or can contact us by filling a small form. There are two different forms one for the logged in users and others who haven’t registered themselves but want to contact us. If the user is a logged in user then the user just have to write the message directly else the user needs to first give his name, email and phone before contacting.
8. Track Order (tracker.html):
<div class="container py-5">
    <div class="col mt-4">
        <h2>Enter your Order Id to track your order.</h2>
        <form method="post">{% csrf_token %}
            <div class="form-row">
                <div class="form-group col-md-6">
                    <input type="number" class="form-control mt-3" name="order_id" placeholder="Order Id">
                </div>
                <button type="submit" class="btn btn-primary mt-4">Track Order</button>
            </div>
    </div>
    <div class="col my-4">
        <h4>Order Items:</h4>
        <div class="my-4">
            {% for i in order_items %}
            <ol class="list-group">
                <li class="list-group-item d-flex justify-content-between ">
                  <div class="ms-2 me-auto">
                    <div class="fw-bold">{{forloop.counter}}. {{i.product}}</div>
                  </div>
                  <span class="badge bg-primary rounded-pill">Qty: {{i.quantity}}</span>
                </li>
              </ol>
            {% endfor %}

        </div>
        <h4>Your Order Details:</h4>
        <div class="my-4">
            {% for i in update_order %}
            <ol class="list-group">
                <li class="list-group-item d-flex justify-content-between ">
                  <div class="ms-2 me-auto">
                    <div class="fw-bold">{{i.desc}}</div>
                  </div>
                  <span class="badge bg-primary rounded-pill">Date: {{i.date}}</span>
                </li>
              </ol>
            {% endfor %}
        </div>
    </div>
</div>
Views.py:
def tracker(request):
    if not request.user.is_authenticated:
        return redirect('/login')
    data = cartData(request)
    items = data['items']
    order = data['order']
    cartItems = data['cartItems']
    if request.method == "POST":
        order_id = request.POST['order_id']
        order = Order.objects.filter(id=order_id).first()
        order_items = OrderItem.objects.filter(order=order)
        update_order = UpdateOrder.objects.filter(order_id=order_id)
        print(update_order)
        return render(request, "tracker.html", {'order_items':order_items, 'update_order':update_order})
    return render(request, "tracker.html", {'cartItems':cartItems})
Code Explanation:
After placing the required order you will get an order id. That id can be further used for tracking the order. In the track order menu you have to give your order id for viewing the status of the order.
Summary:
We have successfully developed an Online Shopping System in Python Django Framework. With this project, I think you will be understanding and loving Django a lot more. You can download the entire source code which is mentioned at the start of the project.
Your 15 seconds will encourage us to work even harder
Please share your happy experience on Google


sir i want database for above case could you please provide it
in want to built an website .
hey, i just log on in server with a user i created in terminal and we have RelatedObjectDoesNotExist at /
User has no customer here. please help
what will be the admin id password for change the data
bro u create ur own admin id and password
using following command
python manage.py createsuperuser
give me report pdf n ppt and how run this source code in my pc
Sir I want the above one in dbms please provide it sourcecodes