Automate Linkedin Connections with Python
Master Python with 70+ Hands-on Projects and Get Job-ready - Learn Python
LinkedIn is a social platform for professional networking where people network with other people as well as exhibit their skills by demonstrating projects and sharing their accomplishments. Connecting with other people or Networking is a key use of LinkedIn since networking gives more room for knowledge sharing. Now we can see a way to automate linkedin connections using python
Python Automate LinkedIn connections project:
To automate LinkedIn connections using python, we make use of the library selenium.
Project Prerequisites:
The project requires certain libraries which can be installed using pip as follows:
- Selenium: pip install selenium
Understanding the HTML layout of the websites will be of help to code.
Download Automating Linkedin Connections Project Code:
Please download the source code for automating linkedIn connections using python from the following link: Automate Linkedin Connections Project
Project File Structure:
Below is the flow of the Automate Linkedin Connections project.
1. Importing necessary library
2. Declaring functions to login and connect with people
3. Initialising the browser and calling functions
1. Importing libraries:
#DataFlair's Guide to Automating LinkedIn Connections using Python
#Import libraries
from selenium import webdriver
Code Explanation:
- from selenium import webdriver: To automate the process, we use selenium. Selenium controls a web browser and performs the functions such as clicking on buttons or sending text to be filled in login forms and so on. To use a browser, we import webdriver from selenium. For further reading: selenium docs
2. Declaring functions to login and connect with people:
NOTE: To webscrape and understand the given code snippets properly, open the website in another tab and put your mouse cursor at the desired area, which can be input areas, icons etc and right click. In the menu, you will find Inspect Element or just Inspect. That is how we obtain the details for the input fields discussed below.
NOTE 2: To find the path of any element, after selecting inspect, right click on the tag the console shows to you after you select inspect. From the menu, you can choose ‘Copy Path’ and it will display the various options.
def login_to_linkedin():
#Find username
Username=browser.find_element_by_name("session_key")
#Send username details
Username.send_keys("enter username")
#Find password
password=browser.find_element_by_name("session_password")
#Send password details
password.send_keys("enter password")
#Submit button
browser.find_element_by_xpath("//button[@type='submit']").click()
Code Explanation:
- def login_to_linkedin(): Function to login to linkedIn
- Username=browser.find_element_by_name(“session_key”): The username input is given with the name ‘session_key’. Hence we give the same to place our control in the textbox.
- Username.send_keys(“enter username”): Using send_keys, we send the credentials to the textbox so it can be placed in the input area.
The same holds for password field - browser.find_element_by_xpath(“//button[@type=’submit’]”).click(): Now that we have sent the credentials to the login form, we now have to hit submit to login. To do that, we click on the ‘sign in’ button which is of type submit using xpath.
Note: find_element_by_name can be helpful when the input field or icon we want to select has a unique name that no other widget can share. On the other hand, xpath can be useful when the same HTML path is shared by many elements with few changes.
def navigate_to_network_and_connect():
#Navigate to the network page
browser.find_element_by_xpath('//*[@id="ember21"]').click()
#Cause a delay so it does not throw an error
browser.implicitly_wait(5)
#Select 'See All' browser.find_element_by_xpath('/html/body/div[6]/div[3]/div/div/div/div/div[2]/div/div/main/ul/li[1]/div/button/span').click()
#Obtain the number of items containing the same path
elements = browser.find_elements_by_xpath('/html/body/div[3]/div/div/div[2]/section/div/ul/li')
for i in range(1,len(elements)+2):
#Send connection request
browser.find_element_by_xpath('/html/body/div[3]/div/div/div[2]/section/div/ul/li[{}]/div/section/div[2]/footer/button/span'.format(str(i))).click()
#Connections send to 13 people at a time
print('Connection request sent to person {}'.format(str(i)))
#Cause a time delay before progressing to next person
browser.implicitly_wait(1)
Code Explanation:
- def navigate_to_network_and_connect(): To connect with people, we create this function
- browser.find_element_by_xpath(‘//*[@id=”ember21″]’).click(): To connect with people, we need to move to the page where the suggestions for connections are given.
- browser.implicitly_wait(5): An error will pop up if selenium tries to access a HTML component before the webpage loads, thus terminating our program. To avoid that, we give a delay using this function for 5 seconds. An alternative is time.sleep(seconds) which requires time package.
browser.find_element_by_xpath().click(): The network page of linkedin contains people, pages and events. Thus to use only people, we select the option ‘See All’ - elements: To get an idea of how many connections are present at a time, we find elements that contain a similar HTML path using find_elements_by_xpath.
- for i in range(1,len(elements)+1): To provide connections request, we use a loop starting from 1 upto the last index, 12
- browser.find_element_by_xpath().click(): Click the connect button in the profile of various people
- browser.implicitly_wait(1): A delay to wait for 1 second before connecting/clicking on the connect button of another person’s profile.
3. Initialising the browser and calling functions:
#Open the webbrowser and use it for autonomous control
browser = webdriver.Firefox(executable_path='/home/deepika/Downloads/internship/instagram/geckodriver')
#Open the URL in the opened webbrowser
browser.get('https://www.linkedin.com/login?fromSignIn=true&trk=guest_homepage-basic_nav-header-signin')
#Start using the functions after a delay
browser.implicitly_wait(5)
#Call all the functions in order based on webpages
login_to_linkedin()
navigate_to_network_and_connect()
Code explanation:
- browser = webdriver.Firefox(): To automate sending connections using python, we need a browser with autonomous control. Thus we use firefox with the executable_path set to the .exe file which is nothing but the driver for the web browser. Firefox uses Geckodriver and chrome uses its own driver. Check for version compatibility when using the browsers and their driver files
- browser.get(‘’): In the browser we have opened autonomously, we now make it open the login page of linkedin.
- browser.implicitly_wait(5): Before calling the functions, the browser must load with the website. So we give a delay using implicitly_wait(). This is analogous to time.sleep()
- login_to_linkedin(), navigate_to_network_and_connect(): Call functions in the order of the webpages.
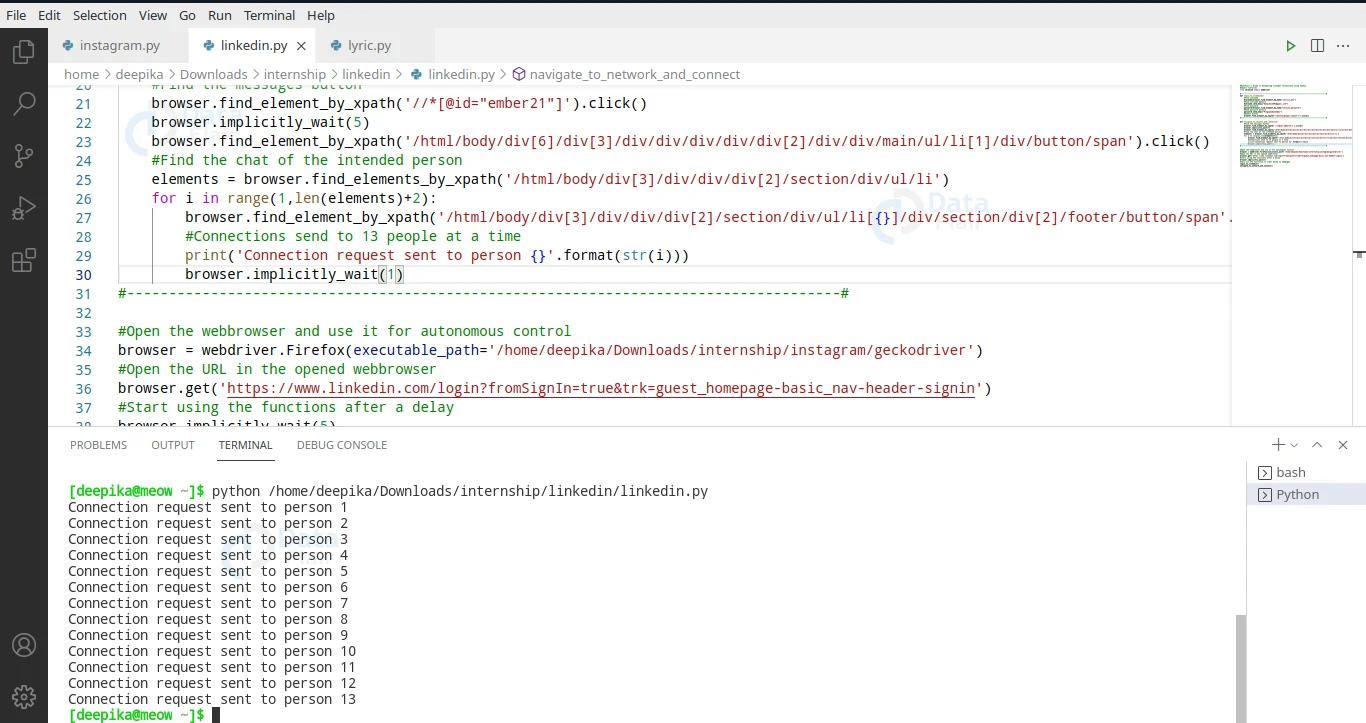
Python Automate Linkedin Connections Output:
Run the python linkedin bot program and view your output
Summary
Thus we found a way to automate sending of connection requests to people on linkedin using python. This project is a great introduction to web scraping and is ideal for a beginner to try.
If you are Happy with DataFlair, do not forget to make us happy with your positive feedback on Google


