Generate PDF Invoices Using Python
Python course with 57 real-time projects - Learn Python
An Invoice Generator is an application that helps you to create invoices and notes under the standard format. It keeps all the information about the product, it also has information regarding payments for the product and interacts with customers. Let’s develop invoice generator project using Python and its modules.
About Python Invoice Generator Project
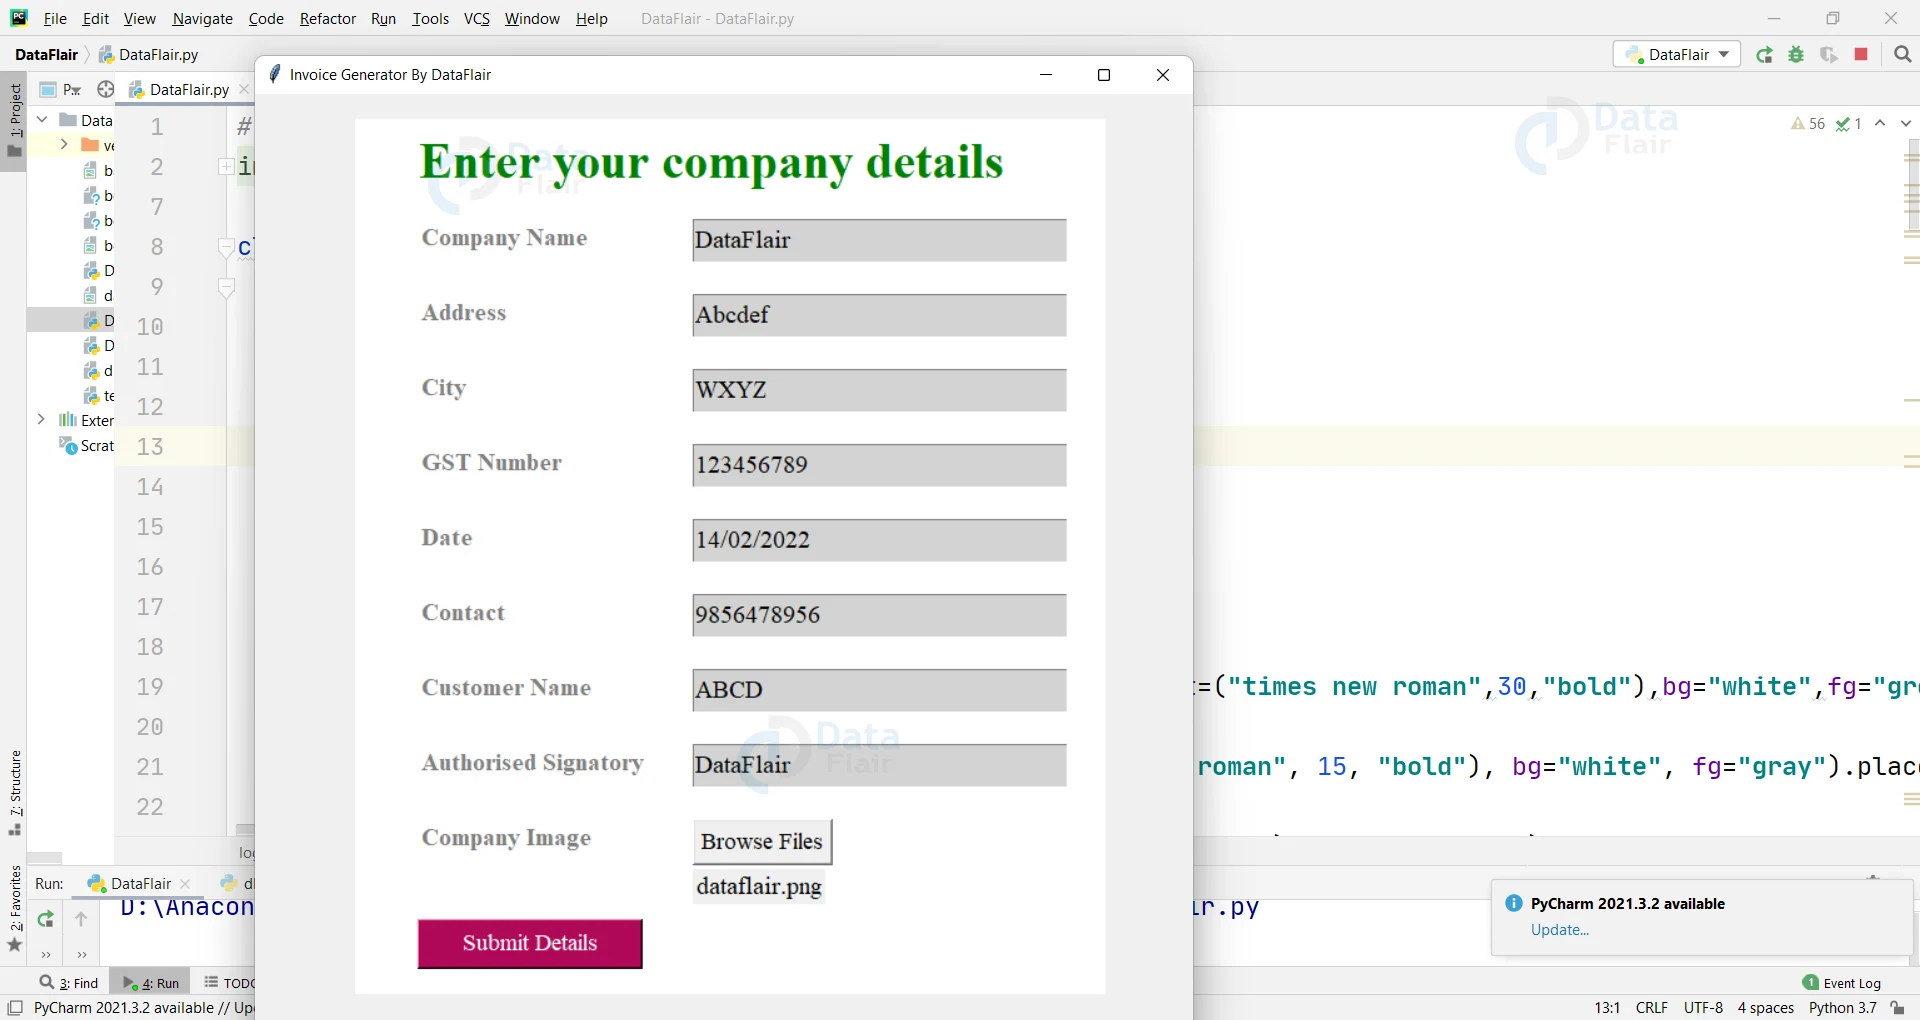
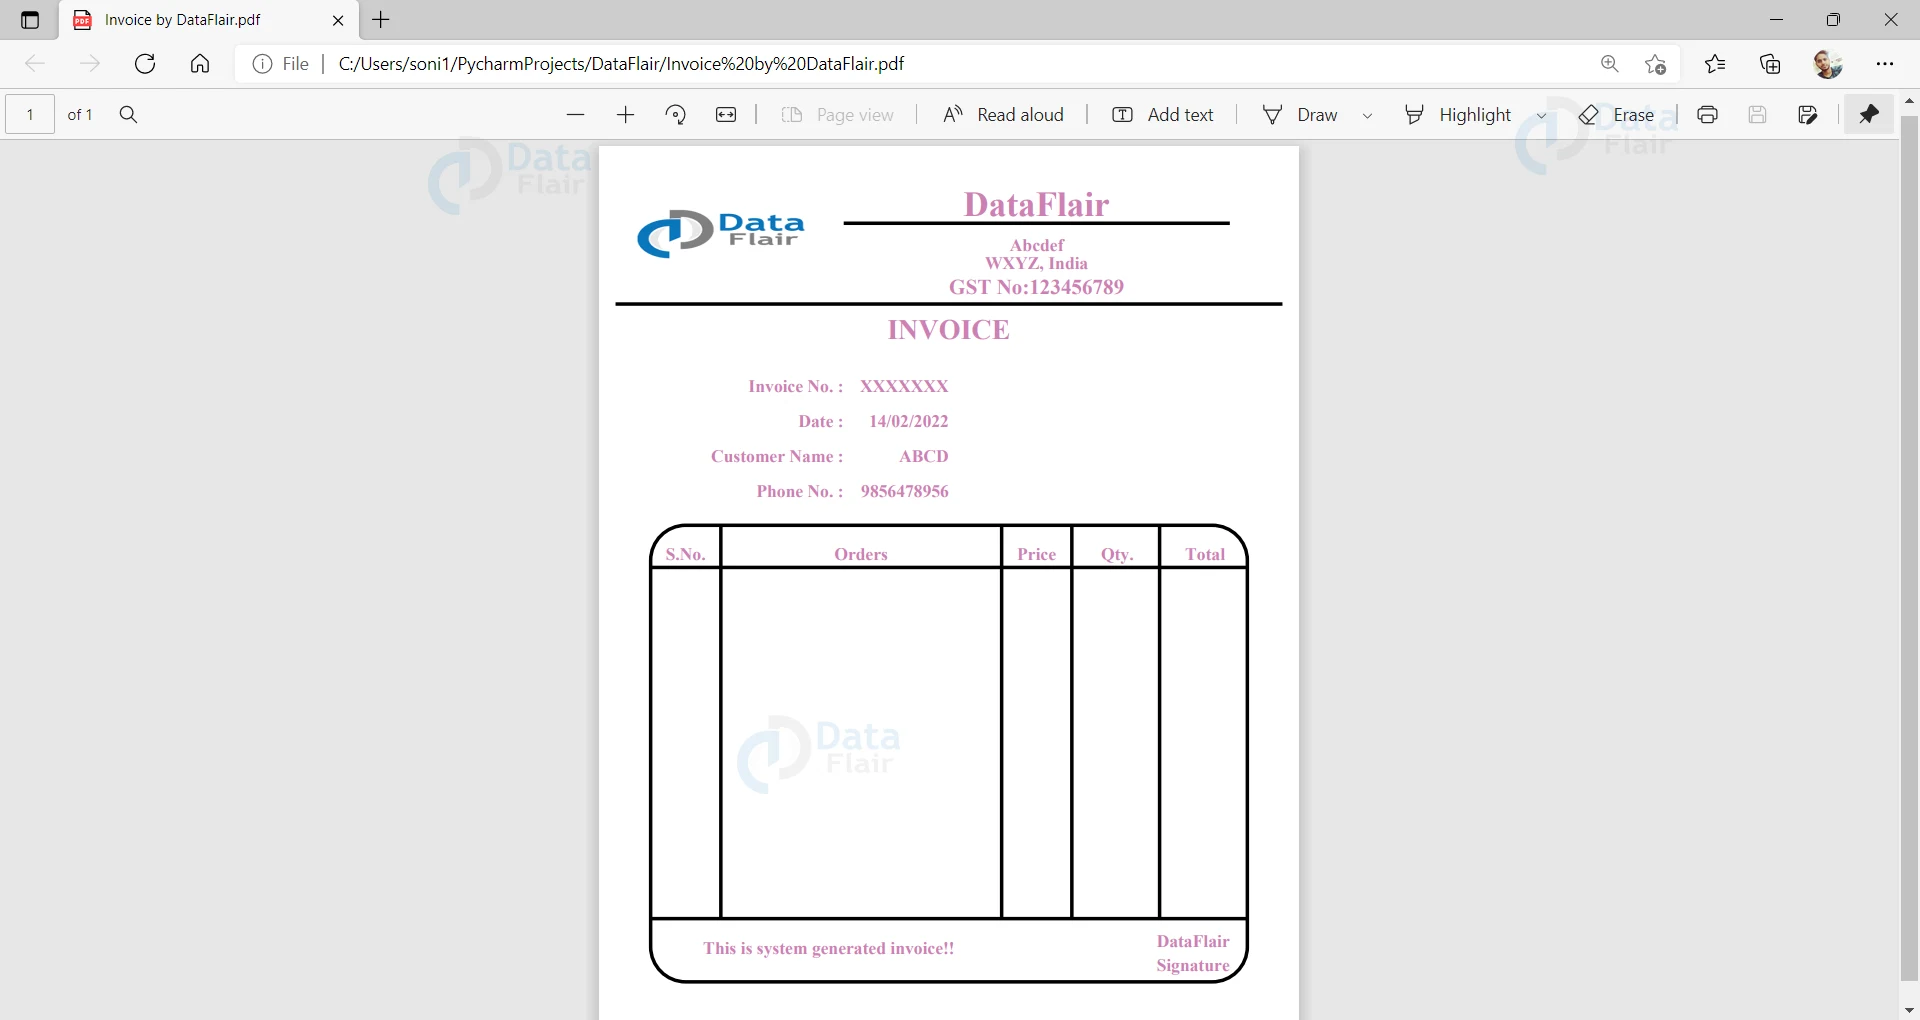
The objective of the project is to create an Invoice Generator in Python. In this project, we will create a user interface to get all the details of the company including its address, GST number, location, authorized signature for invoice and then generate the Invoice in pdf format.
Prerequisites
To develop this project we need a basic knowledge of some models like tkinter, os, and reportlab.pdfgen.
- tkinter – for use Interface(UI)
- os – provides functions for creating and removing a directory (folder), fetching its contents, changing and identifying the current directory, etc.
- reportlab.pdfgen – this library lets you directly create documents in Adobe’s Portable Document Format (PDF) using the Python programming language
Download Python Invoice Generator Project Code
Please download the full source code of python invoice generator: Invoice Generator Project Code
Steps to create Python Invoice Generator
Let’s see the steps to create Python Invoice Generator
- First import all the necessary modules.
- Create a display window for our generator.
- After getting all the details from the user, create a function that will accept all the details and generate an invoice in pdf format.
Python Invoice Generator Project File Structure
- Importing modules
- Creating display function
- Defining Functions
- Calling main function
1. Importing Modules
We will first import all the necessary libraries required for this project.
# ==== Importing all the necessary libraries for Python Invoice Generator Project

import os
import tkinter as tk
from tkinter import *
from reportlab.pdfgen import canvas
from tkinter import filedialog
2. Create Display Window
We will create a main class which is named as Invoice Generator, where we create an initiator function in which we pass the root of the interface. Now, we set the title, geometry, background image, frames and buttons for the decent user interface.
# ==== creating main class
class InvoiceGenerator:
   def __init__(self,root):
       self.root = root
       self.root.title("Invoice Generator By DataFlair")
       self.root.geometry("750x800")

       # creating frame in window

       self.frame=Frame(self.root,bg="white")
       self.frame.place(x=80,y=20, width=600, height=700)

       Label(self.frame,text="Enter your company details ",font=("times new roman",30,"bold"),bg="white",fg="green",bd=0).place(x=50,y=10)

       Label(self.frame, text="Company Name", font=("times new roman", 15, "bold"), bg="white", fg="gray").place(
           x=50, y=80)
       self.company_name=Entry(self.frame,font=("times new roman",15),bg="light grey")
       self.company_name.place(x=270,y=80,width=300,height=35)

       Label(self.frame, text="Address", font=("times new roman", 15, "bold"), bg="white", fg="gray").place(
           x=50, y=140)
       self.address= Entry(self.frame, font=("times new roman", 15), bg="light grey")
       self.address.place(x=270, y=140, width=300,height=35)

       Label(self.frame, text="City", font=("times new roman", 15, "bold"), bg="white", fg="gray").place(
           x=50, y=200)
       self.city = Entry(self.frame, font=("times new roman", 15), bg="light grey")
       self.city.place(x=270, y=200, width=300, height=35)

       Label(self.frame, text="GST Number", font=("times new roman", 15, "bold"), bg="white", fg="gray").place(
           x=50, y=260)
       self.gst = Entry(self.frame, font=("times new roman", 15), bg="light grey")
       self.gst.place(x=270, y=260, width=300, height=35)

       Label(self.frame, text="Date", font=("times new roman", 15, "bold"), bg="white", fg="gray").place(
           x=50, y=320)
       self.date = Entry(self.frame, font=("times new roman", 15), bg="light grey")
       self.date.place(x=270, y=320, width=300, height=35)

       Label(self.frame, text="Contact", font=("times new roman", 15, "bold"), bg="white", fg="gray").place(
           x=50, y=380)
       self.contact = Entry(self.frame, font=("times new roman", 15), bg="light grey")
       self.contact.place(x=270, y=380, width=300, height=35)

       Label(self.frame, text="Customer Name", font=("times new roman", 15, "bold"), bg="white", fg="gray").place(
           x=50, y=440)
       self.c_name = Entry(self.frame, font=("times new roman", 15), bg="light grey")
       self.c_name.place(x=270, y=440, width=300, height=35)

       Label(self.frame, text="Authorized Signatory", font=("times new roman", 15, "bold"), bg="white", fg="gray").place(
           x=50, y=500)
       self.aus = Entry(self.frame, font=("times new roman", 15), bg="light grey")
       self.aus.place(x=270, y=500, width=300, height=35)

       Label(self.frame, text="Company Image", font=("times new roman", 15, "bold"), bg="white", fg="gray").place(
           x=50, y=560)

       # ==== Browse File
       Button(self.frame, text="Browse Files", font=("times new roman", 14), command=self.browse).place(x=270, y=560)

       # ====submit details
       Button(self.frame, text = "Submit Details",command = self.generate_invoice, font = ("times new roman", 14),fg = "white",cursor = "hand2", bg = "#B00857").place(x = 50, y = 640, width = 180, height = 40)
3. Defining functions
In this part we’ll discuss all the necessary functions which are required to complete our projects. We’ll see the use of each function separately and how it’ll work.
i. browse() –
This function will browse the image file from the document and then pass that image file location to generate_invoice function to use it in Invoice.
# ==== Browse Function
def browse(self):
    self.file_name = filedialog.askopenfilename(title="Select a File")
    Label(self.frame, text=os.path.basename(self.file_name), font=("times new roman", 15)).place(x=270, y=600)
ii. generate_invoice() – This function will generate an invoice with all the details given by the user with the help of canvas module.
# ==== Invoice Generation Function
  def generate_invoice(self):
      c = canvas.Canvas("Invoice by DataFlair.pdf", pagesize=(200, 250), bottomup=0)
      c.setFillColorRGB(0.8, 0.5, 0.7)

      c.line(70, 22, 180, 22)
      c.line(5, 45, 195, 45)
      c.line(15, 120, 185, 120)
      c.line(35, 108, 35, 220)
      c.line(115, 108, 115, 220)
      c.line(135, 108, 135, 220)
      c.line(160, 108, 160, 220)
      c.line(15, 220, 185, 220)

      c.translate(10, 40)
      c.scale(1, -1)
      c.drawImage(self.file_name, 0, 0, width=50, height=30)

      c.scale(1, -1)
      c.translate(-10, -40)

      c.setFont("Times-Bold", 10)
      c.drawCentredString(125, 20, self.company_name.get())

      c.setFont("Times-Bold", 5)
      c.drawCentredString(125, 30, self.address.get())
      c.drawCentredString(125, 35, self.city.get() + ", India")
      c.setFont("Times-Bold", 6)
      c.drawCentredString(125, 42, "GST No:"+self.gst.get())

      c.setFont("Times-Bold", 8)
      c.drawCentredString(100, 55, "INVOICE")

      c.setFont("Times-Bold", 5)

      c.drawRightString(70, 70, "Invoice No. :")
      c.drawRightString(100, 70, "XXXXXXX")

      c.drawRightString(70, 80, "Date :")
      c.drawRightString(100, 80, self.date.get())

      c.drawRightString(70, 90, "Customer Name :")
      c.drawRightString(100, 90, self.c_name.get())

      c.drawRightString(70, 100, "Phone No. :")
      c.drawRightString(100, 100, self.contact.get())

      c.roundRect(15, 108, 170, 130, 10, stroke=1, fill=0)

      c.drawCentredString(25, 118, "S.No.")
      c.drawCentredString(75, 118, "Orders")
      c.drawCentredString(125, 118, "Price")
      c.drawCentredString(148, 118, "Qty.")
      c.drawCentredString(173, 118, "Total")

      c.drawString(30, 230, "This is system generated invoice!!")

      c.drawRightString(180, 228, self.aus.get())
      c.drawRightString(180, 235, "Signature")

      c.showPage()
      c.save()
4. Creating main function
In this we’ll create a main function in which we declare the root for our interface and also create the object for our main class named as InvoiceGenerator. Then we will call this main function to execute our project.
# ==== creating main function
def main():
   # ==== create tkinter window
   root = Tk()
   # === creating object for class InvoiceGenerator
   obj = InvoiceGenerator(root)
   # ==== start the gui
   root.mainloop()

if __name__ == "__main__":
   # ==== calling main function
   main()
Output of Python Invoice generator project
Company Details
Generated Invoice
Summary
Hooray! We have successfully designed an Invoice Generator using python, tkinter and reportlab.pdfgen with a decent user interface. I hope you enjoyed the python project by DataFlair!!.
Did you like our efforts? If Yes, please give DataFlair 5 Stars on Google


Does not work..
Sure it does.
I used this script as a start for my invoicing program.
Thank you for this!
Regards,
Michaël