Python Instagram Bot – Automate Instagram Messages
Python course with 57 real-time projects - Learn Python
Millions use instagram to communicate with their friends, own a small business and even do reels to show off their talent. Now automating messages in any platform is just writing a simple code to ‘automatically’ send messages or images to any person or a database, it can be anything. Here we will see one way of sending messages automatically to an instagram user after a timeout. So let’s start the project to Automate Instagram Messages using Python.
Python Automate messages to an instagram user project:
Here, we create a simple project for Automating messages to an instagram user using selenium, requests, beautifulSoup and time library.
Project Prerequisites:
The project requires certain libraries which can be installed using pip as follows:
- Selenium: pip install selenium
- BeautifulSoup: pip install beautifulsoup4
The remaining packages (random, time, requests) are already available in python. So importing them will suffice. Since this project is purely based on web scraping, understanding HTML tags and the flow (parent child relationship) will be helpful.
Download Automate Instagram Messages Project:
Please download the source code to automate instagram messages from the following link: Automate Instagram Message Project
Project File Structure:
Below is the flow of the python instagram bot project.
1. Importing libraries
2. Declaring the necessary functions
3. Initialising the browser and calling functions
1. Importing libraries:
#DataFlair's Guide to Automating Instagram Messages using Python
#Import libraries
from selenium import webdriver
import time
import random
import requests
from bs4 import BeautifulSoup
Code Explanation:
- from selenium import webdriver: Selenium is a package we will use to control the web browser and automate sending the messages. To use a browser, we import webdriver from selenium. For further reading: selenium docs.
- import time: To display the time the automated message was sent, we use Time library. Since this step is optional, it can be removed if not needed.
- import random: To obtain a random joke, we need a random integer indicating a joke. Thus we can achieve the functions of random using this library.
- import requests: To extract the jokes from the website, we need the requests library to retrieve data from the website.
- from bs4 import BeautifulSoup: To scrape the data from the obtained website, we make use of this library. For further reading: beautiful soup docs.
2. Declaring the necessary functions to automate Instagram messages using Python:
NOTE: To webscrape and understand the given code snippets properly, open the website in another tab and put your mouse cursor at the desired area, which can be input areas, icons etc and right click. In the menu, you will find Inspect Element or just Inspect. That is how we obtain the details for the input fields discussed below
NOTE 2: To find the path of any element, after selecting inspect, right click on the tag the console shows to you. From the menu, you can choose ‘Copy Path’ and it will display the various options.
def jokes():
   #Open the website to scrape the jokes from
   result = requests.get('https://bestlifeonline.com/one-liner-jokes/')
   #Html parser using beautiful soup
   soup = BeautifulSoup(result.content, 'html.parser')
   #print(result.status_code)
   #Choose a random joke
   joke_number = random.randint(1,20)
   #Using the HTML parser, find the ordered list tag and then list item tags
   #Extract the random joke
   joke = soup.ol.find_all("li")[joke_number]
   #print(len(joke))
   #Return only the text ie joke and not the entire tag
   return joke.text
Code Explanation:
- def jokes(): Declaration of the function for jokes
- result = requests.get(‘https://bestlifeonline.com/one-liner-jokes/’): Connect to the website for jokes and check the status code. If the status code is 200 or similar, then we can parse through the HTML outline of the webpage. Find another webpage if status code is 403 which means forbidden.
- soup = BeautifulSoup(result.content, ‘html.parser’): To scrape data, we must be able to parse through the HTML outline of the webpage. We do that using beautiful soup. The first parameter is the content of the web page which contains html tags as well as textual information displayed to the user and the second parameter indicates the type of parsing that has to be done.
- joke_number: Select a random integer within a given range (starting and ending value included) using the function randint.
- joke = soup.ol.find_all(“li”) [joke_number]: Extract the list item-li under ordered list tag-ol, using find_all. This obtain the needed joke by indexing it.
- eturn joke.text: The joke obtained will contain tags as well. Thus we return only the textual part by giving joke.text
def login_to_instagram():
   #Find username
   Username=browser.find_element_by_name("username")
   #Send username details
   Username.send_keys("enter username")
   #Find password
   password=browser.find_element_by_name("password")
   #Send password details
   password.send_keys("enter password")
   #Submit button
   browser.find_element_by_xpath("//button[@type='submit']").click()
Code Explanation:
- def login_to_instagram(): Declaration of the function for logging in to instagram.
- Username=browser.find_element_by_name(“username”): This is the name of the input box for username input. Obtain the element containing the given name to send the username.
- Username.send_keys(“put_username_here”): Now that we have the input text area for the username, we can send the username using send_keys.
The same holds for password field - browser.find_element_by_xpath(“//button[@type=’submit’]”).click(): To submit the credentials and login to instagram, we find the login button. Xpath is the path starting from the HTML tag upto the element. // is similar to relative path. Thus we find the button that has the type submit and click on it to login.
def skip_buttons():
   #Not now button for not saving the password   browser.find_element_by_xpath("//div[@class='cmbtv']/button[@type='button']").click()
   #Turn off the notifications button
   browser.find_element_by_xpath("//div[@class='mt3GC']/button[@class='aOOlW   HoLwm ']").click()
Code Explanation:
- def skip_buttons(): Some options will be present asking to ‘save The Password’ and to ‘Turn On Notifications’. We deal with those options here by selecting ‘Not Now’ for them all. Thus declare the function skip_buttons.
- browser.find_element_by_xpath(“//div[@class=’cmbtv’]/button[@type=’button’]”).click(): When the screen goes to the second page, you select the option ‘Not now’ by giving this command. @class denotes the name of the class and @type denotes the type of the button or any HTML tag.
The same concept is extended to the Notifications option in the third page.
def navigate_to_sender():
   #Find the messages button
   browser.find_element_by_css_selector('html.js.logged-in.client-root.js-focus-visible.sDN5V body div#react-root section._9eogI.E3X2T nav.NXc7H.jLuN9 div._8MQSO.Cx7Bp div._lz6s div.MWDvN div.ctQZg div._47KiJ div.XrOey a.xWeGp svg._8-yf5').click()
   #Find the chat of the intended person
   elements = browser.find_elements_by_xpath('/html/body/div[1]/section/div/div[2]/div/div/div[1]/div[2]/div/div/div/div/div')
   length = len(elements)
   for i in range(length):
       find_user = browser.find_element_by_xpath('/html/body/div[1]/section/div/div[2]/div/div/div[1]/div[2]/div/div/div/div/div[{}]/a/div/div[2]/div[1]/div/div/div/div'.format(str(i+1)))
       if find_user.text == username:
           find_user.click()
Code Explanation:
- def navigate_to_sender(): To find the chat option and the text area for that chat, we declare this function.
- browser.find_element_by_css_selector().click(): It is the same as finding by Xpath, only that it uses a CSS path.
- browser.find_elements_by_xpath: This function is similar to find element with the difference being the data it returns. This function returns a list of all elements containing the same tag. Here we use it to return a list of all the conversations with other users.
- length = len(elements): To determine the conversations between the user and their friends.
- for i in range(length): Since all the usernames are found in the div tag starting from 1 upto to total number of elements.
- find_user =…….div[{}]: Insertion of the div component using format operator.
- f find_user.text == username: Since we chat with many people at different times, what remains as the first chat may not always be the first chat. Hence we compare if the text present in the div tag is the same as the username provided by the user.
def send_jokes(time_between_jokes):
   #Find the text area in the chat to send message   message_entry=browser.find_element_by_css_selector('html.js.logged-in.client-root.js-focus-visible.sDN5V body div#react-root section._9eogI.DT7qQ div.t30g8.L1C6I div.Igw0E.IwRSH.eGOV_._4EzTm div.oYYFH div.pV7Qt._6Rvw2.Igw0E.IwRSH.YBx95.ybXk5._4EzTm.i0EQd div.DPiy6.Igw0E.IwRSH.eGOV_.vwCYk div.uueGX div.JiVIq._0NM_B div.Igw0E.IwRSH.eGOV_._4EzTm div.Igw0E.IwRSH.eGOV_._4EzTm.L-sTb.HcJZg div.X3a-9 div.Igw0E.IwRSH.eGOV_.vwCYk.ItkAi textarea')
   while True:
       #Call jokes function to get a random joke
       joke = jokes()
       #Send the joke to the text box
       message_entry.send_keys('Howdy Partner!!!! '+joke+ ' Joke was sent on {time}'.format(time=time.ctime()))
       #Click on the send buttons
       browser.find_element_by_xpath("/html/body/div[1]/section/div/div[2]/div/div/div[2]/div[2]/div/div[2]/div/div/div[3]/button").click()
       #Send another joke after the timeout
       time.sleep(time_between_jokes)
Code Explanation:
- def send_jokes(time_between_jokes): To send the jokes to the user, we use this function with the parameter being the time delay between messages (jokes).
- message_entry: Locate the text area using find_element_by_css_selector. There are many alternate ways to locate a tag, details of which are given in the documentation.
- while True: Setting the loop to infinity causes it to send the message without a break. If you wish to terminate the process, you can raise a keyboard interrupt in the terminal.
- joke = jokes(): Calling jokes() function to obtain a joke.
- message_entry.send_keys(): Similar to username and password input, where send_keys places the required details in the text area. Time.ctime gives the current date, day and time with seconds. This part is optional.
- for i in range(length): Since all the usernames are found in the div tag starting from 1 upto to total number of elements.
- find_user =…….div[{}]: Insertion of the div component using format operator.
- if find_user.text == username: Since we chat with many people at different times, what remains as the first chat may not always be the first chat. Hence we compare if the text present in the div tag is the same as the username provided by the user.
- browser.find_element_by_xpath(): Find the send button and send the message by giving the option click()
- time.sleep(time_between_jokes): Waits until the time expires by pausing the process i.e., sleeping and then repeating execution since it is in a loop.
3. Initialising the browser and calling functions:
#Read user input to set a delay between jokes and obtain the username
time_between_jokes = int(input("Enter the seconds of delay between each joke: "))
username = input("Enter username: ")
#Open the webbrowser and use it for autonomous control
browser = webdriver.Firefox(executable_path='/home/deepika/Downloads/internship/instagram/geckodriver')
#Open the URL in the opened webbrowser
browser.get('https://instagram.com/')
#Start using the functions after a delay
browser.implicitly_wait(5)
#Call all the functions in order based on webpages
login_to_instagram()
skip_buttons()
navigate_to_sender()
send_jokes(time_between_jokes)
Code explanation:
- time_between_jokes: Get time delay from user using input() and convert it to int using int()
- username: User will input username here. Make sure to give the username as registered by your friends.
- browser = webdriver.Firefox(): Since the process happens in a controlled browser, we assign it using either a firefox browser or a chrome browser. For the Chrome browser, we use the word Chrome instead of firefox. Executable path contains the path to the location of the executable file. Check for compatibility of browser and .exe file version. For firefox, install geckodriver.
- browser.get(‘https://instagram.com/’): Open the URL in the initialized browser using get() function.
- browser.implicitly_wait(5): Before calling the functions, the browser must load with the website. So we give a delay using implicitly_wait(). This is analogous to time.sleep()
- login_to_instagram(), skip_buttons(), navigate_to_sender(), send_jokes(time_between_jokes): Call functions in the order of the webpages.
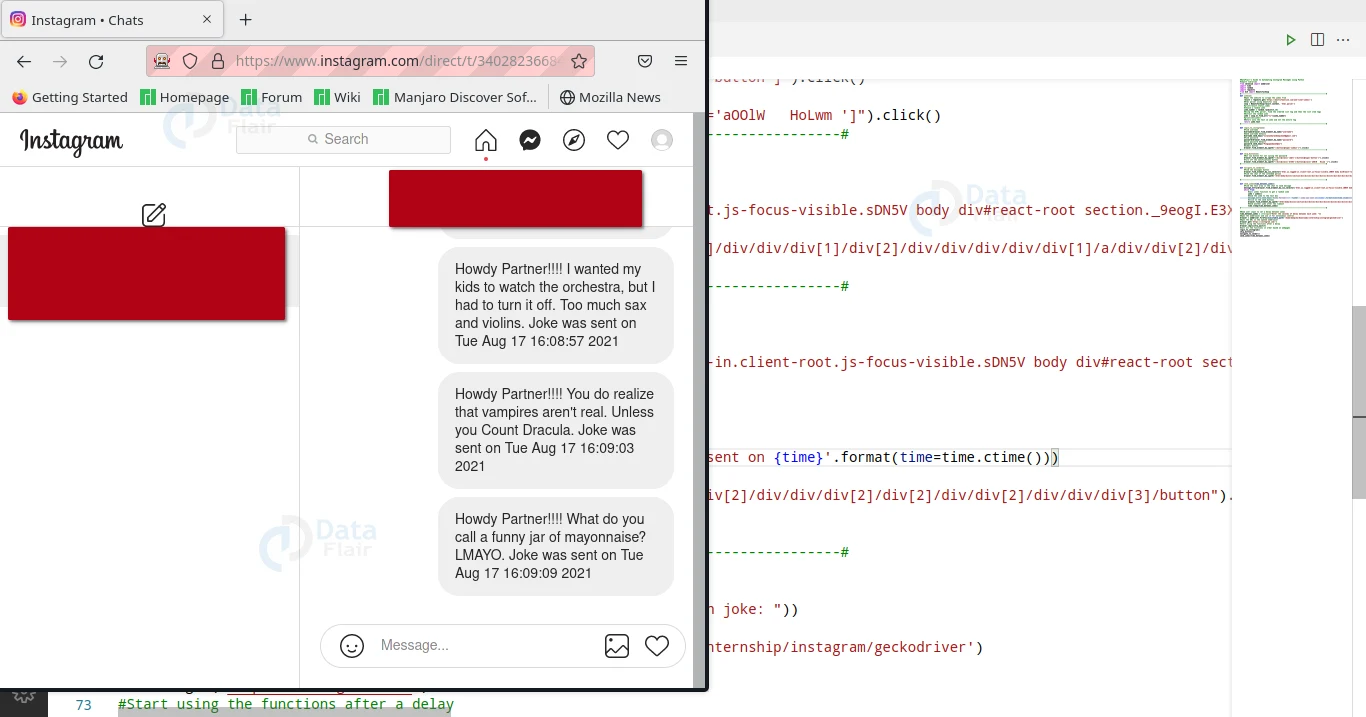
Python Instagram Message Bot Output:
Provide with the time delay between messages and we can now see the jokes being sent automatically:
Summary
Thus we found a way to automate sending of messages to a user using python. This project is a great introduction to web scraping and is ideal for a beginner to try.
Your opinion matters
Please write your valuable feedback about DataFlair on Google


Getting error can you please help
It would be beneficial for me to understand which type of error you are encountering.
im gettig an error can you help?