Python Image Format Converter – Convert JPG to PNG
Master Python with 70+ Hands-on Projects and Get Job-ready - Learn Python
In real time, many times it happens that we have to change the format of any image from jpg to png and vice versa. In this Python project by DataFlair, we are going to learn how to create such an Image format Converter using Python. So let’s start developing the interesting project.
What is an Image Format Converter?
An Image Format Converter is an application that helps a user convert the format/extension of an image. Here we are providing two image extensions – png and jpg. This project will have a GUI Window which will provide both of these options.
Project Details
To create the GUI of this project, we are going to use the Tkinter Module. Tkinter Module has a number of inbuilt libraries that will help us to create GUI very easily. To convert images into different formats, we will be using the PIL Module. The GUI window has two conversion options-
- Png to Jpg
- Jpg to Png
Project Prerequisites
To proceed with the project we will need to install the following libraries with the given command:
- Tkinter Module – pip install tk
- PIL Library – pip install pillow
Download Python Image Format Converter Code
Please download the source code for python image format converter project from the following link: Python Image Format Converter Project
Steps to Create the Image Format Converter Project
We will be performing the following steps to develop this python project-
- Importing Libraries and Modules
- Browsing an image file from the system.
- Converting from Png to Jpg.
- Converting from Jpg to Png.
- Creating the GUI Window.
Let’s have a look at each step in detail.
1. Importing Libraries and Modules:
#importing libraries and modules
import tkinter as tk
from tkinter import *
from tkinter import filedialog
from PIL import Image
- Tkinter Module – This module helps in creating the GUI Window for our project. Filedialog will help us to browse files from the system and save them.
- PIL Library – PIL stands for Python Image Library. In this project this library will help us change the extension of the image and save it with a new extension.
2. Browsing an Image File from the System:
#function to browse image
def browse():
    global img
    filename = filedialog.askopenfilename(title = "Select a File")#selecting a file from the system
    img = Image.open(filename)#opening the selected file
- This function will help us browse a file that exists in our system.
- filedialog.askopenfilename() – This function opens up a window from which we can select a file that needs to be changed. We select the value and save it in a variable named filename.
- open() – Using the open() function, we will be opening the image file selected. We will pass variable filename to the open() method because the value of the selected image file is stored in this variable.
3. Convert from Png to Jpg:
#function to change from png to jpg
def png_to_jpg():
    global img
    export_file_path = filedialog.asksaveasfilename(defaultextension='.jpg')#choosing the path and changing extension to jpg
    img.save(export_file_path)#saving the file on desired path
- This function will convert the format of an image from Png to Jpg .
- filedialog.asksaveasfilename() – As we have already browsed an image that needs to be converted, this function will ask us the path and name where we want to save the file. Here the default extension is passed as .jpg.
- save() – Using the save function, we save the image at the chosen path with the extension .jpg.
4. Convert From Jpg to Png:
#function to change from jpg to png
def jpg_to_png():
    global img
    export_file_path = filedialog.asksaveasfilename(defaultextension='.png')#choosing the path and changing extension to jpg
    img.save(export_file_path)#saving the file on desired path
- Using the same things as in the previous functions, we have created this function to change the format from Jpg to Png. Here only the default extension is changed, else all is the same as in the previous function.
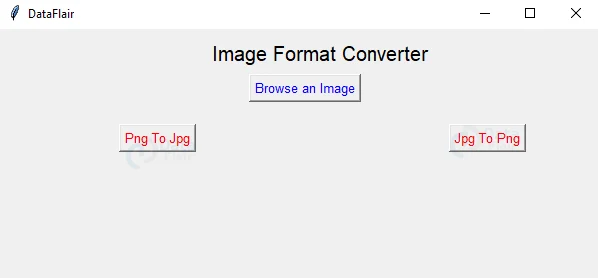
5. Creating the GUI Window:
#creating window
root = Tk()
root.geometry('600x250')#geometry of window
root.title('DataFlair')#title for window
Label(root,text='Image Format Converter',font='arial 15').place(x=210,y=10)
- Tk() – Using the Tk() method, we have created a window named root.
- geometry() – This function specifies the size of the window.
- title() – gives a title to the created window.
- Label() – Label is a Gui widget that is generally for displaying a piece of text on the window. This creates a label on the GUI window of the project. We can change the color, font , size, height, width etc of a label. Here we have used this Label() function to display a text.
- place() – place() function helps in displaying the widgets on the window. Using the place() function we can specify the x and y coordinates of a widget and place it accordingly.
Button(root,text='Browse an Image',command=browse,fg='blue',font='arial 10').place(x=250,y=45)#creating button
- Button() – This helps in creating a button on the window. command=browse specifies that whenever this button is triggered the browse function will be evoked. Same as the label, here also we can specify the color, font, background color, foreground color etc of a button
Button(root,text='Png To Jpg',command=png_to_jpg,fg='red',font='arial 10').place(x=120,y=95)
Button(root,text='Jpg To Png',command=jpg_to_png,fg='red',font='arial 10').place(x=450,y=95)
- Using the same technique, we have created 2 more buttons for Png to Jpg and Jpg to Png respectively. To display all of these buttons we have used the place() function.
root.mainloop()
- The mainloop() function helps in displaying the GUI window when the project is run.
Python Image Format Converter Output
Summary
FInally we have developed python project of image format converter using different modules like Tkinter Module and PIL Library.
I hope you have enjoyed building this project with DataFlair.
Your 15 seconds will encourage us to work even harder
Please share your happy experience on Google


i love u data flair
utharaiah ka beta cvr ka shan navaneeth bholthe
navaneeth bhai antuna nenu