Create Animated GIF using Python
Master Python with 70+ Hands-on Projects and Get Job-ready - Learn Python
We all use GIFs almost every day as a form of communication. These visual messages are attracting users of all ages. Have you ever wanted to create your own? Yes!! We are here with a project for GIF Generator using Python. Let’s not wait and start with the introduction.
What is a GIF?
Graphics Interchange Formats, GIFs, are a series of animated images that give a sense of motion. These are being used by most people to communicate with others on social media platforms like WhatsApp, Instagram, etc. Here we will be building a GIF Creator that creates a GIF from the images.
GIF Creator using Python
In this project, we will be using the Tkinter, glob, and imageio modules for development purposes. We use the Tkinter module to build a GUI to take the inputs of users about the path of images to be converted to GIF and their extension. And the glob is used to extract the files from the device. At last, we use the imageio to read the images and convert them to a GIF.
Download the GIF Creator Project
Please download the source code for the GIF Creator project using the link: GIF Creator using Python
Project Prerequisites
Prior knowledge of Python, Tkinter, and glob is useful. And the following commands can be used to install the modules discussed above.
pip install tkinter
pip install glob2
pip install imageio
Steps to build the Python GIF Creator
Now it’s time to build the project. Let’s first discuss the steps to build the project.
- The first step is to import the required modules.
- Then we create the GUI and add the required widgets.
- Finally, we write the function to convert the images and run the code.
1. Importing the Modules
We import all the modules glob, tkinter, and imageio whose use we have just discussed above. We use the messagebox to show the pop up message once the GIF is saved.
#Importing modules
import glob
from tkinter import *
from tkinter import messagebox
import imageio
2. Creating the GUI
The next step is to create a GUI for taking the input from the user.
#Creating the window
wn = Tk()
wn.title("DataFlair GIF Creator")
wn.geometry('500x300')
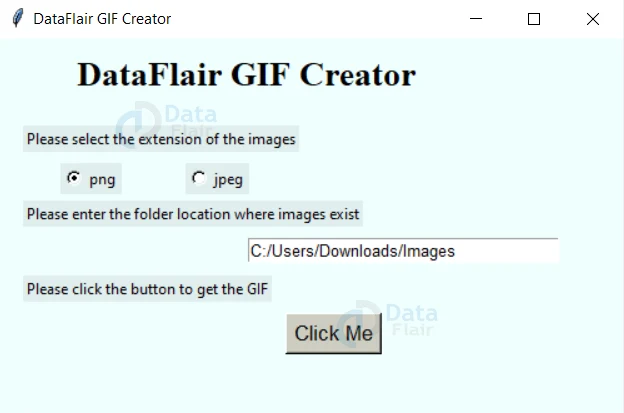
wn.config(bg='azure')3. Adding the Widgets
Now we add the widgets to the GUI created. The first widget is a pair of radio buttons to select the extension of the images as either .png or .jpeg. The variable ‘extension’ will hold the value based on the selection of the radio buttons.
Then we take the input of the path of the folder with the images. After this, on pressing the button the GIF gets created.
#Creating the variables to get the path of folder and the extension of images
extension = StringVar(wn)
direc=StringVar(wn)

#The main label
Label(wn, text='DataFlair GIF Creator',bg='azure',
fg='black', font=('Times', 20,'bold')).place(x=60, y=10)

#Getting the extension of the image as either png or jpeg
Label(wn, text='Please select the extension of the images',bg='azure2', anchor="e", justify=LEFT).place(x=20, y=70)

Radiobutton(wn, text='png',bg='azure2', variable=extension, value='png').place(x=50,y=100)
Radiobutton(wn, text='jpeg',bg='azure2',variable=extension, value='jpeg').place(x=150,y=100)

#Getting the path of the folder with the images
Label(wn, text='Please enter the folder location where images exist',bg='azure2', anchor="e", justify=LEFT).place(x=20, y=130)

Entry(wn,textvariable=direc, width=35, font=('calibre',10,'normal')).place(x=200,y=160)

#Button to convert the images into GIF and save the GIF
Label(wn, text='Please click the button to get the GIF', bg='azure2',anchor="e", justify=LEFT).place(x=20, y=190)

Button(wn, text="Click Me", bg='ivory3',font=('calibre', 13),
command=convertToGIF).place(x=230, y=220)

#Runs the window till it is closed by the user
wn.mainloop()
4. Function to Get the Images and convert to GIF
This function executes when the user presses the button. In this function, we get the path of the folder and extension
Then we get the directories of all the images in the folder using glob. Then we read these images and store in imgs list
Finally, we create the gif from the images in the imgs list and save it
#Function to convert Images to GIF
def convertToGIF():
path = direc.get() #Get the path of the folder entered by the user
ext=extension.get() #Get the extension png or jpeg
path_in =path+'/*.'+ext #Creating the final path of the images
path_out = path+"/MyGif.gif" #Creating the path for GIF in the same folder as the images

imgs=[] #list to store all the images
try:
file = glob.glob(path_in, recursive = True) #Recursively getting the paths of all the images in the folder
for im in file:
imgs.append(imageio.imread(im)) #Reading all the images

imageio.mimsave(path_out, imgs) #Converting the images to GIF and saving it
#Showing the message box on saving the gif
messagebox.showinfo("DataFlair GIF Generator","GIF is saved successfully in the folder with Images!")
except:
#Showing a message if not able to collect the images or convert them to gif
messagebox.showinfo("Error occurred!","Please check the path of the folder or the extension of images.")
Python GIF Creator Output
Image of pop up message on saving the GIF
Summary
Congratulations! You have successfully learned to create a GIF from the images using Python GIF Generator Project. Hope you liked this project. Enjoy building your own gifs and sharing them with your friends!
If you are Happy with DataFlair, do not forget to make us happy with your positive feedback on Google


how to enter the path in this project? please reply as soon as possible i need this fr my college project