Django Templates – Learn to Create Your First Template Using HTML
Python course with 57 real-time projects - Learn Python
FREE Online Courses: Enroll Now, Thank us Later!
Working on Django Templates is one of the favorite parts of any front-end developer of a website. Django Templates are the Django’s way of serving the pages to the web server in its own unique way. While deploying our first app, we returned an HTTP Response to the client, which was a string in Python that was parsed as HTML by a web browser.
Prerequisite
Before starting this tutorial, we recommend you to complete the previous tutorial on Django Views. Also, we will be modifying the same files, which we created in that tutorial.
Need of Django Templating
What if our project layout is too big and for every function, we have a fully designed webpage? Now consider the size of web pages of today’s time, some can range to 500 lines of code easily with the migrations of Stylesheets and JavaScript code.
Imagine putting all that code for each function in a single view file of the application. It will be a very complex task for front-end developers.
Drawbacks of the Traditional MVC Pattern
- Many big companies like Amazon have different departments for the website like frontend department, backend, database administrator, etc. Now, here the main issue is that the front-end developer would need to learn the Python too. Thus, leading to a lengthy process and slower development.
- The approach contradicts Django’s design philosophy of loosely coupled, i.e. different components of code modifies with little or no change to other components.
- Website design (HTML, CSS, etc) change much more frequently than the backend, but with this approach, the frontend developer will need to assign the Python variables in the new design again and that means he is creating the website again. That’s a different story whether he knows python which itself is a skill required.
These problems are serious and need to get solve while also retaining the MVC architecture benefits.
The Django templates are the answer to this approach, they implement the loosely coupled design philosophy as one of the best implementations in the Industry.
Also, Django templates are much easier to use, when compared to other popular frameworks and are quite reliable.
Django is a web framework and that makes it really important to serve HTML pages dynamically, so to achieve that, Django has a special component, which is Django Templates.
What are Django Templates?
Django templates are a combination of static HTML layout and Django Syntax which is essentially Python code. Both of these components help in generating HTML pages dynamically and make your website more user-engaging.
The main purpose of Django templates is to separate the data representation with the data itself. That means, the browser part is only to render the HTML sent to it by the server, and all the relevant data is given to the template by Django itself. This makes the process much easier and pages render easily as there is less clutter in both the front-end and back-end.
Django templating is done via templating engines, there are multiple templating engines(Jinja templating) although the one which Django ships in is Django template as you can see in your projects’ settings.py file.
The Django templates language has their own syntaxes and rules, although they are not hard to grasp and we will cover them in the next section of this tutorial, first let’s create our own template.
Do you know the Unique Features of Django?
Creating Your First Django Templates
A Django template defines various template tags and placeholders, which are used to make the layout and how the data should be placed in the HTML. Also, Django templates are capable of displaying more than HTML, they can generate pdf, CSV and other popular formats.
Django templates use certain tags, first, we will link our Django templates with the views.
Step 1. Open the views.py file created from our previous tutorial.
There was a function that we imported which was rendered in Django Views Tutorial.
You just have to paste this code swapping the student_show().
Code:
from .models import Student
def student_show(request):
student = Student.objects.order_by('roll_no')
return render(request, 'student/student_show.html', {'student': student})
Your file shall look like this now.
Understanding the code
Remember, we have made the model student in our Django models tutorial and also connected our view with the model.
We have imported the Student Class from the models.py in the same directory.
This was necessary as now, we are capable of accessing the data stored in the database. Then we have the function student_show() which is taking request as a parameter.
Always remember, all view functions have at least one parameter that is requested.
There we defined a local variable of type Student and we are applying the order_by() function on the data. We are getting to sort the data on the basis of the roll_no field in our database table.
Then we are returning the response as a render, which has 3 parameters. First is a request, the second is a path of our HTML template, and third is a dictionary student, which has the data of our local view variable. Thus, views will get the data from the models. Then, that data will pass on to the template as a dictionary so that there is no server-side code sent to the browser. That makes it much more secure.
Step 2. Create the Django template rendered in views.py file
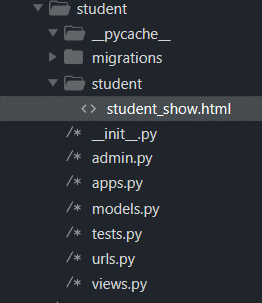
Make a new directory named student same as the application name, and inside that create one HTML file named student_show.html which we also passed in the render function.
Your app directory should look like this.
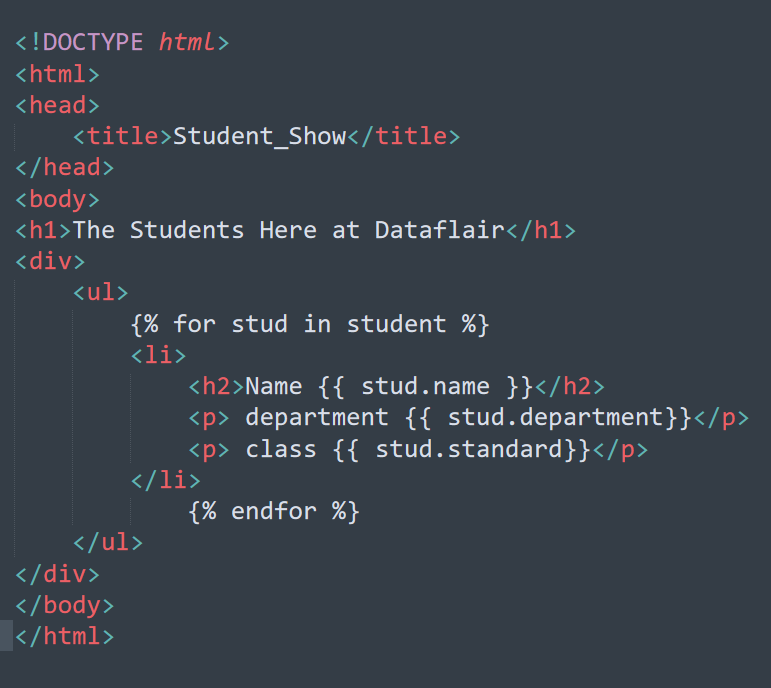
Now, copy this code and paste it in the HTML file we just created.
HTML Code:
<!DOCTYPE html>
<html>
<head>
<title>Student_Show</title>
</head>
<body>
<h1>The Students Here at Dataflair</h1>
<div>
<ul>
{% for stud in student %}
<li>
<h2>Name {{ stud.name }}</h2>
<p> department {{ stud.department}}</p>
<p> class {{ stud.standard}}</p>
</li>
{% endfor %}
</ul>
</div>
</body>
</html>
That’s it you just created your first Django Template.
Learn to Create, Install & Deploy your First Django App
Django Template Language
Django templates use special language or syntax to implement it because essentially Django template is nothing but python string, which marks-up by Django Template Engine.
We will compare our above code and learn the very basics of this syntax.
There are 4 types of syntax in Django Template language:
i. Tags/ {% control statements %}
Whenever we use {% %}, inside a Django Template, we are writing some logic code that will implement on the data we just passed with the render.
These are called tags in Django Templates.
In the first template,
{% for stud in student %}We started a for loop which will run until the end of our database records. Then it will repeat the statements above the {% endfor %}. The statements between them can be any segment, either Python or browser renderable (HTML, CSS, JavaScript), etc.
ii. Printing Value/ {{ variables }}
Whenever we want to print output of Python code in a Django template directly from the server, we use:
{{variable/ model to print}}We will use these statements in most of your browser-renderable code, as this piece here will exchange with the actual value of the variable stored in it by the server.
Here we have printed 3 variables, as we are accessing the stud object which has all the attributes of student object being passed on.
Understand the Components of MTV Architecture
iii. Filters / {{ metadata | response }}
Since Django is a web framework, it will also serve content on the basis of metadata, where we use the filters.
{{ metadata| response or render }}We need these filters mostly when working on a very big project, where the metadata for the site matters, otherwise it is not that important for smaller blog websites.
Although, by using it for metadata, Django also provides us to dynamically generate our metadata.
iv. Comments/ {# Comments #}
Comments are the best practices that increase code reusability, and readability. Therefore, Django framework provides you with this special tag to comment in the template language.
The general syntax is:
{# this will not be rendered by the browser #}These are the 4 basic constructs of Django Templates. We will be implementing the same in different ways to make our website look better.
How to Insert the Values in Database via phpMyAdmin?
It’s very easy and convenient process whether you know SQL or not.
First, open phpMyAdmin and open the database dataflair, there click on the student_student table.
Notice that student_student is actually appname_modelname.
To open phpMyAdmin, you will need to start apache server and MySQL from the Xampp control panel. Then search this URL in the browser.
localhost/phpmyadmin/
Here, you can see the field roll_no also if you want to insert data in the database.
Just follow these steps:
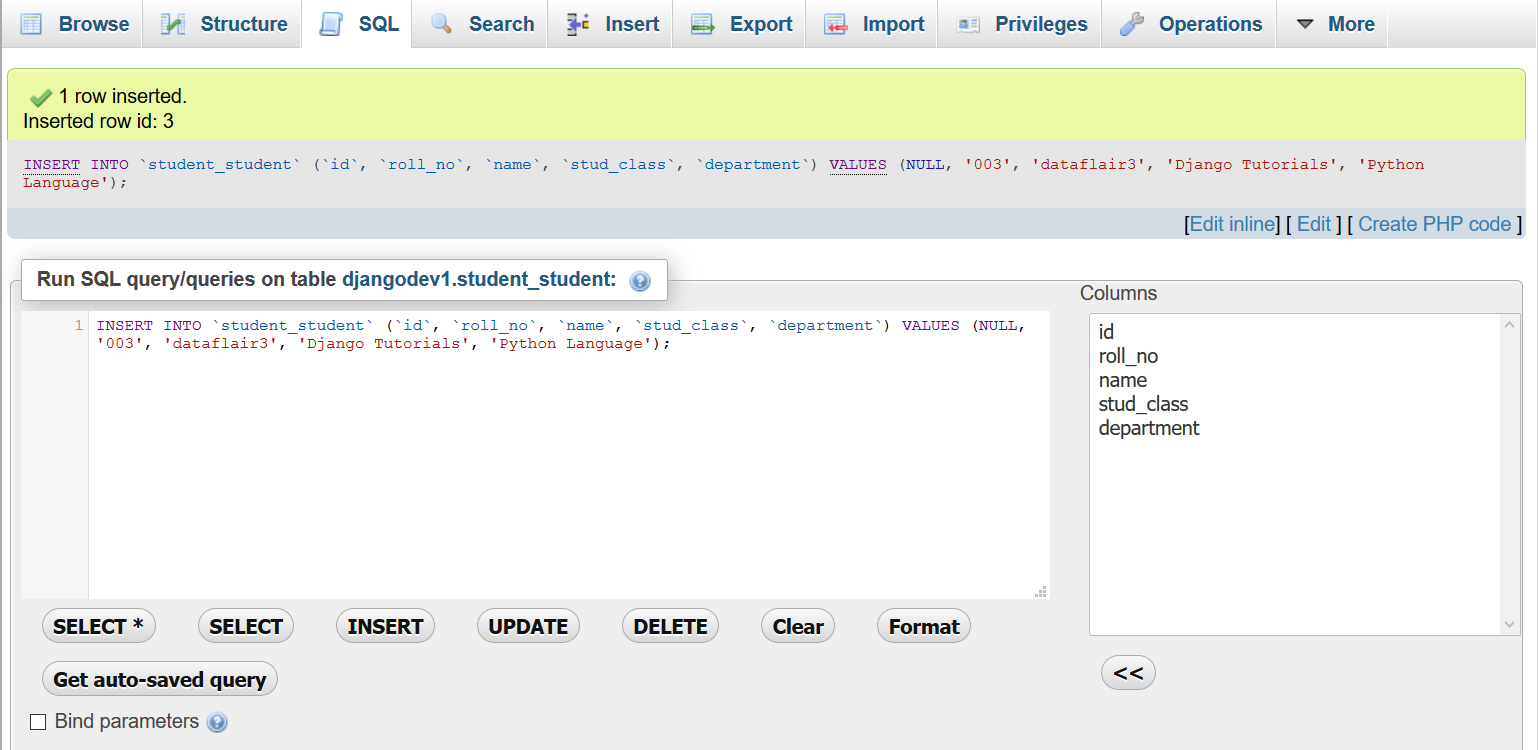
Step 1. Click on Insert tab, as we can see in the window, after clicking that you will get this output.
Here, as we have filled the data under the value section, you can put whatever you want until it satisfies the type of your column.
Step 2. Then just click on the Go.
If you get this message, then your data has been stored in the database. You can see in the table yourself.
Step 3. Click on Browse option.
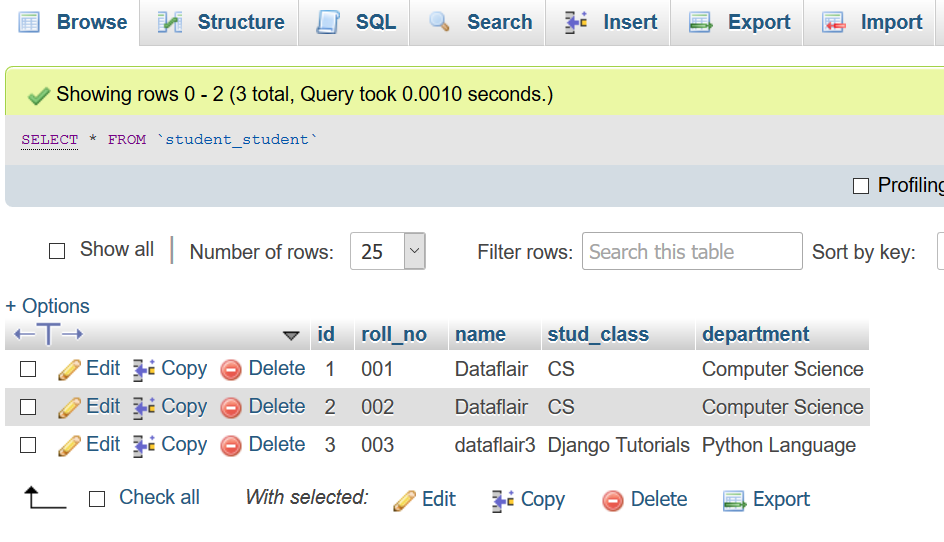
As you can see, we have one new entry with the data we inserted.
Now we will display the data in the template.
Execute these commands in PowerShell to render your first Template
python manage.py makemigrations
python manage.py migrate
python manage.py runserver
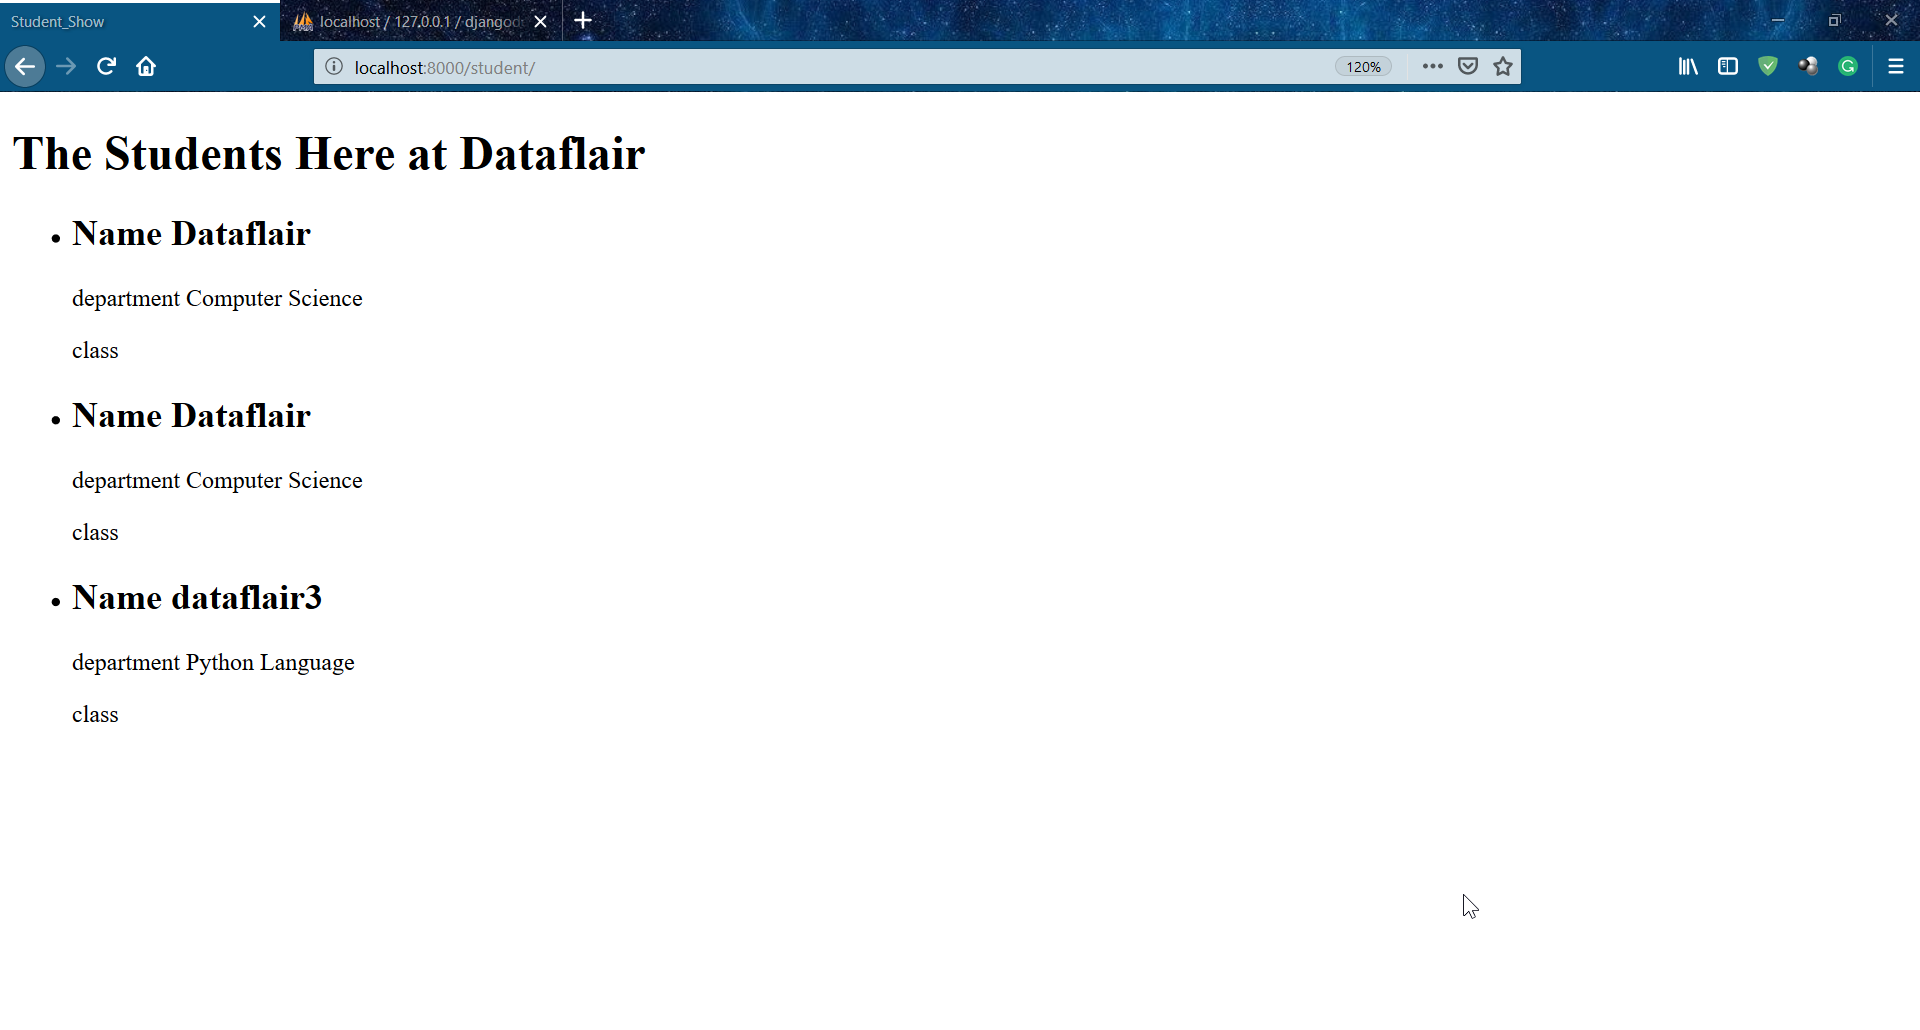
If you have executed every step properly from this and the previous Django Views tutorial, you will get this output after entering the below URL.
localhost:8000/student/
There is a catch though, you should not use python extensively here as it is the server-side language of your project. The more you are applying Python in your template, the more you are moving away from the main design philosophy of Django.
Also, JavaScript is a very powerful scripting language and in today’s time, many websites use the Django and JavaScript frameworks in parallel to create stunning applications.
Well, if you have worked on PHP, or have embedded any programming language in HTML, then you might be thinking that we can code in Python in the webpage too. Seriously, don’t have that approach because as we defined, the template’s main purpose is to separate data representation and information itself. So, if we use the more server-side code in our template then, there will be no difference between Template and View.
Therefore, always use Python code in the template where you just want to display the variable or want to perform some simple logic on the variable.
Explore Top Django Books & increase your Django Web Development knowledge
Summary
We completed 3 main fundamentals of web development and Django.
- As we learned that, Models are for the data transmission between the database and view, they contain data definition of our website.
- View are the connectors between the models and templates while also passing the required server data. They contain the business logic.
- Templates play an important role in Django and are presently the best implementation of loosely coupled architectures.
Thus, Django is best for rapid development, while it’s natively secure too. Furthermore, if you have come across with any queries related to Django Templates tutorial, feel free to ask in the comment section.
Did you know we work 24x7 to provide you best tutorials
Please encourage us - write a review on Google






i hav followed the instructions and did the same but got error
“No changes detected in app ‘student'”
Hello Ankit,
You’re running into an issue with the makemigrations command. Make sure you have added your app’s name in the list of INSTALLED_APPS in settings.py. Often, if you’ve already run the command, it will give you ‘no changes detected’ if you haven’t made any changes to the model after that, but are attempting to do it again.
Hope, it helps you!
I have added app name INSTALLED_APPS in settings.py after that run makemigrations but still got **No changes detected in app ‘student’**. after visiting the url only i got The Students Here at dataflair . help me out
Facing same issue getting “No changes detected in app ‘student”
I followed the guide. However, I kept getting TemplateDoNotExist issue.
My installation kept trying to look for the template inside:
\Lib\site-packages\django\contrib\admin\templates\student
The only way i got it to work was to move my html file to this folder?
What is causing this?
I feel the explained way of having the template inside the student folder is much better for maintainablility
Hello Simon,
You can do the following. In your app directory student make a new folder template. In that folder make folder student and inside that keep your html file. Your html file path should look like this. student/template/student/student_show.html
Hi, thanks a lot for the tutorial, it’s been great!!! – I also got the TemplateDoNotExist error, but I used the solution, which is to modify settings.py, just need to add the path to the template in TEMPLATES/DIRS, which in my case was something like this:
TEMPLATES = [
{
‘BACKEND’: ‘django.template.backends.django.DjangoTemplates’,
‘DIRS’: [os.path.join(BASE_DIR, ‘student’),],
‘APP_DIRS’: True,
‘OPTIONS’: {
‘context_processors’: [
‘django.template.context_processors.debug’,
‘django.template.context_processors.request’,
‘django.contrib.auth.context_processors.auth’,
‘django.contrib.messages.context_processors.messages’,
],
},
},
]
Hope it helps!!!
Why do we need to add that path ?
This a good tutorial for basic templates use, and the post of Jerardo is very usefull and I think is missed this point in the tutorial. Also, I think is useful to learn how to implement css, and extended templates in the rigth way, I’m interested in those points, I hope can you extend this template lesson.
I get an error here:
Code: def student_show(request):
student = Student.objects.order_by(‘roll_no’)
Returned error: Class ‘Student’ has no ‘objects’ member
Hey guys,
For those having problems rendering their templates on the browser, just add a “templates” folder in your student app and move the “student” folder together with the “student_show.html” file into the “templates” folder. It should render automatically witoud specifying the “BASE_DIR” path in the settings.py
I love your blog. Great job! I skipping google during Django learning and firstly try to find on your webpage.