Django Logging – The Most Easy Method to Perform it!
Master Python with 70+ Hands-on Projects and Get Job-ready - Learn Python
Interactive Online Courses: Elevate Skills & Succeed Enroll Now!
All developers debug errors. The resolving of those errors takes time. It helps in most cases to know when and where the error occurred. I would say that Python’s error messages are quite helpful. But even these messages render useless when talking about projects with multiple files.
That problem and many other benefits come with logging.
As Django developers, it is important that we also master logging. Backend technologies have various great tools to implement logging. Django too provides support for various logging frameworks and modules. We will implement it using the basic and one of the popular, logging module.
In this tutorial, we will learn about logging. The contents will be:
- What is Logging?
- Python Logging Module
- Logging in Django
Ready to learn. Let’s get started.
What is Logging?
Logging is a technique or medium which can let us track some events as the software executes. It is an important technique for developers. It helps them to track events. Logging is like an extra set of eyes for them. Developers are not only responsible for making software but also for maintaining them.
Logging helps with that part of maintenance immensely.
It tracks every event that occurs at all times. That means instead of the long tracebacks you get much more. This time when an error occurs you can see in which the system was. This method will help you resolve errors quickly. As you will be able to tell where the error occurred.
How does it work? What’s the idea behind it?
The logging is handled by a separate program. That logging program is simply a file-writer. The logger is said to record certain events in text format. The recorded information is then saved in files. The files for this are called logs.
The logs are simple files saved with log extension. They contain the logs of events occurred.
Well, this is just one of the most used implementations, as you can see. Since we are just storing the information, you can come up with more ways to deal with it.
Okay, it’s clear to us that logging is important. Is it difficult? No absolutely not buddy. Logging is not difficult at all. Anyone who knows a little bit about the setup can use this.
Being a Python programmer, you get extra features here too. We got a whole module that lets us accomplish just that. As for other languages, there are many modules, Java has Log4j and JavaScript has its own loglevel. All these are amazing tools as well.
Okay, so we will be dealing with Python (my favorite Language) here.
Logging Module in Python
The logging module is a built-in Python module. It comes preinstalled with Python 3. Logging module is used to keep track of the events that occur as the program runs. That can be extended to any number of programs and thus for software, it is easy to set up and use.
Why use logging module?
As a developer, we can ask why use the logging module. All logging does is writing to a file or printing it on the console. All that can be achieved by using print statements. Then what is the need for a logging module?. That’s a valid question. The answer to that is logging is a module that gives what print cannot.
We use print function to output something on console. So, when a function occurs, we can get a print statement that the function executed. While that approach works with smaller applications, it is inefficient.
Print function becomes part of your program and if the software stops working, you won’t get the result. Also, if anything occurs and system restarts, the console is also clear. So, what will you do then? The answer to that is logging module.
The logging module is capable of:
- Multithreading execution
- Categorizing Messages via different log levels
- It’s much more flexible and configurable
- Gives a more structured information
So, there are 4 main parts of logging module. We will look at them one by one.
1. Loggers
The loggers are the objects that developers deal with. They can be understood as a function which will be invoked when they are called. We use loggers in our project files. Thus, when the function is invoked, we get a detailed report. The logger can generate multiple levels of responses.
We can customize it to full extent.
2. Handlers
Handlers are the objects which emit the information. Think of them as newspaper handlers. Their main task is to transmit the information. That can be achieved by writing the info in a log file (The default behaviour). There are various handlers provided by logging module.
We can easily set-up multiple handlers for the same logger. There are SMTP Handlers too which will mail the log records to you. The handlers usually contain business logic for logging information.
3. Formatters
The formatters are the ones which format the data. You see handlers cannot send the information as it’s a Python data type. Before it can be sent to anyone, it needs to be converted.
The logs are by-default in Log Records format. That is the class pre-defined by logging framework. It gives various methods to developers to use. That format can not be directly sent over a network or written in a text file. To convert that or format that, we need formatters.
There are different formatters for different handlers.
By default, the formatters will convert the Log Record into String. This behaviour can be easily changed and you can customize this as you want. This format can be based on the business logic that we write in Handlers.
4. Filters
The last piece of the logging module is filters. The filters, as the name suggests, filter the messages. Not every message we pass needs to be stored or transported. Or there can be different handlers for different messages. All that is achievable with the help of filters.
We can use filters with both loggers and handlers.
Okay, so now we have got a basic idea of the logging module. It also provides us with message levels. The message levels are defined as:
DEBUG: It is verbose system information when everything is running fine. It will tell you more precise details about the state of the system. Its severity point is 10.
INFO: The info will produce less verbose system information but is similar to debug. It generally tells an overview of what the system is executing. Its severity point is 20.
WARNING: This contains information regarding low-level problems. The problems may be ignored as they don’t cause the system to halt. Although, it is recommended that these problems shall be resolved.
Its severity point is 30.
ERROR: This message is serious. The error will contain information about the major problem that has occurred. The problem may have stopped the operation of program and needs immediate attention.
Its severity point is 40.
CRITICAL: The most critical message. This message is emitted when the problem has caused the system to stop. That means the whole application has halted due to this problem.
Its severity point is 50.
The severity point determines what priority shall be given. Suppose, we set the log level to be 30. Then the logger will log or store the information when the level is greater than or equal to 30. So, you just need to confirm what level of logging you want. We will learn more about them in the further section.
We can easily implement logging by importing the module. Since it’s a built-in module, we need not install it via pip.
Just write this in your Python file and we can use loggers.
Code:
import logging
logging.warning("DataFlair Logging Tutorials")
The output generated by the code is right below. As you can see, the log is printed on the console, it has log-level, logger-name and message. root is the default logger-name. We will use these kinds of functions with our views in Django.
Logging in Django
Django provides logging by using the logging module of Python. The logging module can be easily configured.
When we want to use logging in Django there are certain steps to be followed. The procedure will be as follows:
- We will configure our settings.py for various loggers, handlers, filters.
- We will include the loggers code in views or any other module of Django where necessary.
Okay, so let’s get started.
Create a new Project
We will create a new project for logging. You can then use the logging in existing projects. So, to create a new project, execute this command in the command line:
$ django-admin startproject dataflairlogs
This will start the new project. Now, we will configure settings.py of the project.
Configuring Settings
For including logging in Django, we need to configure its settings. Doing that is pretty easy. By configuring logging settings, we mean to define:
- Loggers
- Handlers
- Filters
- Formatters
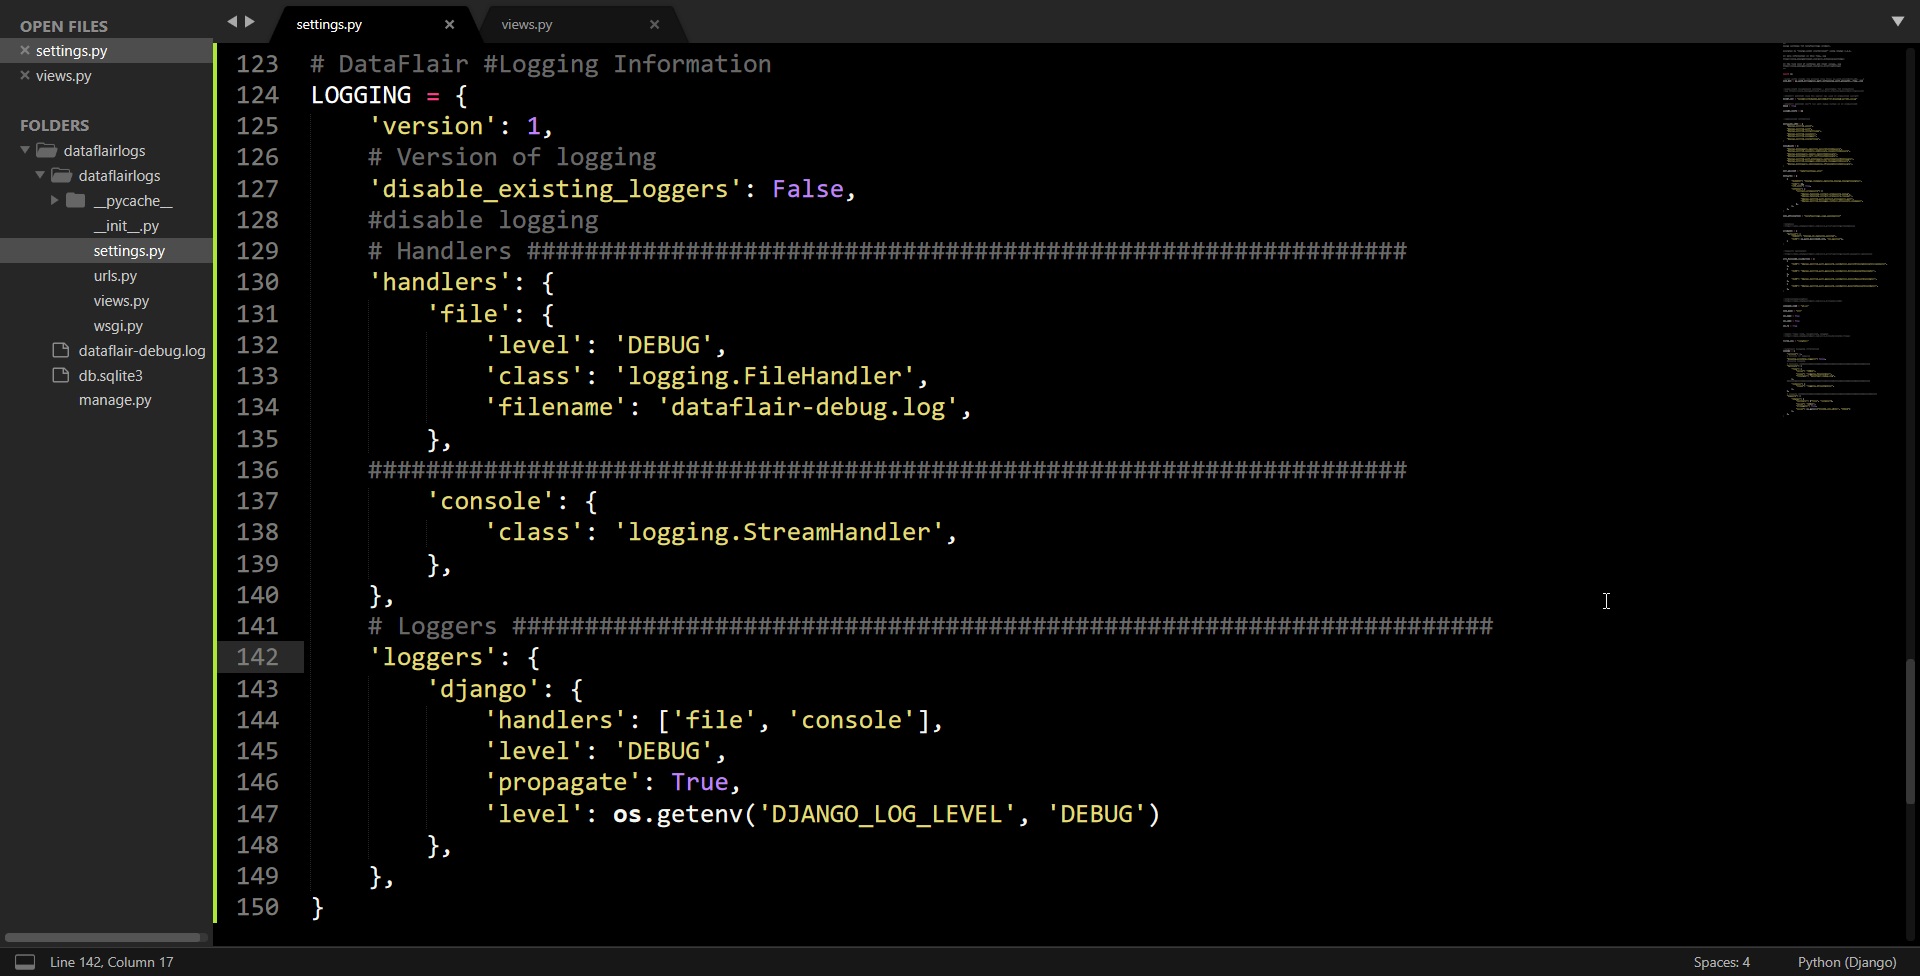
Since Django works with different modules therefore, we use the dictConfig method. There are other raw methods as well, but dictConfig is what Django’s default behavior. Just copy this code in your settings.py
Code:
# DataFlair #Logging Information
LOGGING = {
    'version': 1,
    # Version of logging
    'disable_existing_loggers': False,
    #disable logging
    # Handlers #############################################################
    'handlers': {
        'file': {
            'level': 'DEBUG',
            'class': 'logging.FileHandler',
            'filename': 'dataflair-debug.log',
        },
########################################################################
        'console': {
            'class': 'logging.StreamHandler',
        },
    },
    # Loggers ####################################################################
    'loggers': {
        'django': {
            'handlers': ['file', 'console'],
            'level': 'DEBUG',
            'propagate': True,
            'level': os.getenv('DJANGO_LOG_LEVEL', 'DEBUG')
        },
    },
}
Understand the Code:
I know the code is a bit large but it’s very easy to grasp. We get a built-in variable LOGGING from Django. The logging’s default values come from this dictionary. Since we are configuring settings using a dictionary it’s called the dictConfig method.
There are some important keys inside the LOGGING dictionary.
- version
- disable_existing_loggers
- handlers
- loggers
Let’s discuss them one by one. The version key tells the schema version. It’s important that it has value. It’s by default 1.
The next key is disable_existing_loggers. This key is to tell Django to do not disable loggers. By default, Django uses some of its own loggers. These loggers are connected with Django ORM and other inner parts of Django. This key is by default True. So, it will disable those loggers.
There are various database queries and function calls which the loggers log. Therefore, it is recommended that you don’t True this Key.
Handlers is the 3rd key. As we discussed, handlers handle the message and pass them to console, file, etc. The handlers itself is a dictionary. That dictionary-key names will be the names of the handlers. There are various handlers provided by the logging module. We are using two handlers here.
1. FileHandler: logger-name – filehandler
The FileHandler will store the logs in a file. As you can see, we have given the filename as dataflair-debug.log. The level defines, until what level the logger shall commit logs.
Note:
Log files are generally stored with .log extension. This file can only be edited with permissions. It can only be appended.
2. StreamHandler: logger name – console
The stream handler will stream the log on console. This is not a recommended method. There is a limit of characters until the command line shows you logs. Since logs are too big to handle by command line therefore we need file-handlers.
There are more handlers like mailhandlers, AdminEmailHandler etc.
The AdminEmailHandler is a great addition to the opensource module.
Loggers are the ones that will log your server or software information. Loggers are also a dictionary type. It has a similar architecture as handlers. Although, there are different attributes and other properties.
Django also provides a set of loggers. There are various loggers like django, django.requests. and more.
Now, to implement logging, you just need to follow these steps:
Start your server.
$ python manage.py runserver
The moment you hit enter there will be a series of logs and a lot of that. This happened because we set the default level to debug. All these logs are actually messages from the default loggers.
You can create your custom loggers in the consecutive files. That way you can get logs from specific files.
Here is the output of the file which is generated after logging.
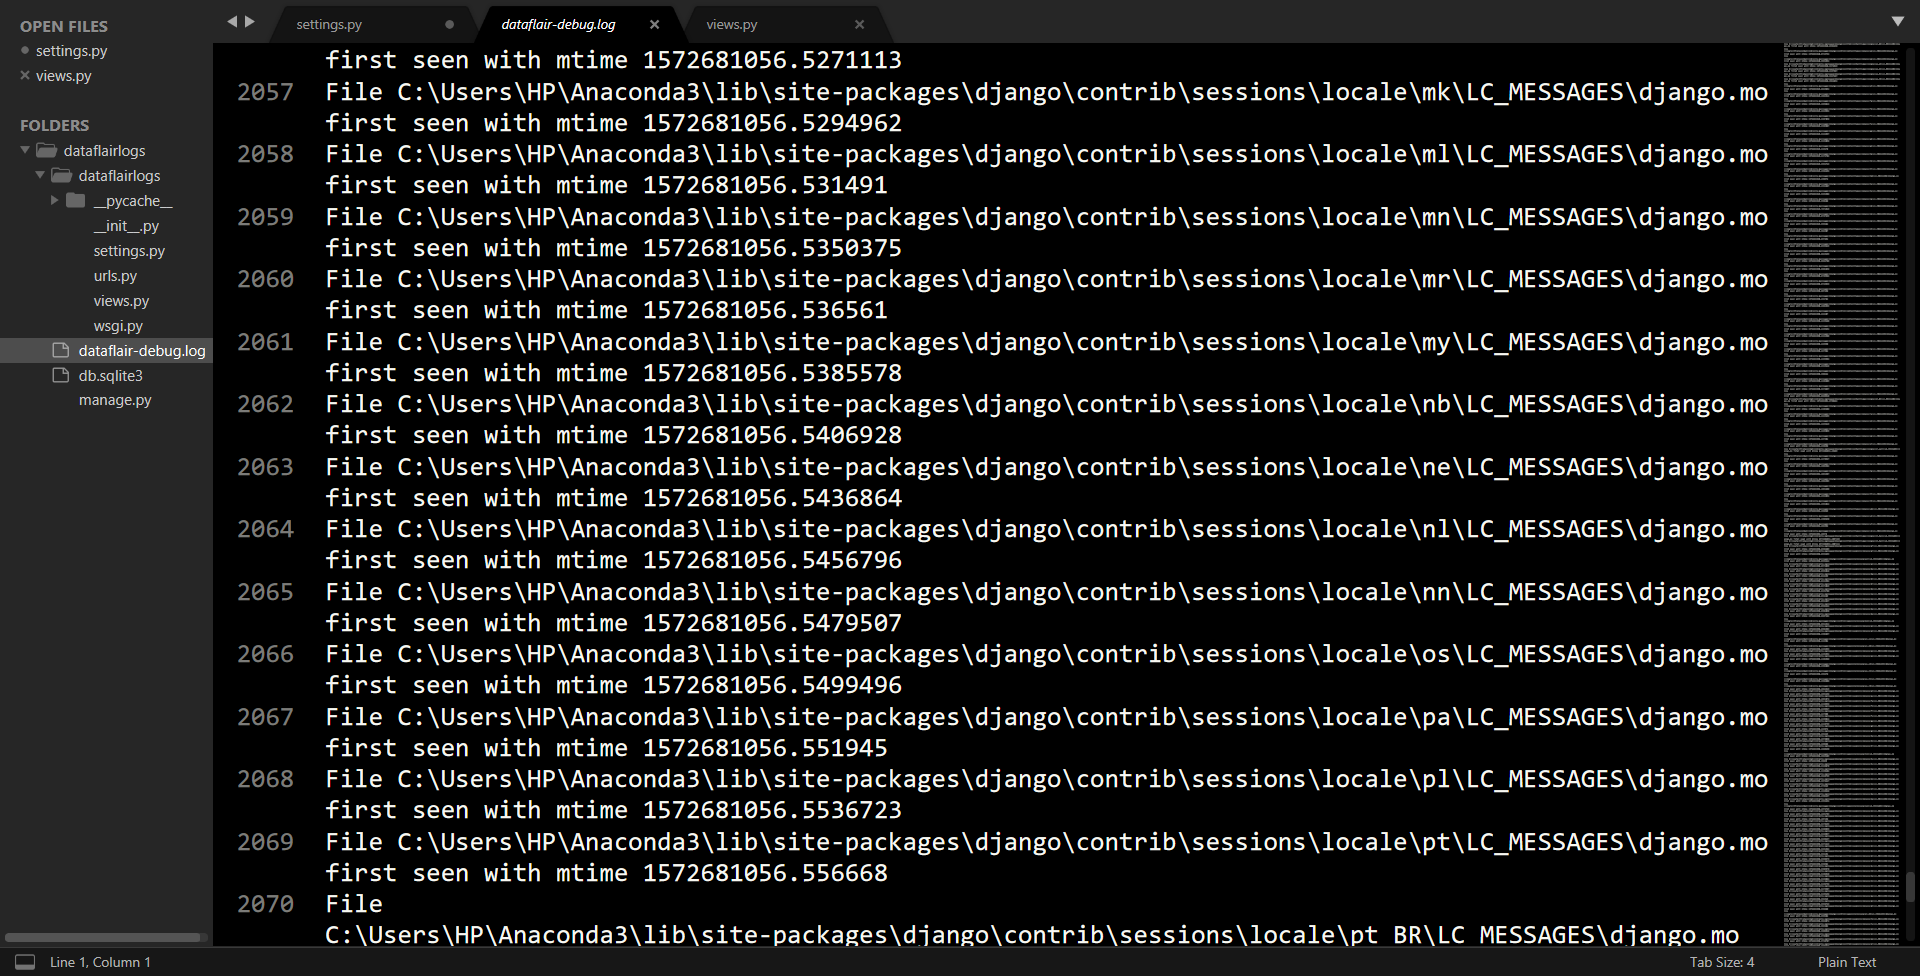
These are the logs. There are a lot of logs but only warning or above levels shall be notified.
Summary
Logging is pretty important. If it’s implemented correctly, then it can save you a lot of time. Generally, logging is done after the project is complete.
Logging module is the basics of logging with Django or another python project. There are other solutions as well like, celery, travis etc. These log handlers also make it easy to handle logs. They can ease the task of searching whether the events occurred or not and what was the cause.
Any queries related to Django Logging article? Mention through comments
Did you like this article? If Yes, please give DataFlair 5 Stars on Google


how to login as user in e-commerce website
and make change password,wishlist,myorder,address etc
How to show google map from a template by {% load static %}……..
Thanks for the information
I want to implement azure app insight for a django application any method for that