Django Web Hosting and IDE – An Easy-to-Implement Guide for Beginners
Master Python with 70+ Hands-on Projects and Get Job-ready - Learn Python
Job-ready Online Courses: Click, Learn, Succeed, Start Now!
We have spent a good time learning Django. The framework is simple, modular yet very powerful. There is a catch though. We have been running our website on the local computer.
A website’s true application is on the web. I am sure we all concur on that. So, we have to put out a website online. It is also referred to as going live, on a production server, etc.
These all mean the same thing. Hosting is the part where you can showcase your work to the public. When websites go live, it becomes accessible by the public. People can see and access what you have built. It’s a wonderful feeling. You will get the notion when you do it for your project.
In this article on Django web hosting, we are not going to make a new Django application from scratch. Actually, we are not going to develop anything on Django in this article. We are going to learn how to upload it on a server computer.
We are using the SQLite database in this article. You should change your project settings accordingly.
We are going to learn the below-mentioned topics in this Django web hosting tutorial:
- What is the Production Environment?
- Git – Introduction & Installation
- Hosting Service of Choice – pythonanywhere.com
- Setting up the Production Environment
- Configuring Settings for a Production Environment
- Uploading Project on Server
- Creating a Superuser
- Making a Django Web Application
- Settings for Security
- Settings for Static Files and Allowed Hosts
- Search the URL in the Browser
This Django article is going to be a long one. It is highly recommended that you follow all the steps. Django is relatively easier to put on a production server. Still, the process takes some time of around 30 mins. Let’s start the Django web hosting tutorial.
What is Production Environment?
A server computer is nothing but a computer. The special thing about a server computer is that it’s connected to internet 24×7. It has a server program, backend and everything your website needs. Therefore, it is often called a production environment.
A suitable example could be a smartphone manufacturing factory. The end product of this factory is ready for end-user. The same thing is your website on the server. The server is the factory which processes your website. The user consumes the processed product. Every website on the internet is on a server. That server provides the developer with a production environment.
A production environment is capable of running and serving your website to users. The production environment can include:
- Computer Hardware
- Operating System like windows, ubuntu, etc.
- Support for a programming language like Python Interpreter
- Web Server like Apache, Nginx, etc.
- Application server
- Databases on which our website is built
- Some extra tools like a load balancer, proxy server, etc.
So, there are a lot of components on a web server. Server technology is a domain in its own. We need not bother about it. For our purpose, we just need a server which is connected to internet 24×7.
That server can be situated in local premises or you can choose a hosting platform. Generally, developers prefer hosting platforms. It has its own benefits. In this article, we are going to learn how to host our website using one of these hosting platforms.
Hosting platforms provide infrastructure as a service to developers. So developers need not buy hardware. They can skip to the part of the software configuration. This is an application of cloud computing and is called IaaS (Infrastructure as a Service). These hosting companies can also provide a PaaS (Platform as a Service). You can actually create a computer with chosen hardware specifications. You can select everything from OS to software installed. Cloud technology has lots of applications. We are going to use one of them.
Hosting platforms are better for every developer who is a beginner. Since we as developers get a chance to showcase our work for free. We will be using pythonanywhere.com for this purpose. There are several hosting platforms available like AWS, Heroku, Digital Ocean, etc.
You can check out this website to know which hosting service provide Django support:
There are a lot of them since Django is a powerful framework. Ultimately, it depends on you to use whatever platform. Generally, developers choose the one which is easiest to start working with.
Git – Introduction & Setup
This part is for developers who have no experience with Git. Feel free to skip if you have installed Git and have an account on GitHub. We are going to introduce Git and GitHub in this article.
So, Git is a version control system which means it will track your progress on the software. There are many similar tools but currently, Git is the most popular. Beginners often think Git and GitHub as the same thing. They are very different.
As stated earlier, Git is a version control system. It is a piece of software that you can install on your computer. You can track the changes you made to the project. It is a powerful software for fast and manageable development. You can make repositories of your code and then mark what changes were made. It really helps out when you have been making changes to project over a long period of time. Remember Django migrations tutorial. The migrations were acting like a version control system for models. Git is the same but for a whole software.
We need to download Git for your operating system:
Download and Install git as instructions are given on the link above. Once you have installed Git, try executing this command in Terminal/ PowerShell.
Command:
git –version

If this works, then you have successfully installed Git on your machine. It is an amazing utility for project management and version control. You should learn about this tool. It will help you a lot in project collaboration and working with a team.
What is GitHub?
GitHub is a hosting platform for Git. As you have experienced, Git is a command-line tool and can be difficult for beginners. GitHub provides a graphical UI so it is fairly easy then Git. Although, GitHub is really powerful when you use it alongside Git.
The Github.com provides developers a place to freely host their project code. That can be manipulated by the Git CLI tool. Its integration is what makes this tool awesome and so productive.
Just open Github website for making an account. This GitHub account is a developer’s portfolio. So, I advise you to upload your work on the platform. This will help you a lot in getting a job or recommendation.
Okay, so you need to make a GitHub account. Just follow along with the instructions provided by the website. Ok so, now we are prepared to make some changes in the project.
Let’s get started with configuring some settings in Django.
Django Web Hosting Process
We are going to host our website on pythonanywhere.com. Its really easy and you get to do it for free. The free account does have some limitations. It is more than enough for our Django Project. We will also need to have an account on this platform.
So, visit pythonanywhere.com and make a free account now.
Click on the signup link and follow along with the instructions.
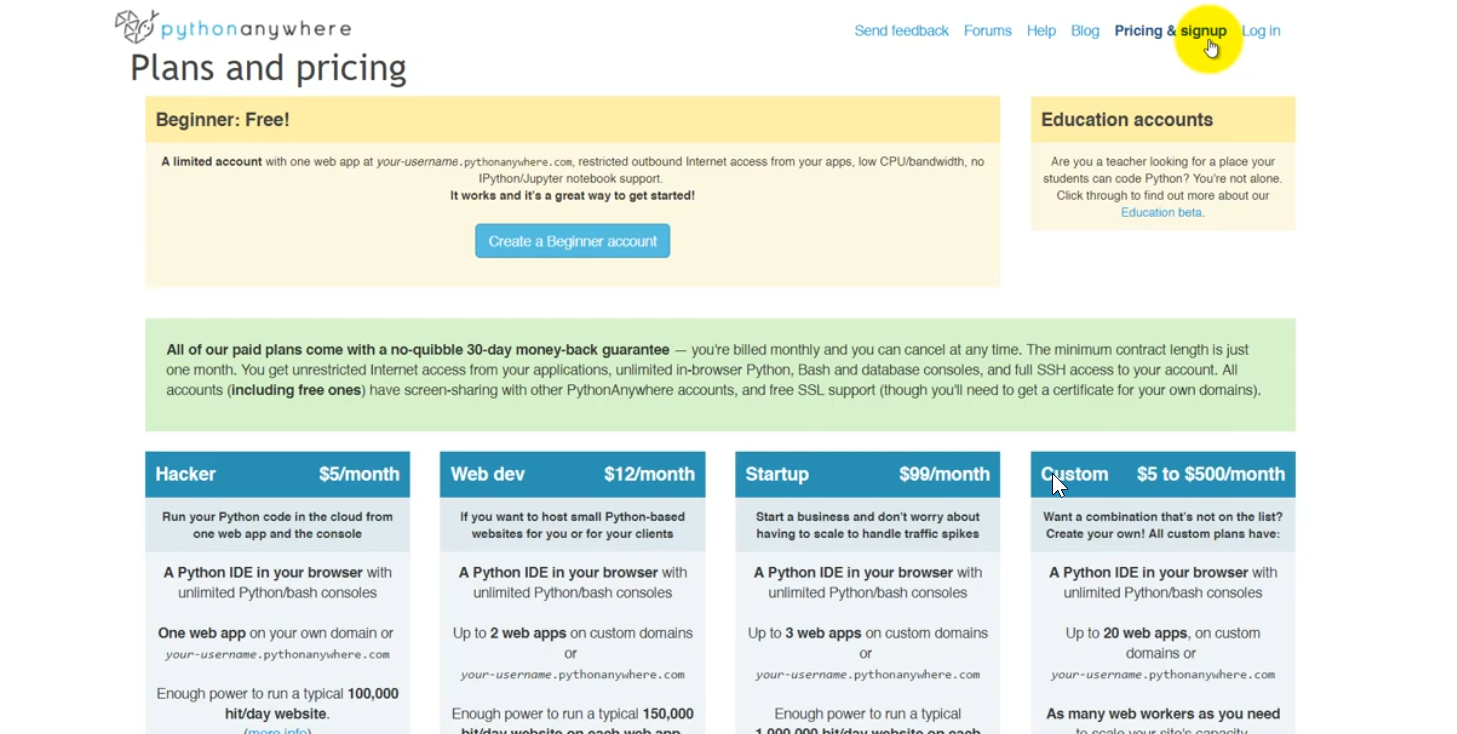
Click on Create a Beginner account link. Then fill in your name and email. Then we are good to go.
Setting up the Production Environment
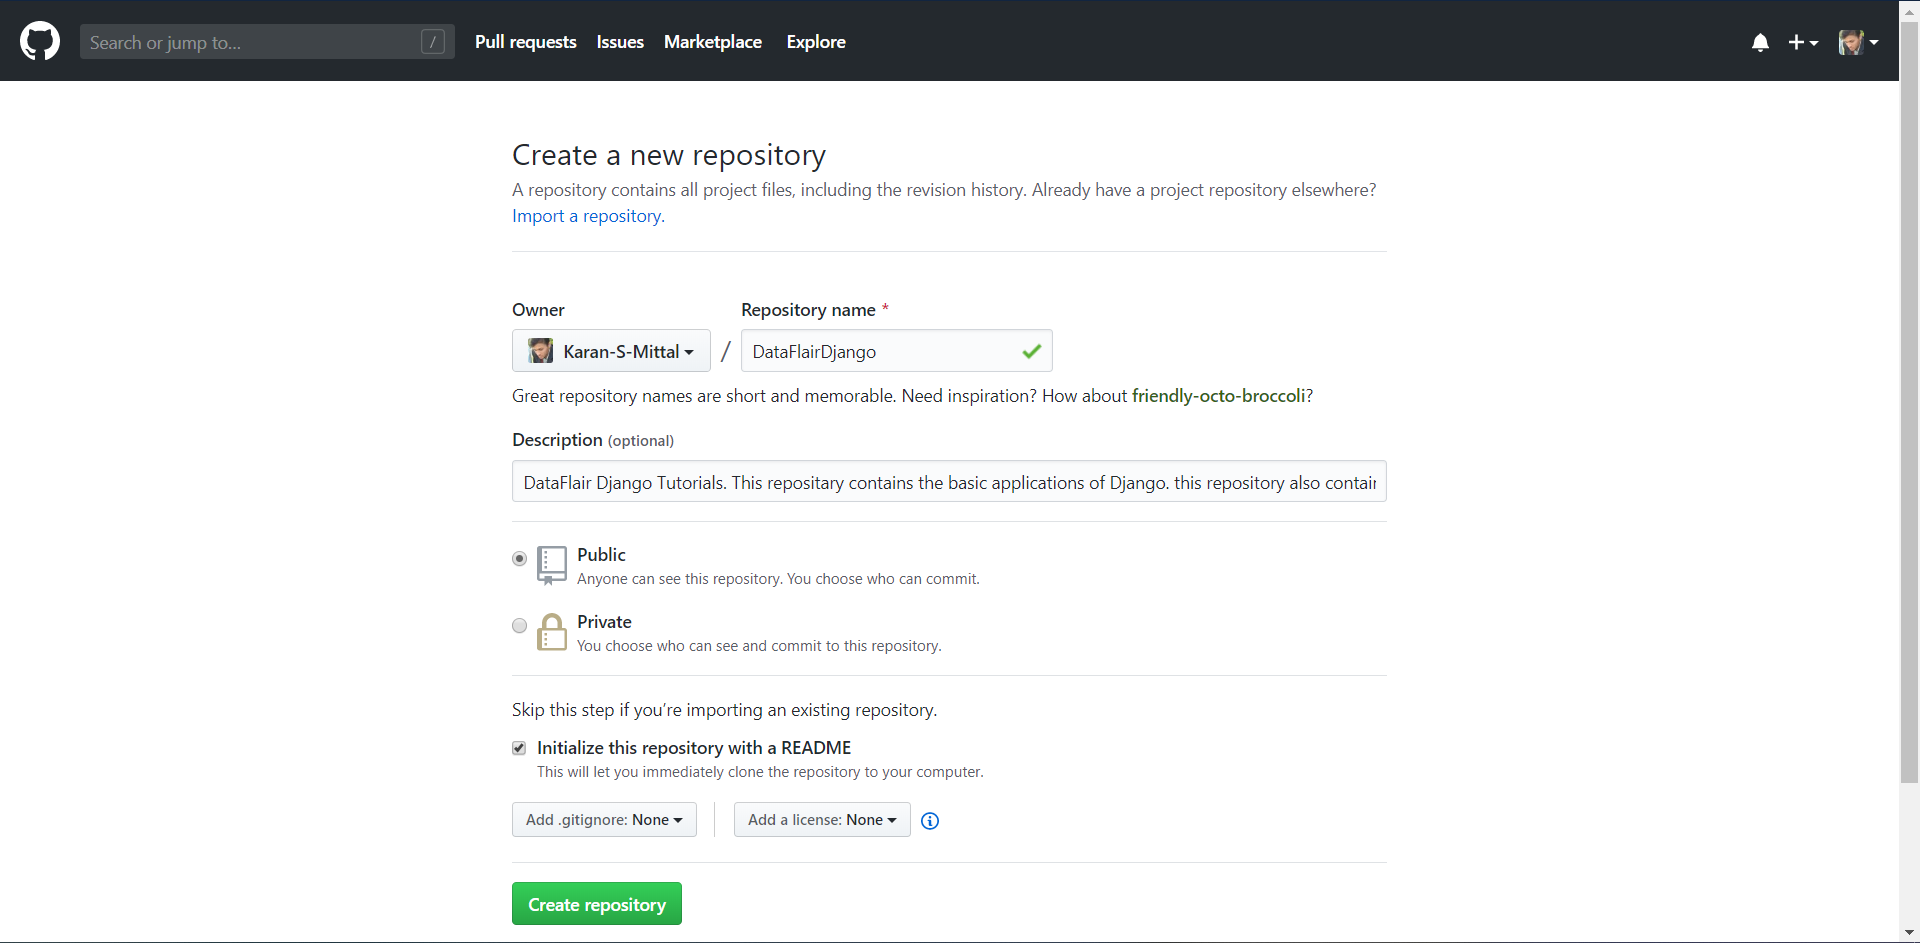
Now we need to make a repository on GitHub. Open github.com and make a new repository.

Use a small and sensible name. Once you have made the repository, start git bash program. You can also execute these commands on the command line or the terminal or PowerShell.
First, move to the directory where the project exists. For example:

The highlighted folder contains manage.py and other apps. You get the idea of the root. Now you need to move to this level from the command line.
Once, you reach this level type in this command:
git init
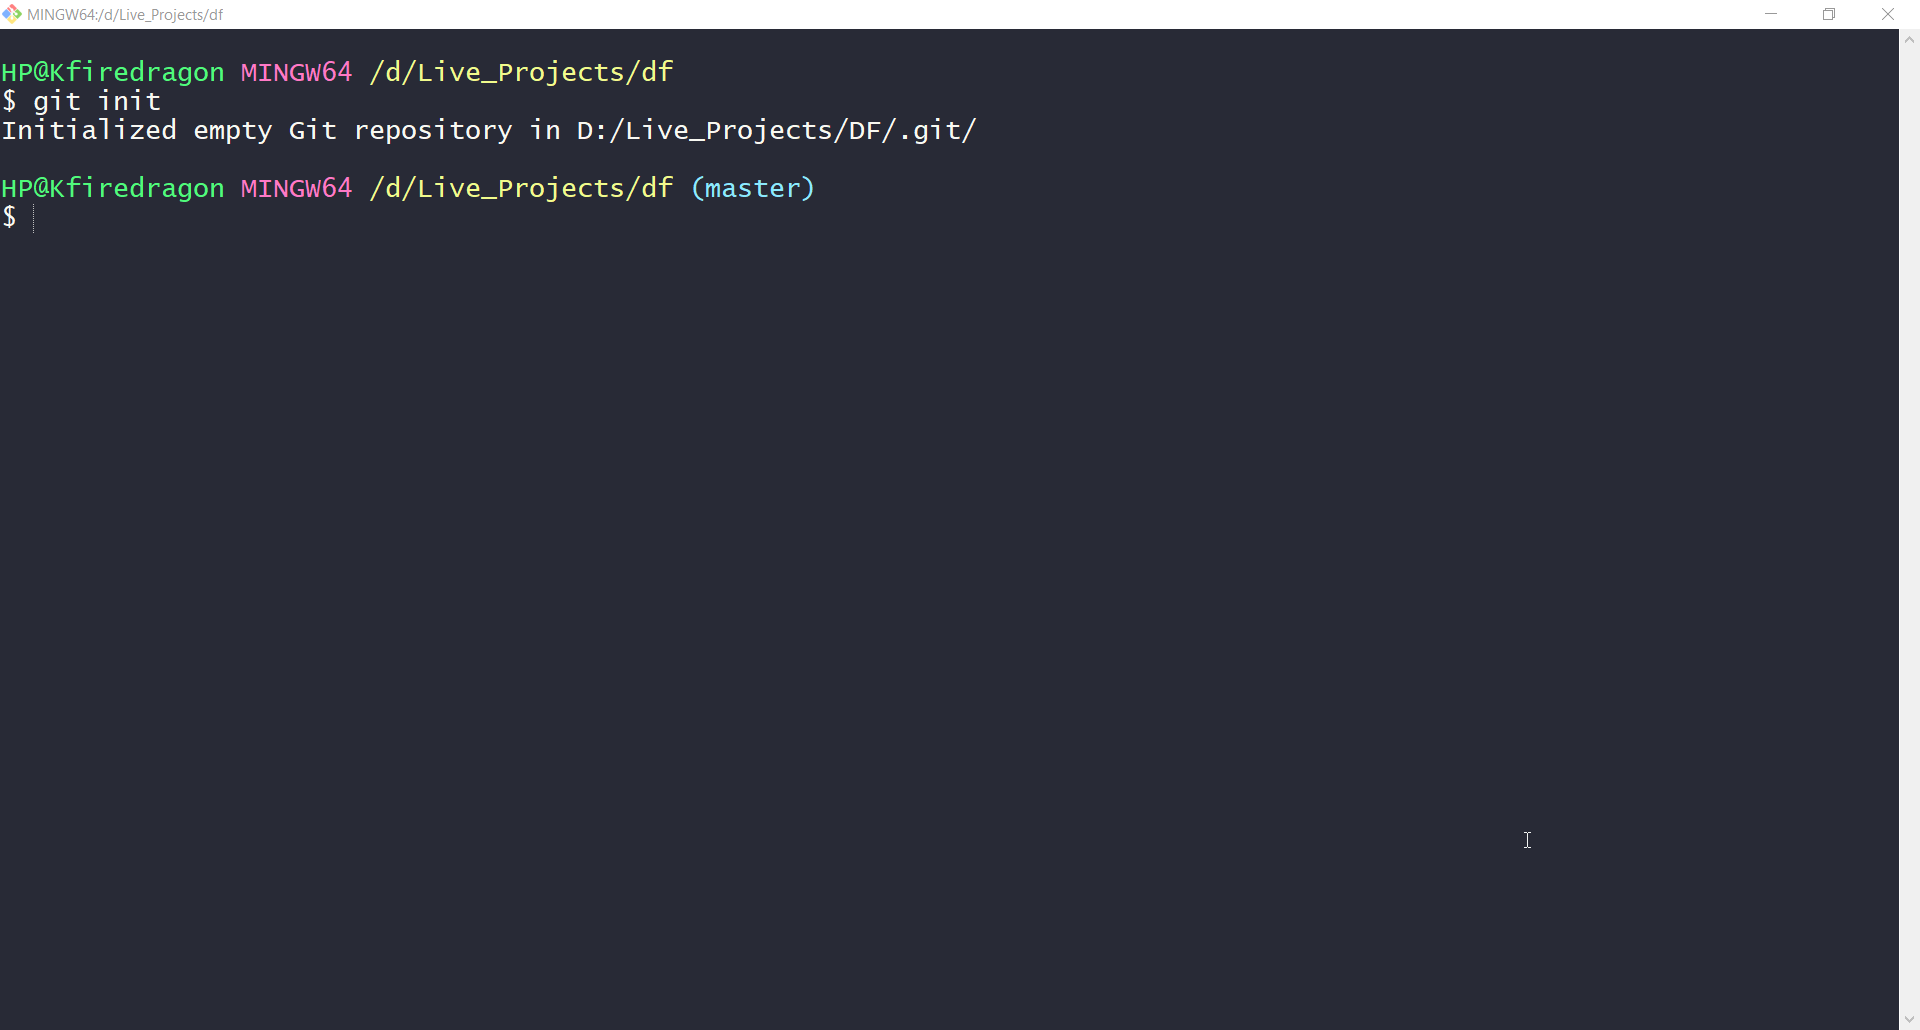
If you are using git bash then this will be the output. You can run the same command in PowerShell, Windows Command Prompt or Terminal.
This command will initialize an empty git repository. Then you can add code or project in this repository.
Command to add your project in the repository:
git add project_name

This will add the files in the repository. Now we can commit the changes to the repository. We will be using this command to commit the changes made so far. You will be using these commands a lot.
git commit project_name -m ‘first_commit’
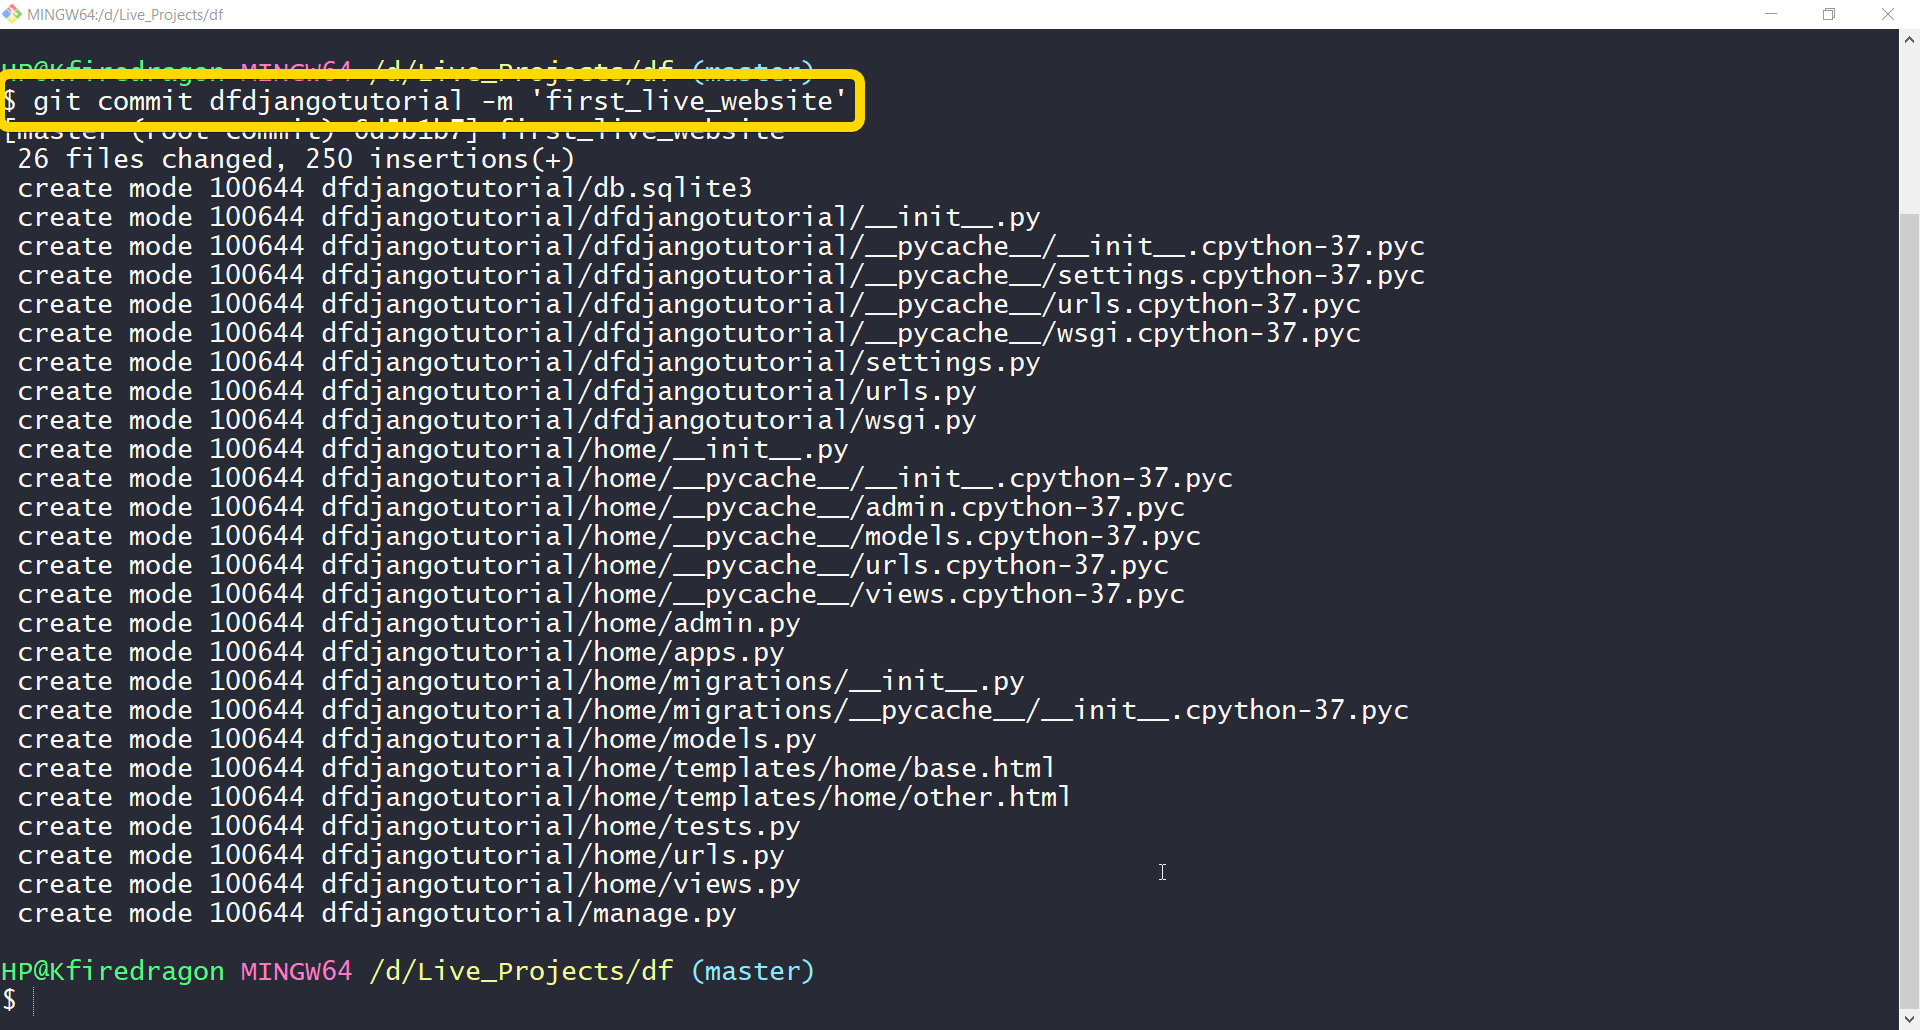
If you see an output like this then we have done a good job so far. git commit is used to commit your changes in code. We have given a message of first_commit in the command. That can be any message you want to associate with your code. That message is displayed on GitHub or when you track your changes. It’s really helpful if these messages are short and accurate.
Now, to add these files to a repository on GitHub.com, type in this command:
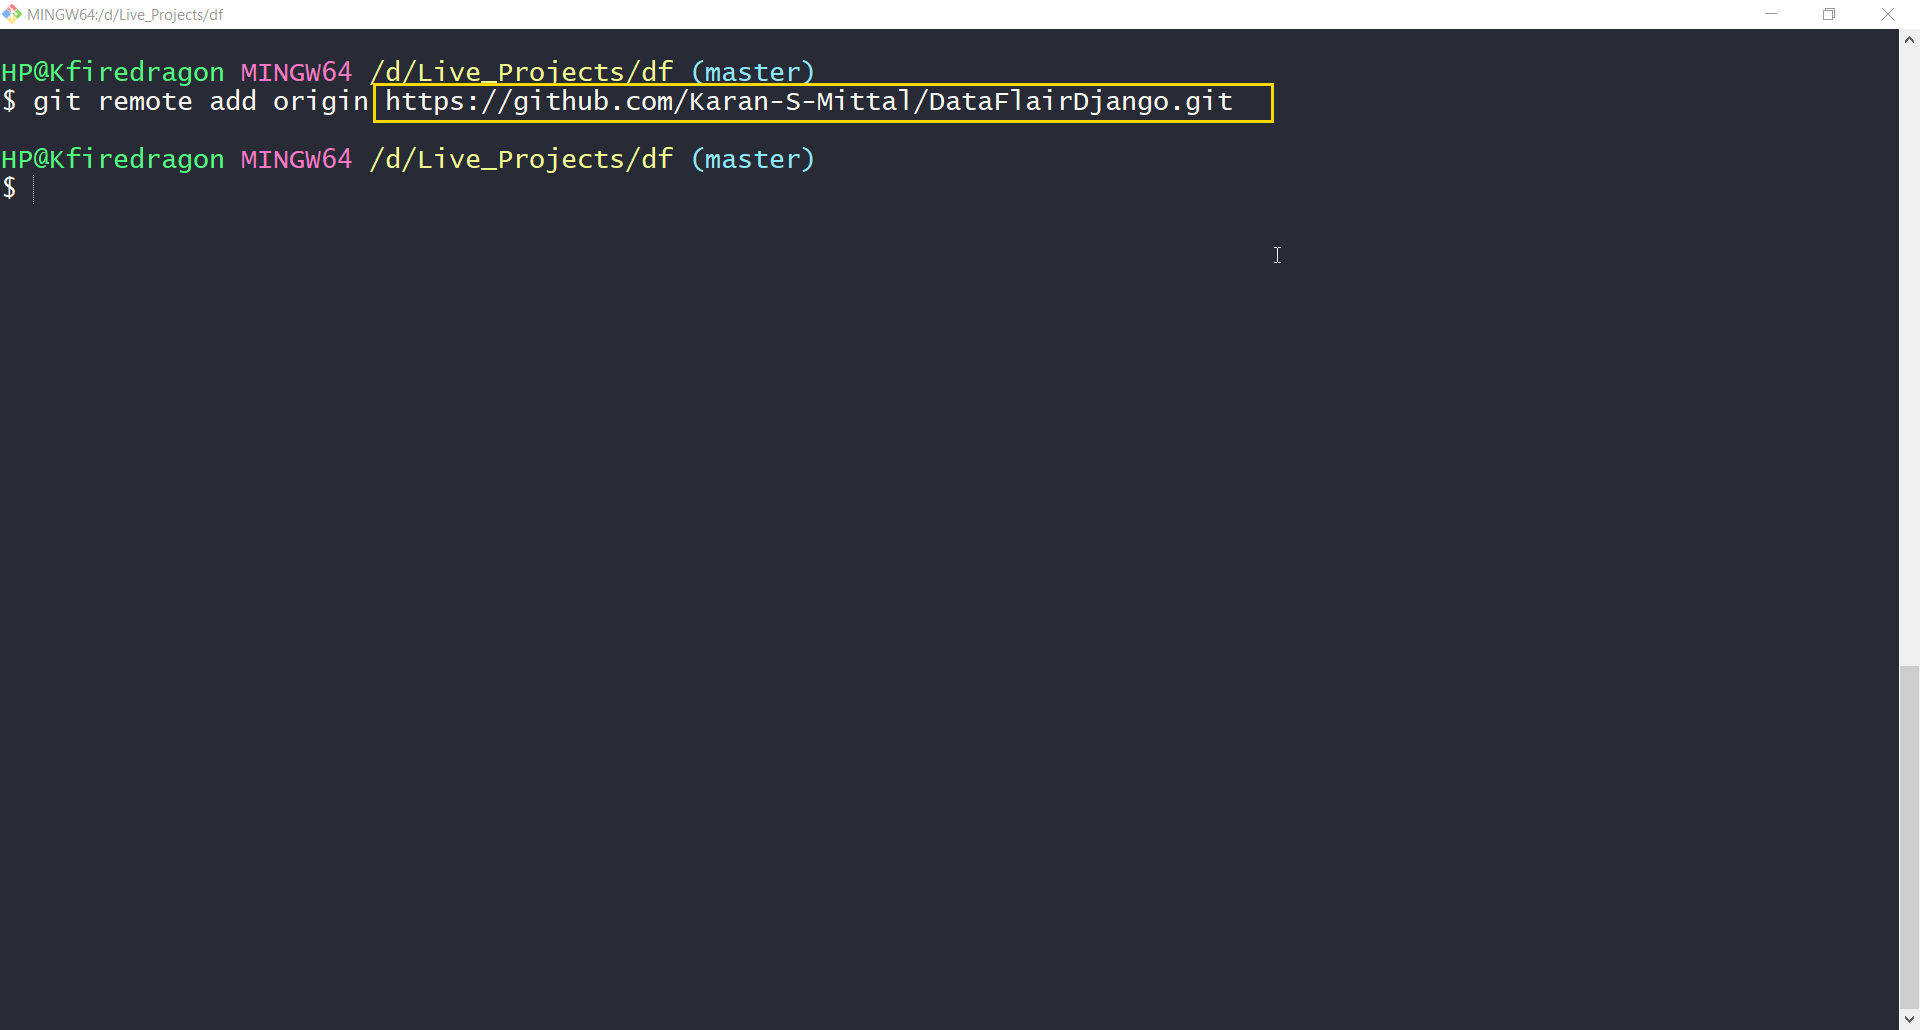
git remote add origin repository URL
Now, for repository URL, you can copy the URL of the repository tab (as you can see in the URL bar). Just paste it in place of repository_url. That’s it.
Git Remote URL of Repository
Git Remote Command
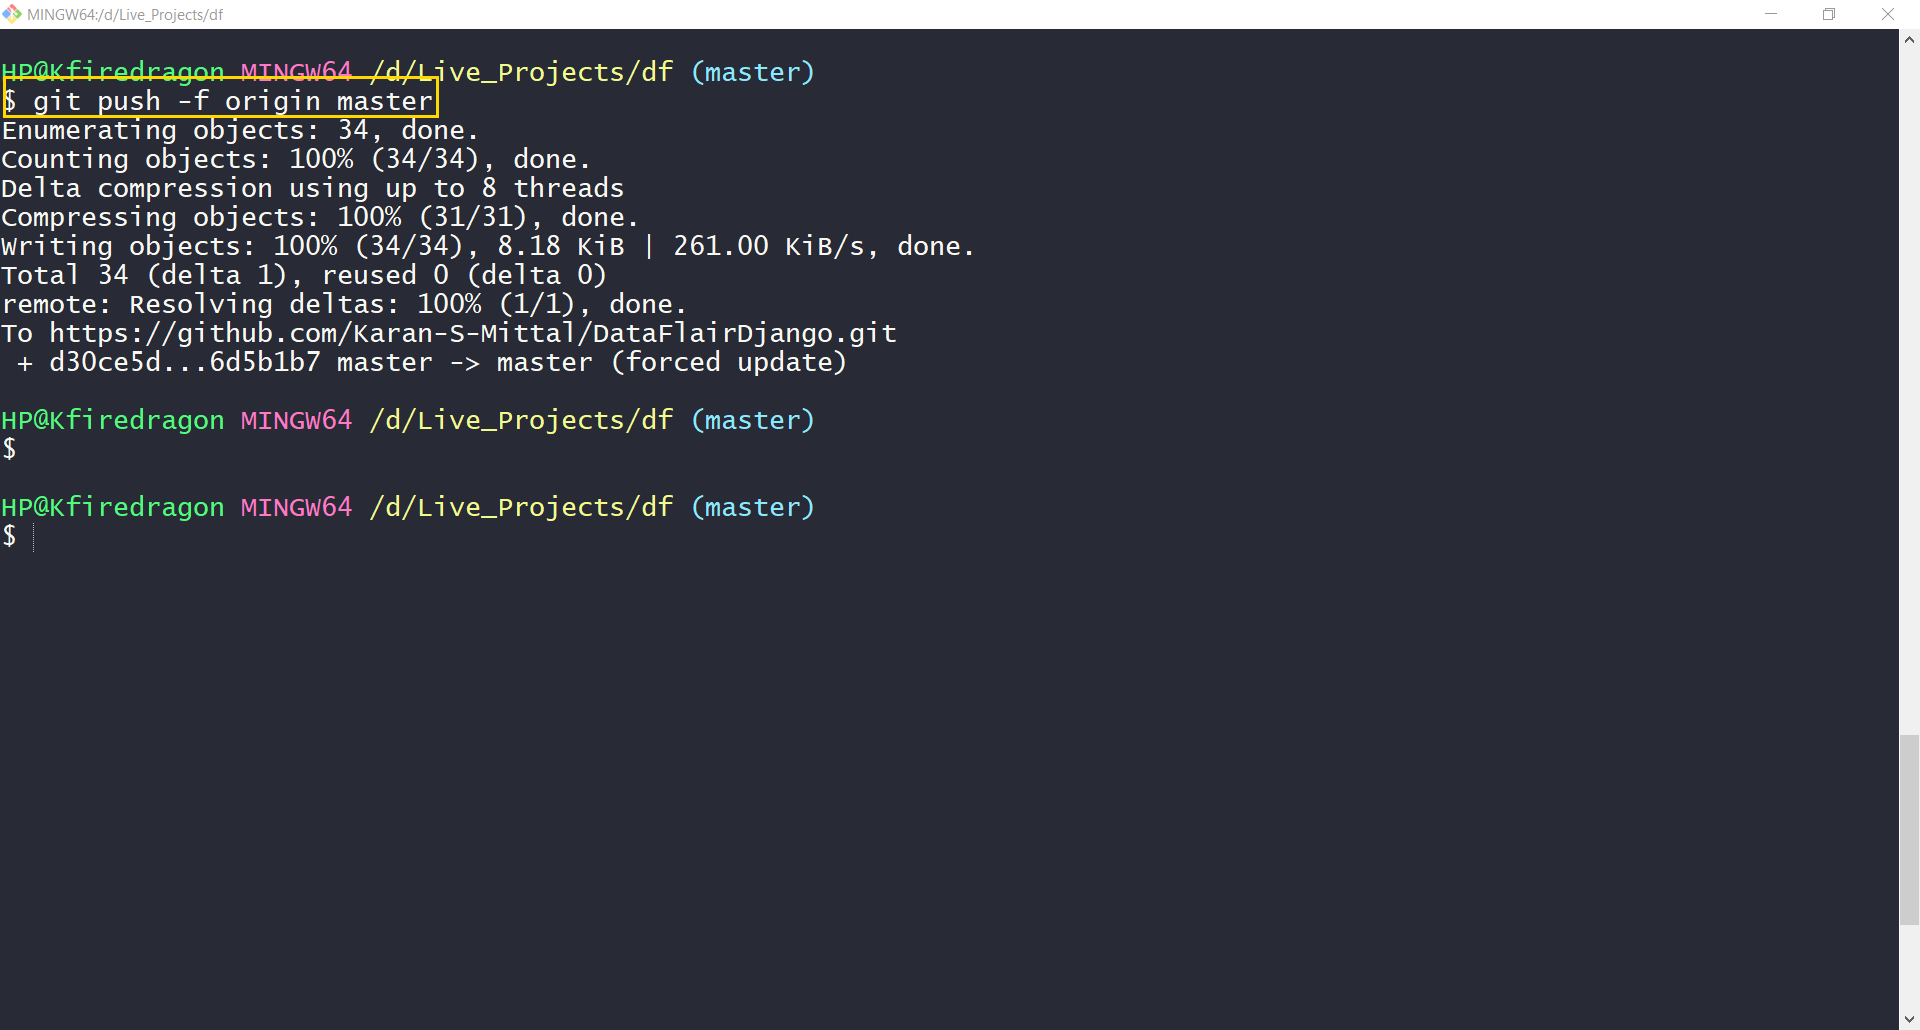
One, last step we need to perform. We need to push this code to online repository now. For that execute this command:
git push -u origin master
===============================================================
Note –
If the command above not works you can use this command:
git push -f origin master
===============================================================
When you execute this command, this popup appears. You need to login for the command to be executed. As these changes will be registered by your name on GitHub.com.

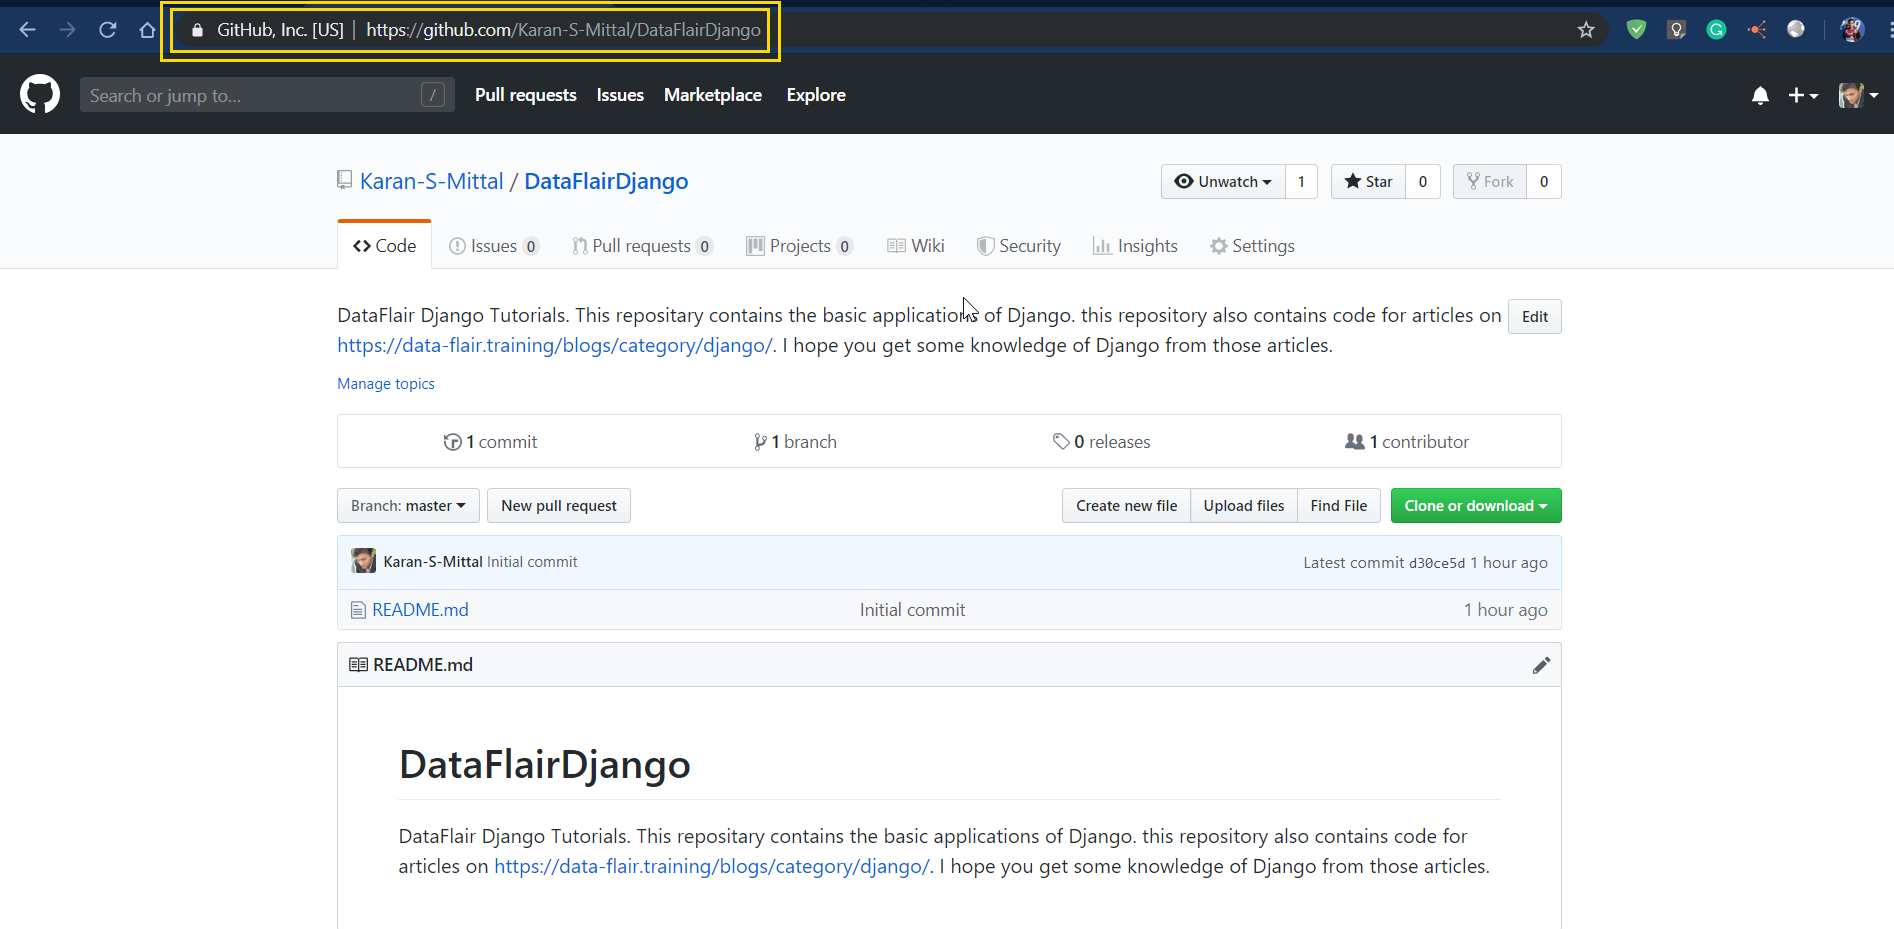
Your push command was successfully executed. Now, you can check the repository online. Our GitHub work is now complete.
Now, we are working with pythonanywhere.com. Open – pythonanywhere website and log in to your account. Click on the console’s link. There click on Bash link.
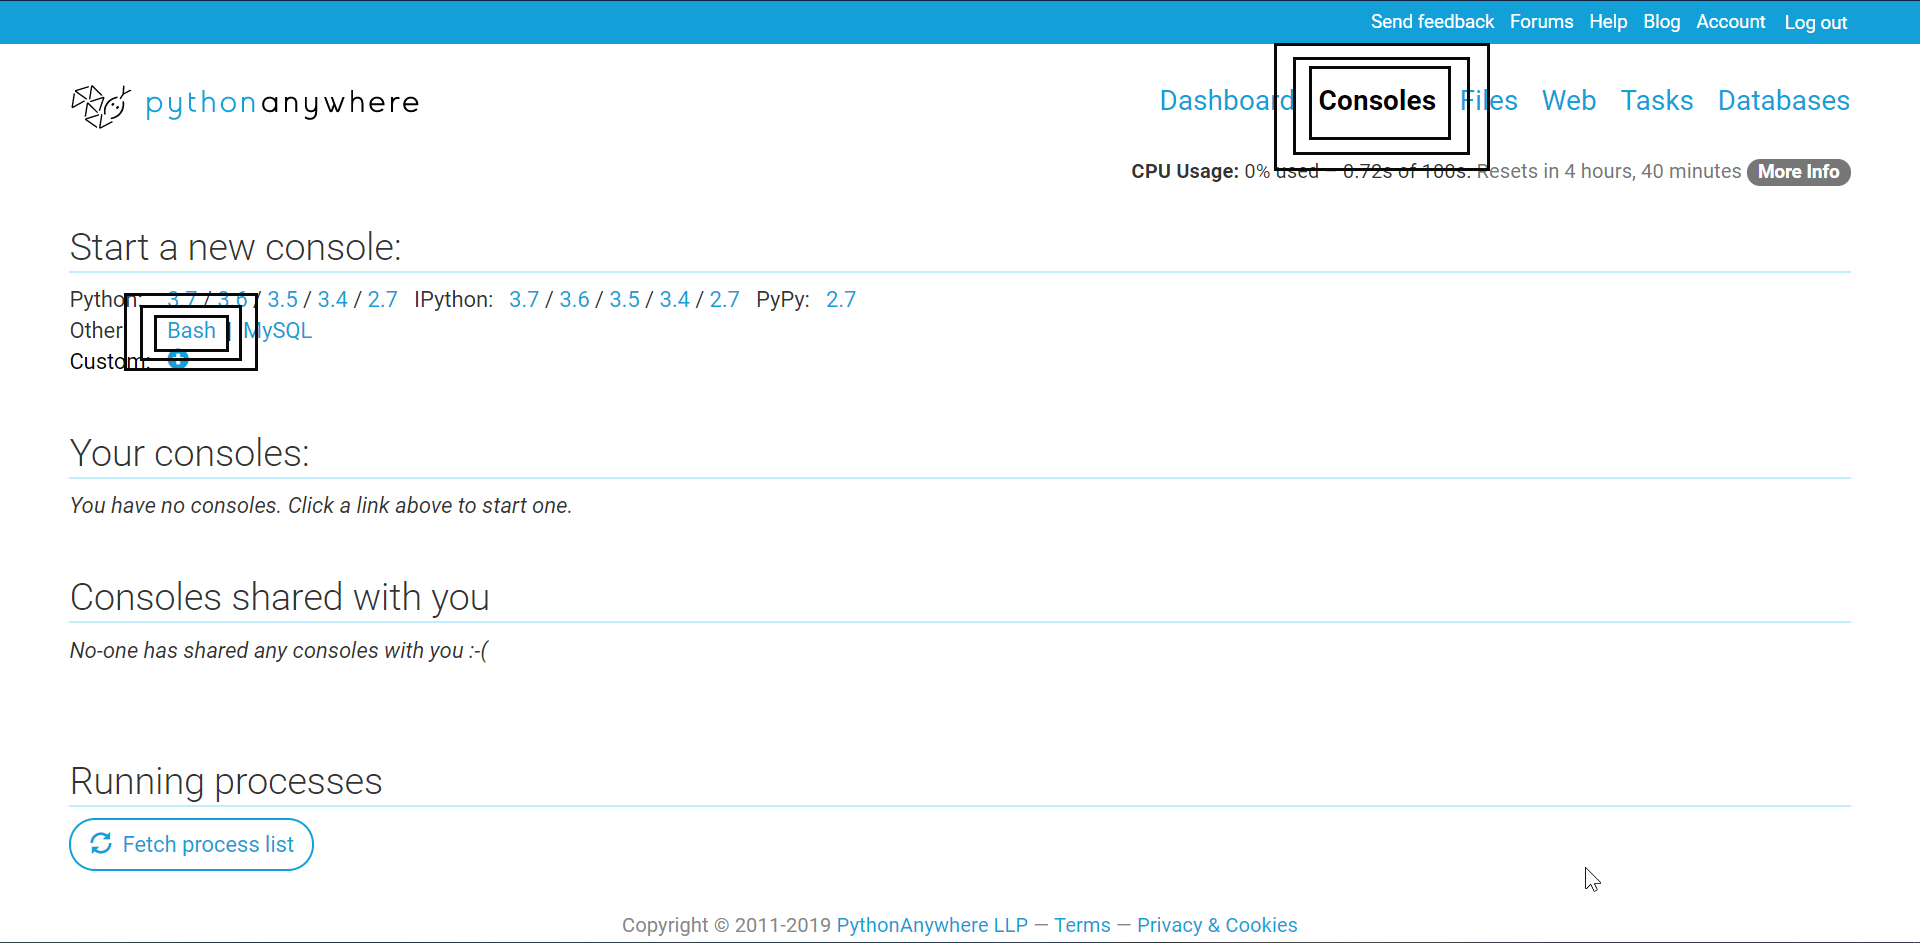
As you can see the highlighted boxes in the above screenshot.
Since its pythonanywhere.com you get Python pre-installed. This is one of the reasons PythonAnywhere is chosen as hosting services.
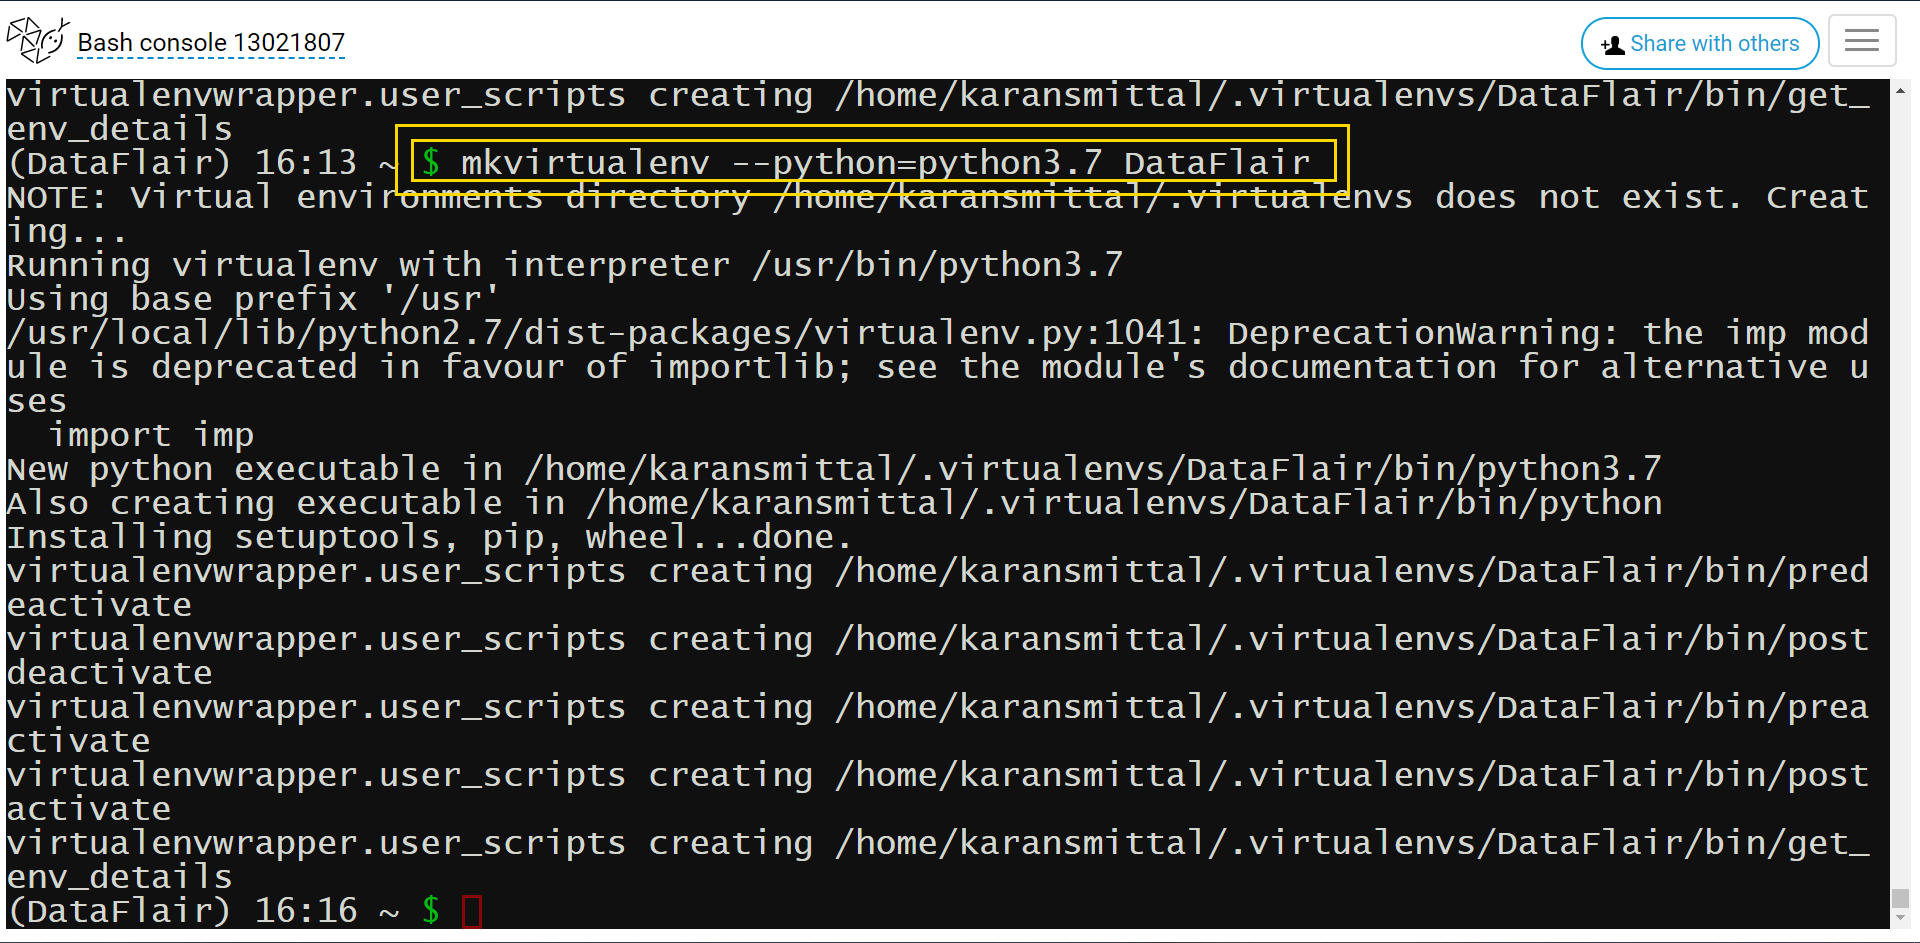
We will make a virtual environment for our project to run.
Run this command in bash:
mkvirtualenv --python=python3.7 env_name
Command Display:
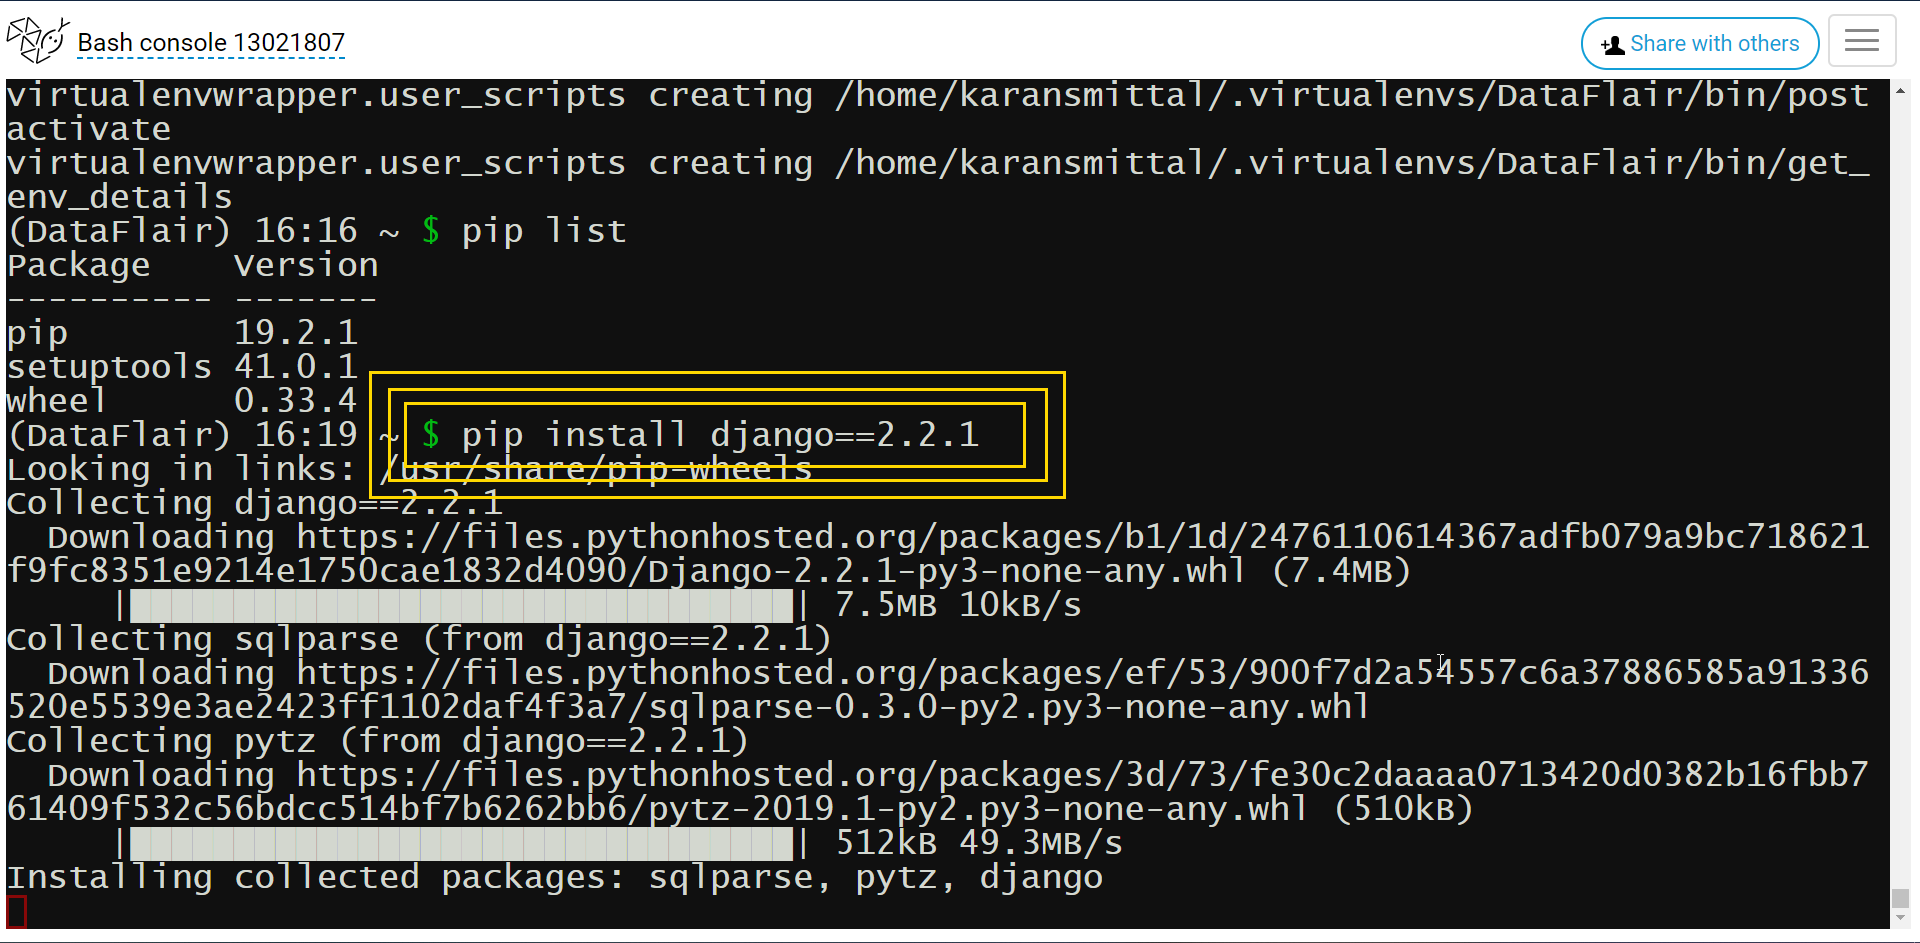
Now, we will install Django on the server. It’s really easy. Just execute this command.
pip install django==2.2.1
We have been using that version of Django. It is the latest version currently.
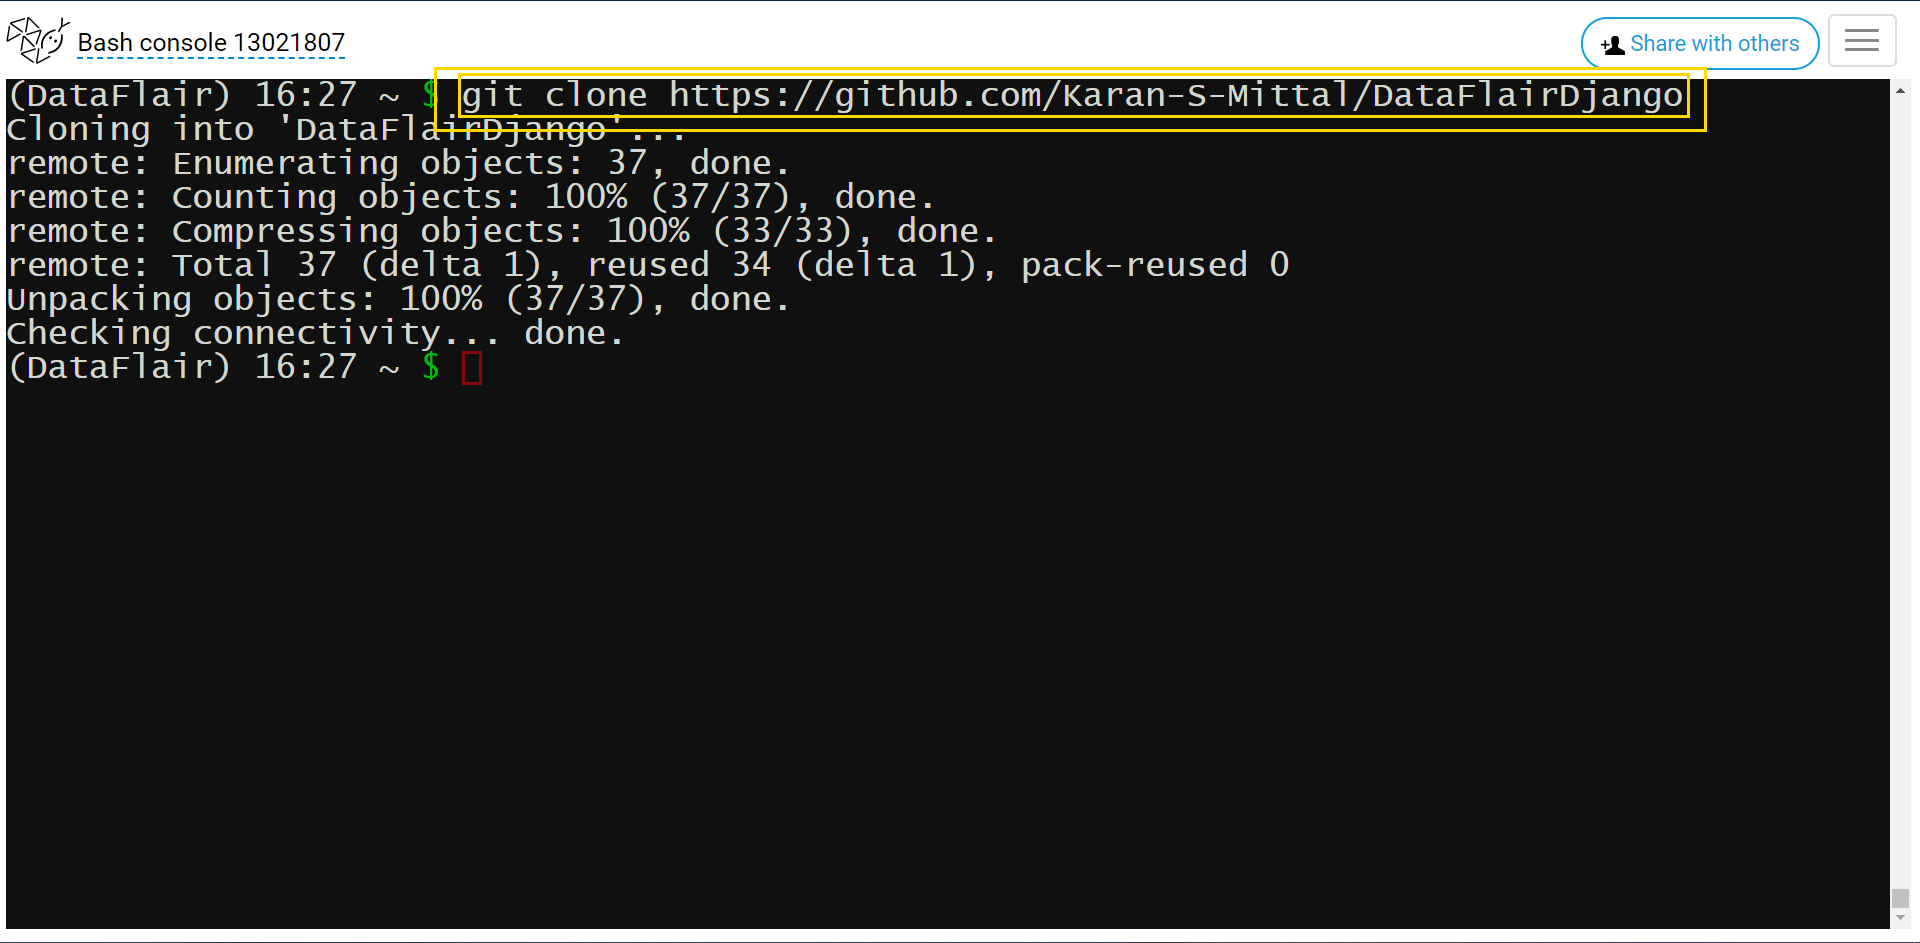
Uploading the Project on Server
Now, finally, it’s time to load our website on the server. Now you will just need the repository URL for this. Then execute this command in bash.
git clone repository_url
Now, we will migrate all the models. As we have done a lot of time in our project. Just move to the manage.py file and run the commands. The commands are the same for PowerShell and Terminal users.

Want to revise about Django Models? Here is the Django Models Tutorial
Creating Superuser in Django
We will now create a superuser. Since we have cloned our project therefore only code was cloned. There is no data entry on the website’s database.
Execute this command to make superuser.
Python manage.py createsuperuser
Command Display:
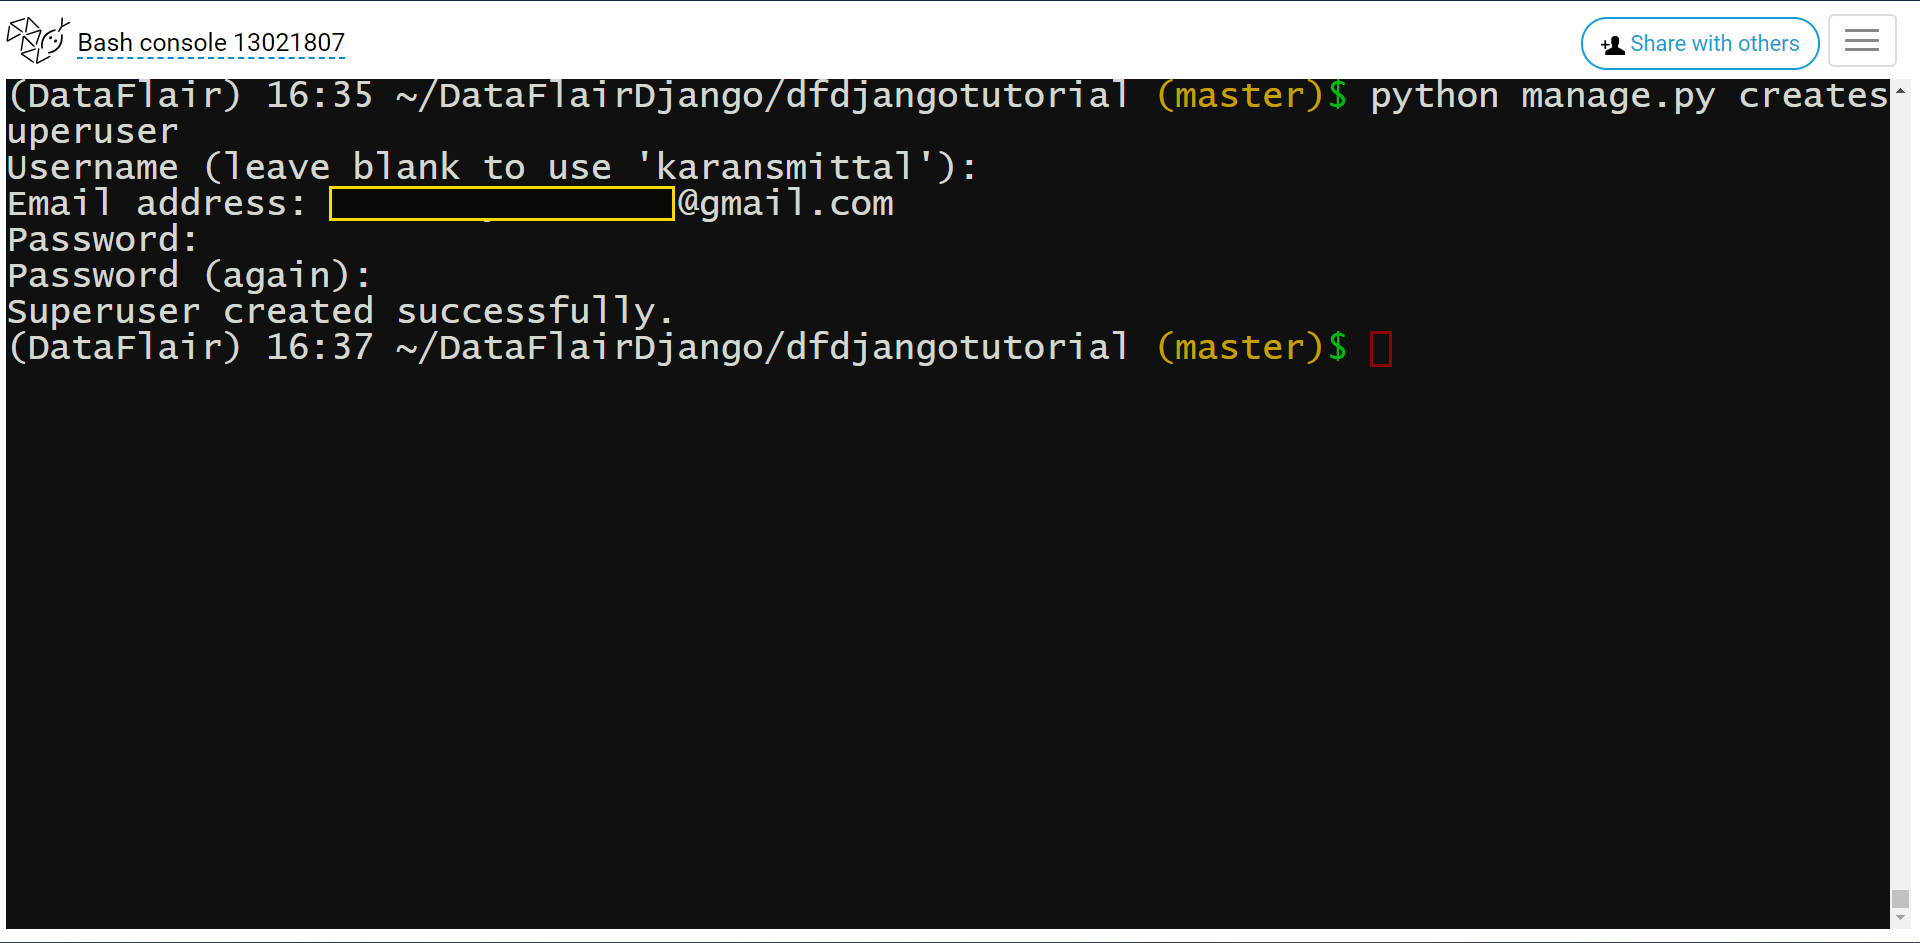
You should know, this user has total control of the project. Therefore, make the password strong and use the original email id.
Any queries in the Django web hosting article till now? Share your views in the comment section.
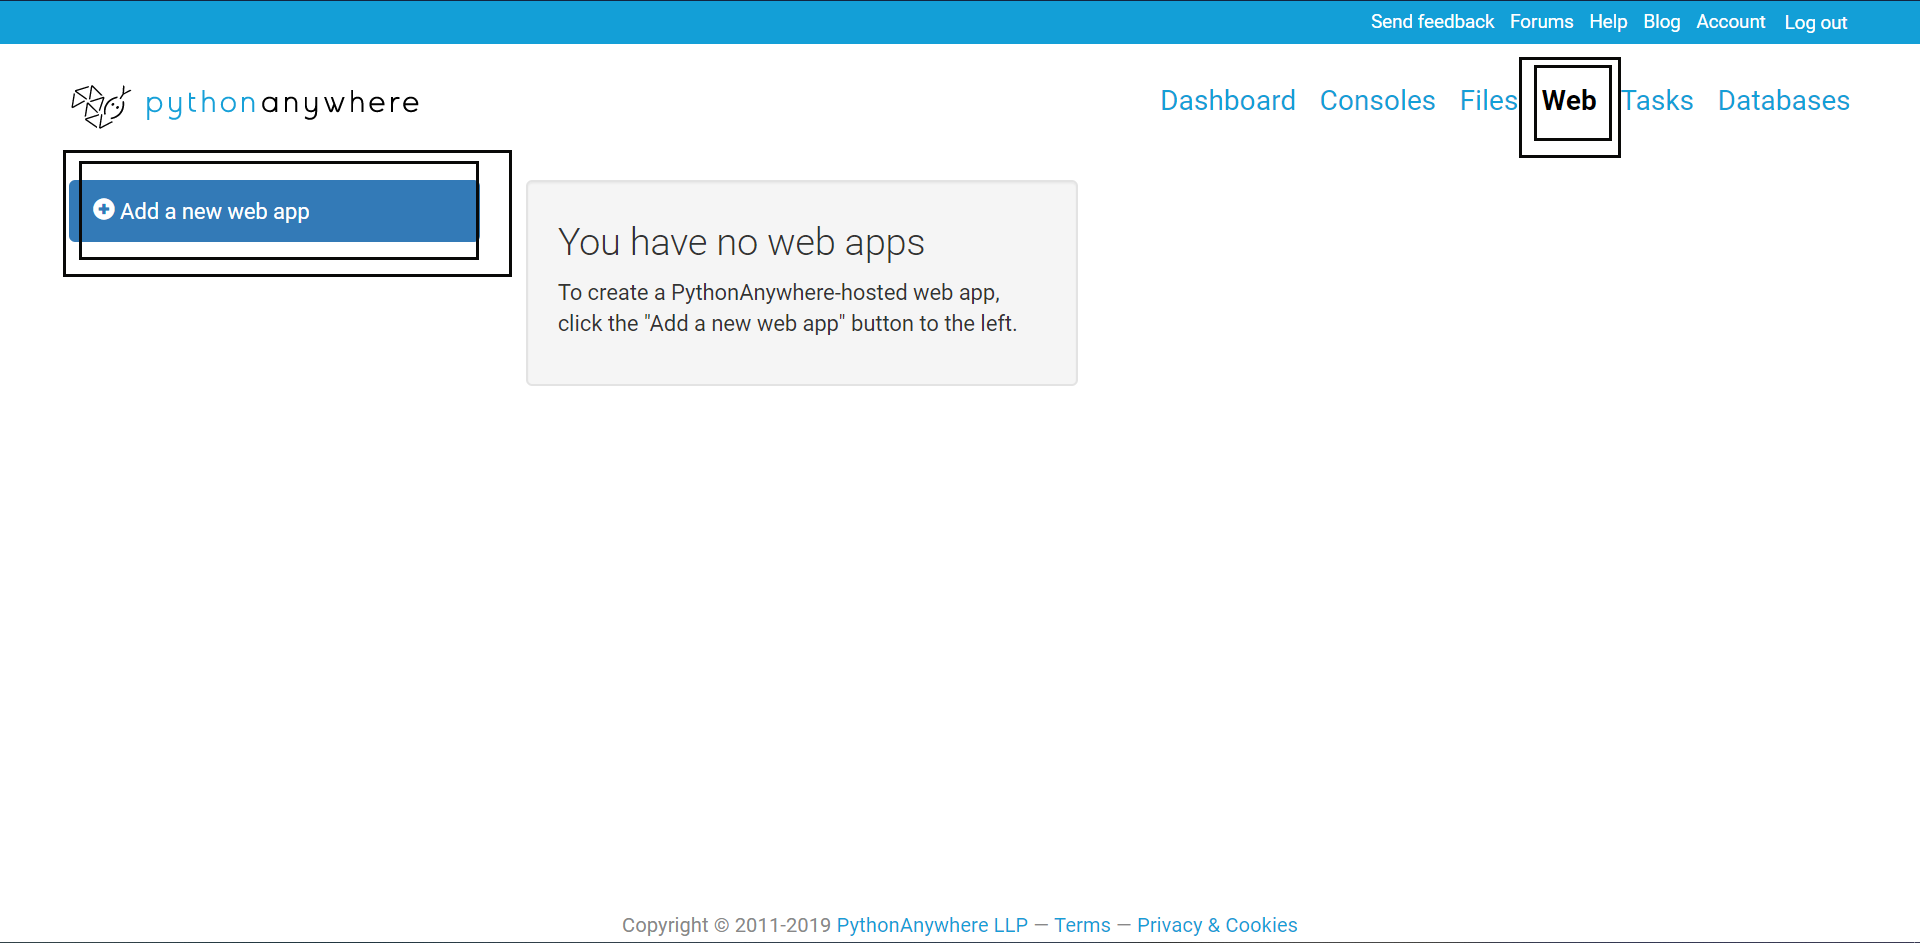
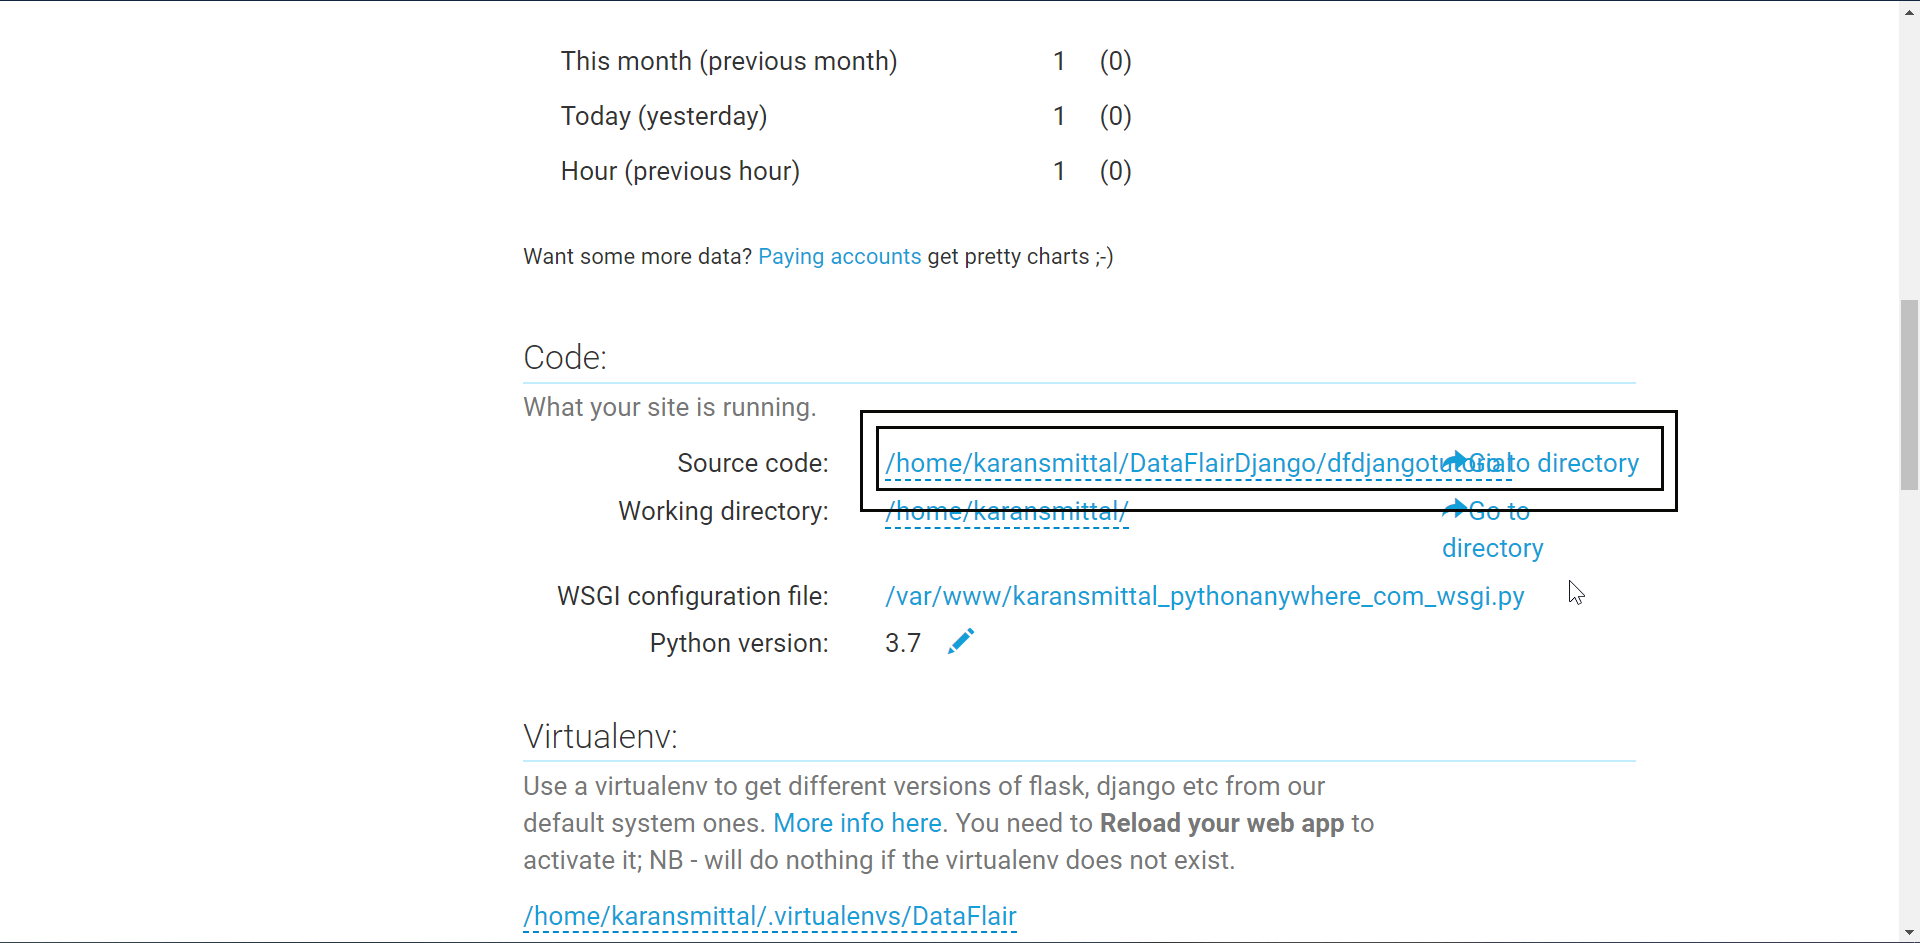
Making a Django Web Application
Now, follow along the pictures and instructions to get everything right.
Click on the web link and then on create a new web app link (as highlighted in the screenshot).
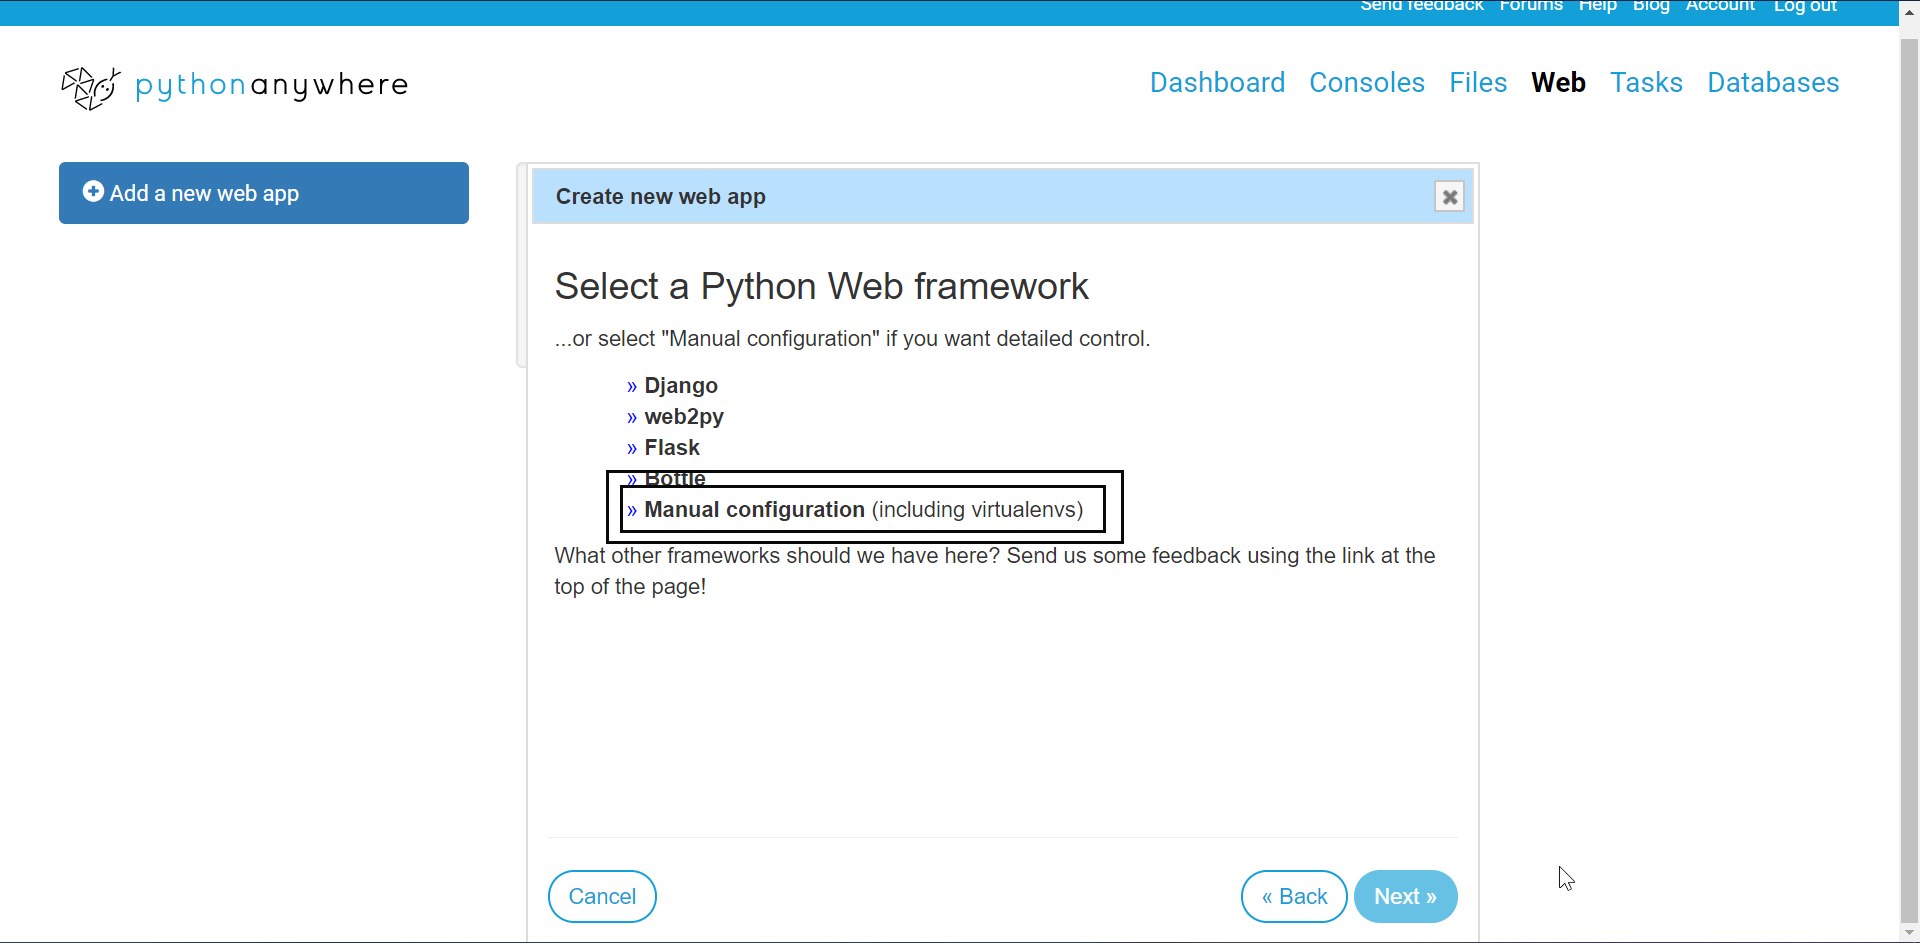
Click next, when a prompt comes. Then select manual configuration option.
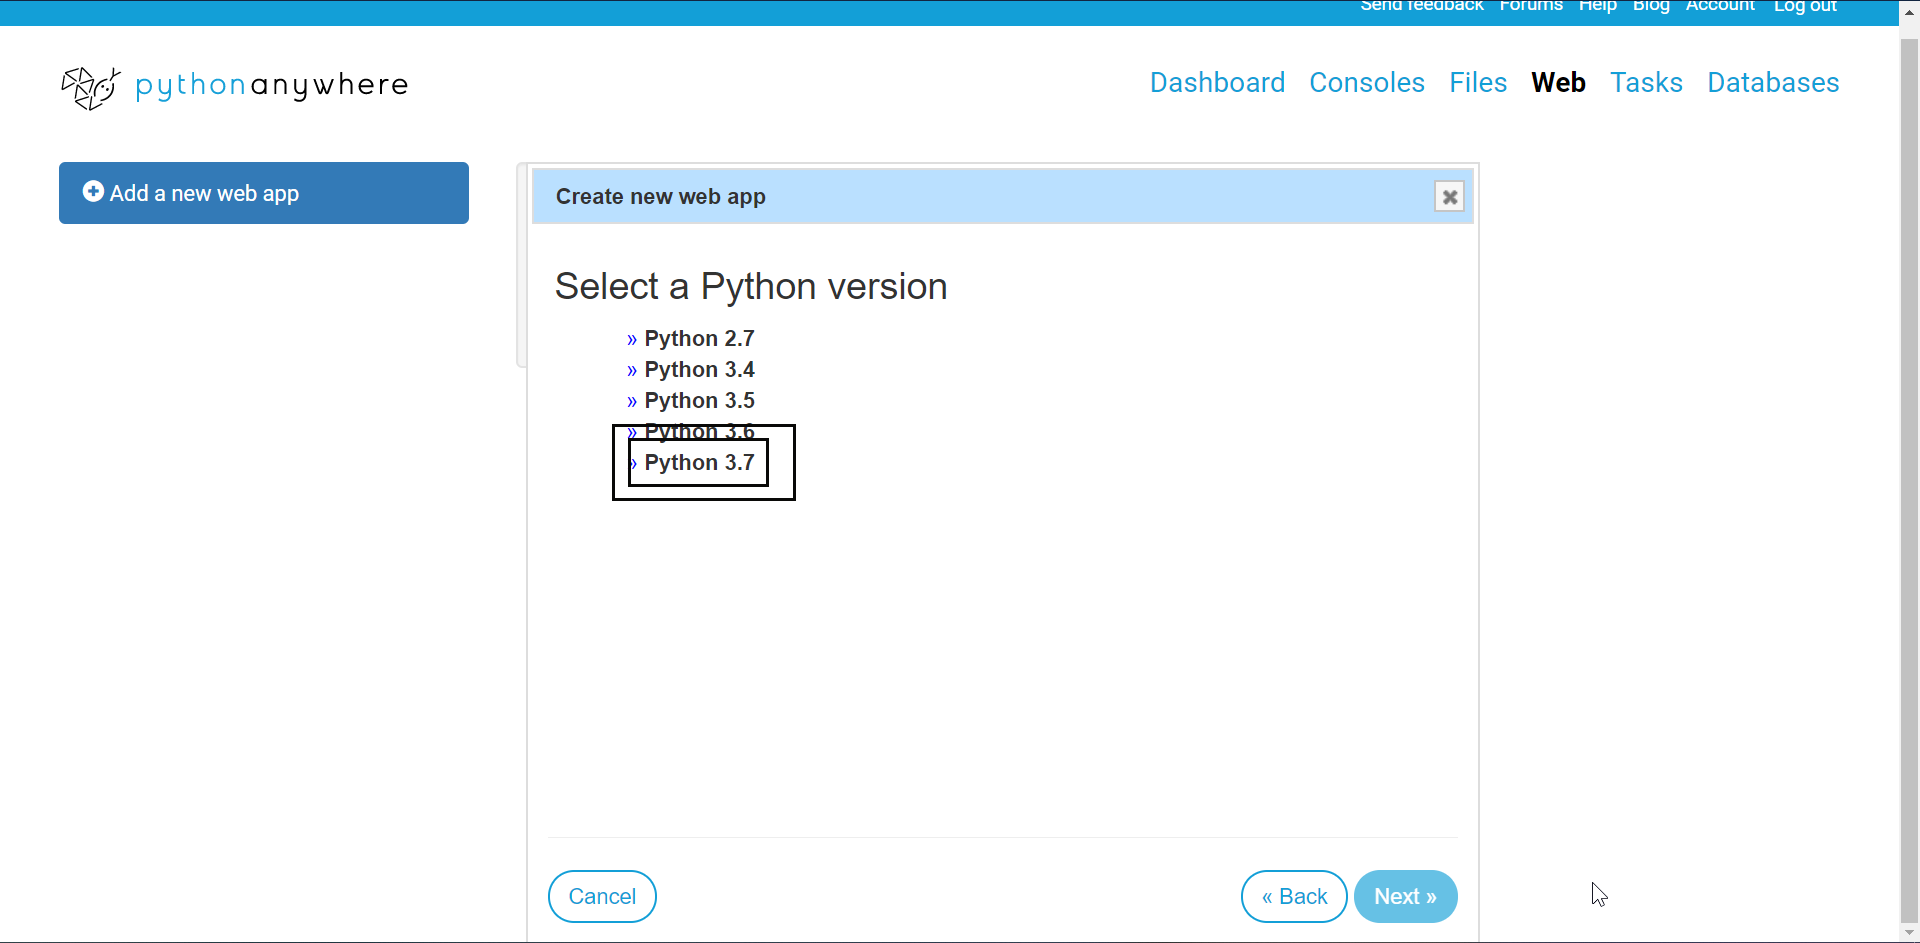
Select the python 3.7 option.
After clicking next, you will get to this page.
You can click on the link highlighted but you will see a different page. We need to configure the WSGI file to redirect to our web app.
Now scroll down to virtualenv section.
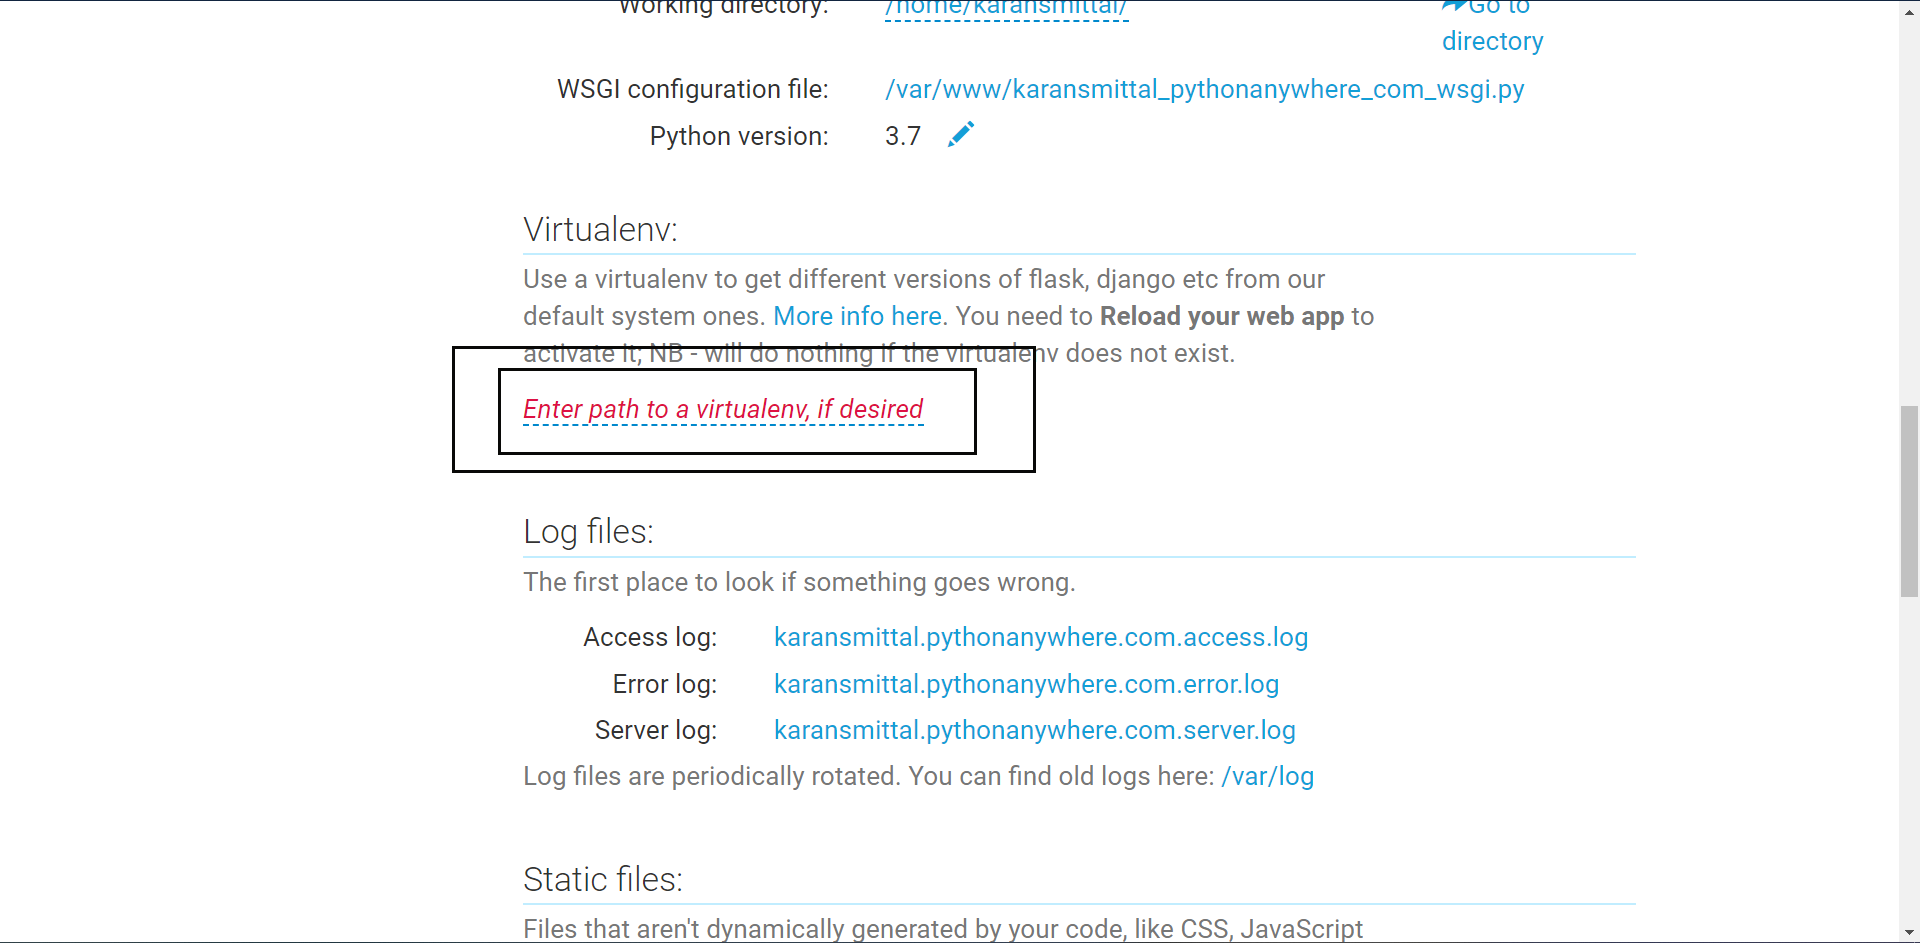
Your virtual environment will be: home/user_name/.virtualenvs/env_name
Now, to set up the path to the actual project folder.
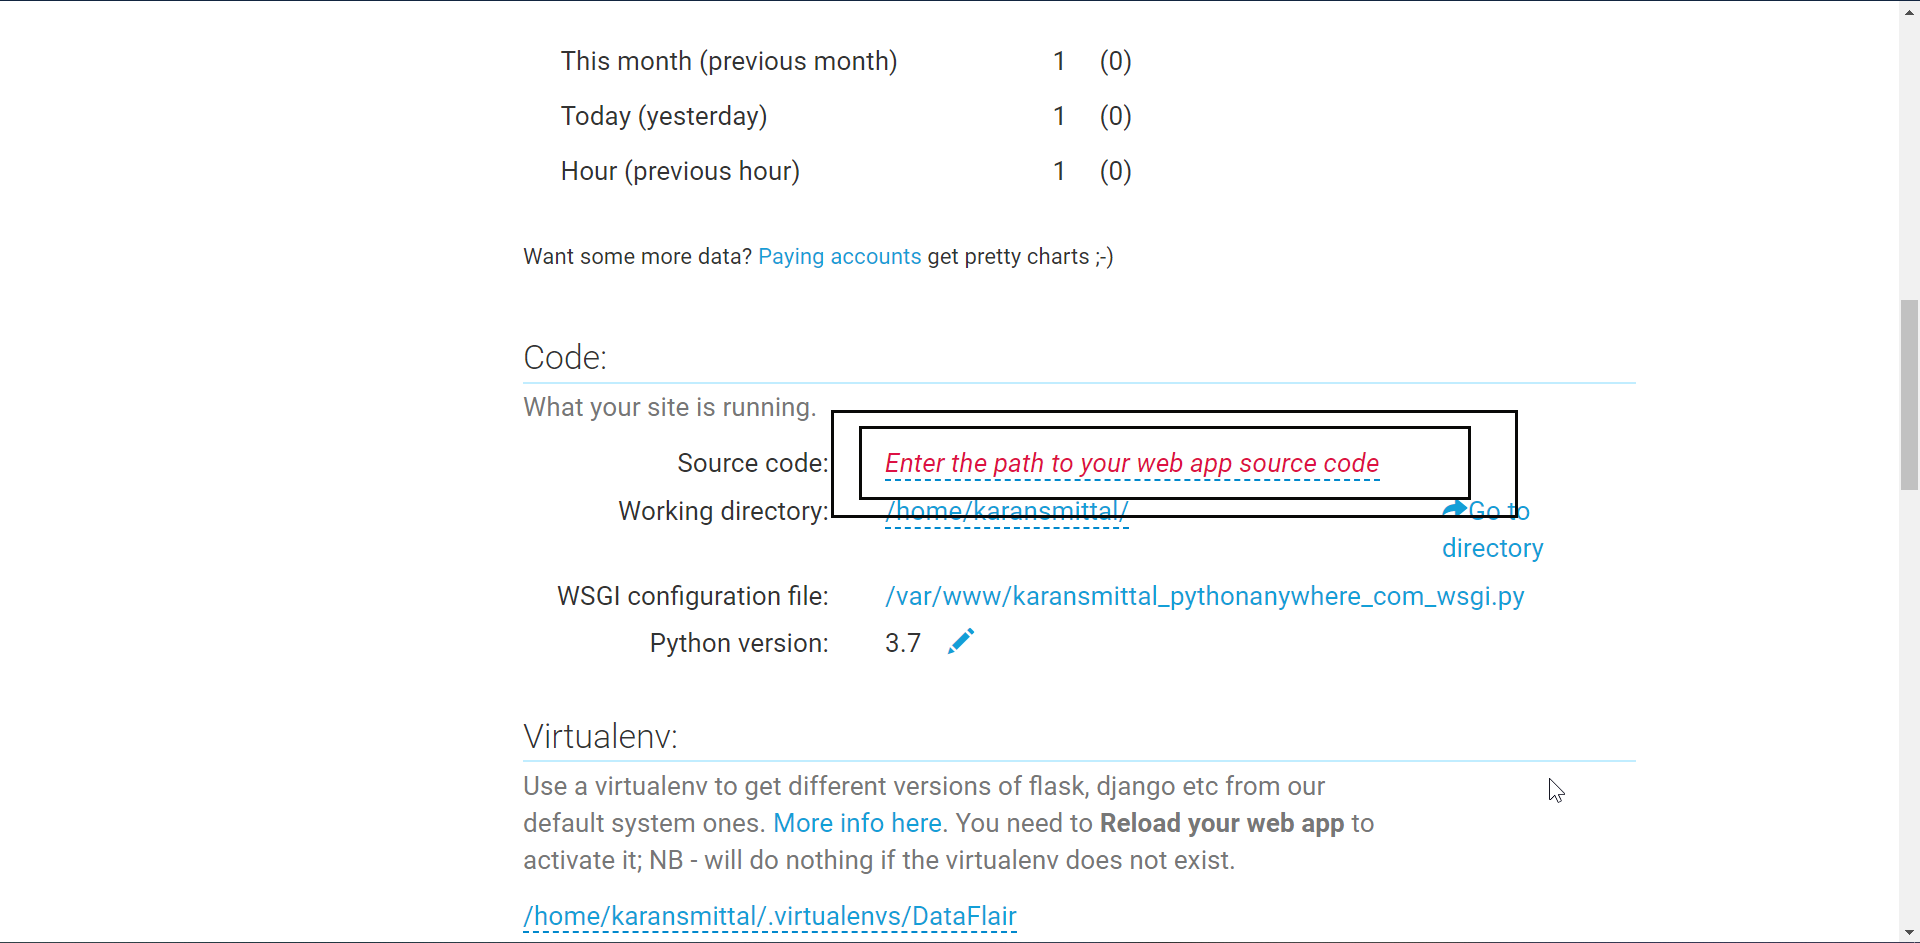
Move up to code section and enter the path in the highlighted area.
This path can be easily looked up to in Files link.
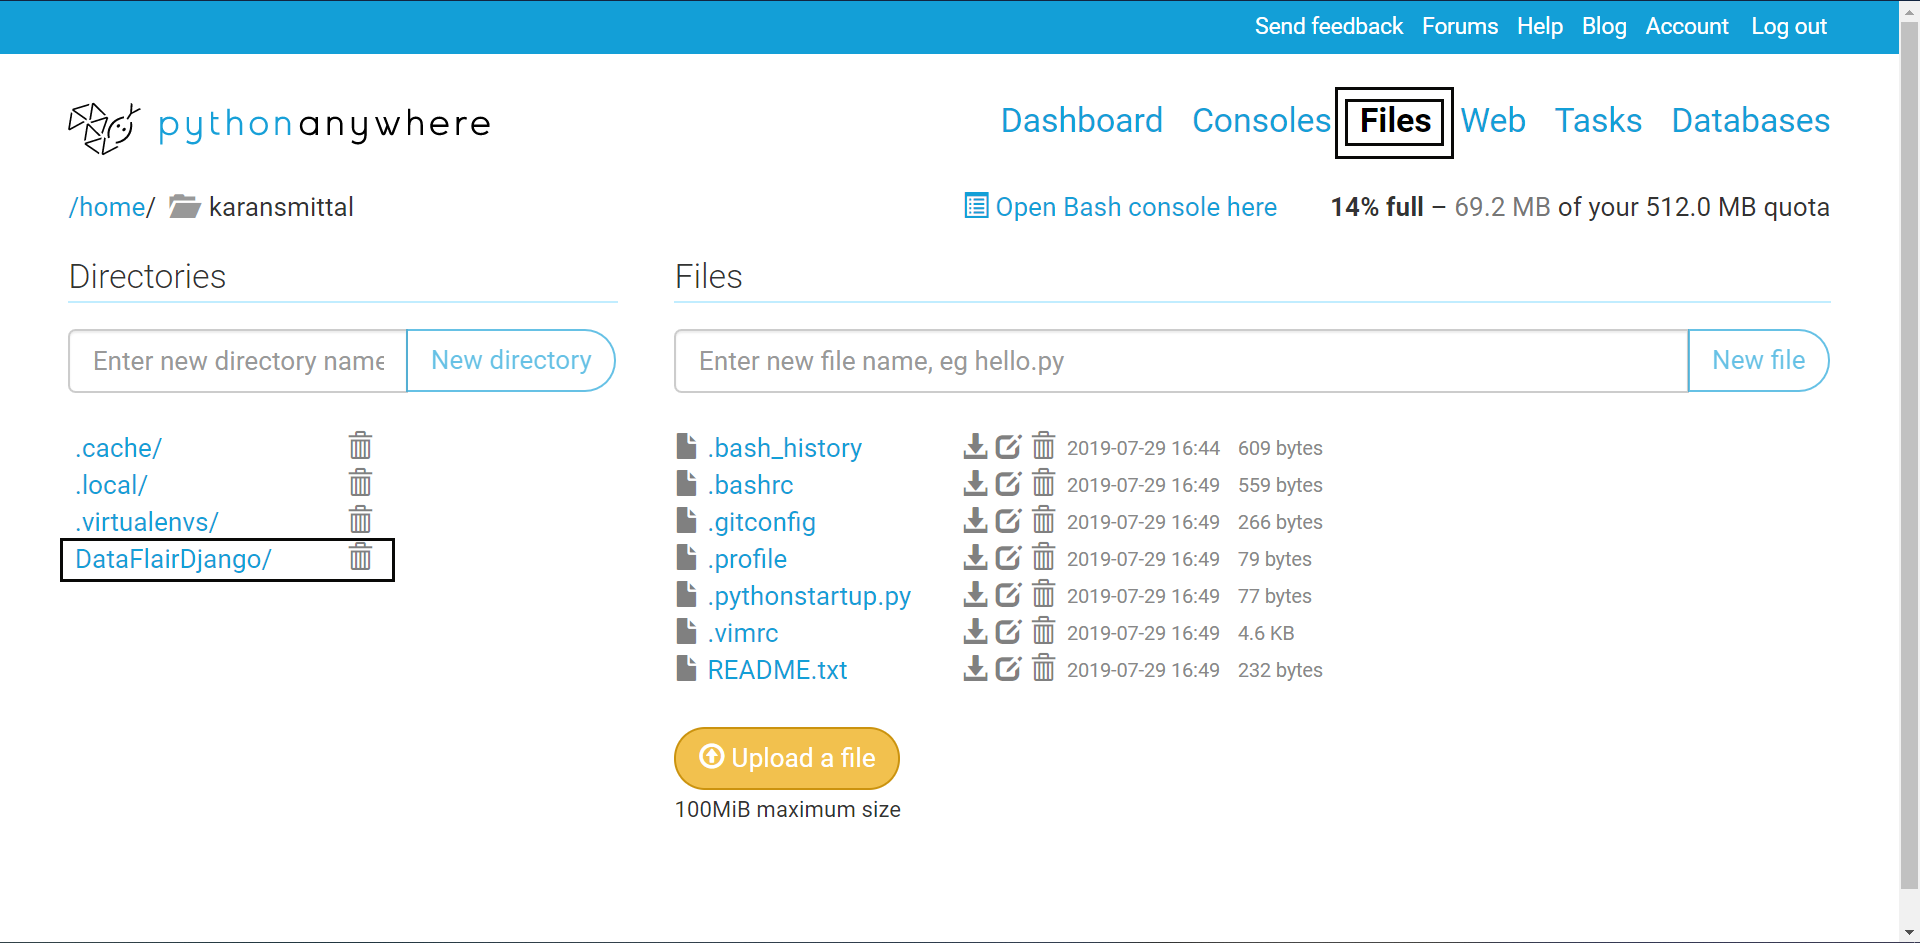
From there you get the path.
The path is a bit long, but it should show no errors. Remember that your folder contains manage.py at the inner level.
We need to modify the WSGI file.
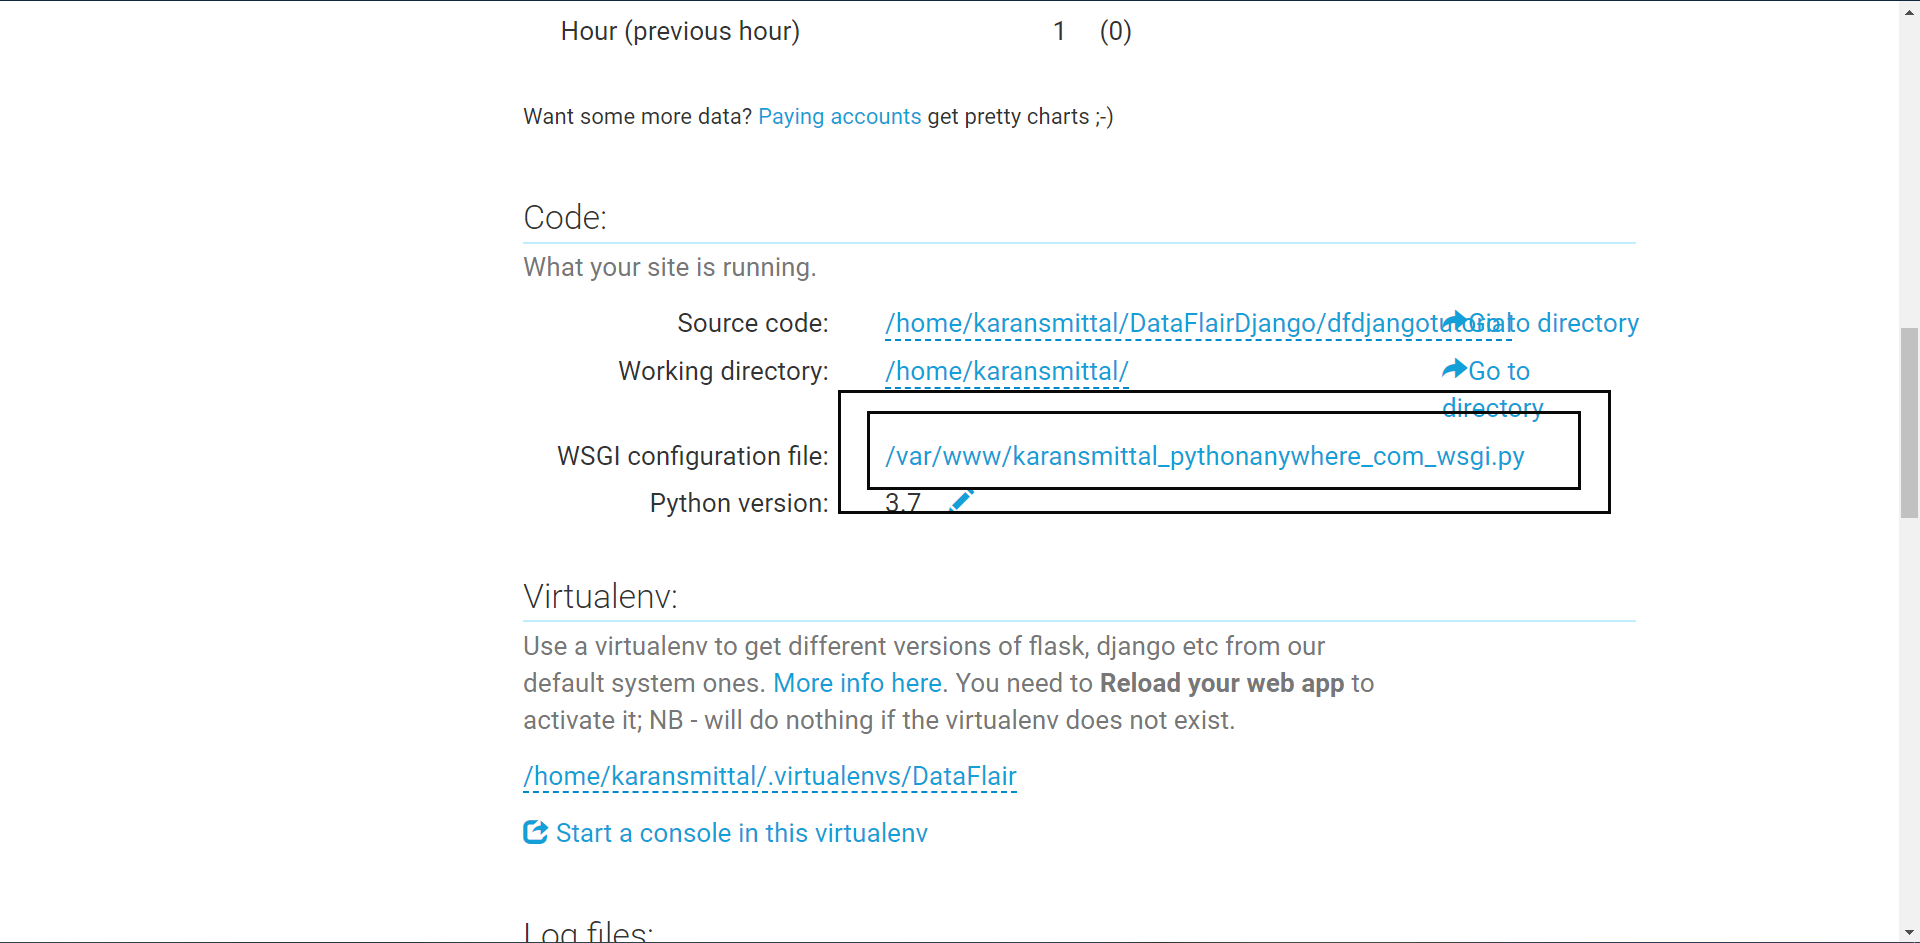
Click on the highlighted link to open the file. After the file is opened, erase the whole code and paste this code.
import os
import sys
#DataFlair
path = '/home/karansmittal/DataFlairDjango/dfdjangotutorial'
if path not in sys.path:
    sys.path.append(path)
os.chdir(path)
os.environ['DJANGO_SETTINGS_MODULE'] = 'dfdjangotutorial.settings'

import django
django.setup()

from django.core.wsgi import get_wsgi_application
application = get_wsgi_application()
Console Display:
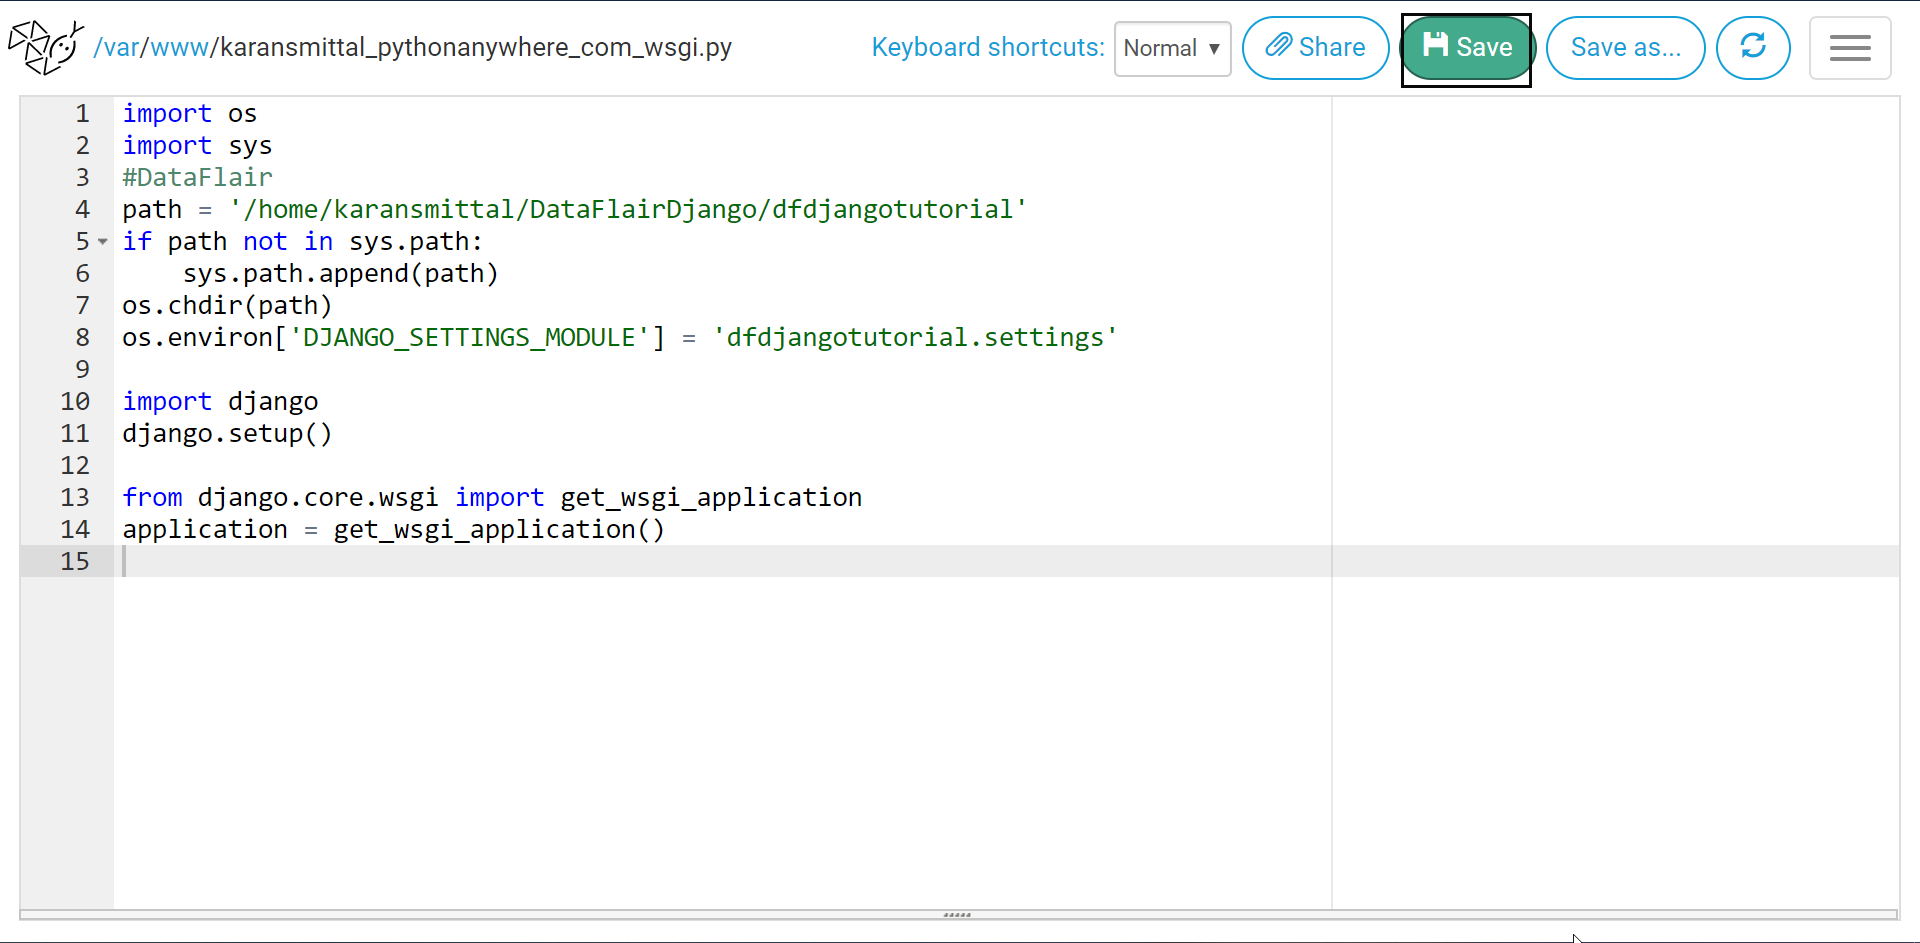
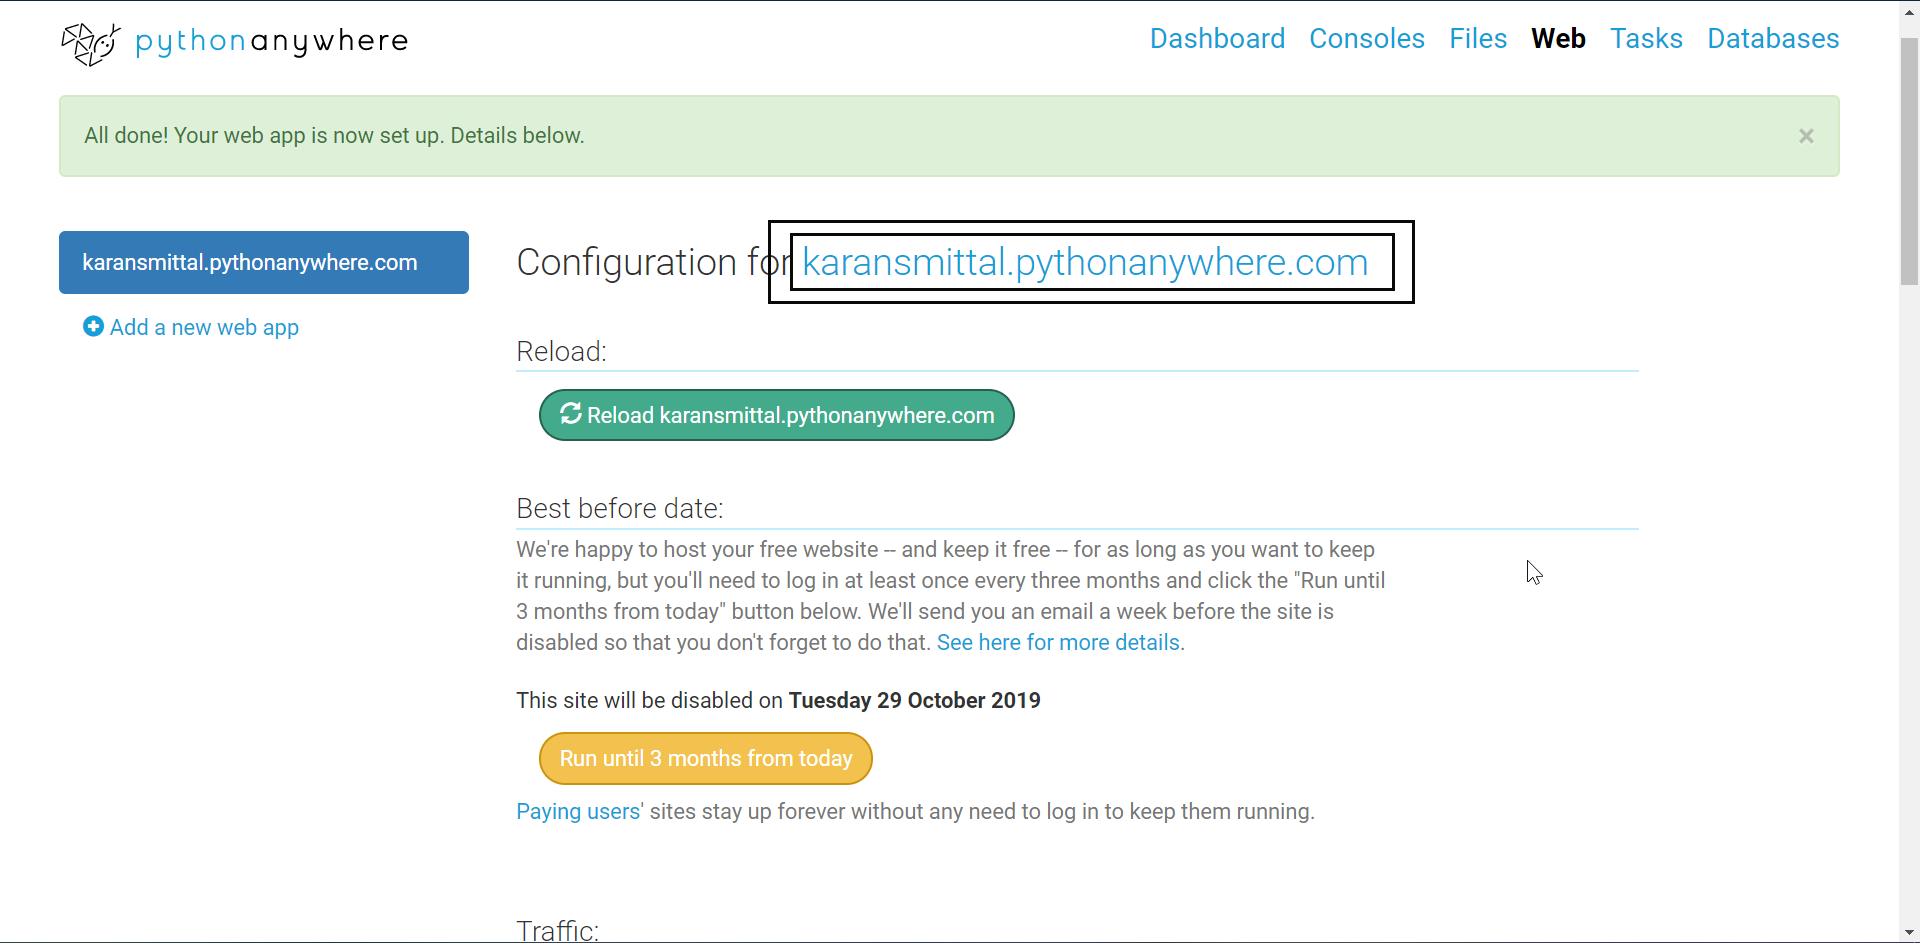
Then click on the Save button. Now it will open our website.
Security Settings
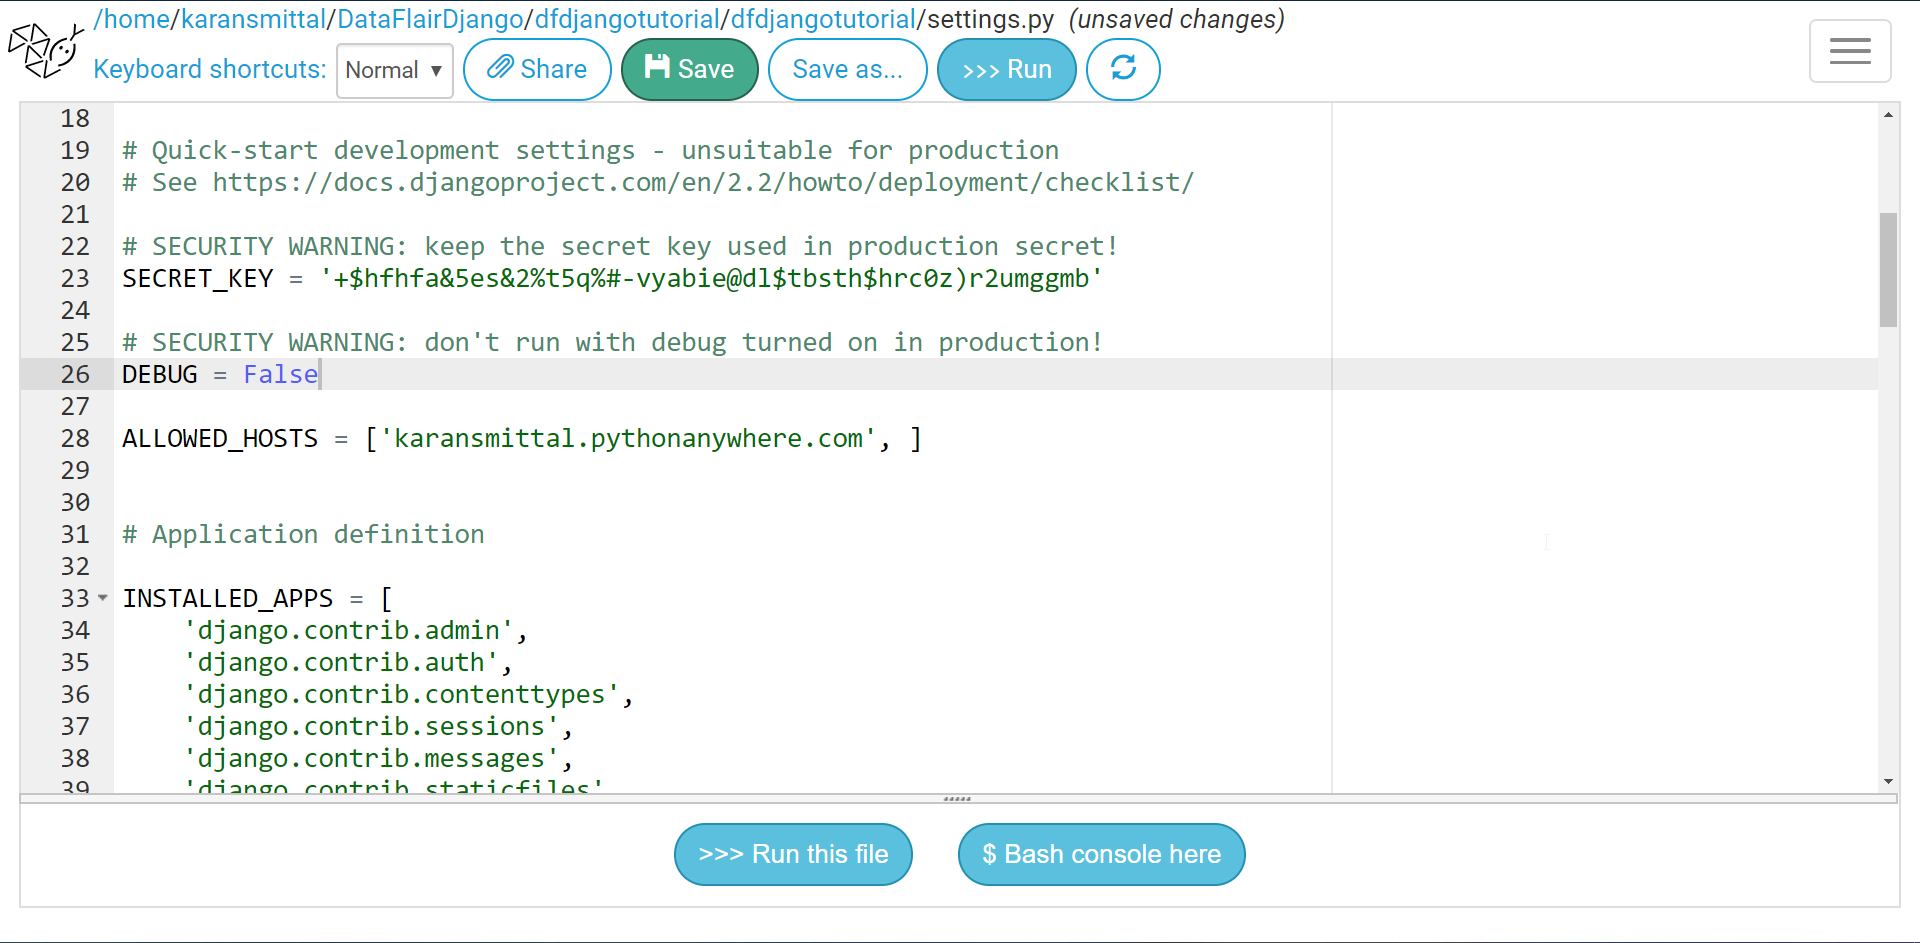
We also need to add the pythonanywhere.com host to settings.py file. Otherwise, we may get DisallowedHost page.
Now locate settings.py from files link.
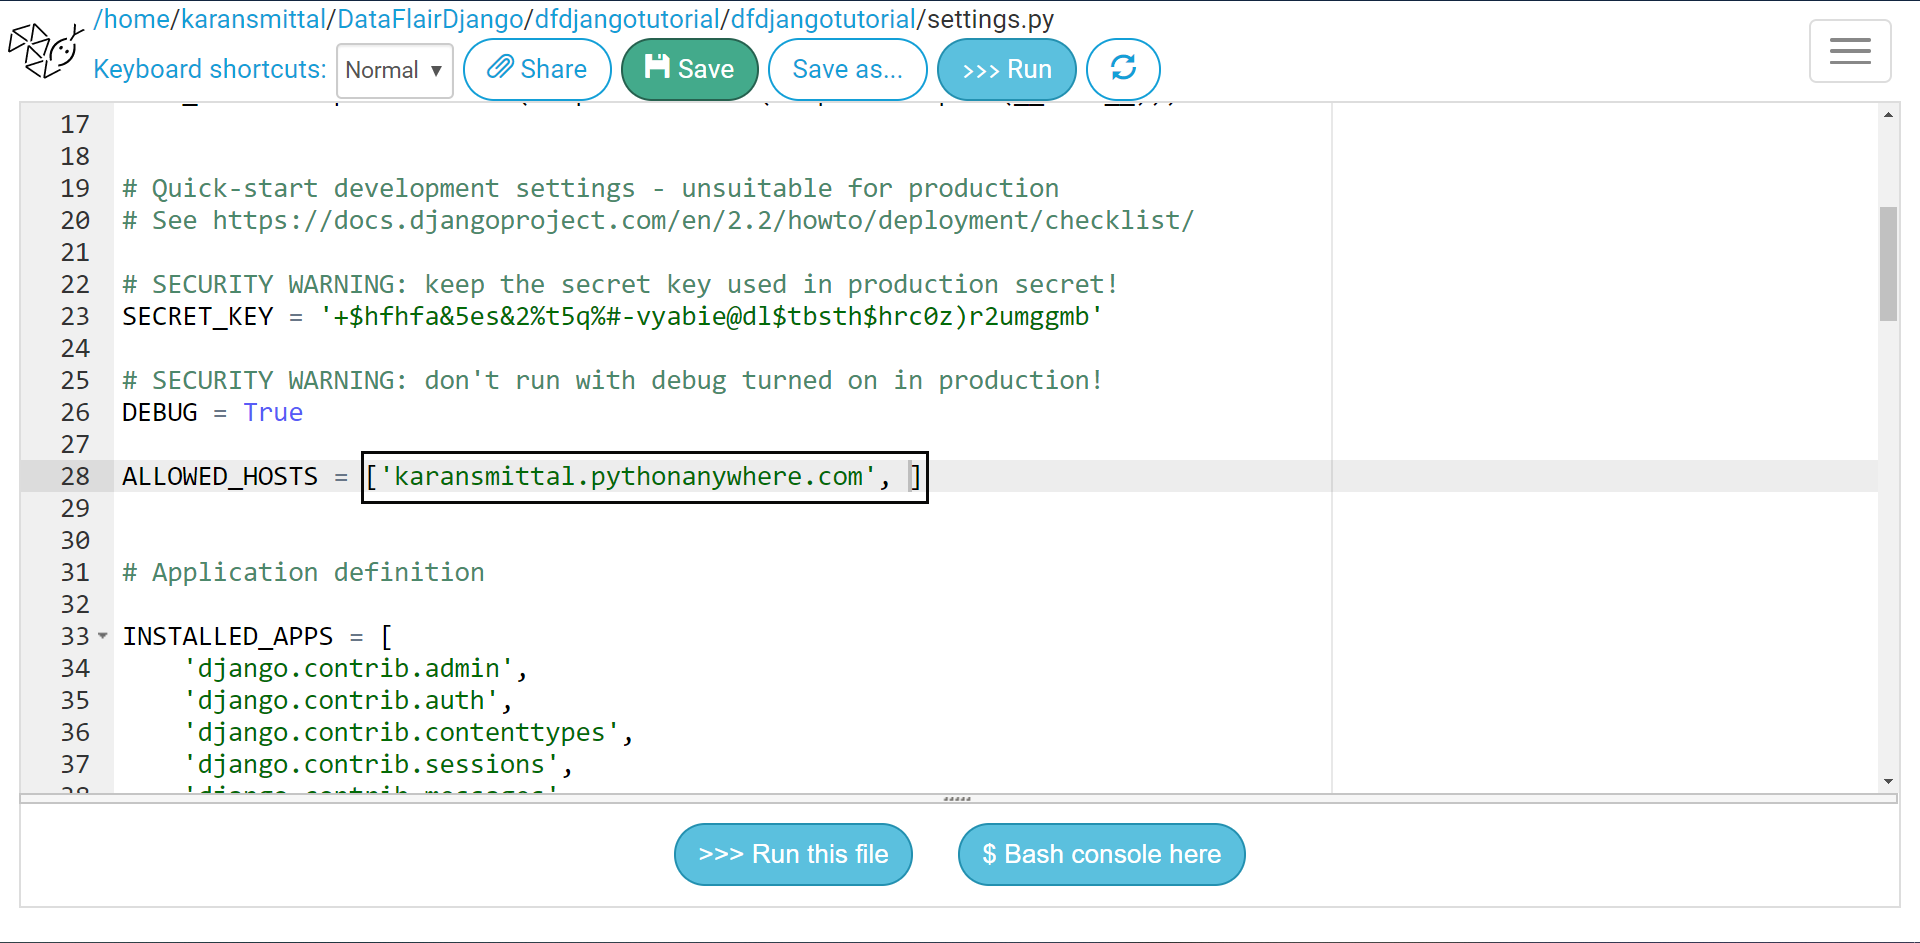
In the ALLOWED_HOSTS list, add URL of a website.
User_name.pythonanywhere.com
In the same file, change DEBUG = False. Also, change your security key. Since the same code is on GitHub. Don’t worry I have changed the key after completing the tutorial.
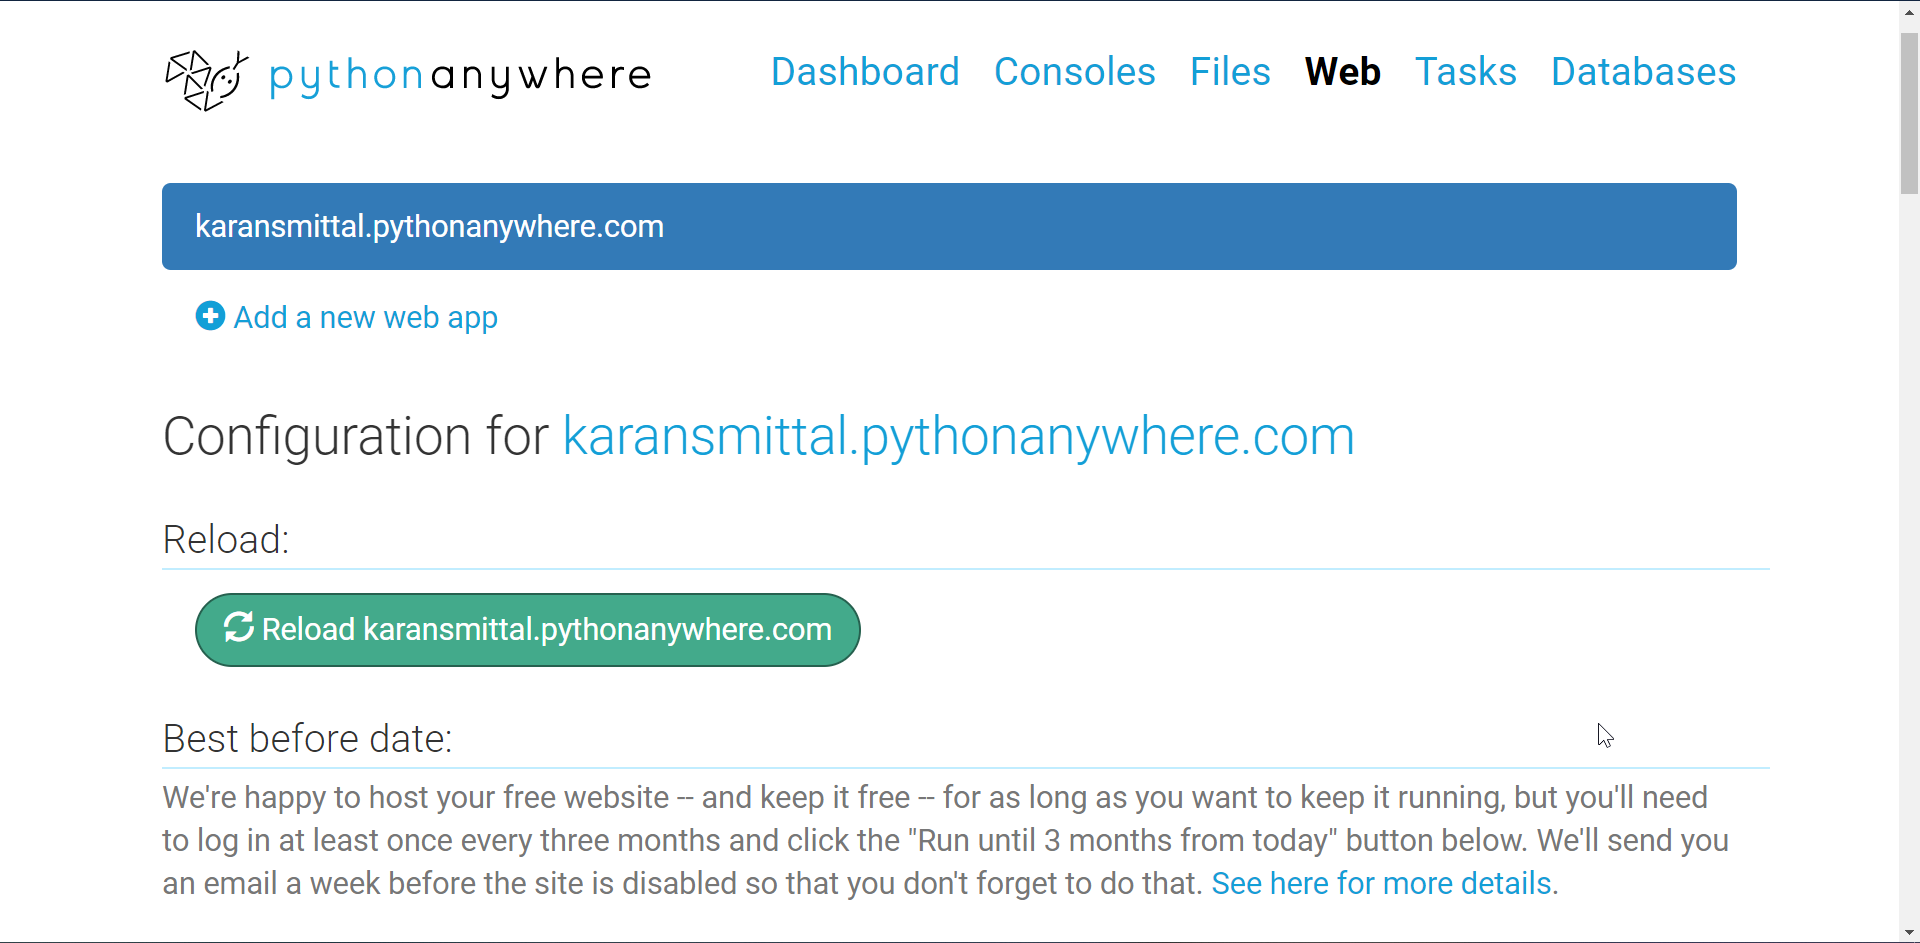
Well, you can complete the tutorial at this point. There is still one important configuration remaining.
Go to web link. Then click on reload web app button. It is in green color.
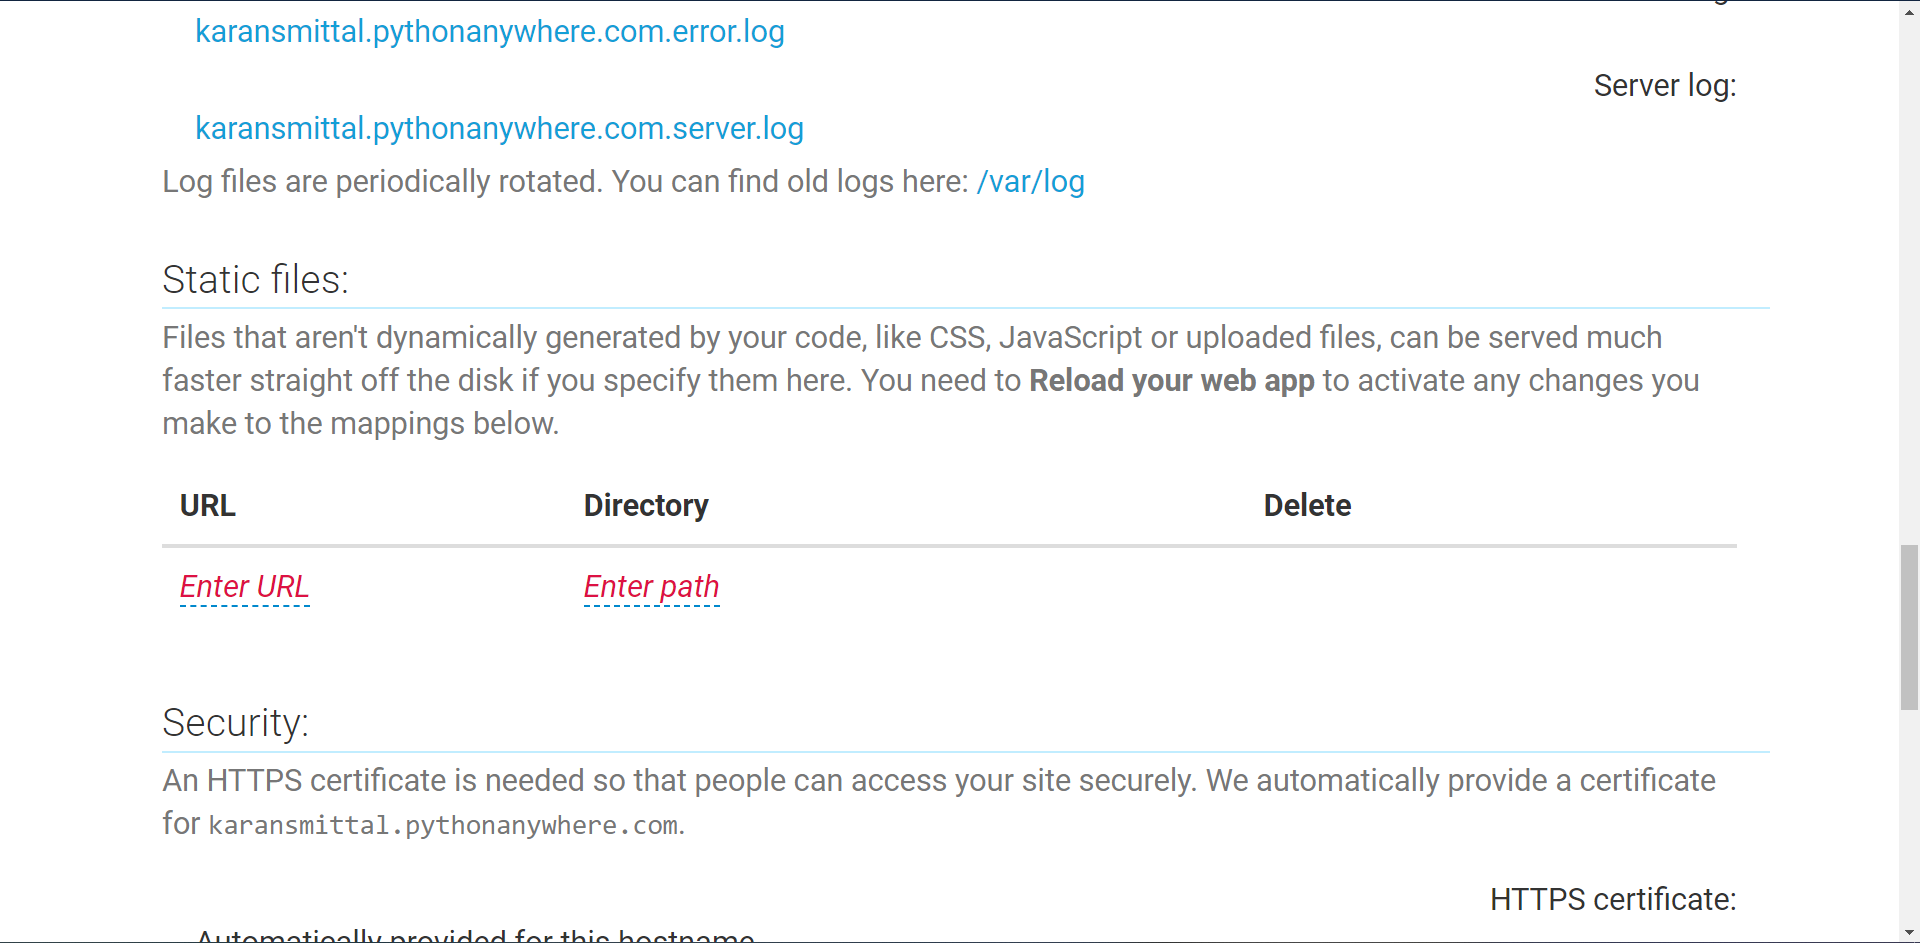
Settings for Static Files
We need to set up static files. If we don’t then we won’t have that beautiful CSS and JavaScript on our website.
To enable static files, open the web link again. Then move to Static Files section.
Enter URL here as:
/static/admin
Enter path here as:
Home/user_name/.virtualenvs/env_name/lib/python3.7/site-packages/django/contrib/admin/static/admin
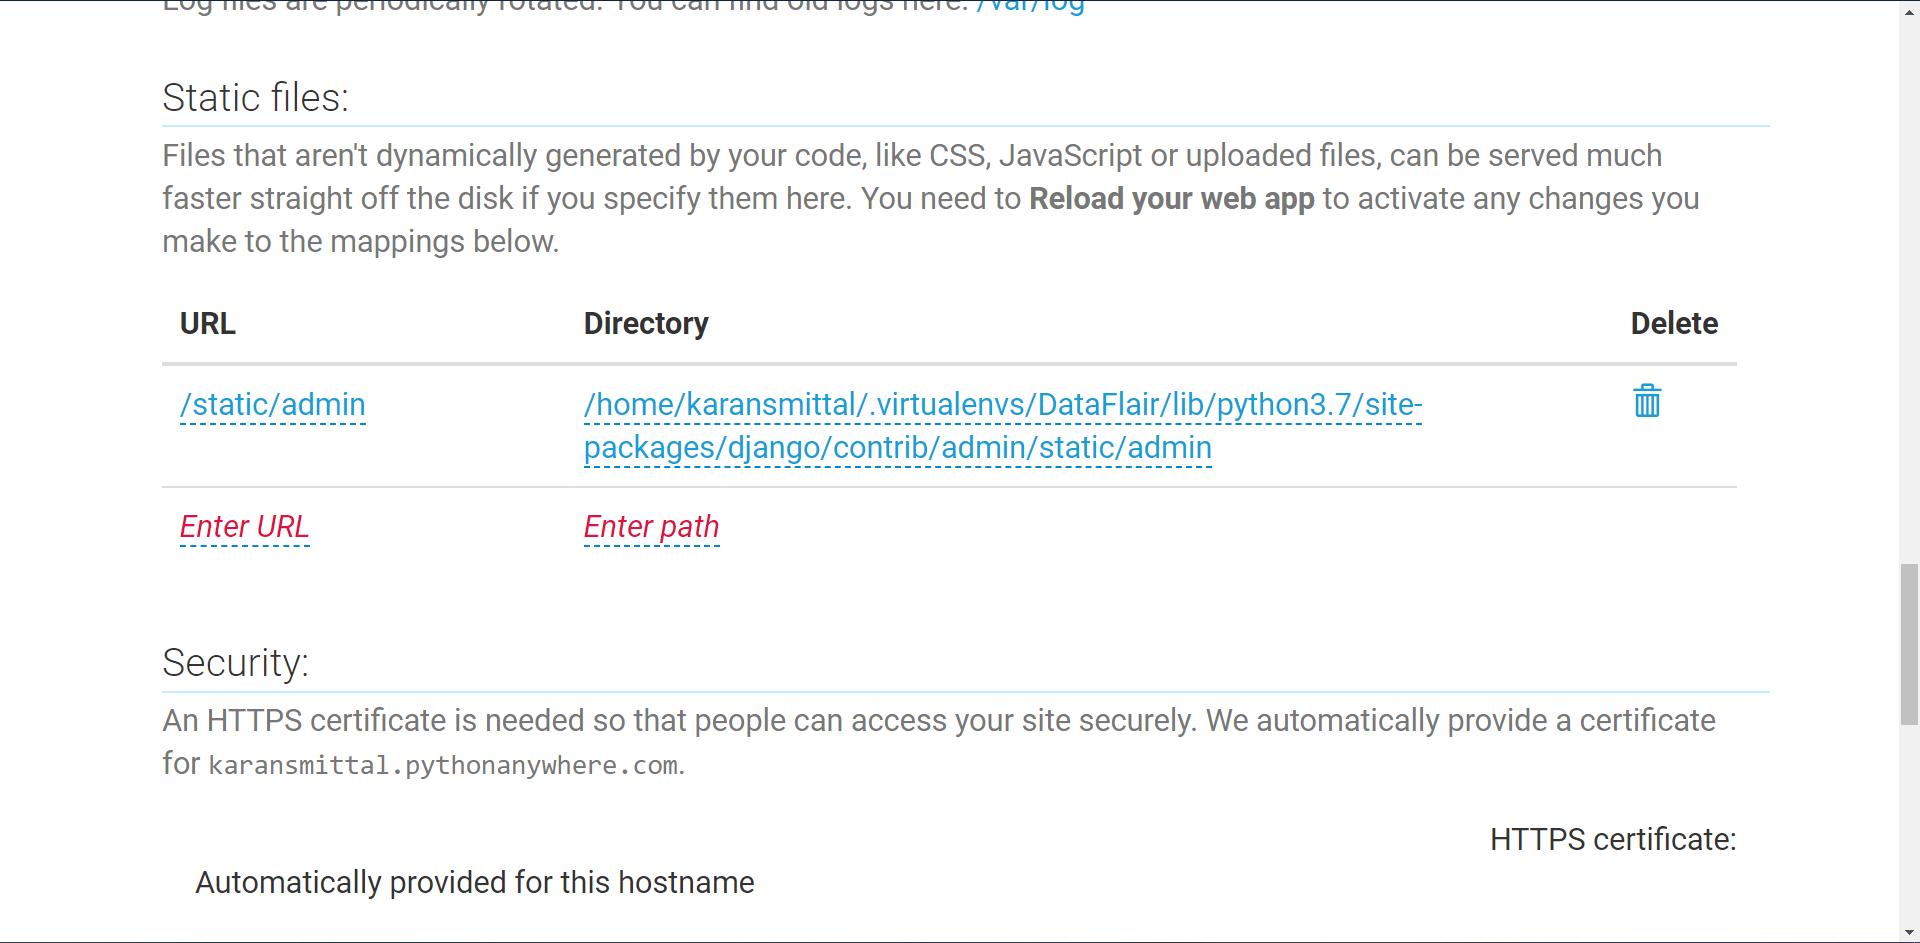
User_name is your username on pythonanywhere.com. env_name is the name of the environment.
After you have done these settings, again reload your web app.

Don’t miss the Django Static Files Handling Tutorial
Well done!! You have performed a great job of Django web hosting.
We have completed the setup of a live website. Share your website URLs in comments to let us see what you have created.
You can visit this website on karansmittal.pythonanywhere.com
Summary
This comes to the end of Django web hosting tutorial. You just did an amazing task. It takes a good amount of time to learn a technology and to actually build something from it. This opens your way to the world. You are now a full stack developer who can build a website and host the same. There are many concepts to learn and grow but this website is your result to the world.
We will learn some more amazing concepts in further articles. We have set up our website on pythonanywhere.com. I hope that you got the basic idea of how to set up a Django application. Now, you can also try AWS, Heroku as they also provide some free accounts. They are a bit complex than pythonanywhere.com but the same concept is followed.
Any questions regarding the concept of Django Web Hosting? Share your queries in the comment section below.
Cracking Django interview made easy by Top Django Interview Questions
You give me 15 seconds I promise you best tutorials
Please share your happy experience on Google


What about the database setup for web hosting? Thank you I have learned a lot with this tutorials.
Hey Michael,
Yes keep visiting our site and we might plan to upload an article on database setup for web hosting.
server error 500
You can easily check your code on local first and then try to deploy on web. This might be some error in django code if its giving a server error.
thank you ! this website is the best . because I think so. thank you for this website.
Thanks for liking DataFlair articles. Do share your review about DataFlair on Google