Django Admin Customization – Step-by-step tutorial for novice learners
Master Python with 70+ Hands-on Projects and Get Job-ready - Learn Python
We offer you a brighter future with industry-ready online courses - Start Now!!
Django Admin is one of the most important tools of Django. It’s a full-fledged application with all the utilities a developer need. Django Admin’s task is to provide an interface to the admin of the web project. Django’s Docs clearly state that Django Admin is not made for frontend work.
Although, we all have used Django Admin and its interface is very user-friendly.
Django Admin’s aim is to provide a user interface for performing CRUD operations on user models and other functionalities like authentication, user access levels, etc. These all are functions that make admin more productive. We have a separate tutorial, which explains these functions.
This tutorial on Django Admin customization is aimed at more advanced users. It will provide you knowledge of how the admin interface is customizable, how we can add and change particular things in the admin. This modification may make it more productive according to the use-case.
So, let’s get started. I am simply making a new application in an existing Django project. All the steps of implementation will be there. You can find this blog’s project files here:
Django Admin Customization
We will be customizing some parts of the Django Admin. This customization will provide us with a better representation of objects. To implement it in your project, make a new app in your Django project named products.
Command:
python manage.py startapp products
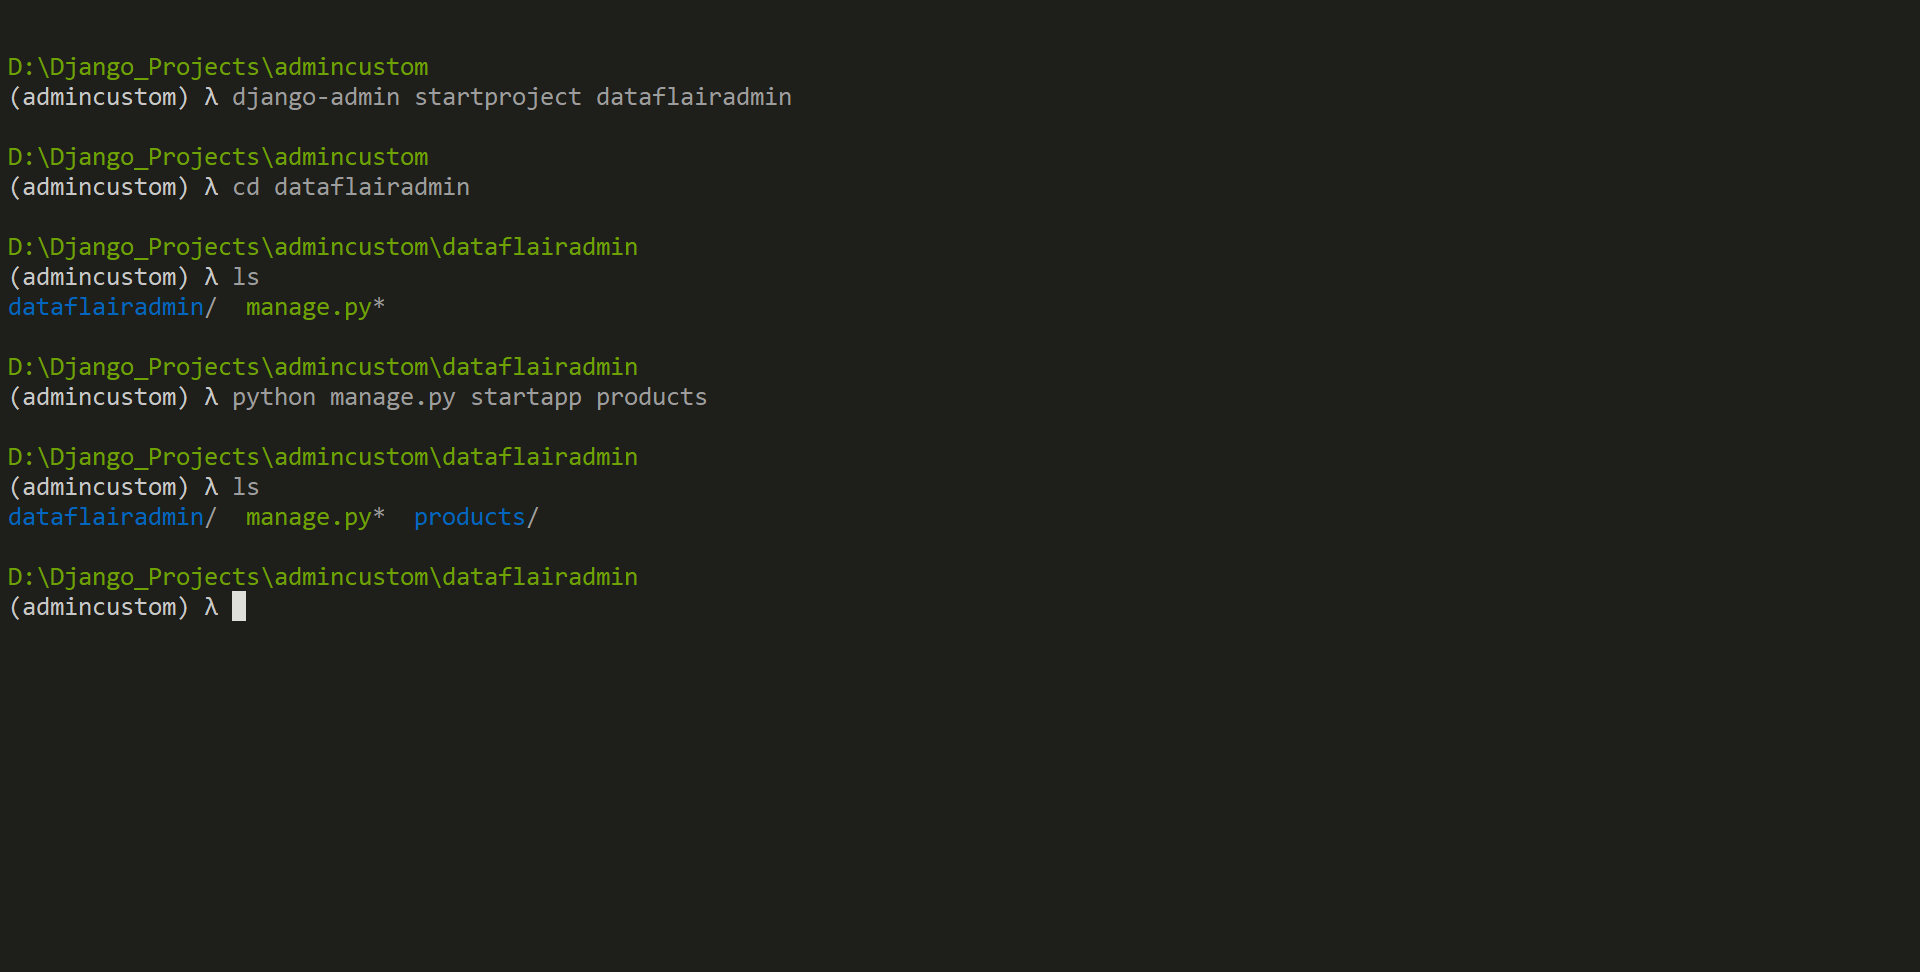
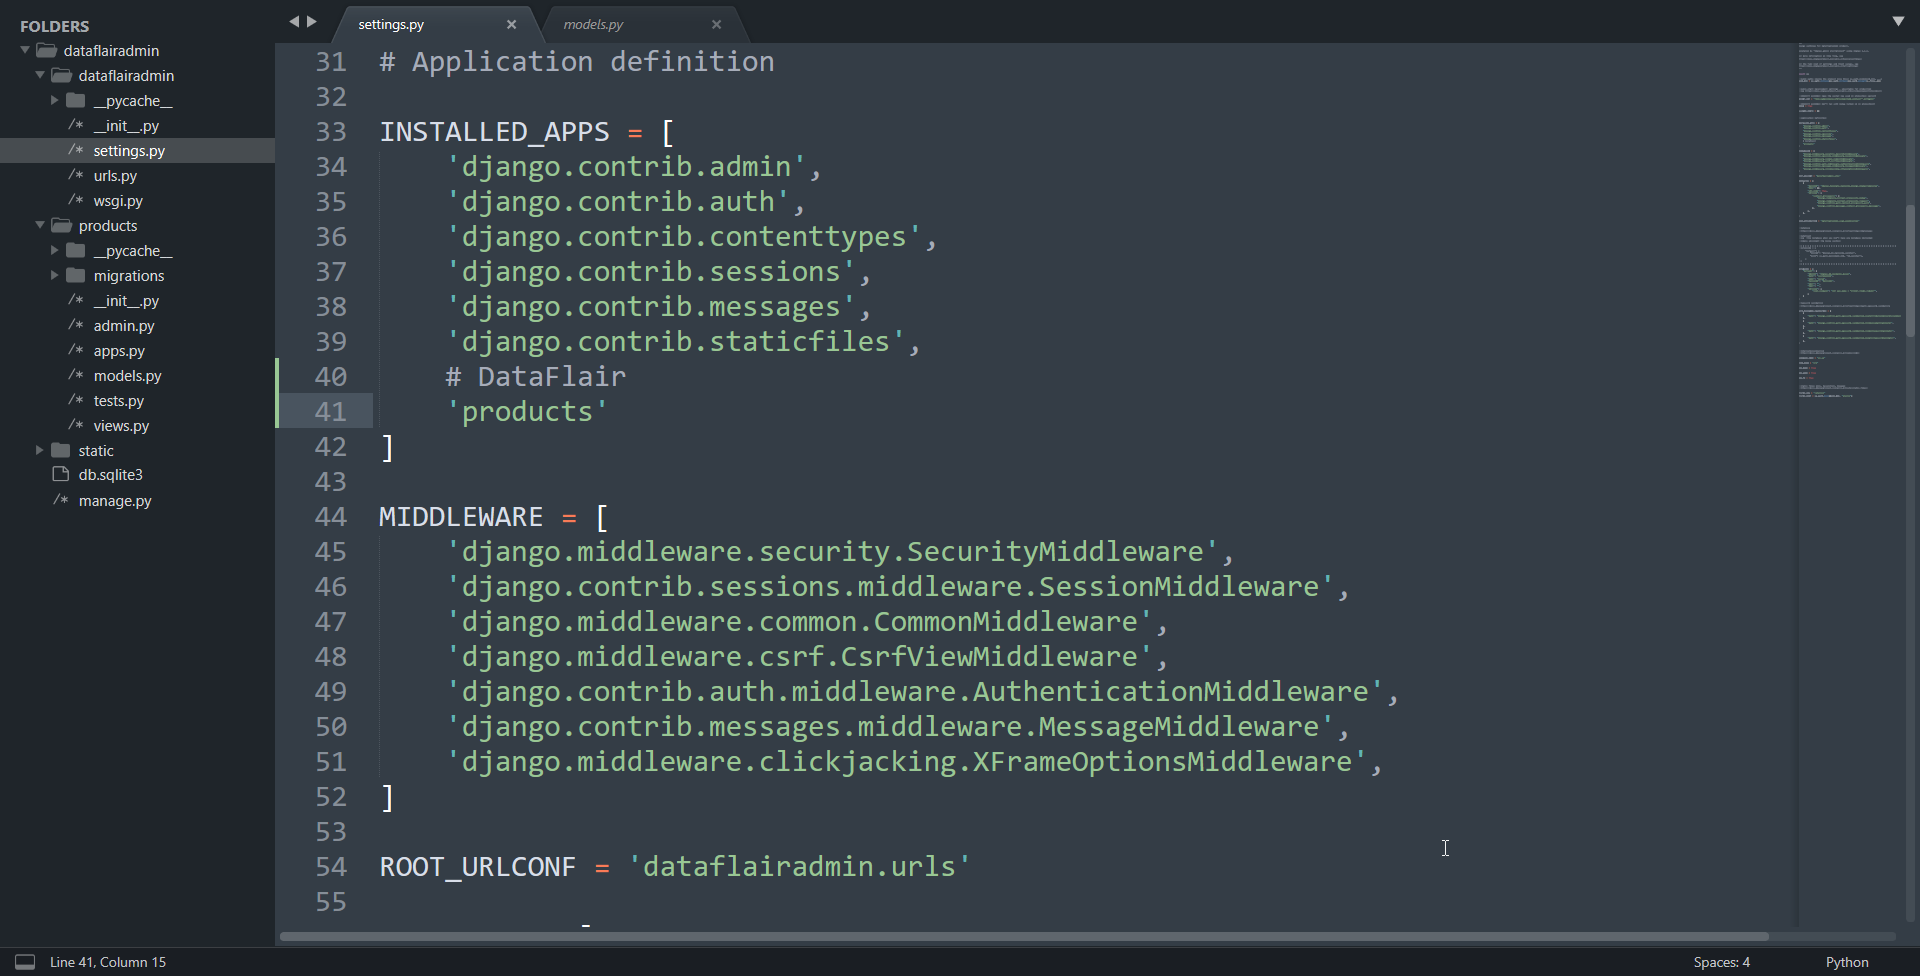
Install this application, type product in the INSTALLED_APPS list in settings.py file.
We will now make models in the products app. The model will be used throughout the tutorial to customize the Django Admin.
Code:
from django.db import models

#DataFlair
class Product(models.Model):
    name = models.CharField(max_length = 200)
    description = models.TextField()
    mfg_date = models.DateTimeField(auto_now_add = True)

    def __str__(self):
        return self.name

    def show_desc(self):
        return self.description[:50]
Now, we need to migrate these changes to the database. For that, execute these commands in order.
 python manage.py makemigrations
 python manage.py migrate
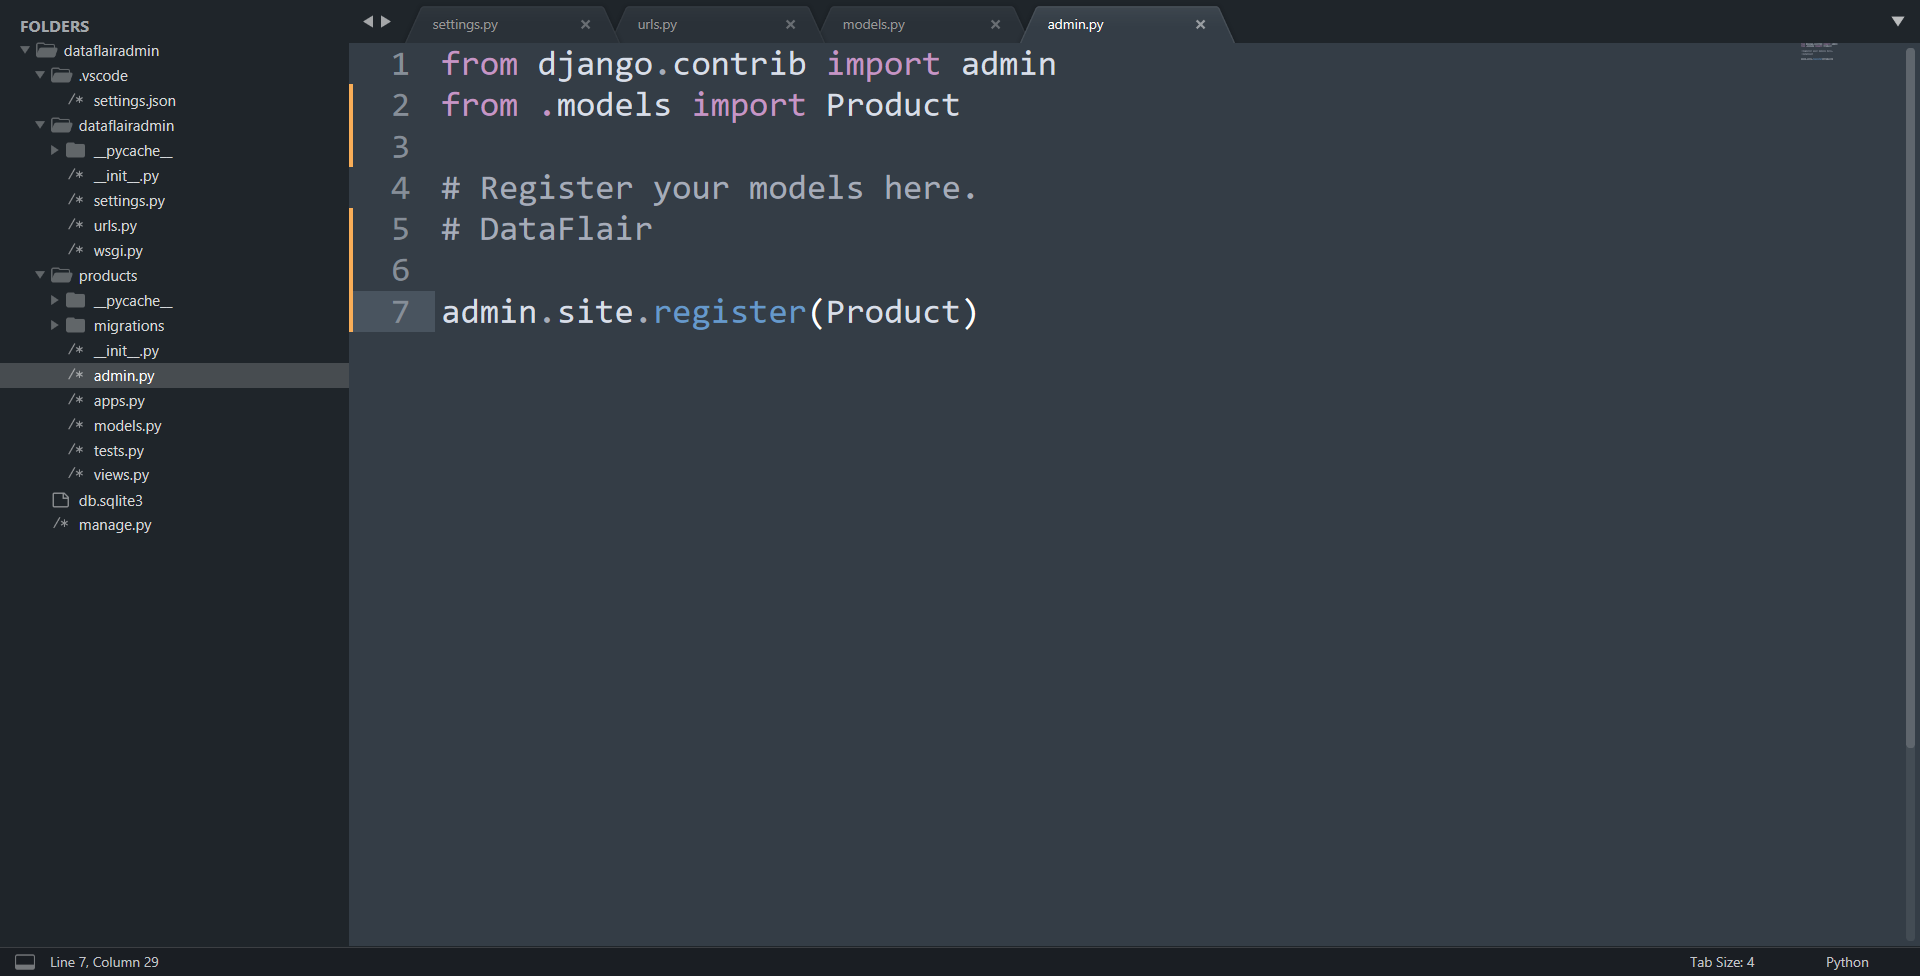
We need to register these models on the Django Admin. To do this, edit the products/admin.py file. Paste this code after clearing the file.
Code:
from django.contrib import admin
from .models import Product

# Register your models here.
# DataFlair

admin.site.register(Product)
We also need a superuser to access the admin. You can skip this part if you already have a superuser account.
To make a superuser in Django Admin, execute this command.
python manage.py createsuperuser
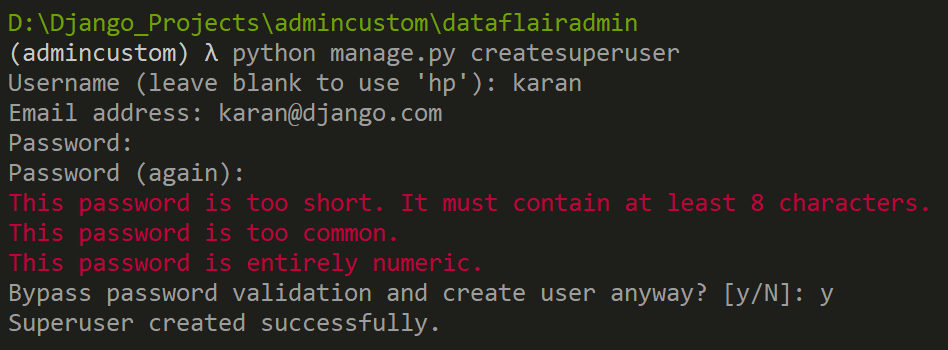
The password won’t be displayed while you type. In the image, you can not see anything in front of password fields. After successfully creating a superuser, start your server.
python manage.py runserver
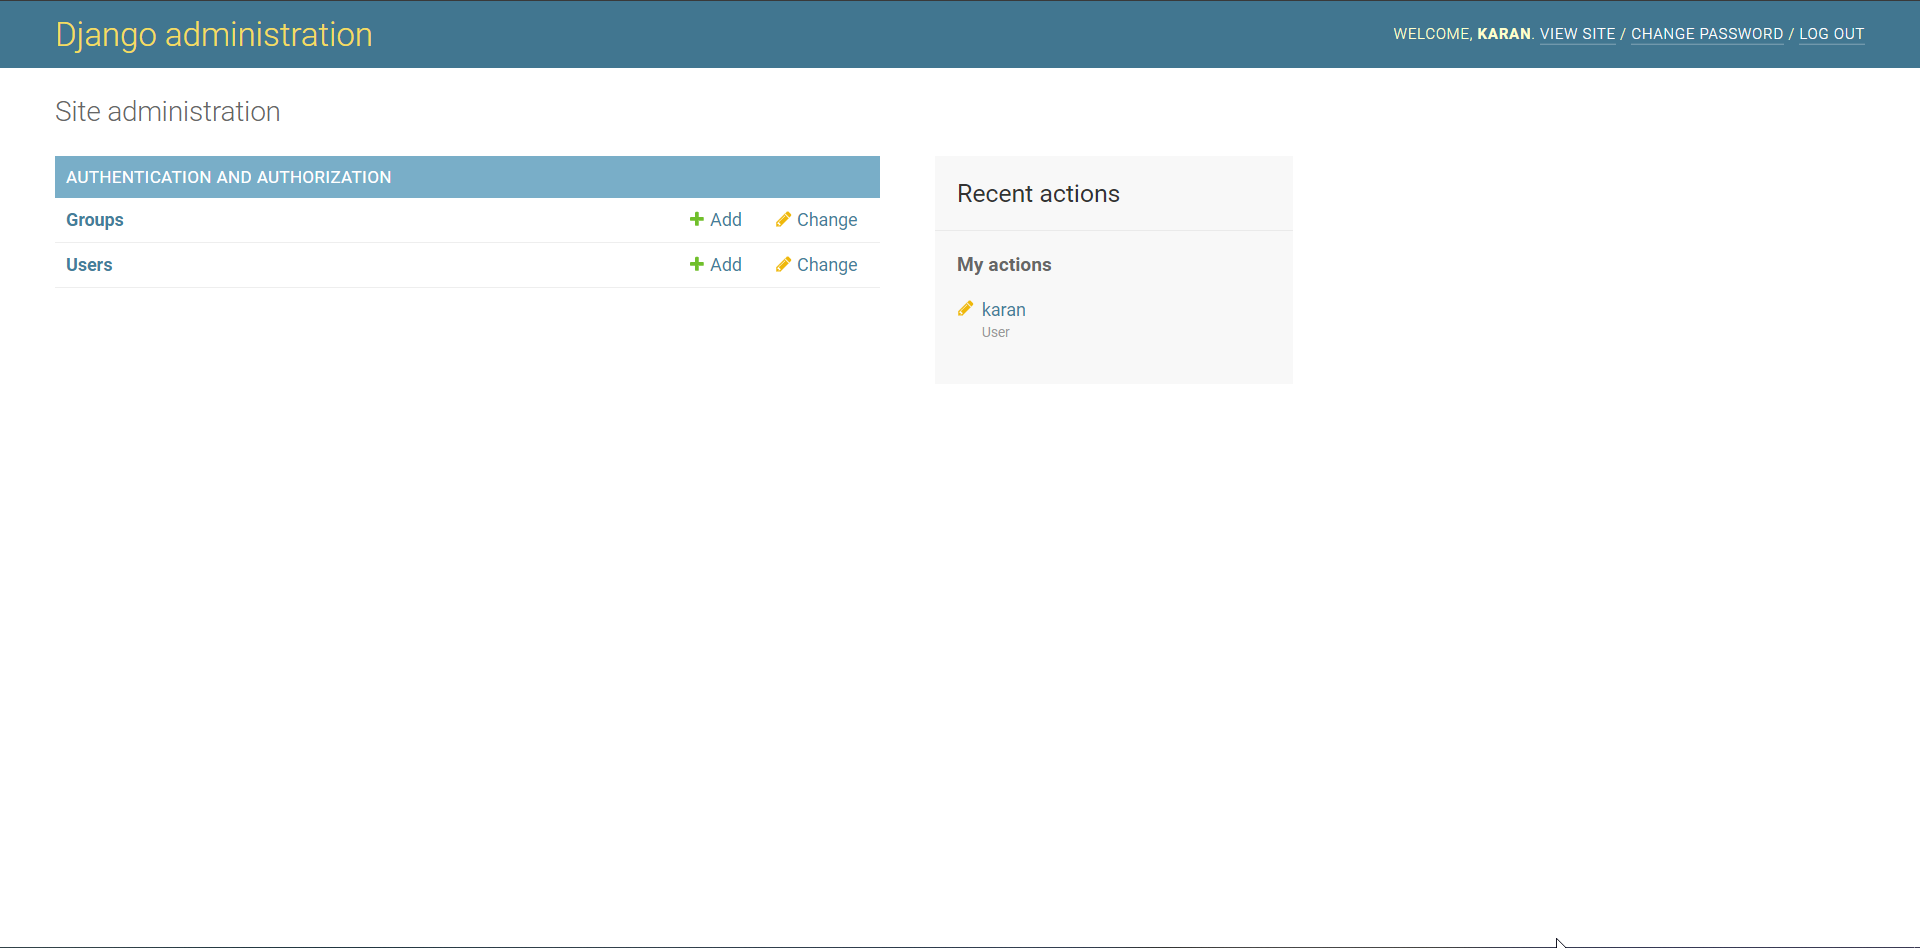
Now, we can start playing with Django Admin. Search this URL in your browser:
http://localhost:8000/admin/

We will make a lot of changes to this panel.
1. Register/ Unregister models from admin
We can register models in admin easily. We have used the register method to register models in the admin. But, what to do for unregistering models?
A valid point of the argument is that you simply don’t register the model. Yes, that’s true. What if we want to remove default models like Groups, Users from admin? The answer is unregister method.
Let’s see how to unregister the model.
Open, products/admin.py file and paste this code in it.
Code:
from django.contrib import admin
from django.contrib.auth.models import Group
from .models import Product

# Register your models here.
# DataFlair

admin.site.register(Product)
admin.site.unregister(Group)
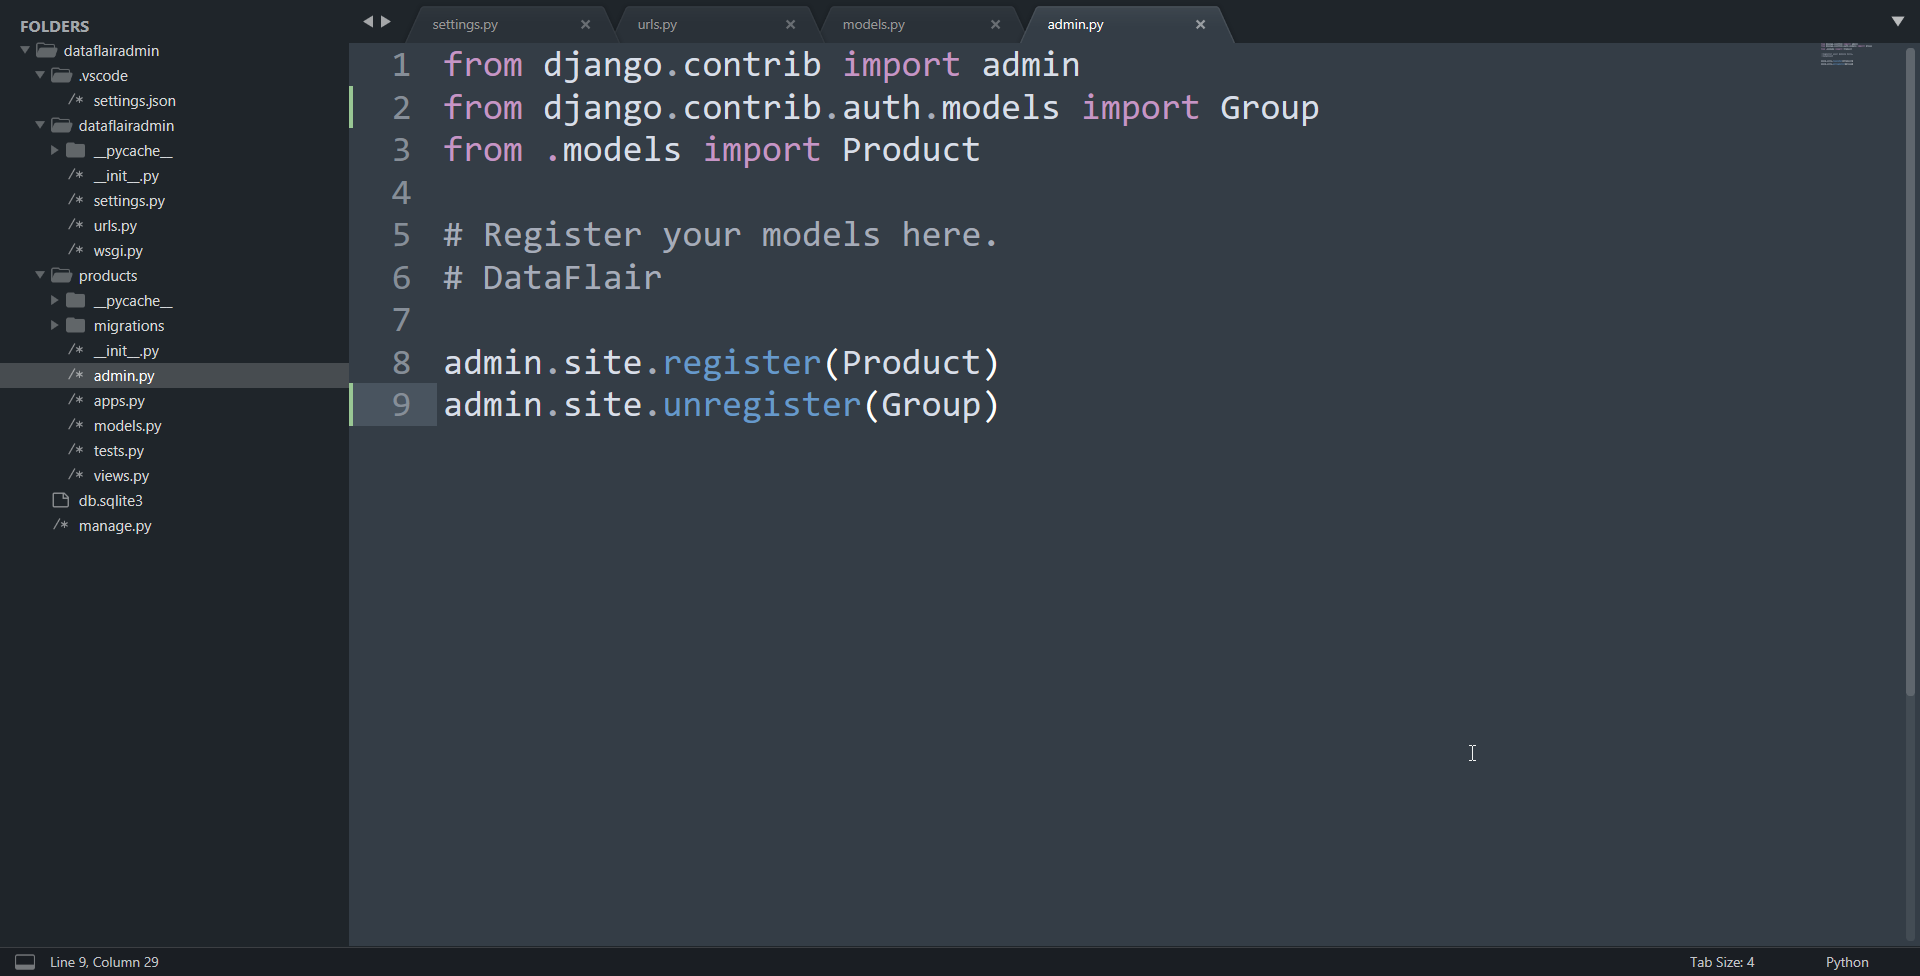
Now, simply reload your server and open the admin panel. You will see that the Group model is not there.
Understanding the code:
The file is mostly identical, except two lines that are added in this picture. The 2nd line is where we import the Group model. Then we simply unregister the Group model in the 9th line.

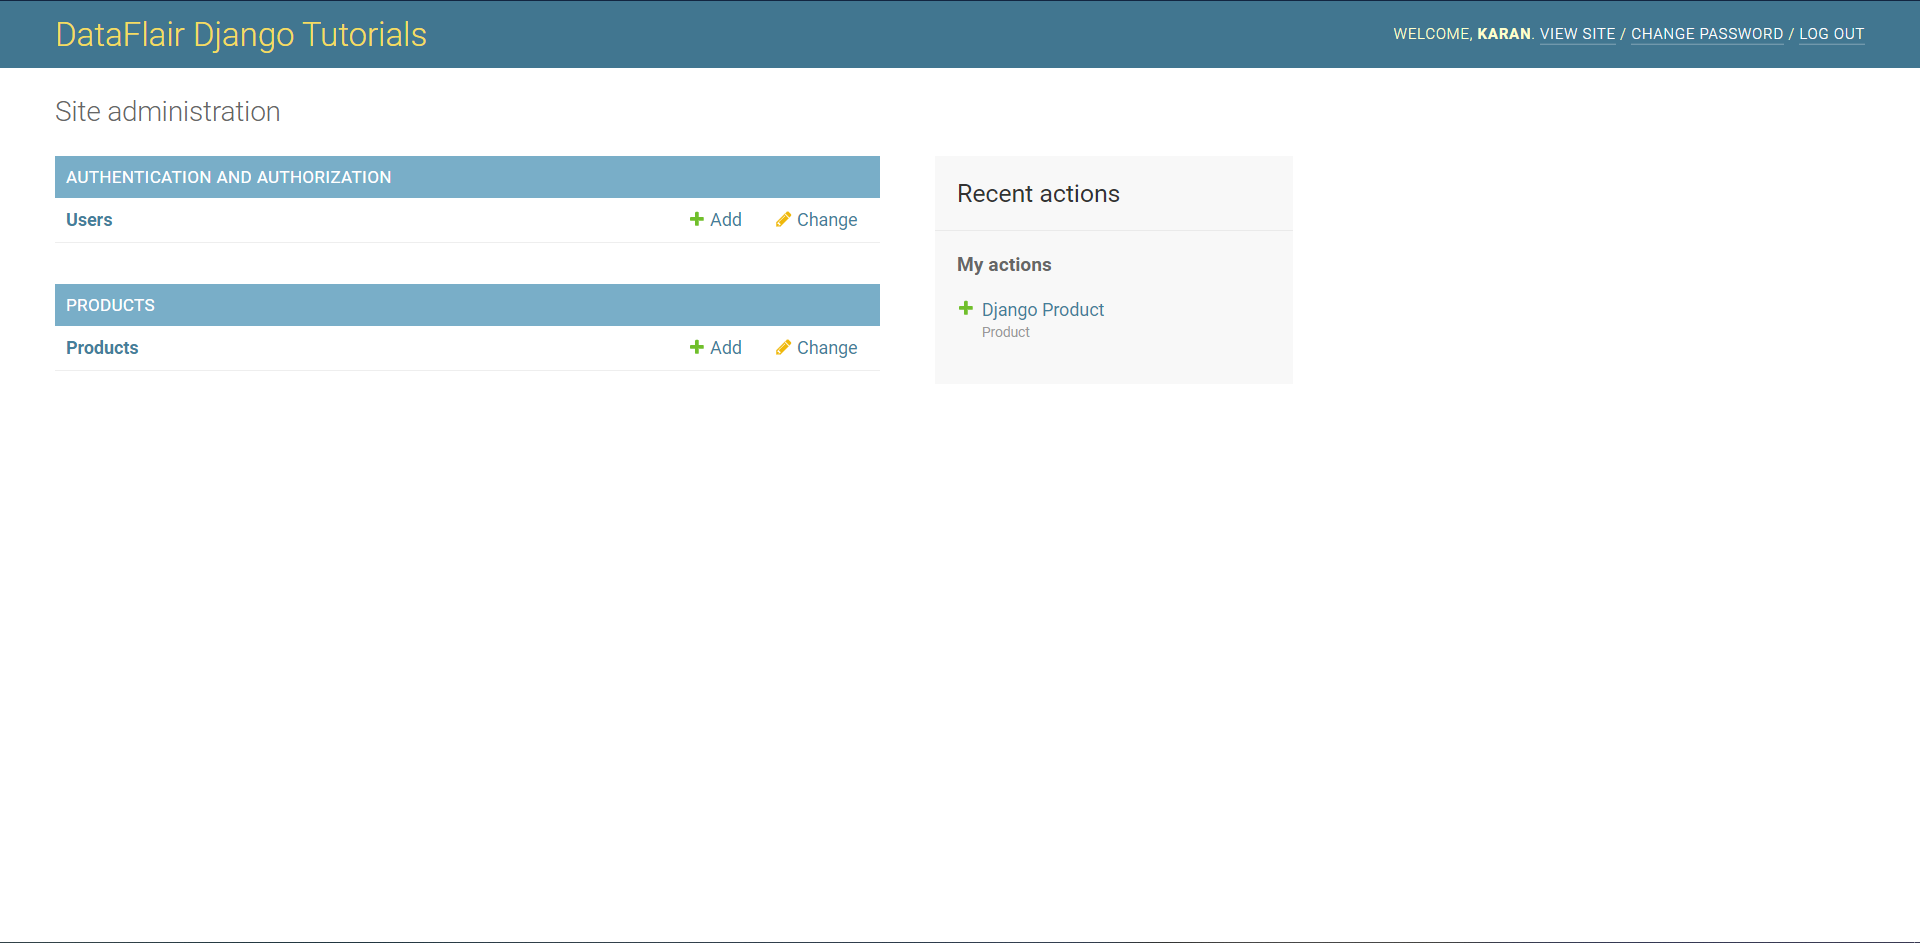
2. Changing the title of Django Admin
There are so many parts that can be changed from the front-end perspective. Like you can change the title written in the top-left corner of the web-page. Django administration can be changed to anything you like.
Add this line in products/admin.py file.
Code:
admin.site.site_header = "DataFlair Django Tutorials"
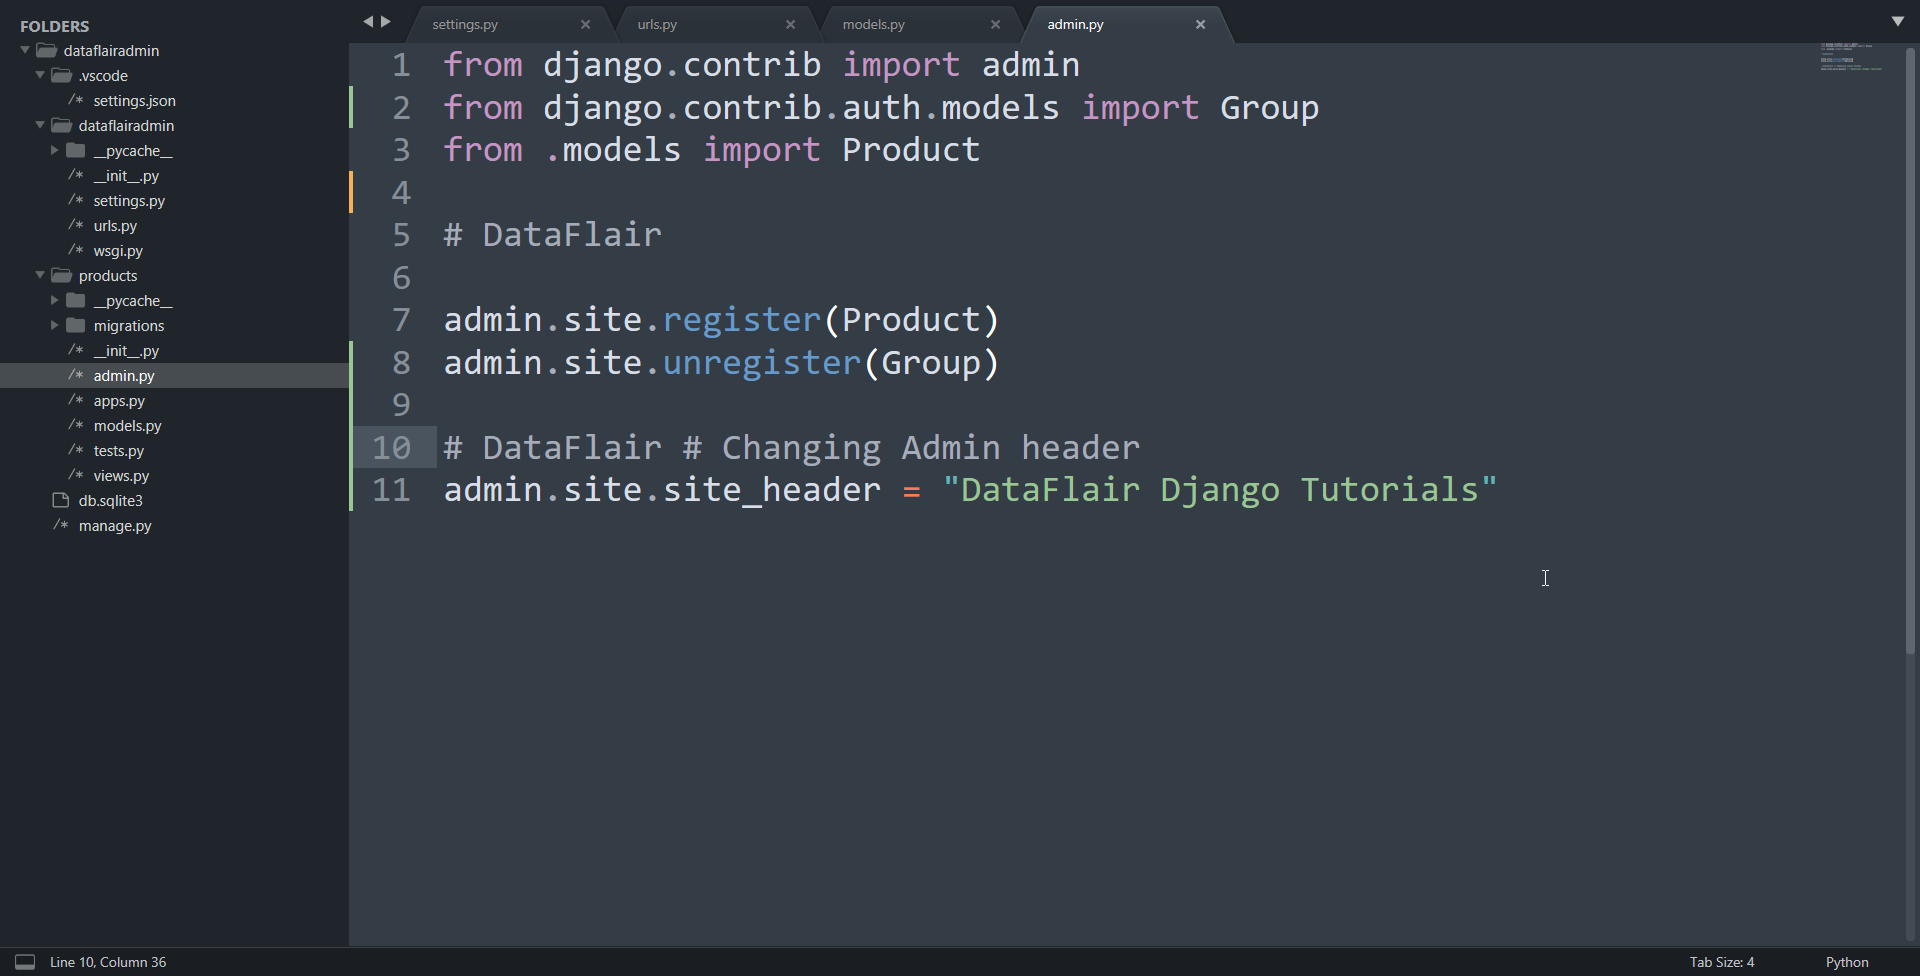
You can assign any string value you like. Just put the value in this variable.
There is much more to the customization of UI. It’s ultimately for you to decide, whether you want this heavily customized or make admin for yourself.
3. ModelAdmin Class
The ModelAdmin class is a representation of user-defined models in the admin panel. It can be used to override various actions. There is a whole range of options opened with ModelAdmin Class.
We have to register the Admin Model alongside the model we want to change. Suppose, we want to exclude some fields to not be shown on the admin panel.
We can do that by simply adding these lines in products.admin.py file.
Code:
# ModelAdmin Class # DataFlair
class ProductA(admin.ModelAdmin):
    exclude = ('description', )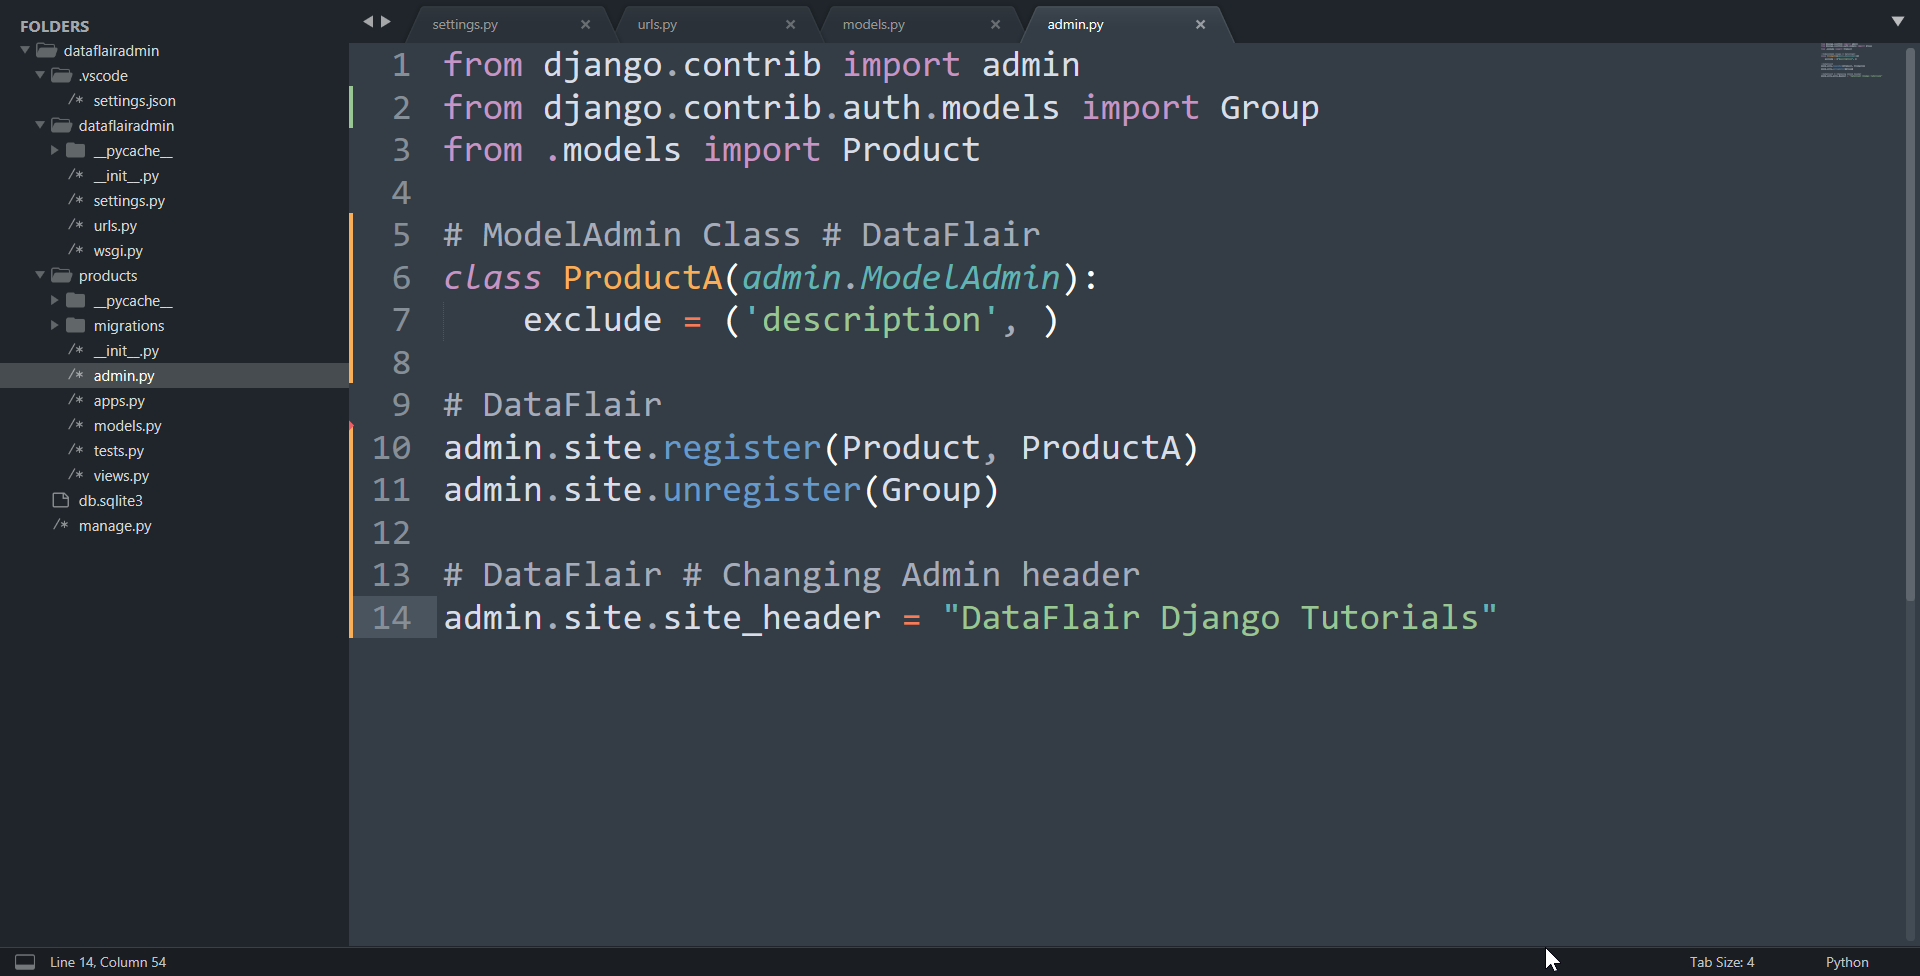
Understanding the Code:
We simply make the ModelAdmin class. This class is used to override the default class views. These default views are those which are created by an admin. We can think of the ModelAdmin class which is always generated by an admin.
When we register our models in admin.py, it was automatically generated. We just use it so to make changes or override the default class. One of the variables we can use is excluded. This variable takes tuple, list as input.
You can specify the fields you want to exclude in the admin view. They will not be deleted from the database. They will not be displayed in the admin panel to input.
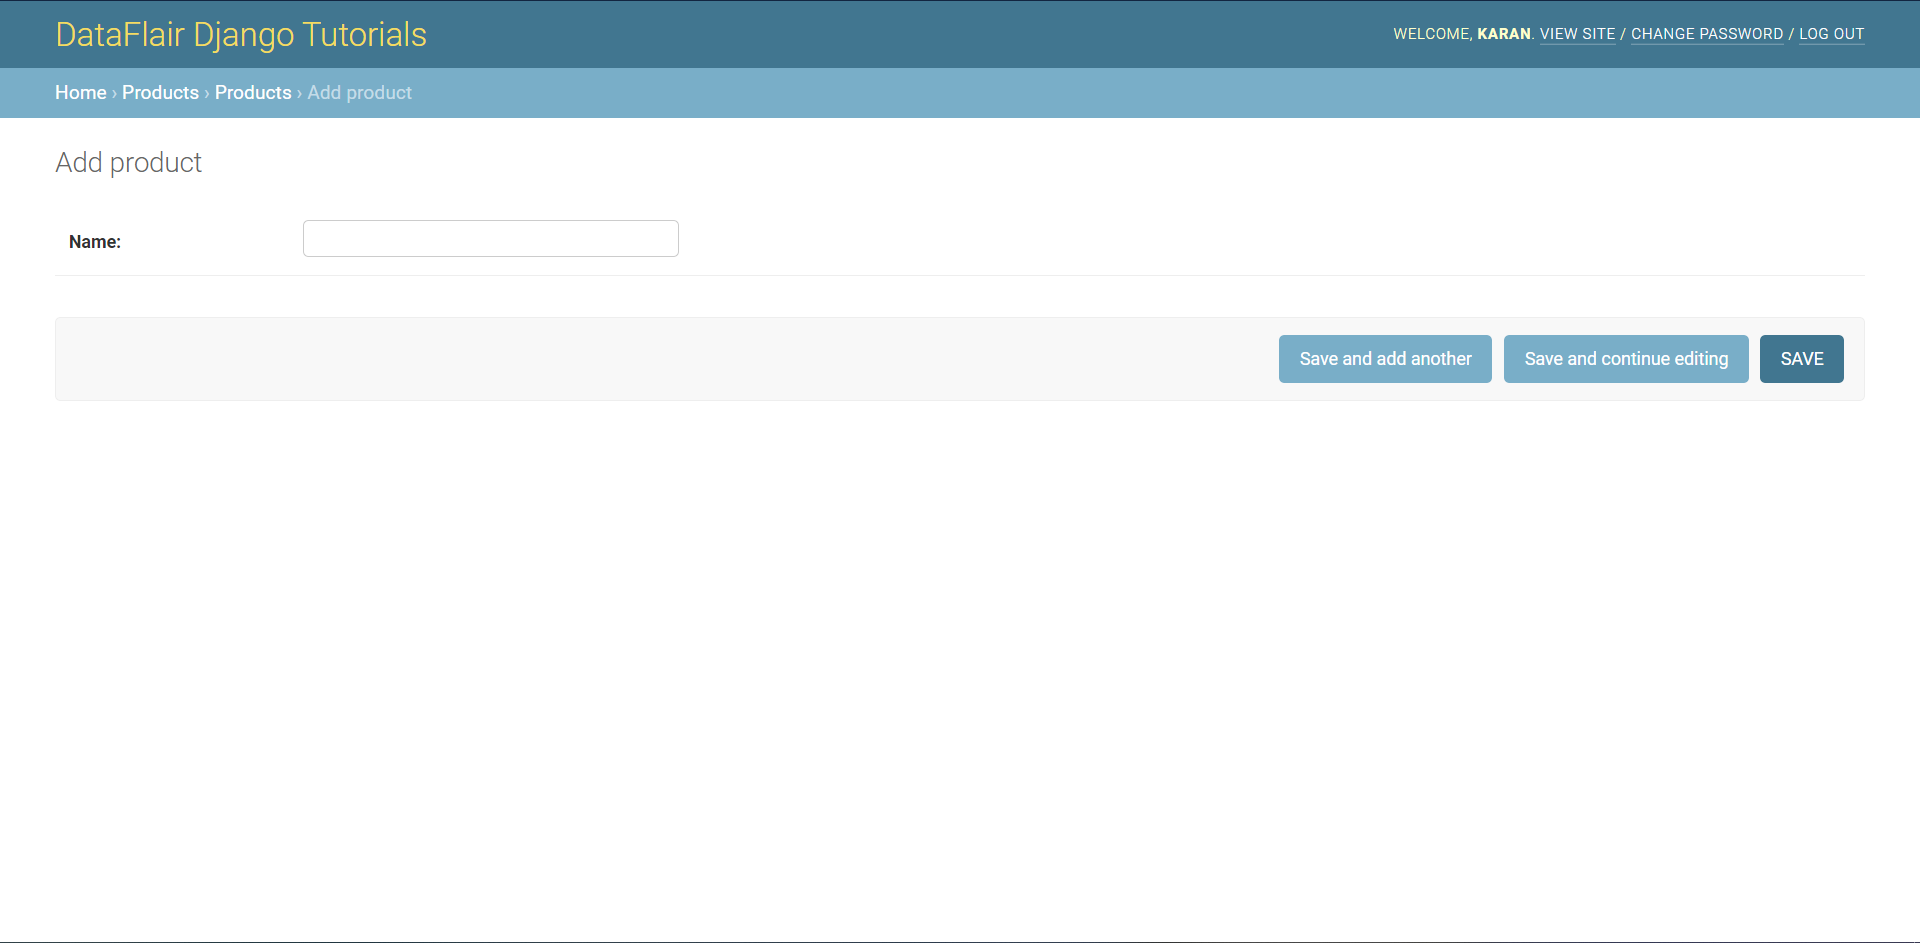
As you can see, the description field is not available for input. The ModelAdmin takes a lot of things.
4. Customizing List Display in Django Admin
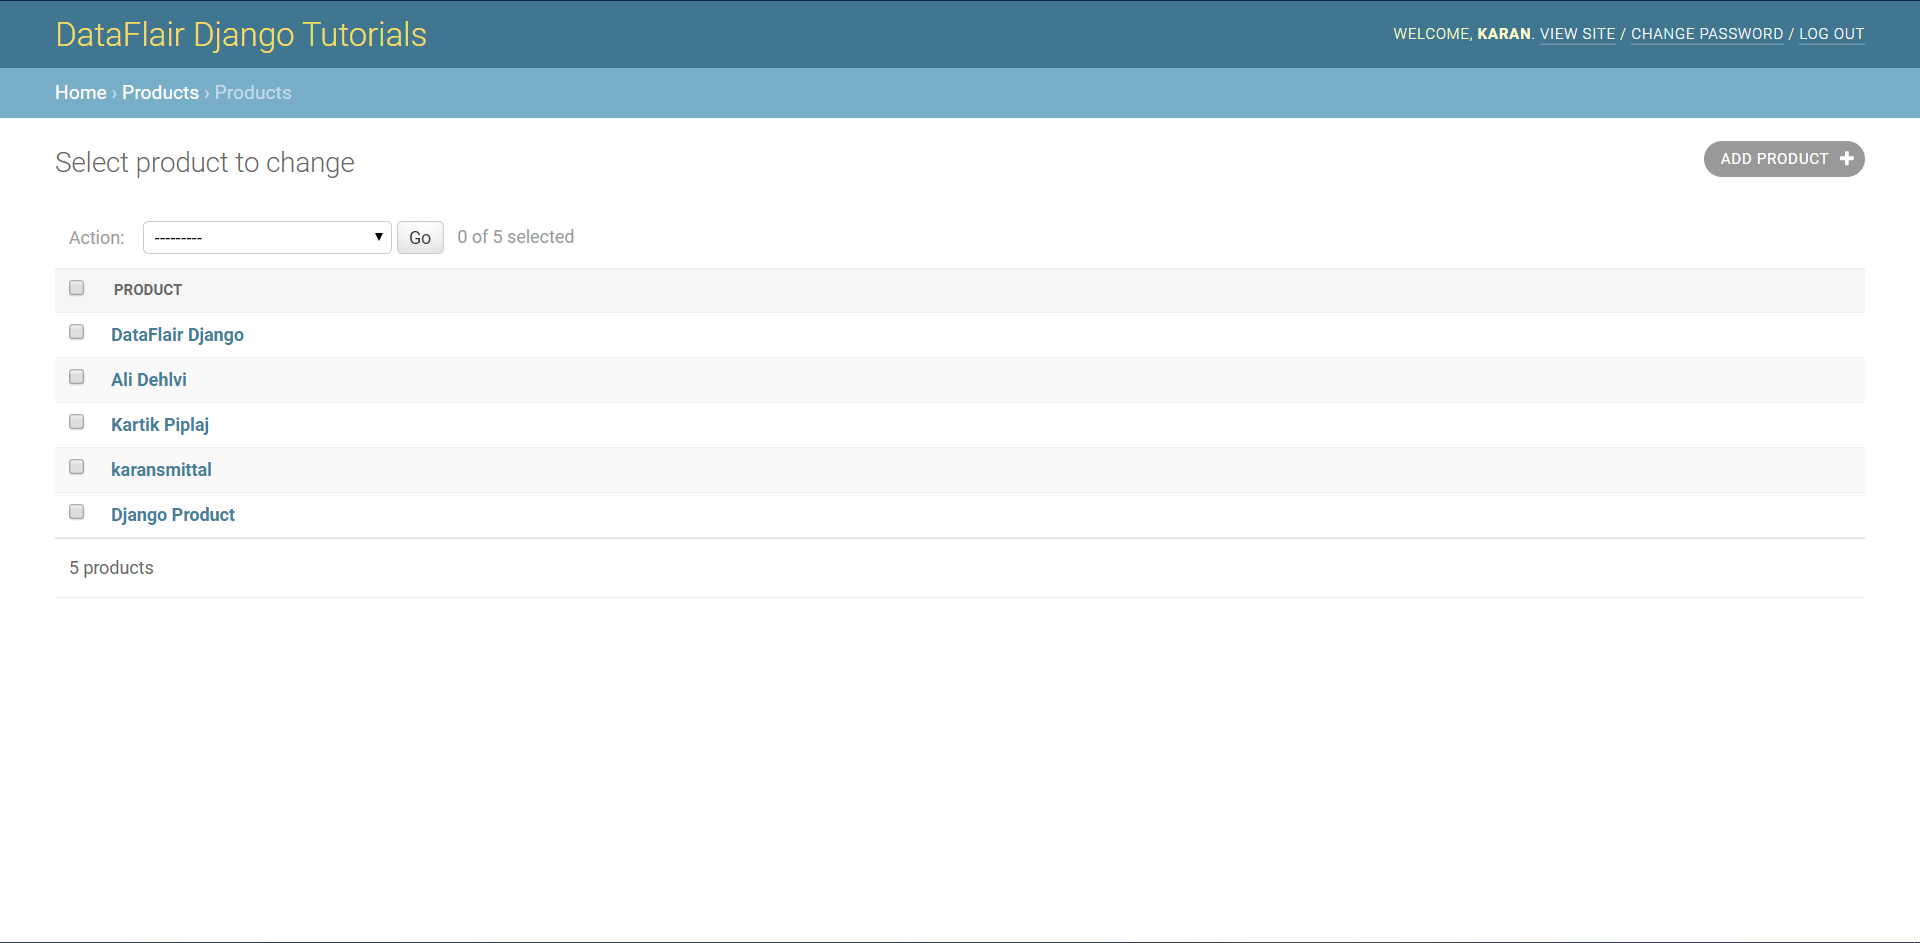
You should add some products before we check out this one. Populate your database with 5-6 products. After you have added some products, open the products model from the admin panel. There you will see a list of Product objects. It only shows the names of the products like in the image.
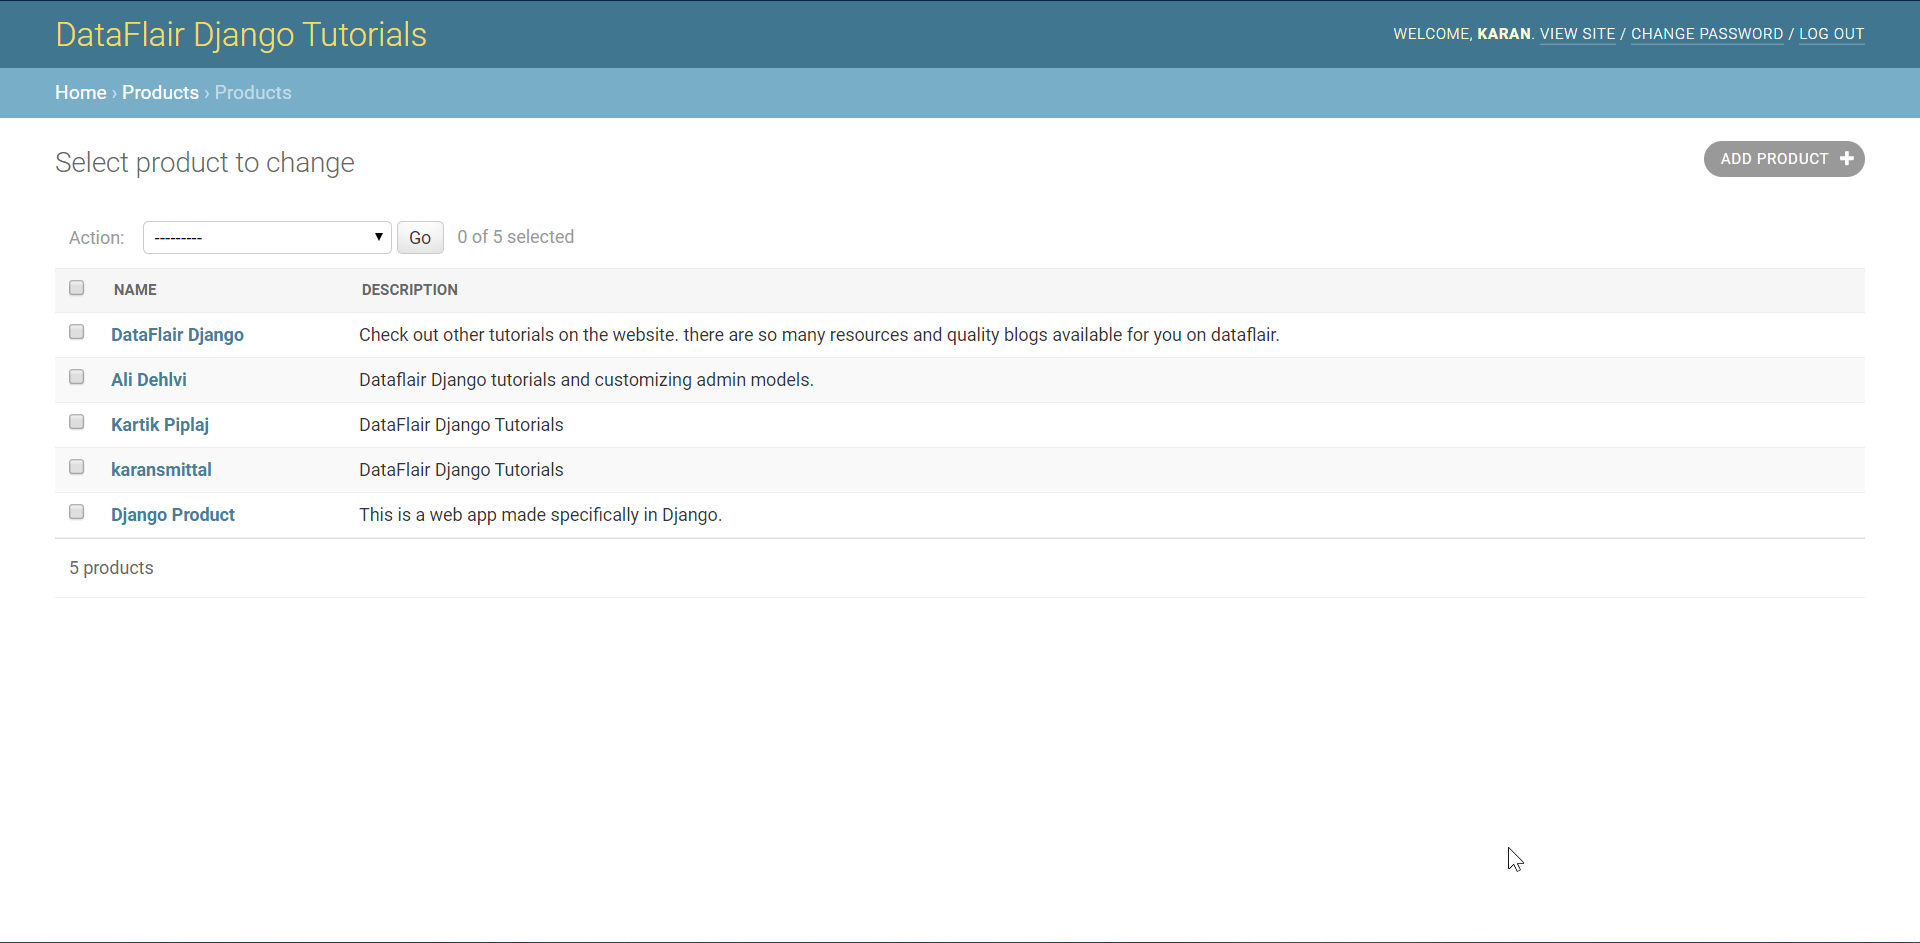
There are many scenarios where one might want more information visible in the list view. We can see all the information in the database. Similarly, we can choose the fields we want in the admin panel. To change the list view, modify your products/admin.py as seen in the image.
Code:
list_display = ('name', 'description')
The list view will now display both name & description fields.
The list_display variable takes a list or tuple as input. You can provide the names of fields you want it to display.
You can add more fields according to your use case. It is recommended that you keep only the necessary information in the admin panel. We have an efficient database to view the whole data. It’s just a good practice to keep only necessary data in admin.
5. Adding a filter in admin
How easy it would be to be able to filter objects. When dealing with a large database, it becomes necessary to see selected information. To perform that task easier, we can add a filter in the list view of the admin panel.
Modify the products/admin.py file as in Image.
Code:
list_filter = ('mfg_date', )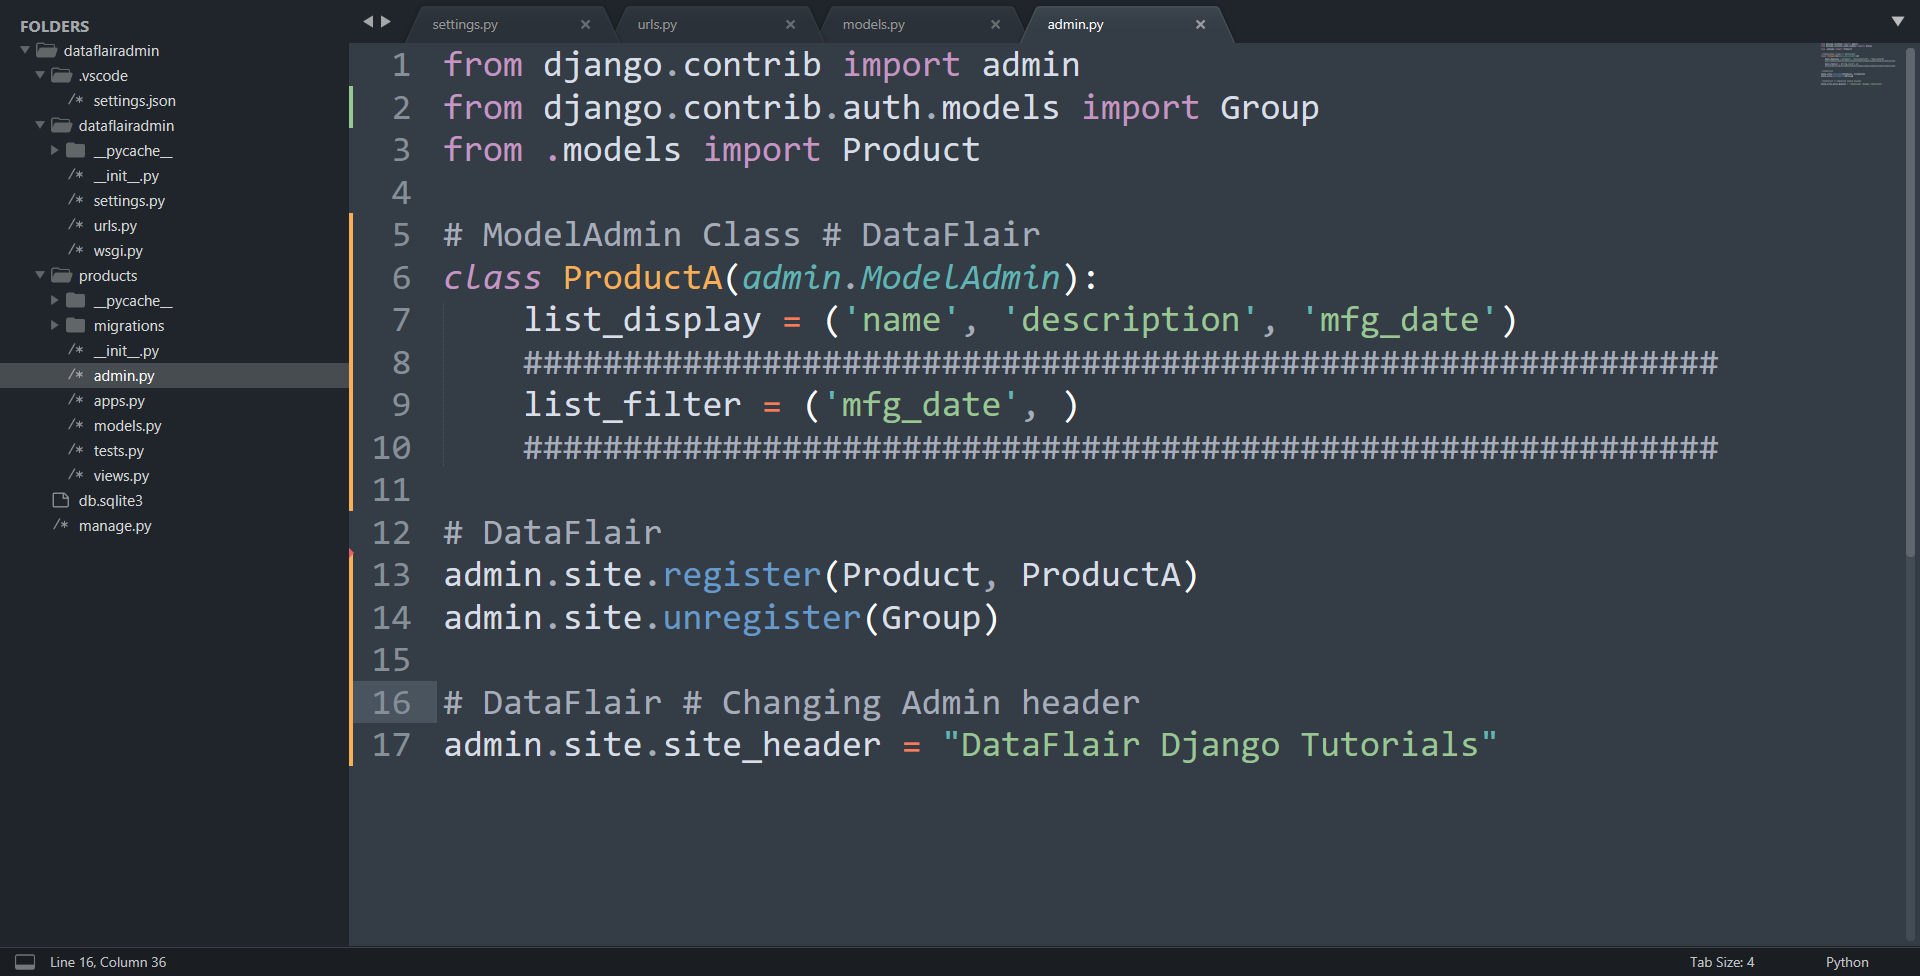
Here, we simply mentioned the fields we wanted a filter for. You can add multiple fields at a time in the list_filter variable. It takes in the list as input. After adding the field name, the admin list_view changes to this.
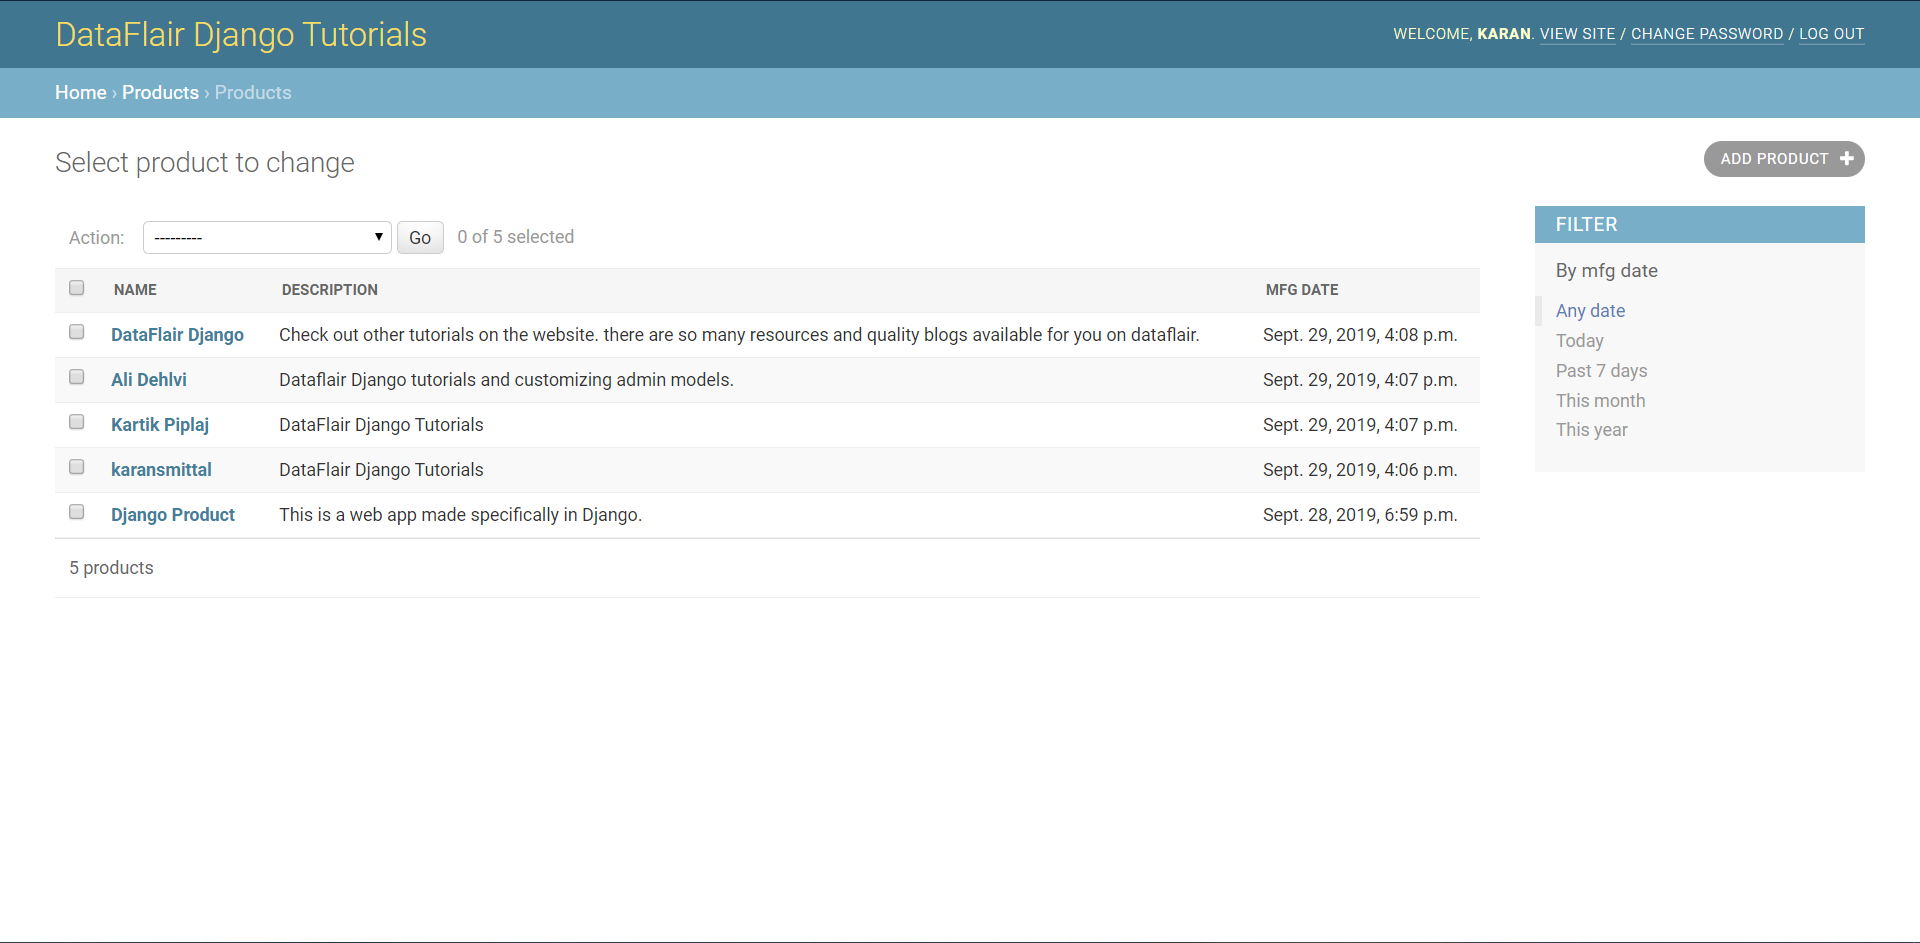
Now, we can classify objects on the basis of date. Django provides options like today, past 7 days, etc. to the panel. It’s so handy and user-friendly.
Django Admin Actions
The admin actions are functions that can modify collective data easily. In this image below, deleting multiple objects is fairly easy. That is the utility of actions. Not just that, actions can do much more. We will also make some actions of our own.

Now, suppose we have a rating system for our products. We have three kinds of ratings, bad, good and excellent.
We are first going to edit products/models.py file. Add this code according to the image.
from django.db import models

Rating = [
    ('b', 'Bad'),
    ('a', 'Average'),
    ('e', 'Excellent')
]

#DataFlair
class Product(models.Model):
    name = models.CharField(max_length = 200)
    description = models.TextField()
    mfg_date = models.DateTimeField(auto_now_add = True)
    rating = models.CharField(max_length = 1, choices = Rating)
    def __str__(self):
        return self.name

    def show_desc(self):
        return self.description[:50]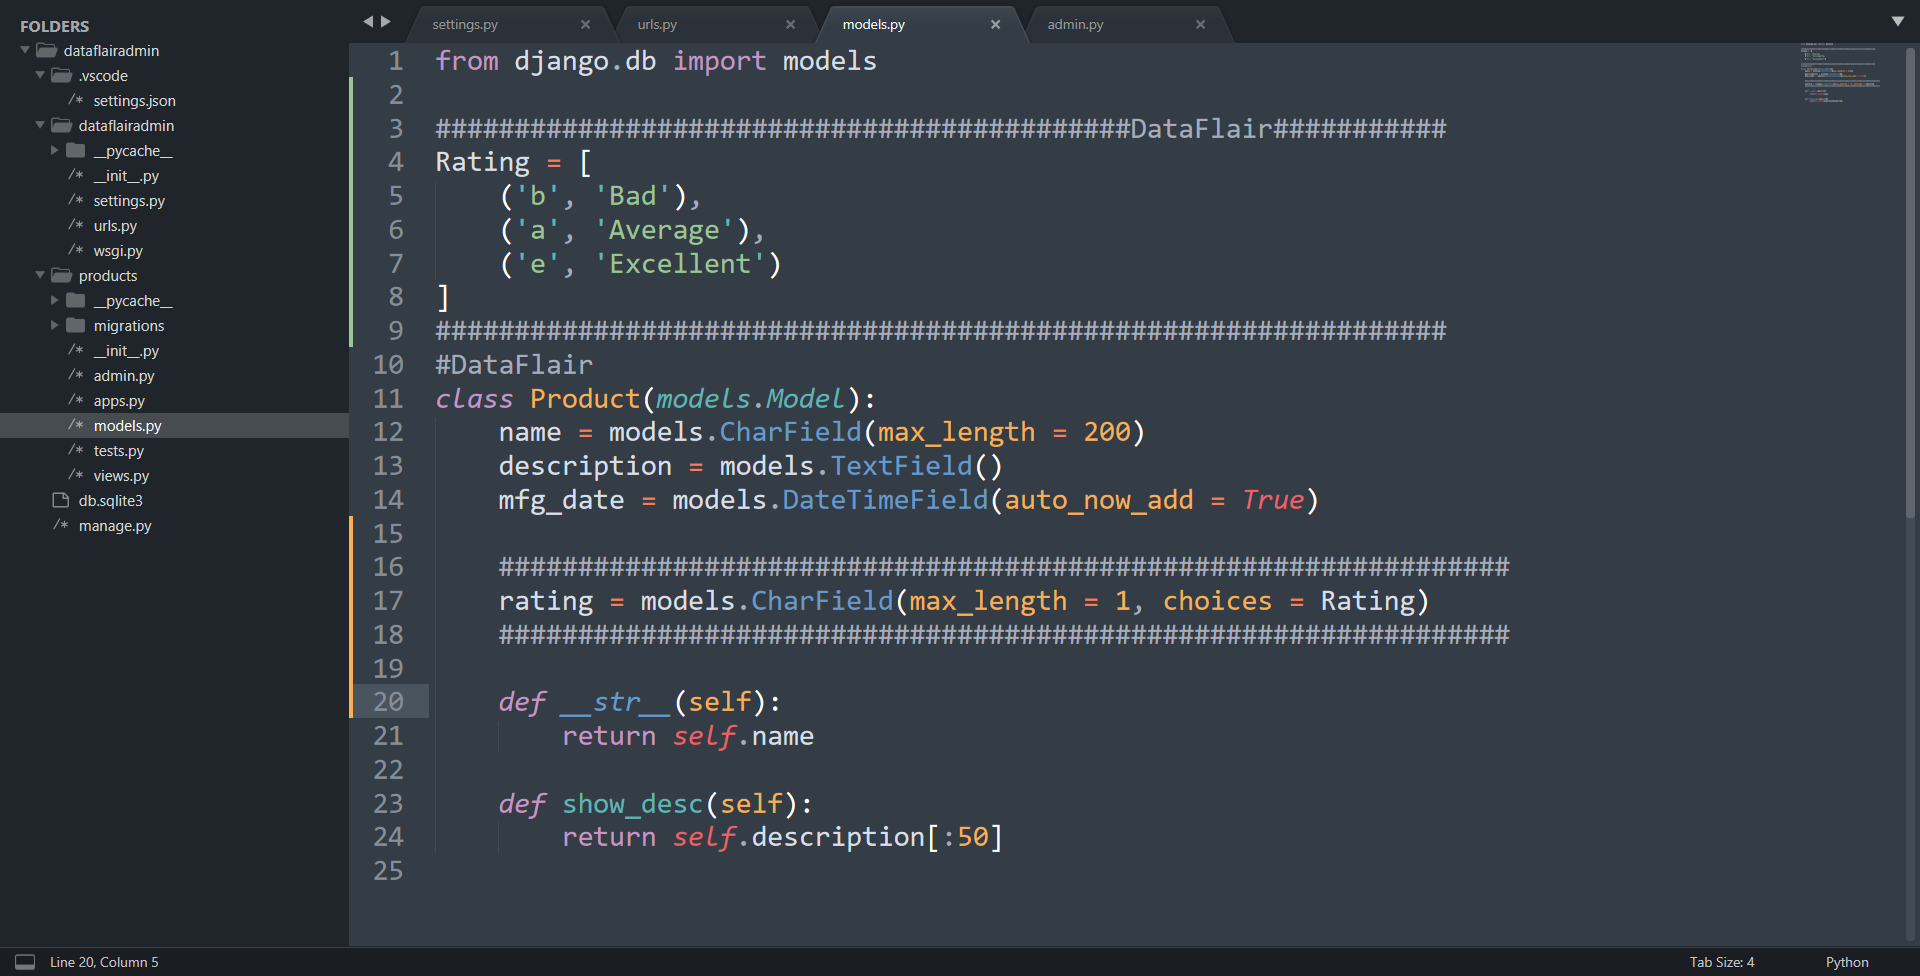
Now, execute the commands as shown in the next image.
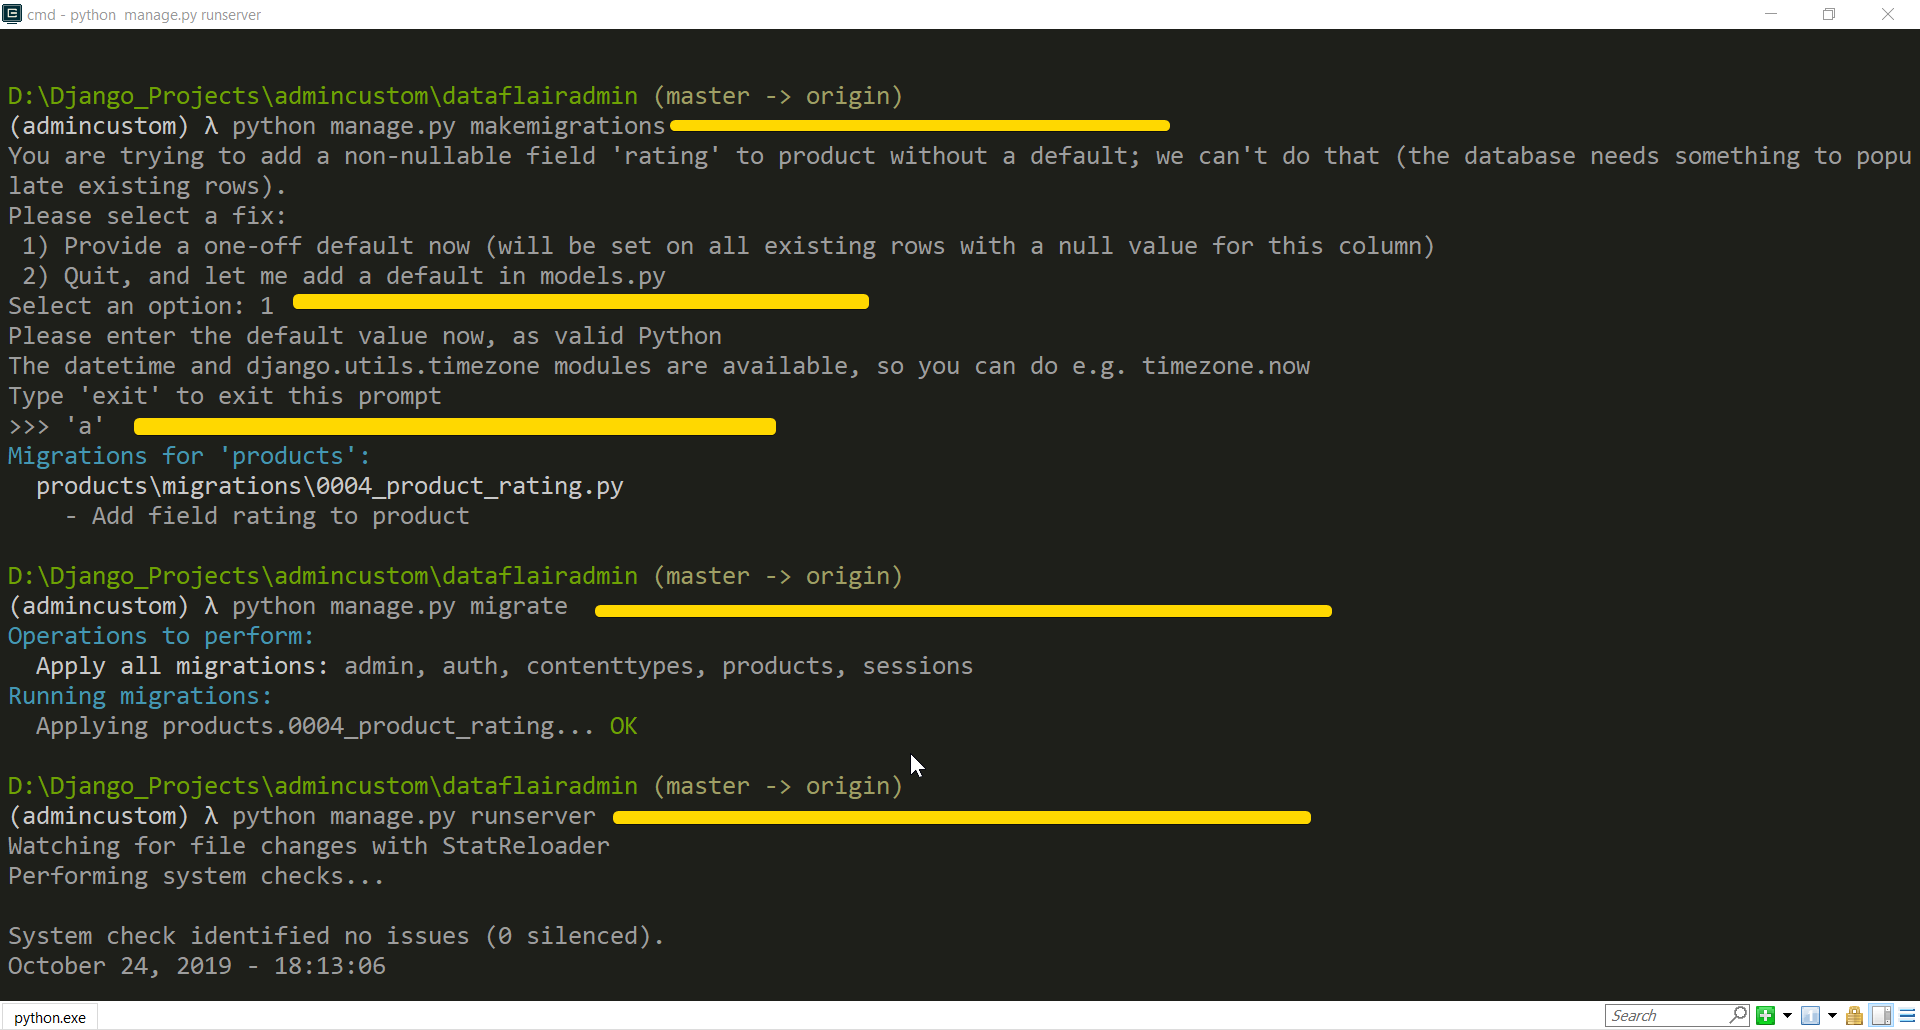
These commands shall be executed in this order. I have highlighted the commands in the yellow rectangles. Also, highlighted the front of those commands. These commands are necessary as we are making changes to the models. In the above code, we added a dropdown for product objects.
Since we already have some objects in the database, Django asks us to assign a default value to them. We assign the value in the third highlighted box. That’s it. After you have done these things and started the server again proceed further.
For any queries regarding the Django Admin customization tutorial please post comments below. Also, there is a GitHub repository for this project.
We will now, edit products/admin.py file. Add this code according to the image.
from django.contrib import admin
from django.contrib.auth.models import Group
from .models import Product

# Admin Action Functions
def change_rating(modeladmin, request, queryset):
    queryset.update(rating = 'e')

# Action description
change_rating.short_description = "Mark Selected Products as Excellent"

# ModelAdmin Class # DataFlair
class ProductA(admin.ModelAdmin):
    list_display = ('name', 'description', 'mfg_date', 'rating')
    list_filter = ('mfg_date', )
    actions = [change_rating]

# DataFlair
admin.site.register(Product, ProductA)
admin.site.unregister(Group)

# DataFlair # Changing Admin header
admin.site.site_header = "DataFlair Django Tutorials"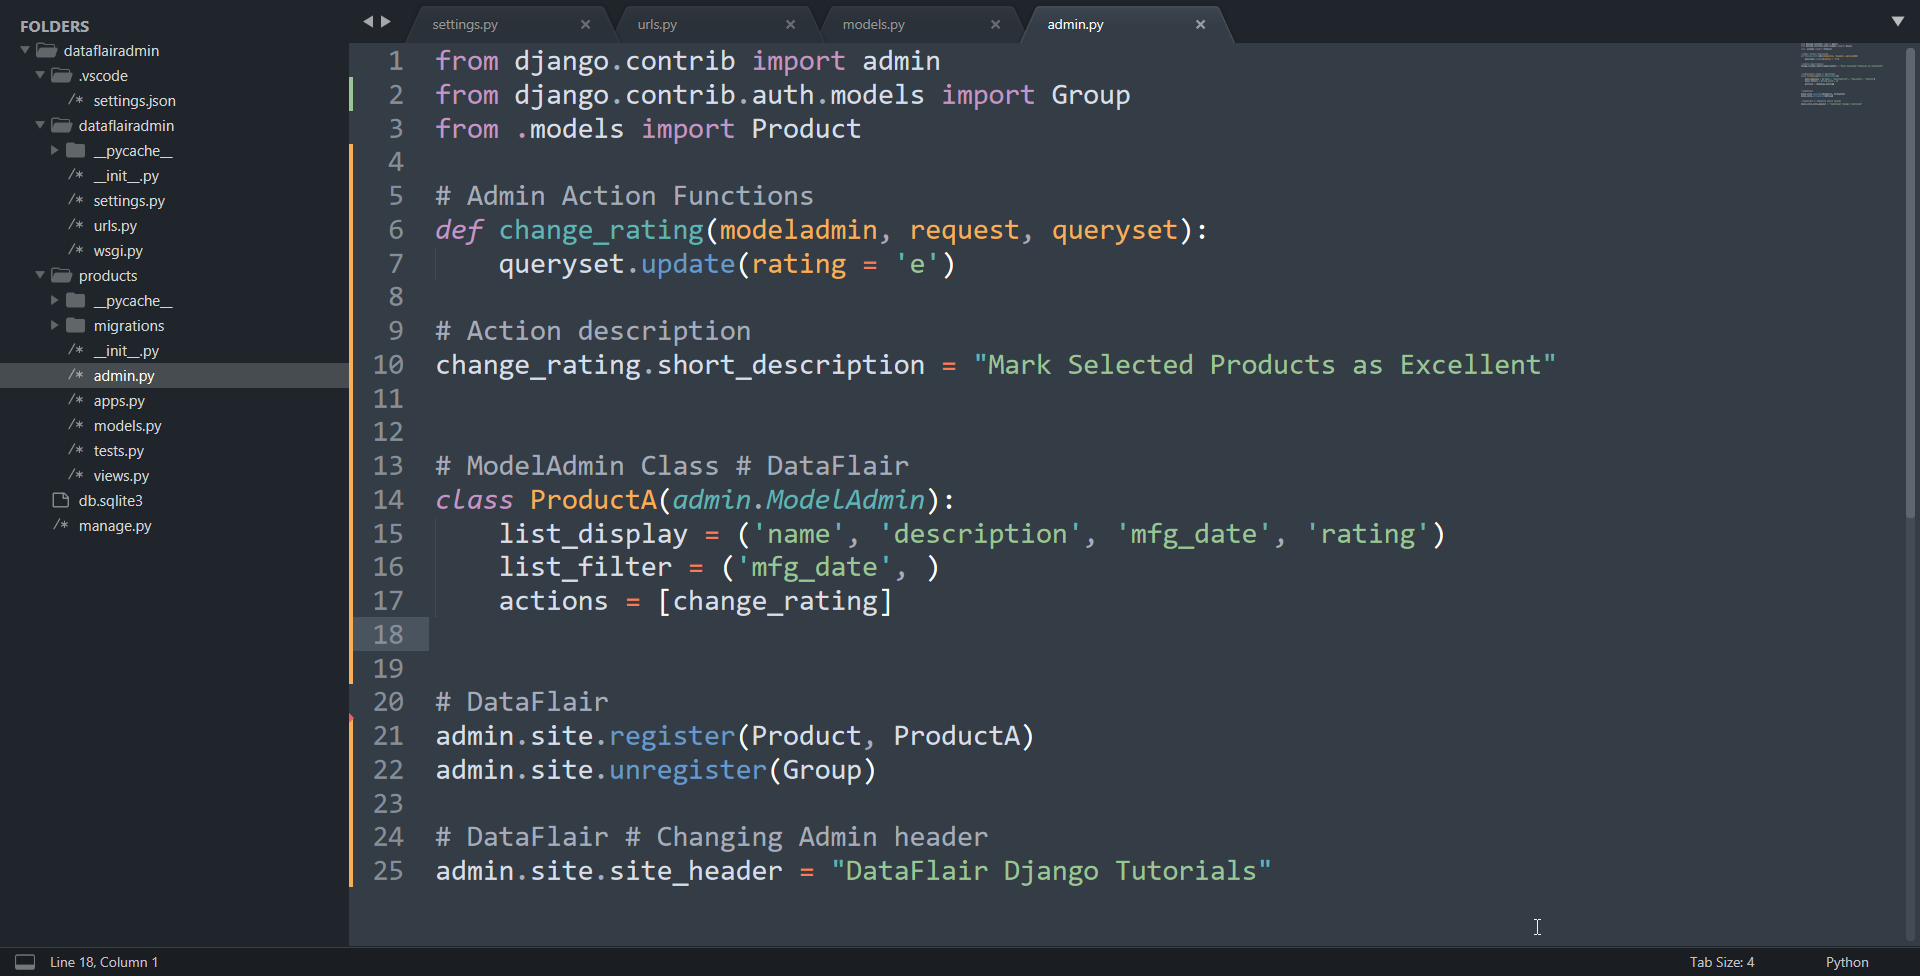
Understanding the Code:
Here, we are adding an action in Django Admin. First, we need a function that will be executed when the action is called. Generally, that action function will take 3 arguments; Request, Queryset, and modeladmin class.
From the code, we made a function change_rating() and passed these 3 parameters.
The function will update the field rating to value e for selected Queryset. The Queryset is nothing but the list of selected objects. Now, we come out of function and define a description for it. The description is visible as an option in the Actions tab in the admin panel.
Then we add the action in actions member of ProductA class. Save the code and the server will auto-reload.
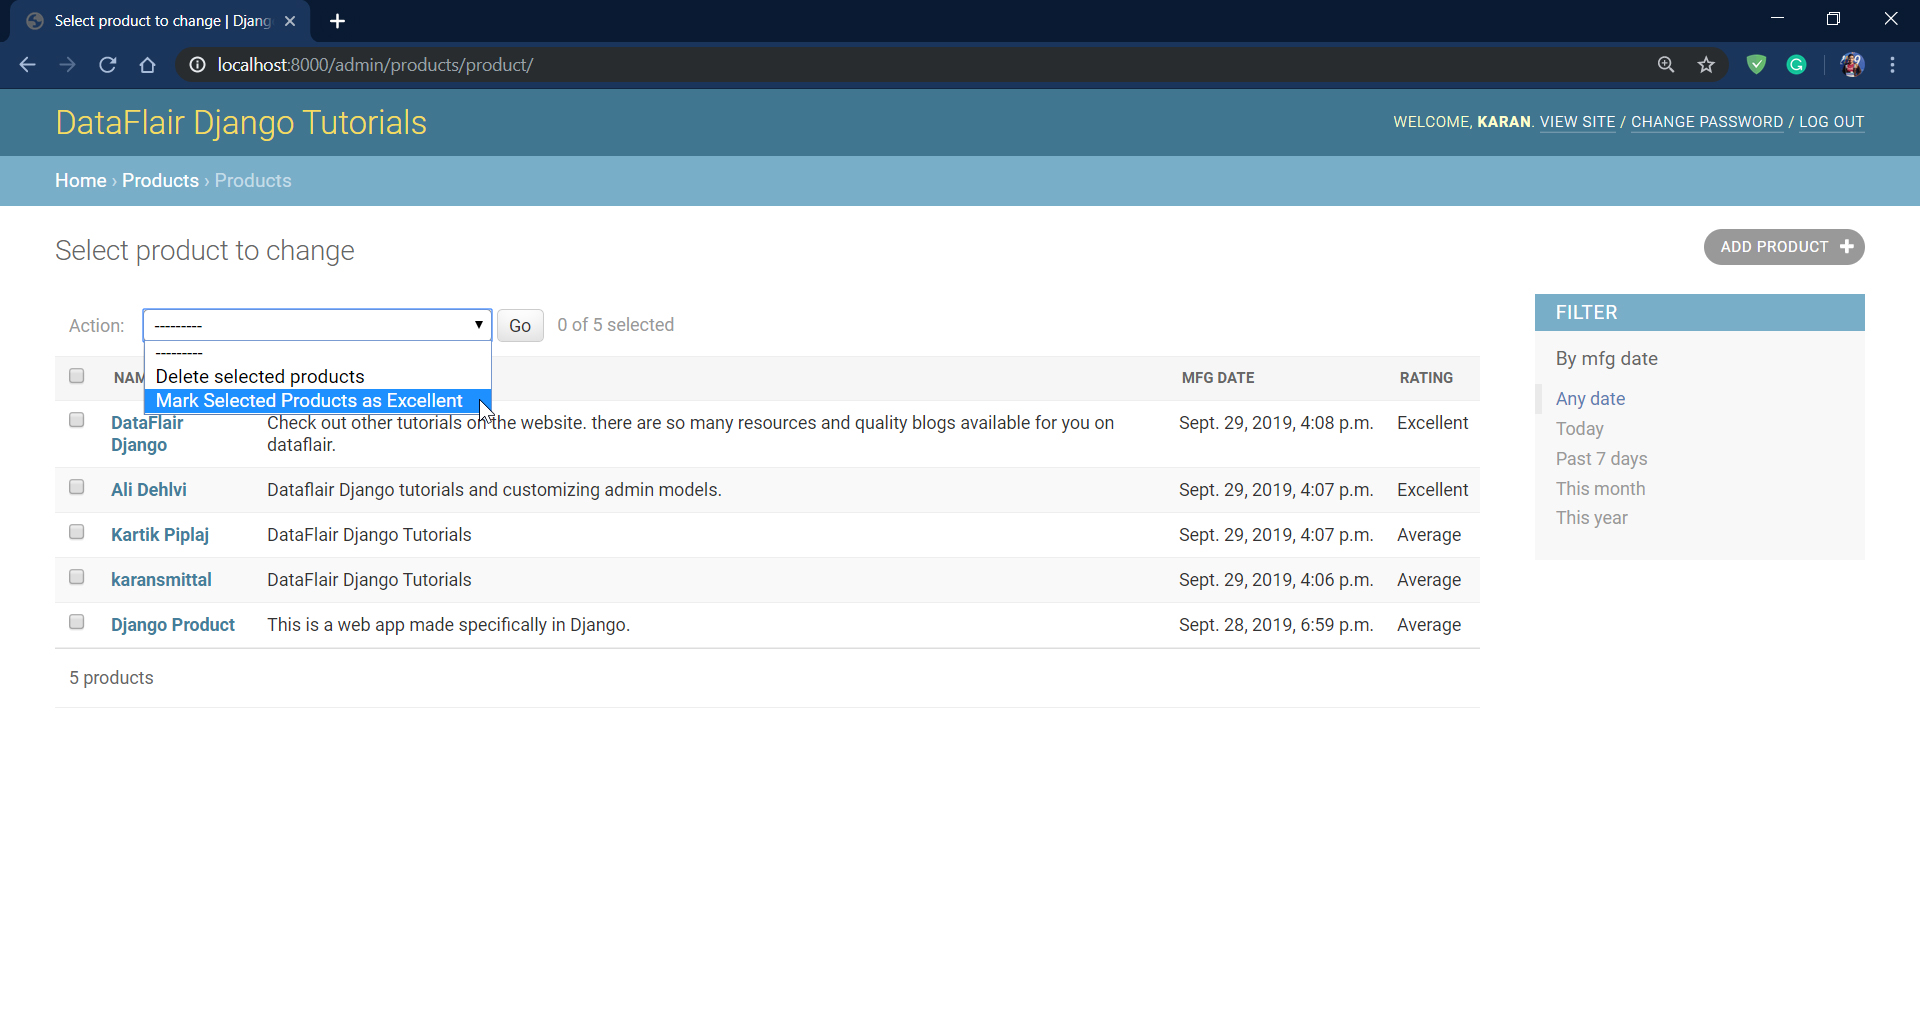
Now, just reload the admin/products page. You will get this new action.
Try and play with some more customizations. Django Admin is a very productive tool and very beginner-friendly.
Summary
The conclusion to this Django Admin customization tutorial is what a great tool admin is. Although, we have not gone to fully customize the Django Admin. The reason for not doing complete customization is wasting time. You see, you need to learn in-depth if you want an admin to be fully customized.
Django Admin is not meant to be customized that deeply and the official docs are also clear about that. Although, there are more customizations available. We only need to customize enough such that it saves time and doesn’t raise any unknown exceptions.
Django Admin is a tool to increase productivity and is meant only for admin.
There are custom skins available for Django Admin. They are also very fine-tuned. There is a catch that every time Django is updated, there are slight changes to the admin too. This raised bugs in our code if we have a highly customized admin.
Therefore, for deep customization or heavy tasks for your websites, you should make your own admin panel. For simple management and CRUD operations, Admin is fairly customizable and capable.
Any queries in the Django Admin Customization Tutorial? Share them in the comment section.
Your 15 seconds will encourage us to work even harder
Please share your happy experience on Google


in admin page Mark Selected Products as Excellent not working
Hello Rohit,
The code is working with django2.2. if you are using any other version it might be that. Other problem may be that your function definition is not correct. do check out this tutorial thouroghly and share your implementation.
Thankyou.
Yes the above problem I am also facing copy the code with this one still not get rating excellent
Hey Moheed, Check the admin file and see if you have some different code. Also, Admin changes are more subtle in 2.2 and version 3 of django so please also verify which version of django you are using.
not fully customizable