Django CRUD Tutorial – Operations and Application Development
Master Python with 70+ Hands-on Projects and Get Job-ready - Learn Python
Job-ready Online Courses: Click, Learn, Succeed, Start Now!
Django CRUD tutorial – Django is an amazing framework. Now, it’s time to make a web application using newly gained skills. We will discuss some important concepts required while making an application.
In this tutorial, we are developing a library application. You can have a glimpse of the application here.

“You might not think that programmers are artists, but programming is an extremely creative profession. It’s logic-based creativity.”
– John Romero
What is CRUD?
CRUD stands for Create, Read, Update & Delete. These are the four basic operations which are executed on Database Models. We are developing a web app which is capable of performing these operations.
Since we are developing a library app, let’s take an example of the same. In a library, books are objects. The books have attributes like name, author, etc. We need an application which can perform CRUD operations on book object. The CRUD operations are defined as follows:
1. Read Operation
The ability of the application to read data from the database.
2. Create Operation
The ability of the application to store data in the database.
3. Update Operation
The ability of the application to edit the stored value in the database.
4. Delete Operation
The ability of the application to delete the value in the database.
We are going to develop the operations in the same order.
Majority of applications on the internet are CRUD applications. For example – Facebook uses CRUD operations to save your data on their database. You can change your profile picture that means perform the update operation. Of course, you can see the data in-app or browser which is read operation.
Also, you can delete your Facebook account which is delete operation. Summarising it, almost all the applications you use are CRUD applications.
For developers, making a CRUD application is one of the very first steps. If you can make a CRUD app from technology then you can start deploying projects.
Django CRUD Tutorial
Let’s explore the steps to design a CRUD application in Django framework:
1. Making a Library CRUD Application
Our first steps would be to make a new project in Django and a new virtual environment. To make a virtual environment, enter:
virtualenv library

Now, install the necessary software in this environment. Once, the environment is set up, activate the same. After activating the environment, install django on it.
pip install django==2.1.7

After the installation is complete make a new django project.
django-admin startapp libraryapp

The project is made by Django. Now, the last command is to make a new application. Move to the directory of manage.py file and make a new app.
python manage.py startapp book

Now, all the required setups are complete. We can proceed further.
2. Installing Application and Other Important Settings
To install the app, just add the application’s name in the INSTALLED_APPS list. This is inside settings.py file.
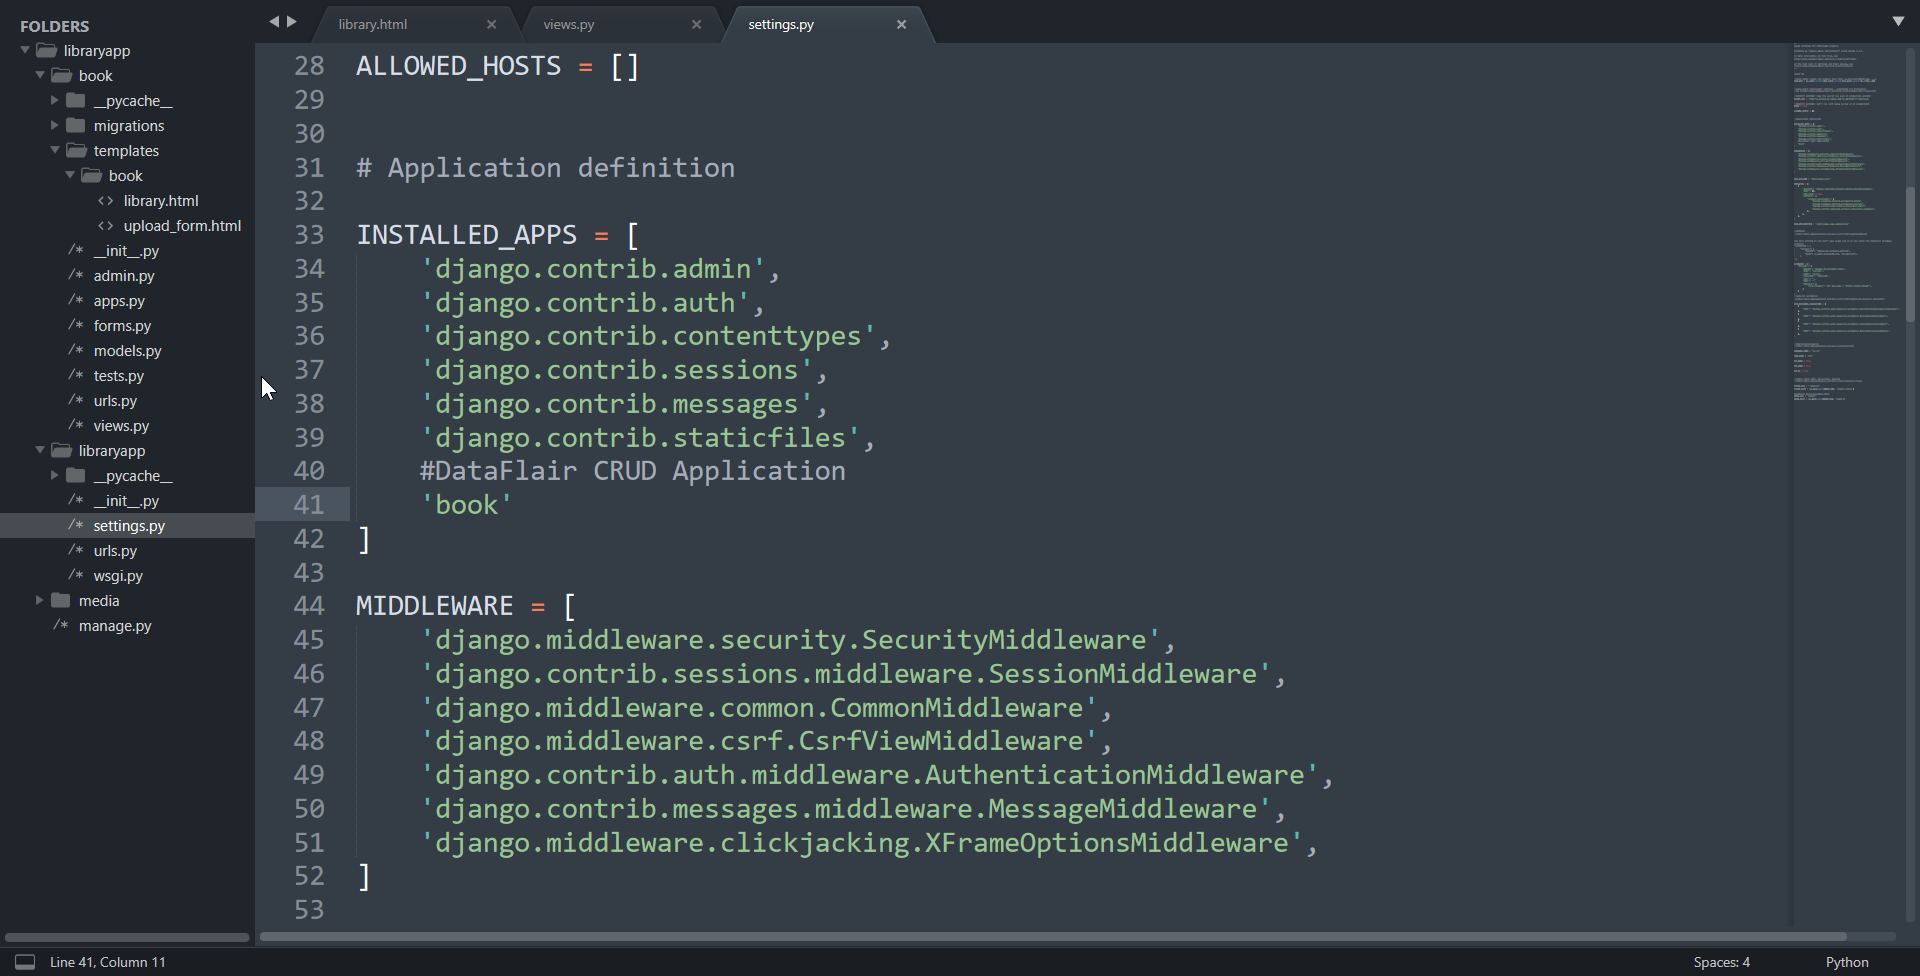
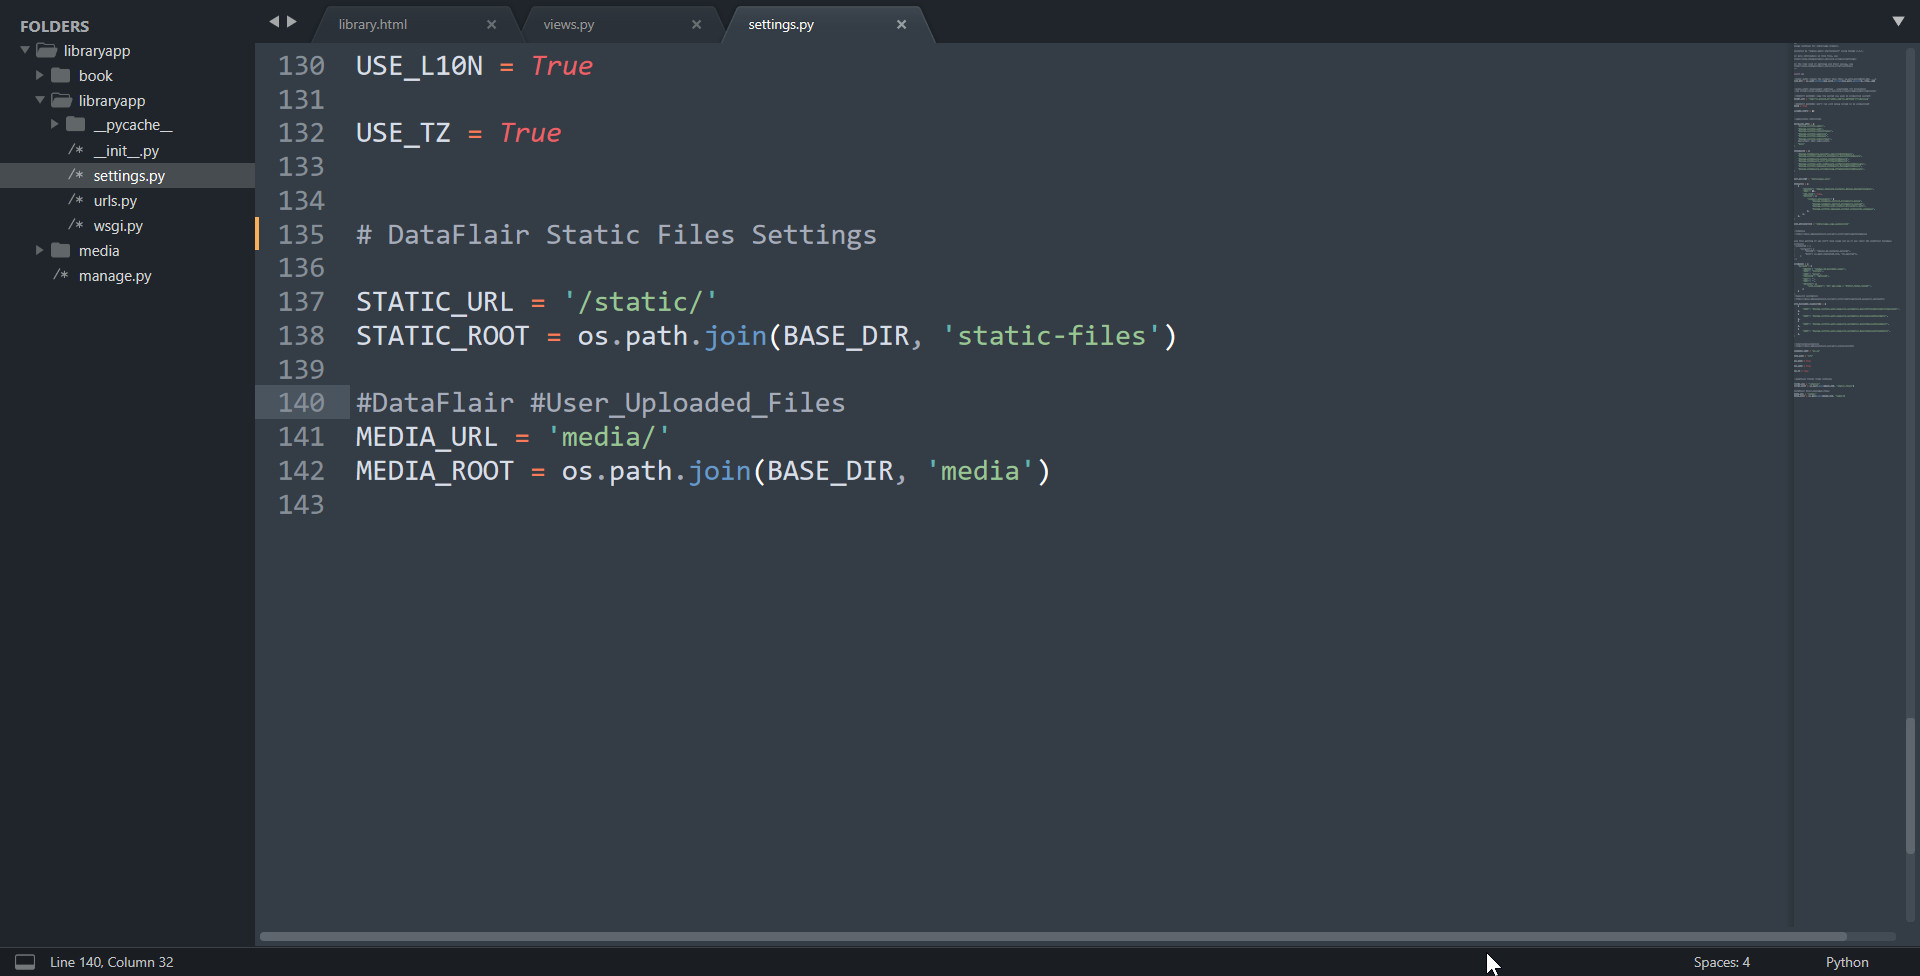
Once you complete this step, we also need to establish the Static Files Settings. Copy these settings as it is and replace it with the existing settings of your project.
Code:
# DataFlair Static Files Settings
STATIC_URL = '/static/'
STATIC_ROOT = os.path.join(BASE_DIR, 'static-files')
#DataFlair #User_Uploaded_Files
MEDIA_URL = 'media/'
MEDIA_ROOT=os.path.join(BASE_DIR, 'media')
Code Display:
Above setting is important for saving and serving static files to the client. Also, we need a pillow package of Python. Install it via command line in your virtual environment.
pip install pillow

Pillow is a Python Imaging Library which deals with different image files. We won’t be using pillow directly but Django is using it. Therefore, we need pillow library.
Okay, now all the preparations for the application are complete. All the settings are done so we can start developing the same.
3. Making Models for Books App
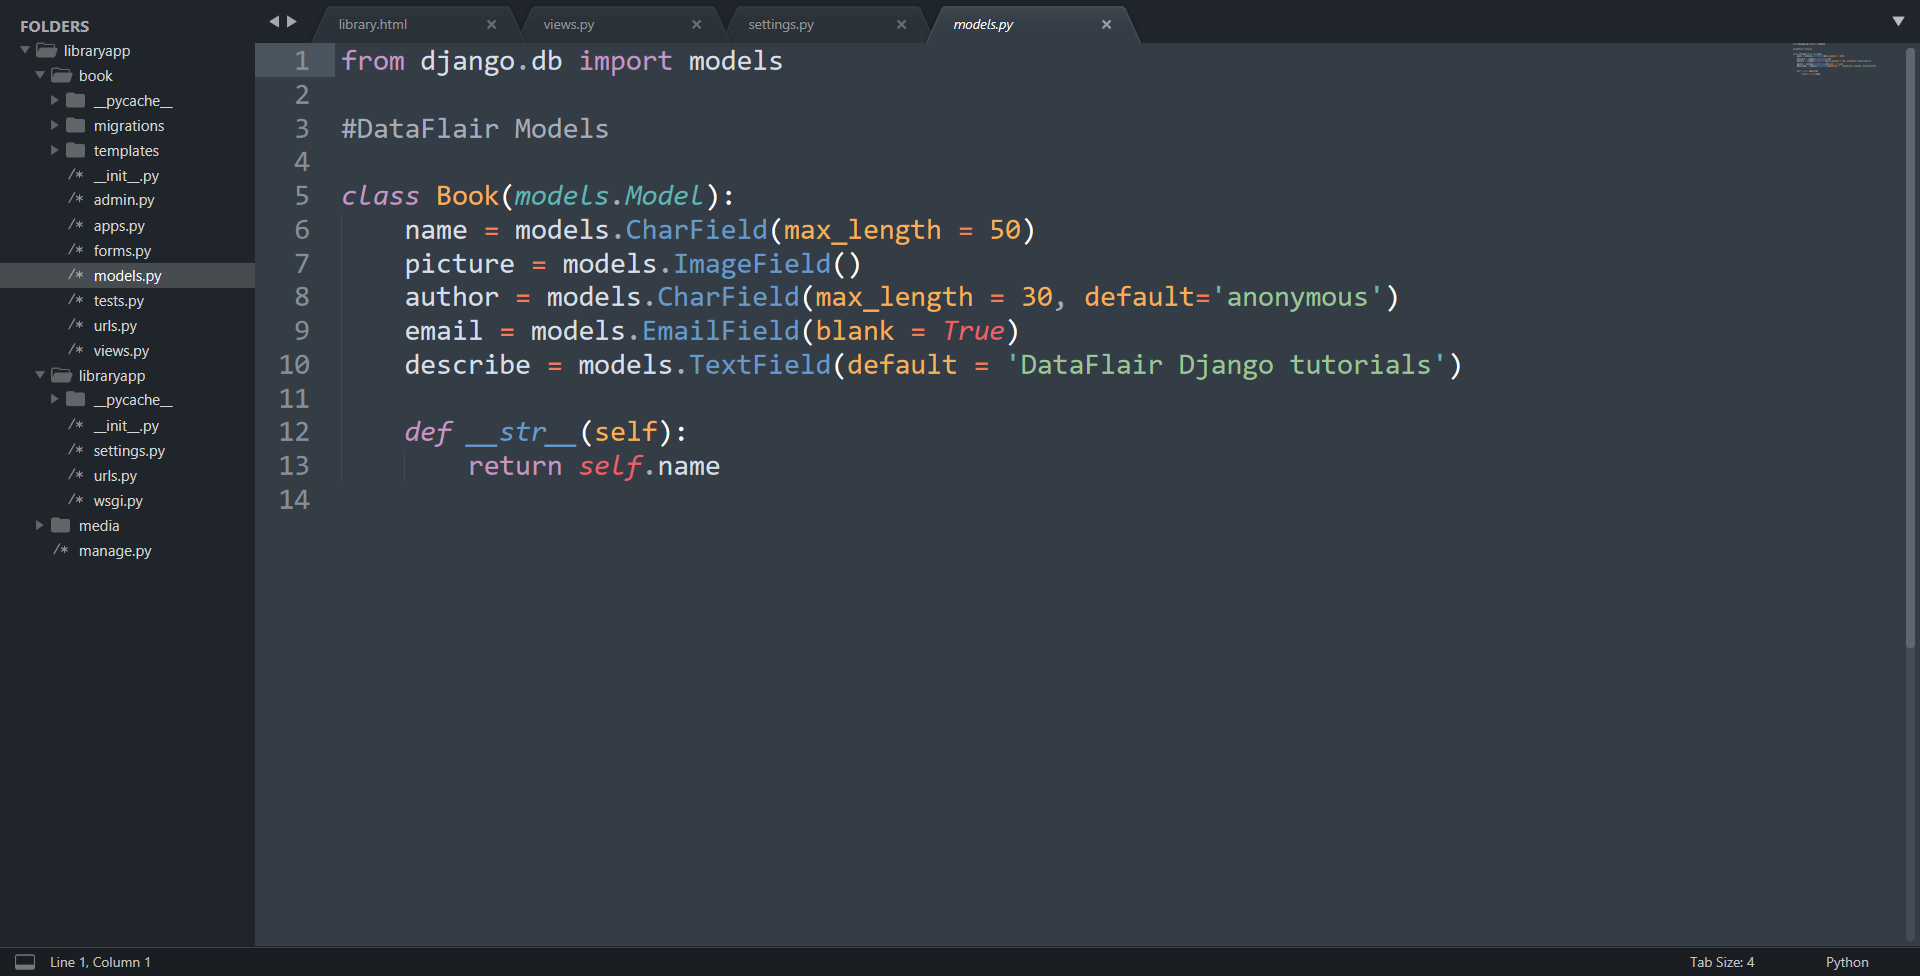
In the book folder, open models.py and paste this code. We are making a model or database table for our books app.
Code:
from django.db import models
#DataFlair Models
class Book(models.Model):
    name = models.CharField(max_length = 50)
    picture = models.ImageField()
    author = models.CharField(max_length = 30, default=’anonymous’)
    email = models.EmailField(blank = True)
    describe = models.TextField(default = ‘DataFlair Django tutorials’)
    def __str__(self):
        return self.name
Code Display:
Understanding the Code:
From the above code, Django will make a table in a database named book. That table will have these fields:
Name, picture, author, email, and description of the book object. From this class, we can easily manipulate the table. The important part here is the picture field. It is set as ImageField.
This ImageField is the reason why we installed pillow in this virtual environment. Django by default uses pillow to handle Images in ImageField. So, that was the models of our book app.
4. Making Model Forms in Book Directory
Django makes it so much easier to make forms for models. We just need to use our models and we can easily make forms.
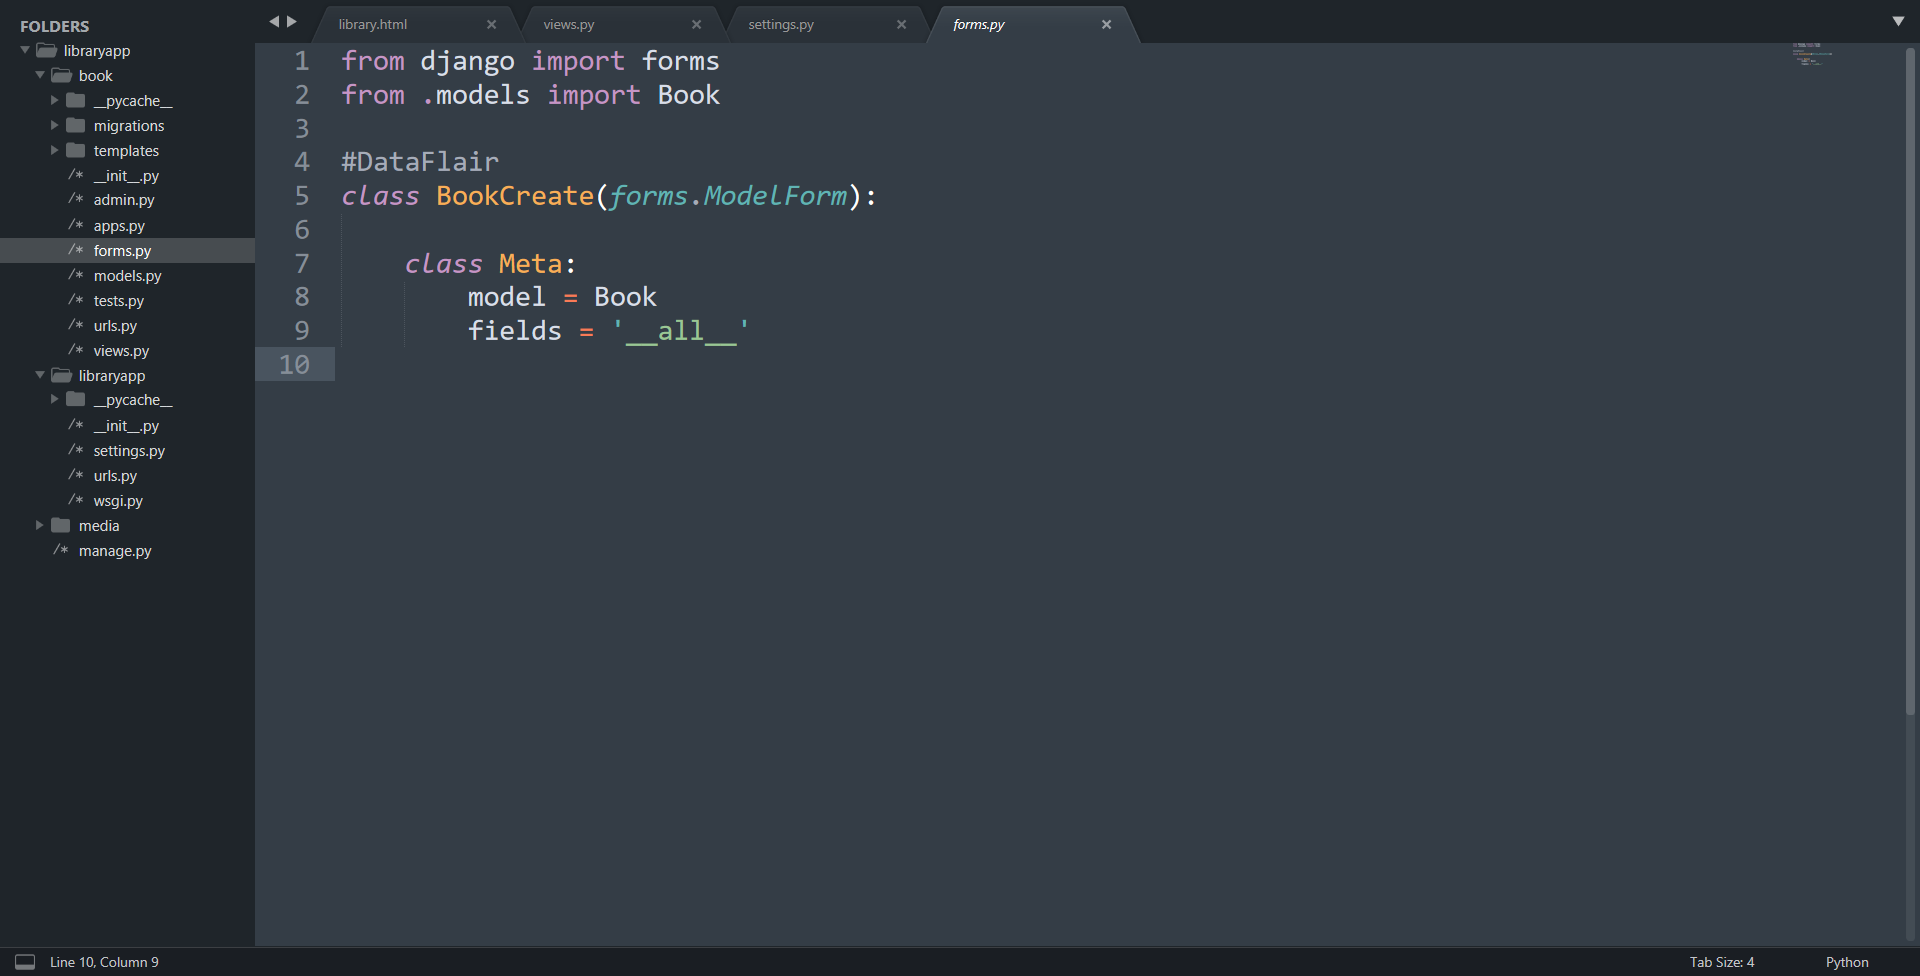
Make a new file forms.py in book directory. Paste this code in this forms.py.
Code:
from django import forms
from .models import Book
#DataFlair
class BookCreate(forms.ModelForm):
    class Meta:
        model = Book
        fields = '__all__'
Code Display:
Understanding the Code:
This is a simple model form we made for book model. Here we import two classes namely, forms and Book. The Book is the model we just made.
The BookCreate() class is the form class which represents the Model form. In the MetaClass, we define which model to be used to make the model form.
Fields denote the actual form fields where we want input from the user. This form is enough for our work.
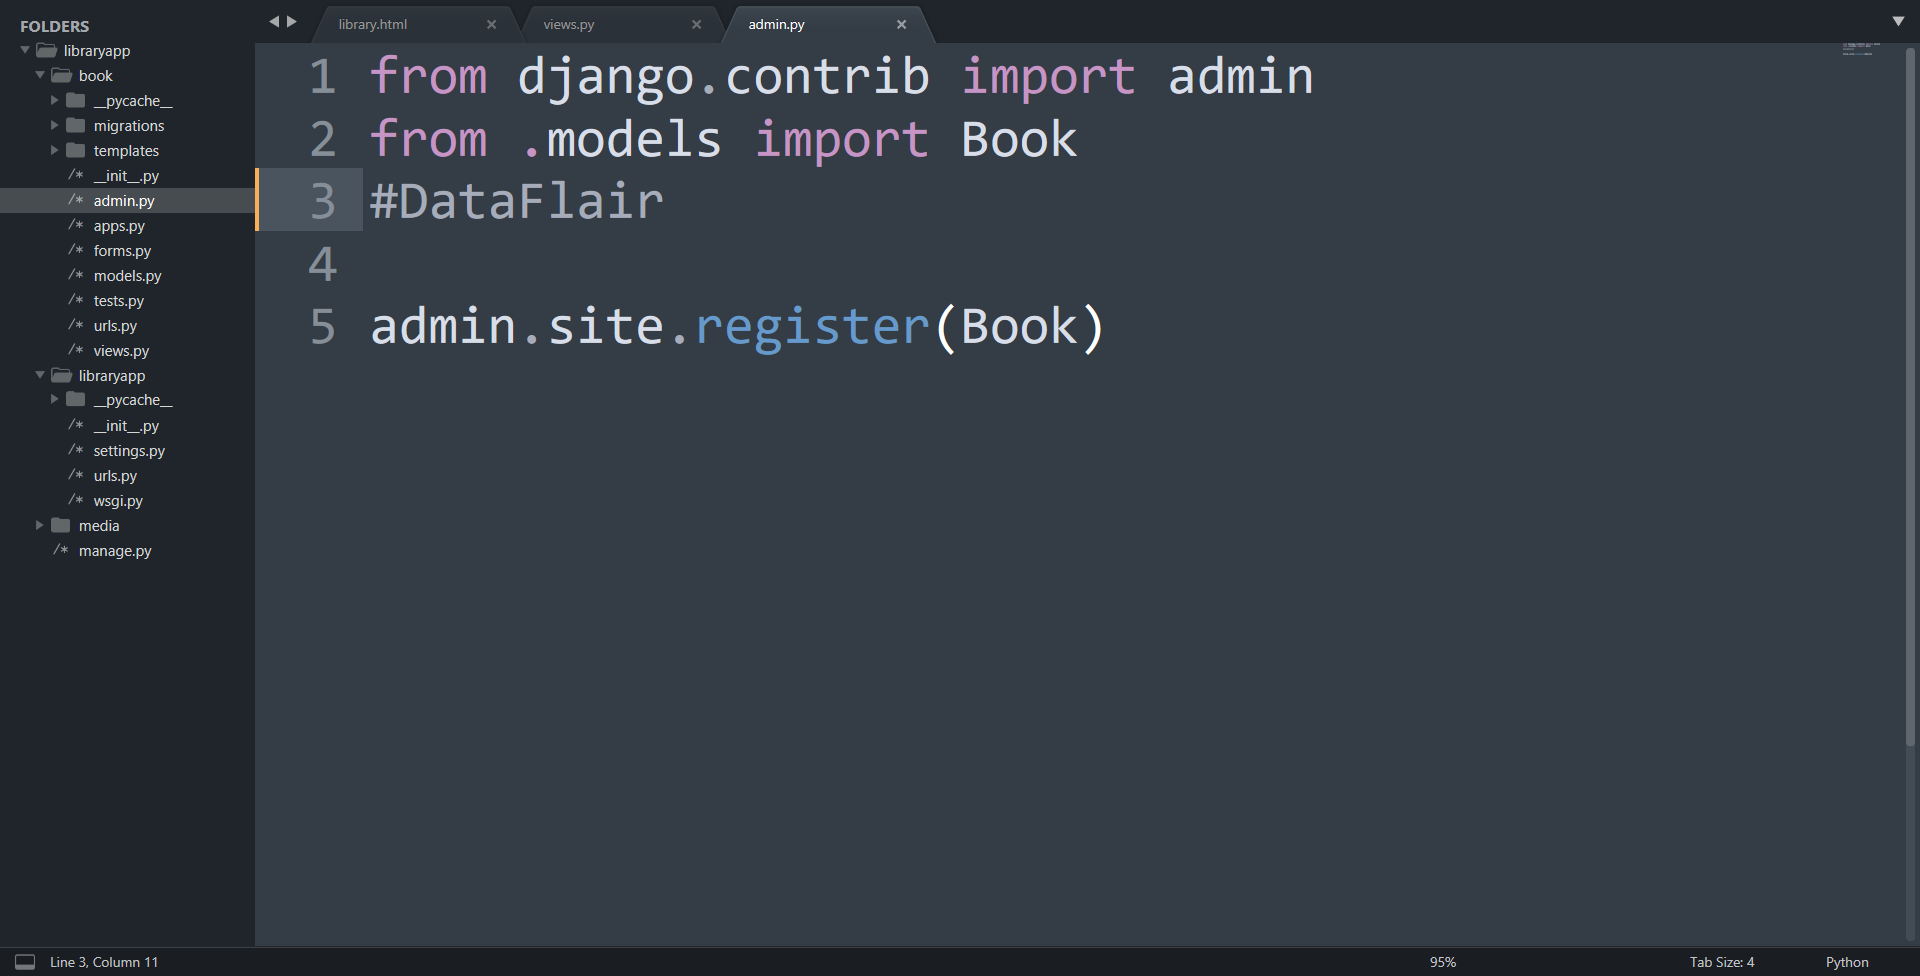
5. Registering Model in Django Admin
Here we are editing admin.py existing in book folder. Import the model you want to register in the admin. In this case, it is a Book.
Then paste this line below it.
Code:
admin.site.register(Book)
Code Display:
Okay, so we have made a lot of backend here. To implement all of this, run these commands in the command line:
python manage.py makemigrations
python manage.py migrate
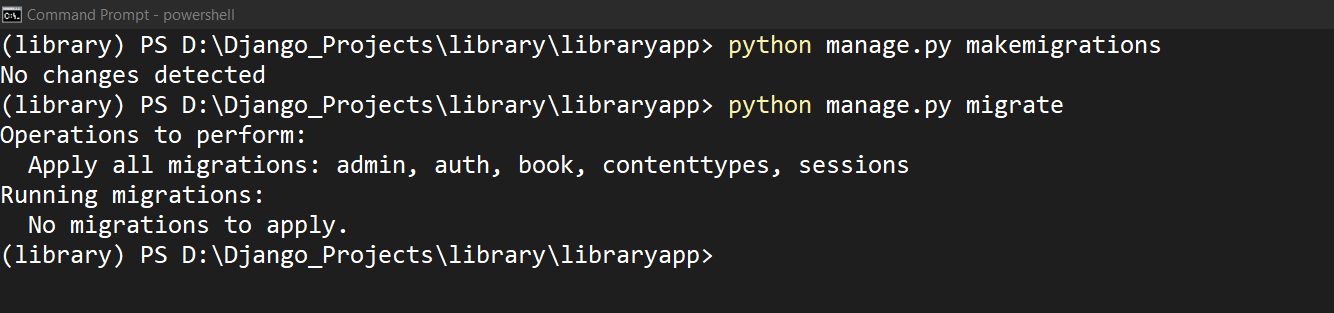
Our, outputs may not concede. I have already tested it thoroughly.
As long as you are following the Django CRUD tutorial, there shall be no errors. If something does arise then tell us in the comments.
After running these commands, we also need a superuser to login to the admin. You can make a superuser using the command:
python manage.py createsuperuser
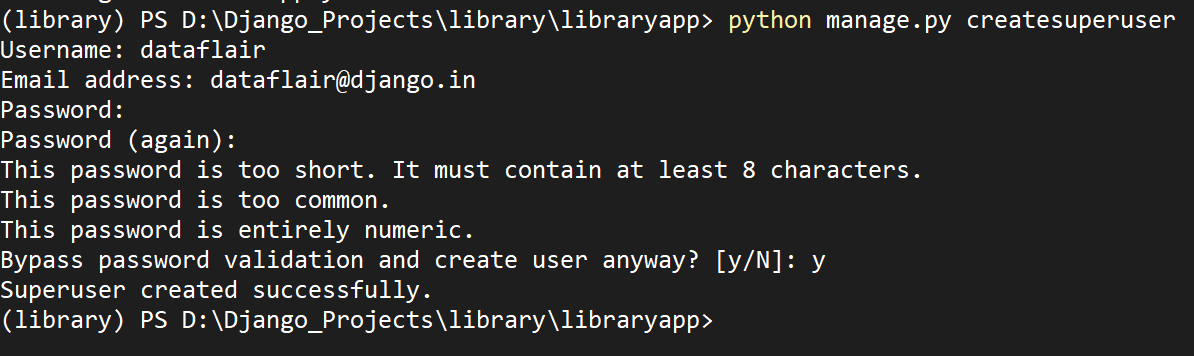
After creating a superuser, you can access the django admin control panel.
We have made models and forms files so far. Now, let’s make the views for our CRUD application.
6. Making View Functions for Django CRUD App
The view functions are our actual CRUD operations in Django. Now, we are editing views.py in book folder. Open views.py file in the folder. Paste this code in it:
Code:
from django.shortcuts import render, redirect
from .models import Book
from .forms import BookCreate
from django.http import HttpResponse
#DataFlair
def index(request):
shelf = Book.objects.all()
return render(request, 'book/library.html', {'shelf': shelf})
def upload(request):
upload = BookCreate()
if request.method == 'POST':
upload = BookCreate(request.POST, request.FILES)
if upload.is_valid():
upload.save()
return redirect('index')
else:
return HttpResponse("""your form is wrong, reload on <a href = "{{ url : 'index'}}">reload</a>""")
else:
return render(request, 'book/upload_form.html', {'upload_form':upload})
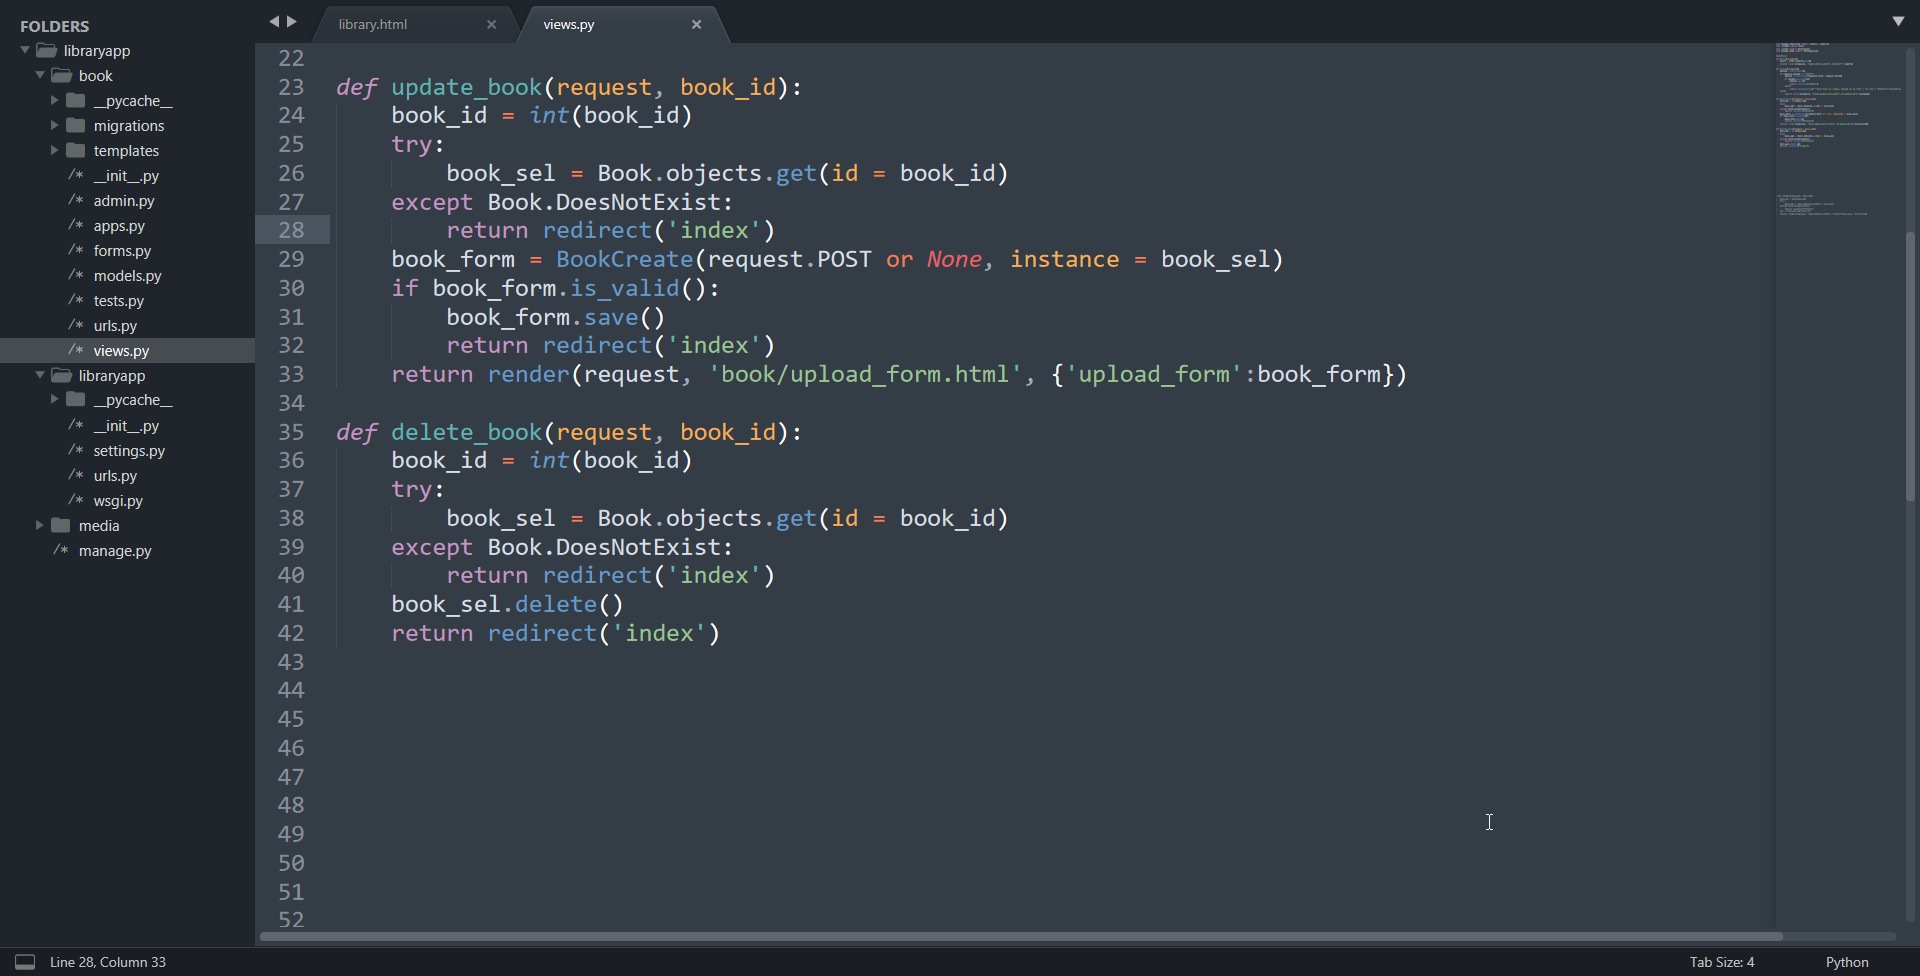
def update_book(request, book_id):
book_id = int(book_id)
try:
book_sel = Book.objects.get(id = book_id)
except Book.DoesNotExist:
return redirect('index')
book_form = BookCreate(request.POST or None, instance = book_sel)
if book_form.is_valid():
book_form.save()
return redirect('index')
return render(request, 'book/upload_form.html', {'upload_form':book_form})
def delete_book(request, book_id):
book_id = int(book_id)
try:
book_sel = Book.objects.get(id = book_id)
except Book.DoesNotExist:
return redirect('index')
book_sel.delete()
return redirect('index')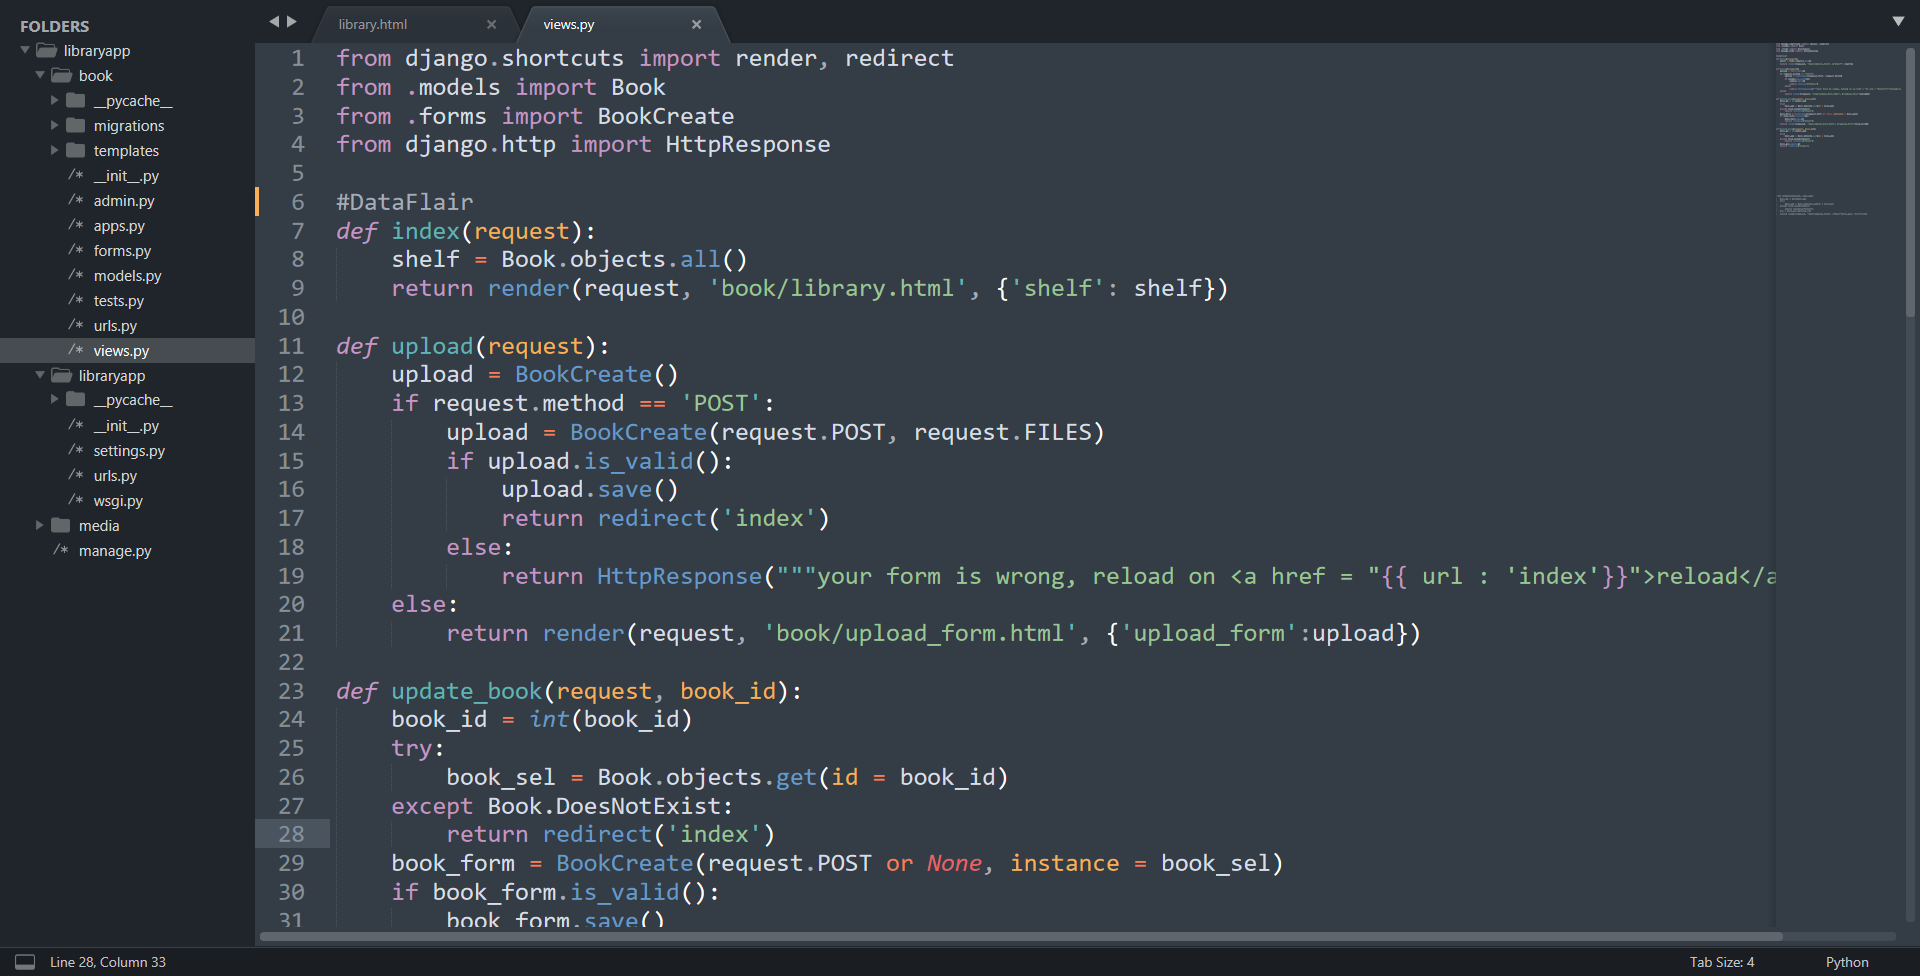
views.py
views.py
Understand the Code:
There is a lot of information in this file. views.py is one of the main backend components and is the business logic layer. So, let’s understand it step by step.
In this file, we have imported Book Model and BookCreate Form.
1. Index Function
This function is performing Read Operation. In this function, we simply retrieve all the objects in the book table. Those objects are then passed to the corresponding template.
We are using Querysets here for that purpose. As discussed in previous articles: Querysets is used to retrieve data from Tables. There are all kinds of filters and usage of Querysets and here we are using:
Book.objects.all()
It is clear from the query that it is passing a set of all objects in Book Table.
2. Upload Function
This function is CREATE operation of CRUD. It is simply taking form data from the user and saving it in a database. Since we made a model form for that, we don’t need to validate data again. We can directly save the form info in the database.
We first create the form object. Then we check whether the form is submitting data or user is visiting for the first time.
If the form request method is POST, it means the form is being submitted. You can see, it is also checked whether the form also has an image file or not. The request.FILES is a dictionary-like object containing the FILES and other information.
Then we check whether the data entered by the user is correct or not. This is done by form_object.is_clean() method. This will return True or False whether the form_object holds valid data or not.
If the answer is True, we save the form data received in the database. form_object.save() accomplishes this and since it’s a model form, we can use it directly.
If we receive a GET request then we return an empty form. That’s how we can create an object in the database.
3. Update_book Function
The update_book Function is a bit similar to the Update Function. It does more than that though. The update_book function takes in two parameters from the request. The request itself and id number. The id number is used to identify the object which is to be edited.
You can pass it in as a URL or as a cookie. The session method is the most secure but we don’t need to use it here. So, the update_book function will check whether the book_id is valid or not.
If the object exists it will return the form filled with the object’s information in it. The user can change the form again. In this case, there will be no creation of new book but the editing of the existing book object.
4. Delete Function
Delete Function is the last function of the CRUD application. We are again using the same object method as with Update book function. We are passing the request and book_id to delete the book.
This is a simpler interpretation of update_book function.
The queryset book.objects.get(id = book_id) will check for the books having an id equal to book_id. Since book_id is a primary key, we will have only one object returned. We can delete that object easily by just executing:
Book.delete() method. This will delete the book from the database.
So, these were the view functions. Now, we are ready to make the templates and complete our app.
7. Making Templates
The first thing you need to do is to make the templates folder in the book folder. Inside book/templates, make another folder book. We are going to make all our templates in that folder.
Inside book/templates/book, make a new file:
library.html
Code:
<!DOCTYPE html>
{% load static %}
<html>
<head>
    <title>Books App</title>
    <link rel="stylesheet" href="https://stackpath.bootstrapcdn.com/bootstrap/4.3.1/css/bootstrap.min.css"
integrity="sha384-ggOyR0iXCbMQv3Xipma34MD+dH/1fQ784/j6cY/iJTQUOhcWr7x9JvoRxT2MZw1T" crossorigin="anonymous">
</head>
<body style="background-color:#4DB6AC;">
<nav class="navbar navbar-light" style="background-color:#FF0033;">
    <a href="#" class="navbar-brand" style="background-color:#FFCC33;color:#000000;border-width:10px;border-color:#FFCC33;border-style:solid;border-spacing:30px;border-radius: 5px;">Library App</a>
    <a class="navbar-link btn-lg" href="{% url 'index' %}" style="background-color:#FFCC33;color:#000000;">DataFlair</a>
<a href="{% url 'admin:index' %}" class = 'navbar-link btn-lg' style="background-color:#FFCC33;color:#000000;">Admin</a>
    <a href="{% url 'upload-book' %}" class="navbar-link btn-lg" style="background-color:#FFCC33;color:#000000;">Upload Books</a>
</nav>
<br>
{% block content %}
<div class="card-columns">
    {% for book in shelf %}
    <div class="card" style="width: 18rem;">
  <img class="card-img-top" src="{{ book.picture.url }}">
  <div class="card-body">
    <h5 class="card-title">{{ book.name }}</h5>
    <p class="card-text">{{ book.describe }}</p>
   <div class="card-footer bg-transparent border-dark">
   <p class="card-title">{{book.author}}</p>
   <center>
       <a href="update/{{book.id}}" class="btn btn-warning" id = '{{book.id}}'>edit</a>
       <a href="delete/{{book.id}}" class="btn btn-danger" id = '{{book.id}}'>delete</a>
    </center>
    </div>
  </div>
</div>
    {% endfor %}
</div>
{% endblock %}
</body>
</html>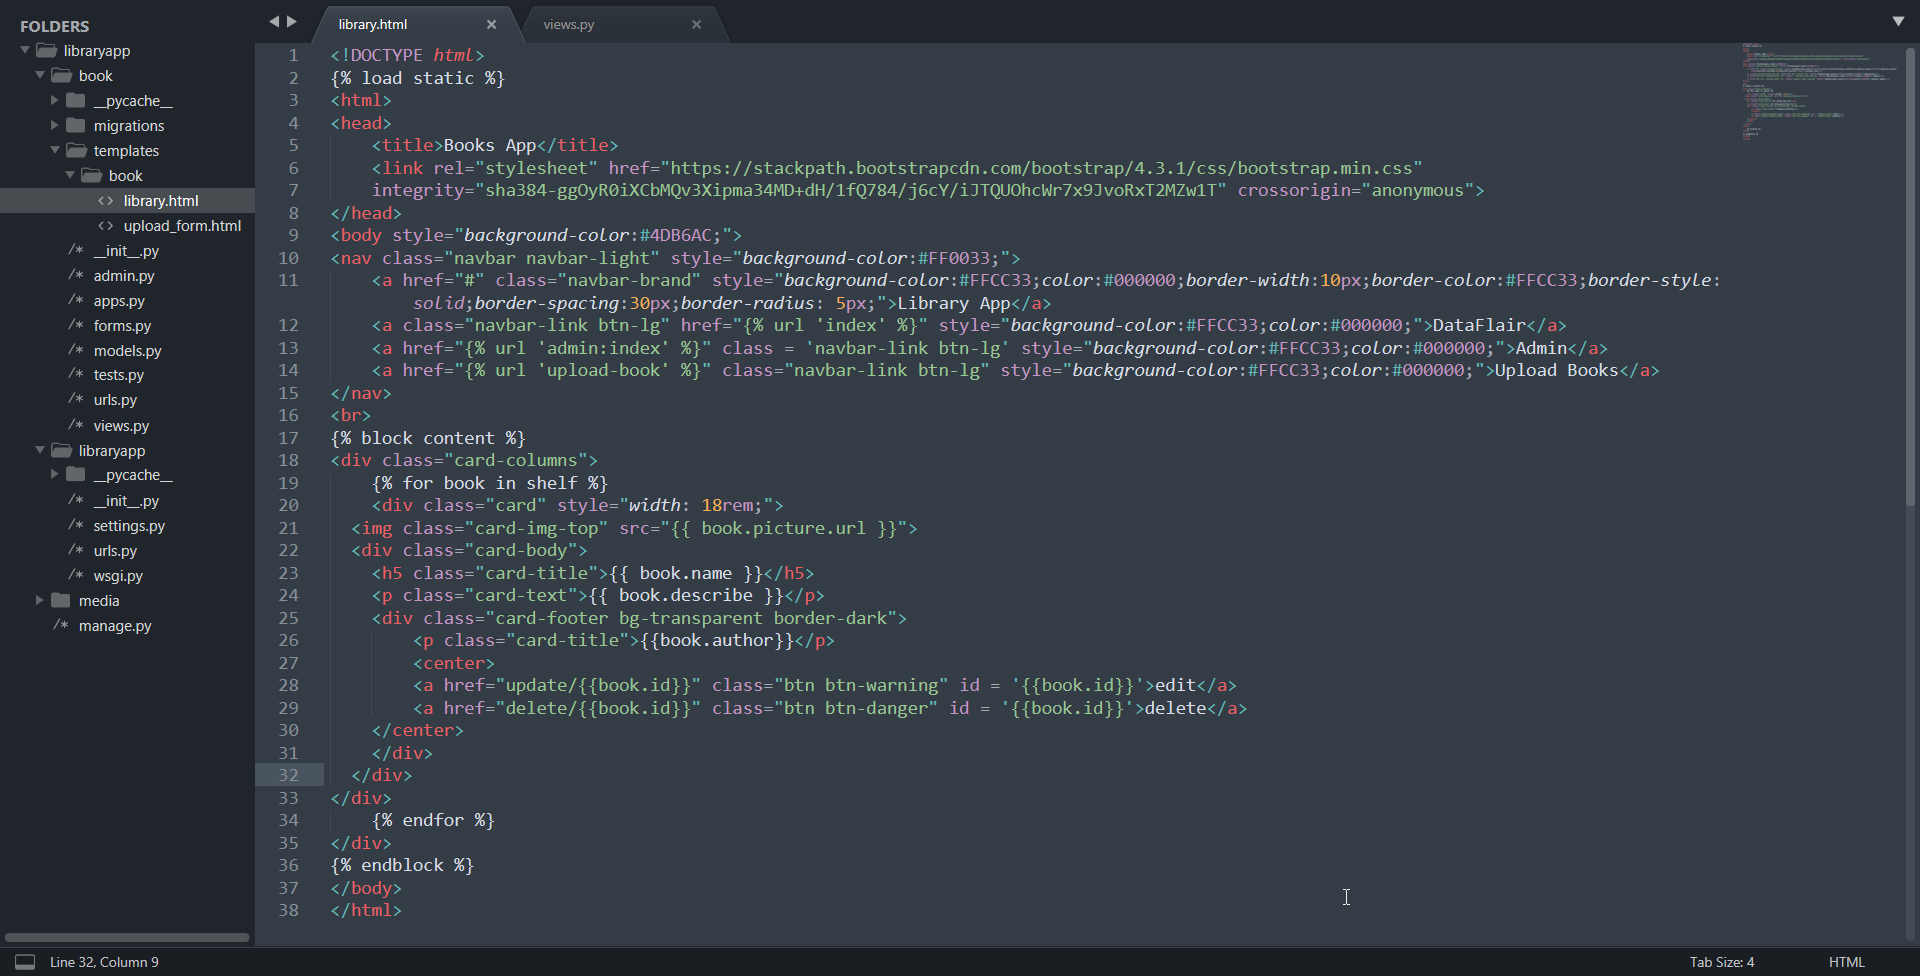
Understanding the Code:
It’s a simple template file where we are displaying objects from a database. We are running a for loop to access the data in the dictionary we passed. All the other things are CSS and some Bootstrap Framework.
Upload_form.html
Code:
{% extends 'book/library.html' %}
{% block content %}
    <center>
    <h1 class="display-3" style="background-color:#000000;color:#FFFF99;">Upload Books</h1>
    <form method = 'POST' enctype="multipart/form-data">
        {% csrf_token %}
        <table class = 'w-50 table table-light' style="border-radius:10px;background-color:#FFFF99;">
            {% for field in upload_form %}
            <tr>
                <th>{{field.label}}</th>
                <td>{{ field }}</td>
            </tr>
            {% endfor %}
        </table>
        <button type="submit" class="btn btn-lg btn-warning">Submit</button>
    </form>
</center>
{% endblock %}
Code Display:
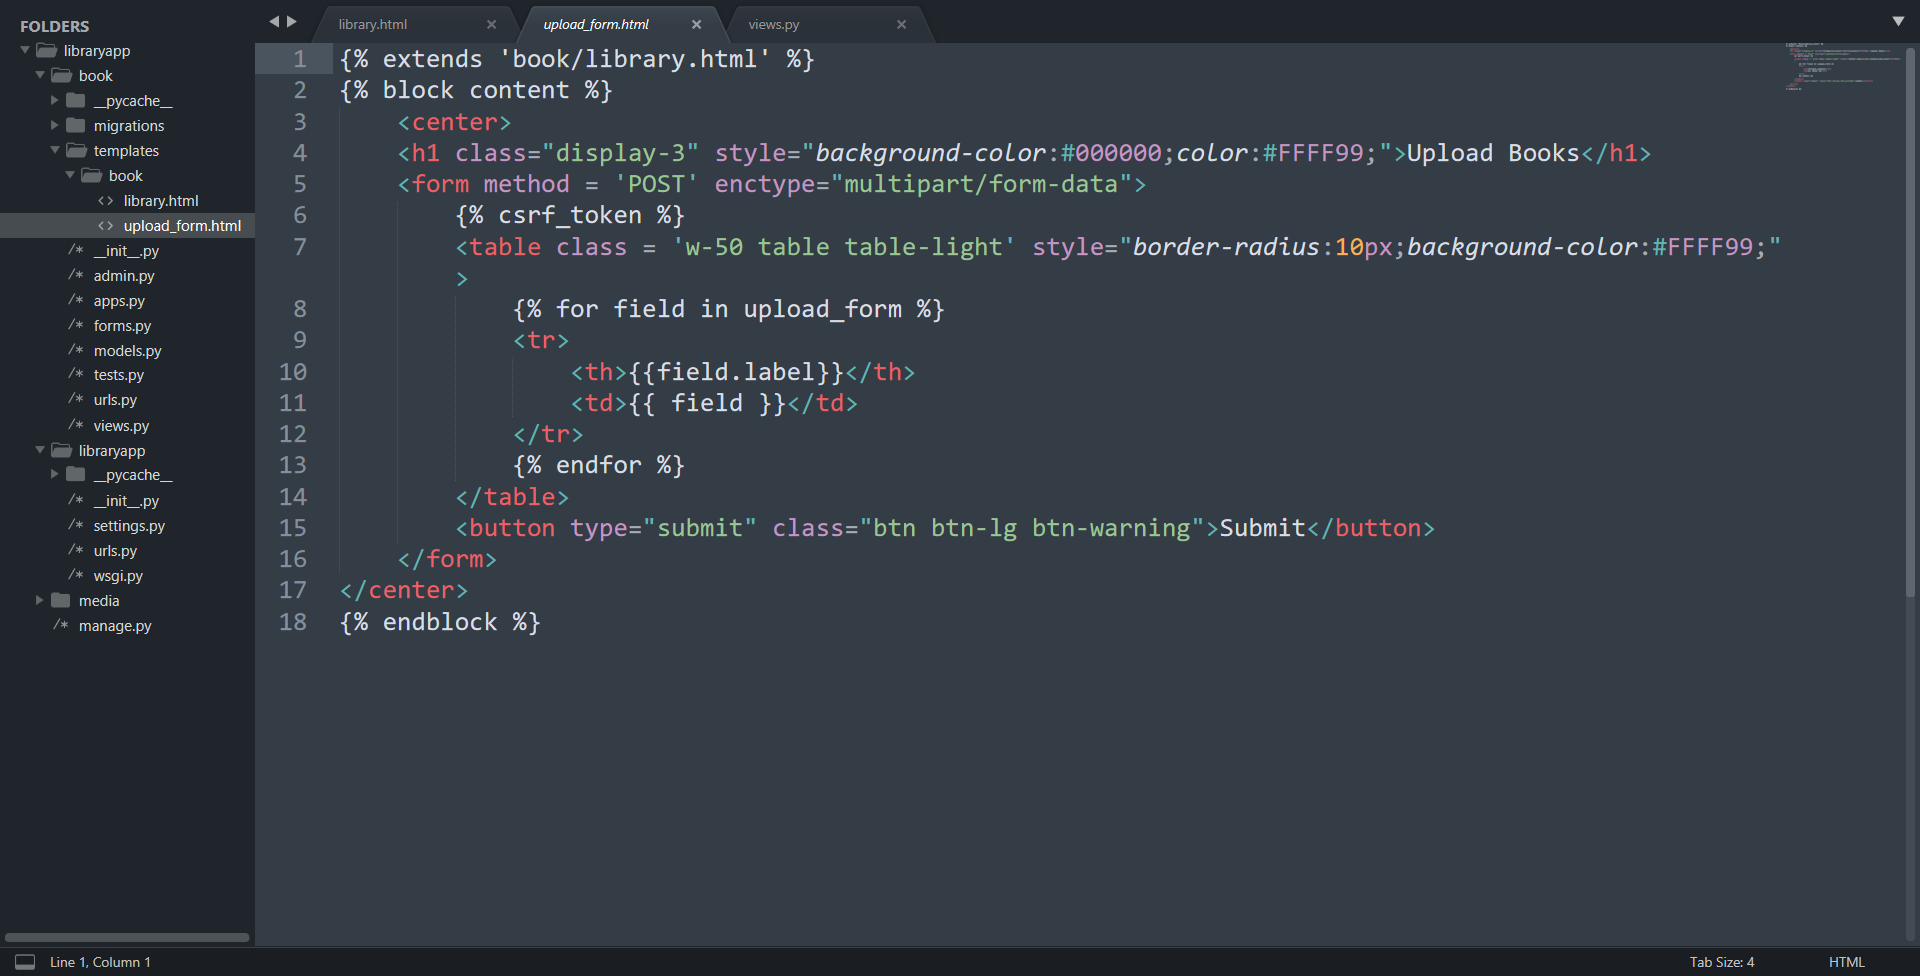
Understanding the Code:
This is a typical form rendering template. We are using csrf token and other form tags. Here I am printing the form fields via for loop. This can be done in another way directly. It depends on how you want to render it in frontend.
8. Configuring URLs
Now, we need to configure the urls file. Paste this code as it is in the mentioned urls files. If the file doesn’t exist then make one and copy the whole thing.
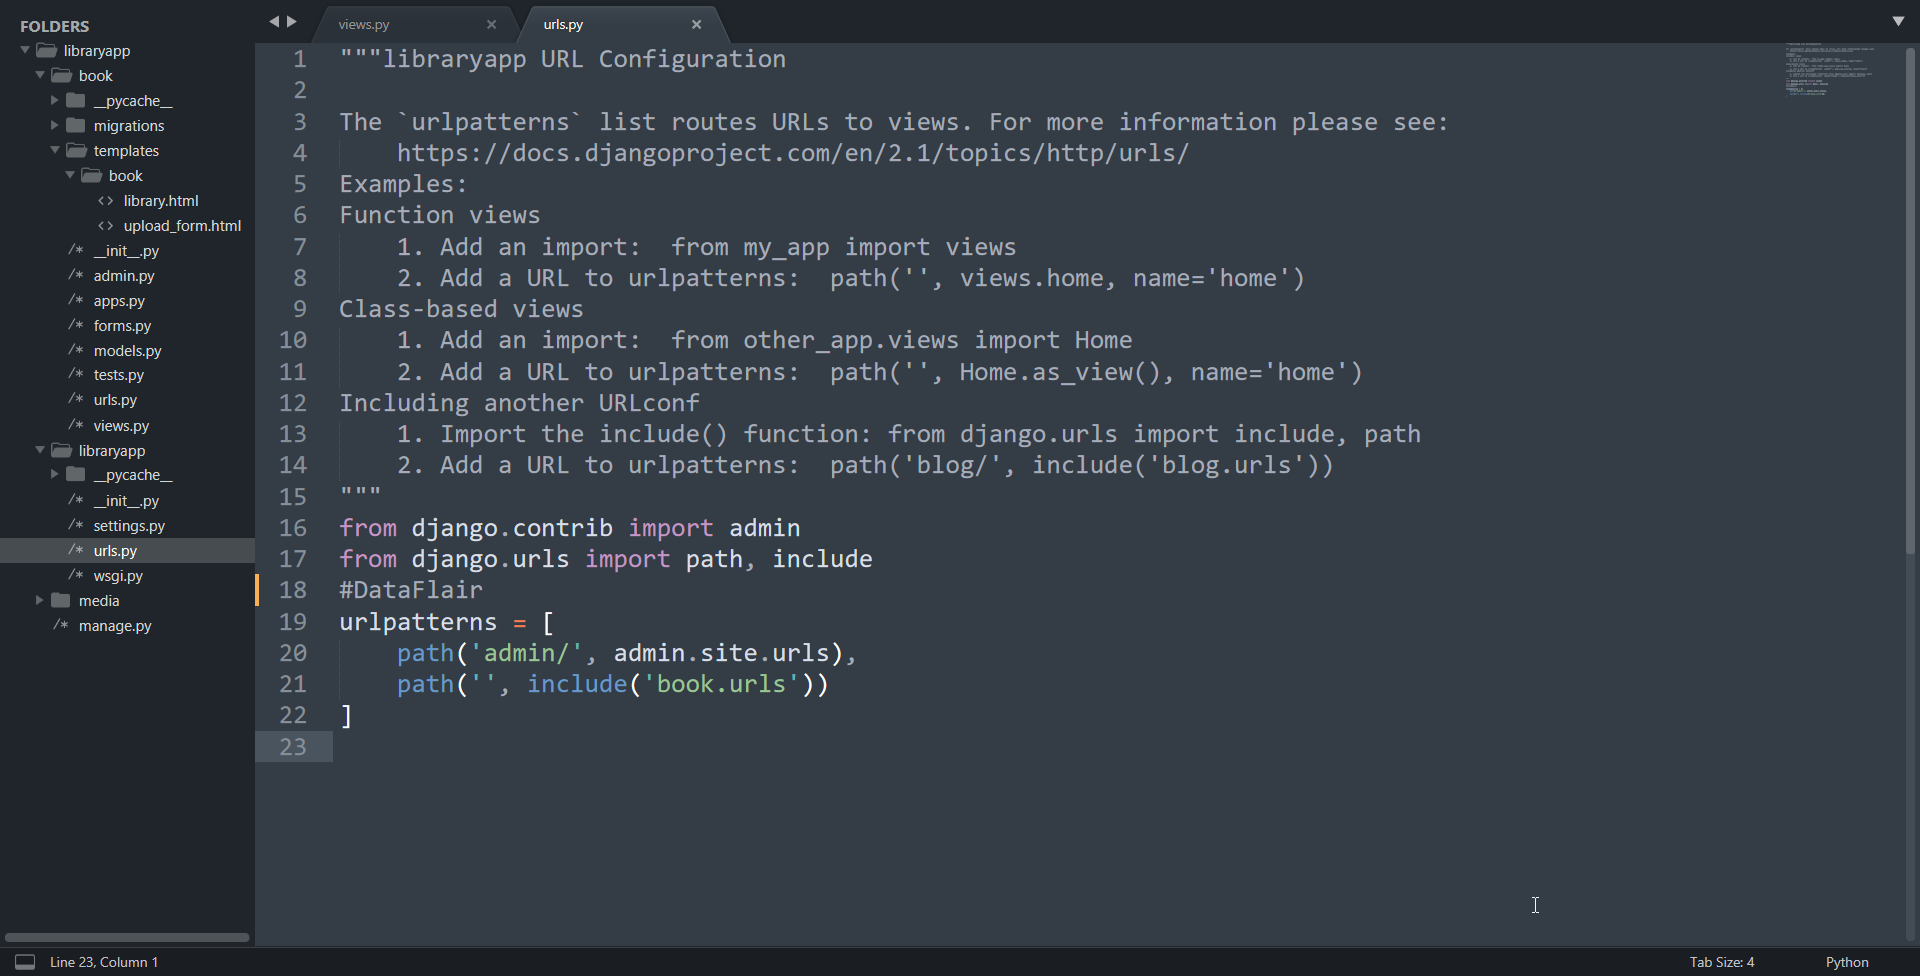
Urls.py
Code:
from django.contrib import admin
from django.urls import path, include
#DataFlair
urlpatterns = [
    path('admin/', admin.site.urls),
    path('', include('book.urls'))
]
Code Display:
Book/urls.py
Code:
from django.urls import path
from . import views
from libraryapp.settings import DEBUG, STATIC_URL, STATIC_ROOT, MEDIA_URL, MEDIA_ROOT
from django.conf.urls.static import static

urlpatterns = [
    path('', views.index, name = 'index'),
    path('upload/', views.upload, name = 'upload-book'),
    path('update/<int:book_id>', views.update_book),
    path('delete/<int:book_id>', views.delete_book)
]

#DataFlair
if DEBUG:
    urlpatterns += static(STATIC_URL, document_root = STATIC_ROOT)
    urlpatterns += static(MEDIA_URL, document_root = MEDIA_ROOT)

This file contains all the URL lookups for library app as well as settings for Django static files. These settings are used by Django to render the images with the book object.
9. Running Server and Testing
At last, the fun part. To test the website, start your server by:
python manage.py runserver

Now, open the URL:
http://127.0.0.1:8000/
You can see a page like this.

Since I have already populated my data, it comes out like this.
Click on Upload book link on the top-right corner of the screen.
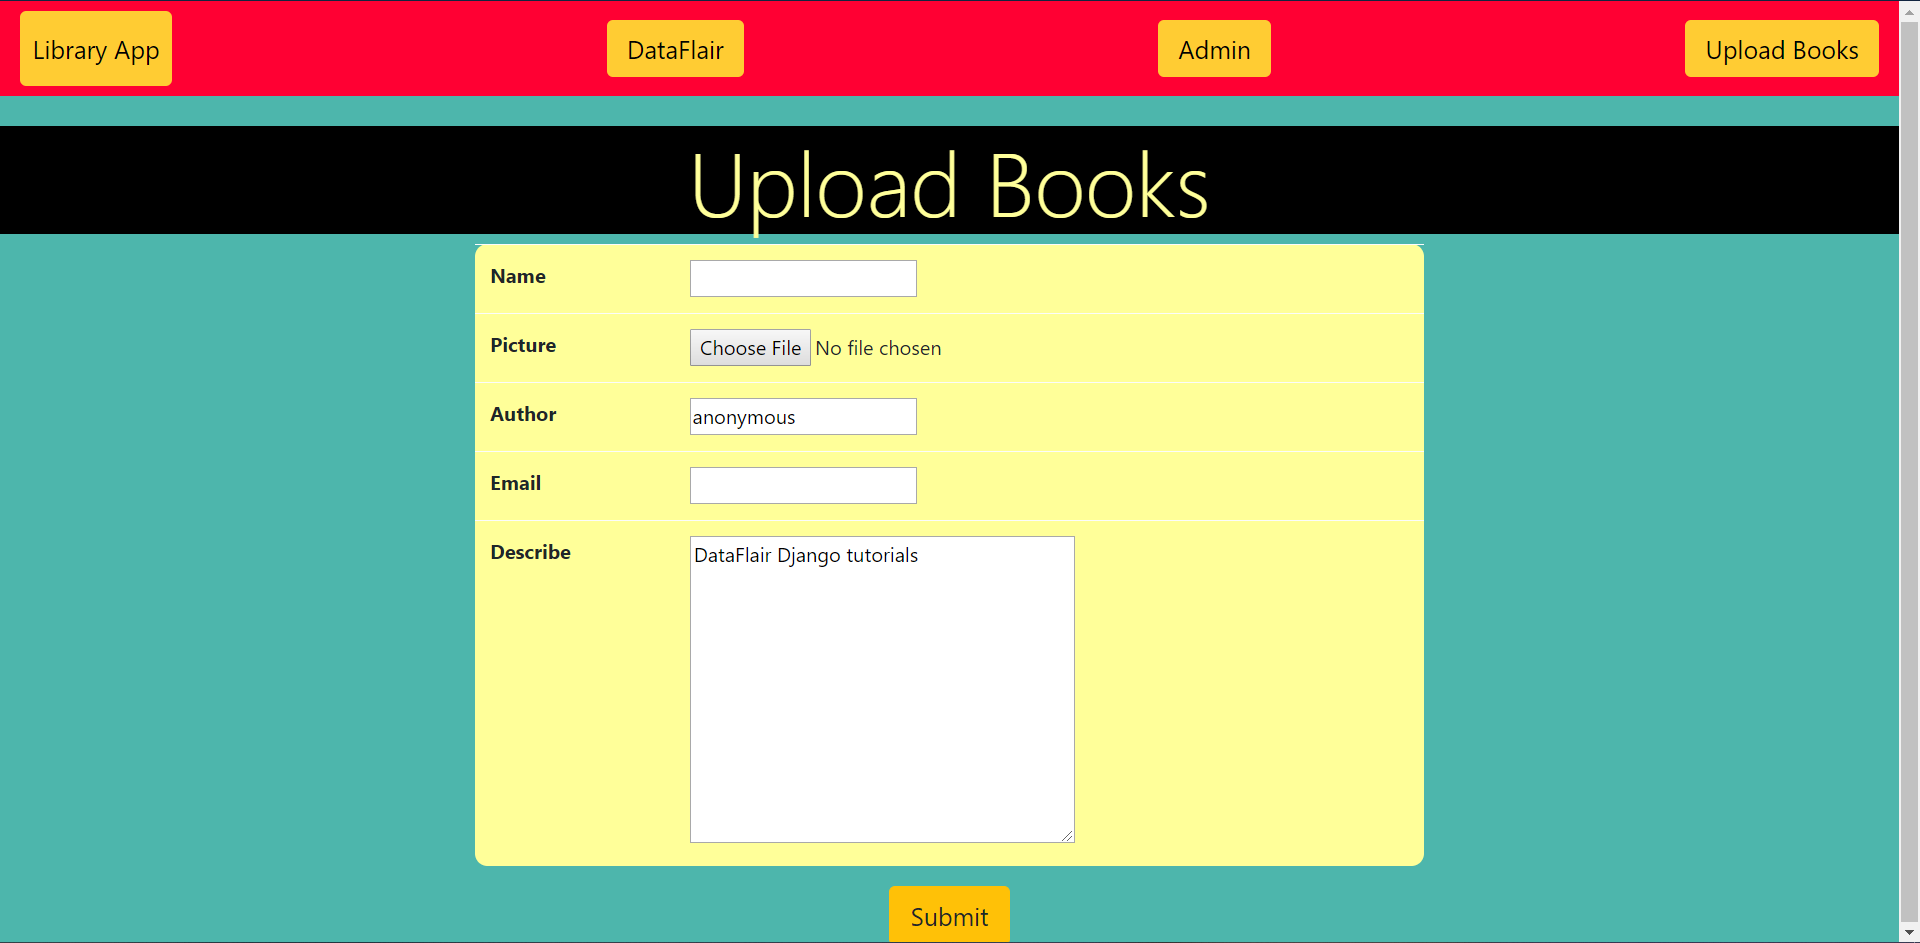
Here you can fill out the book information and submit it. If your book update is successful you should see a new edition on your homepage.
Now, taking the book objects from the homepage. Click on the edit button of one of the books.

As you will see, we will have a form filled with books information.
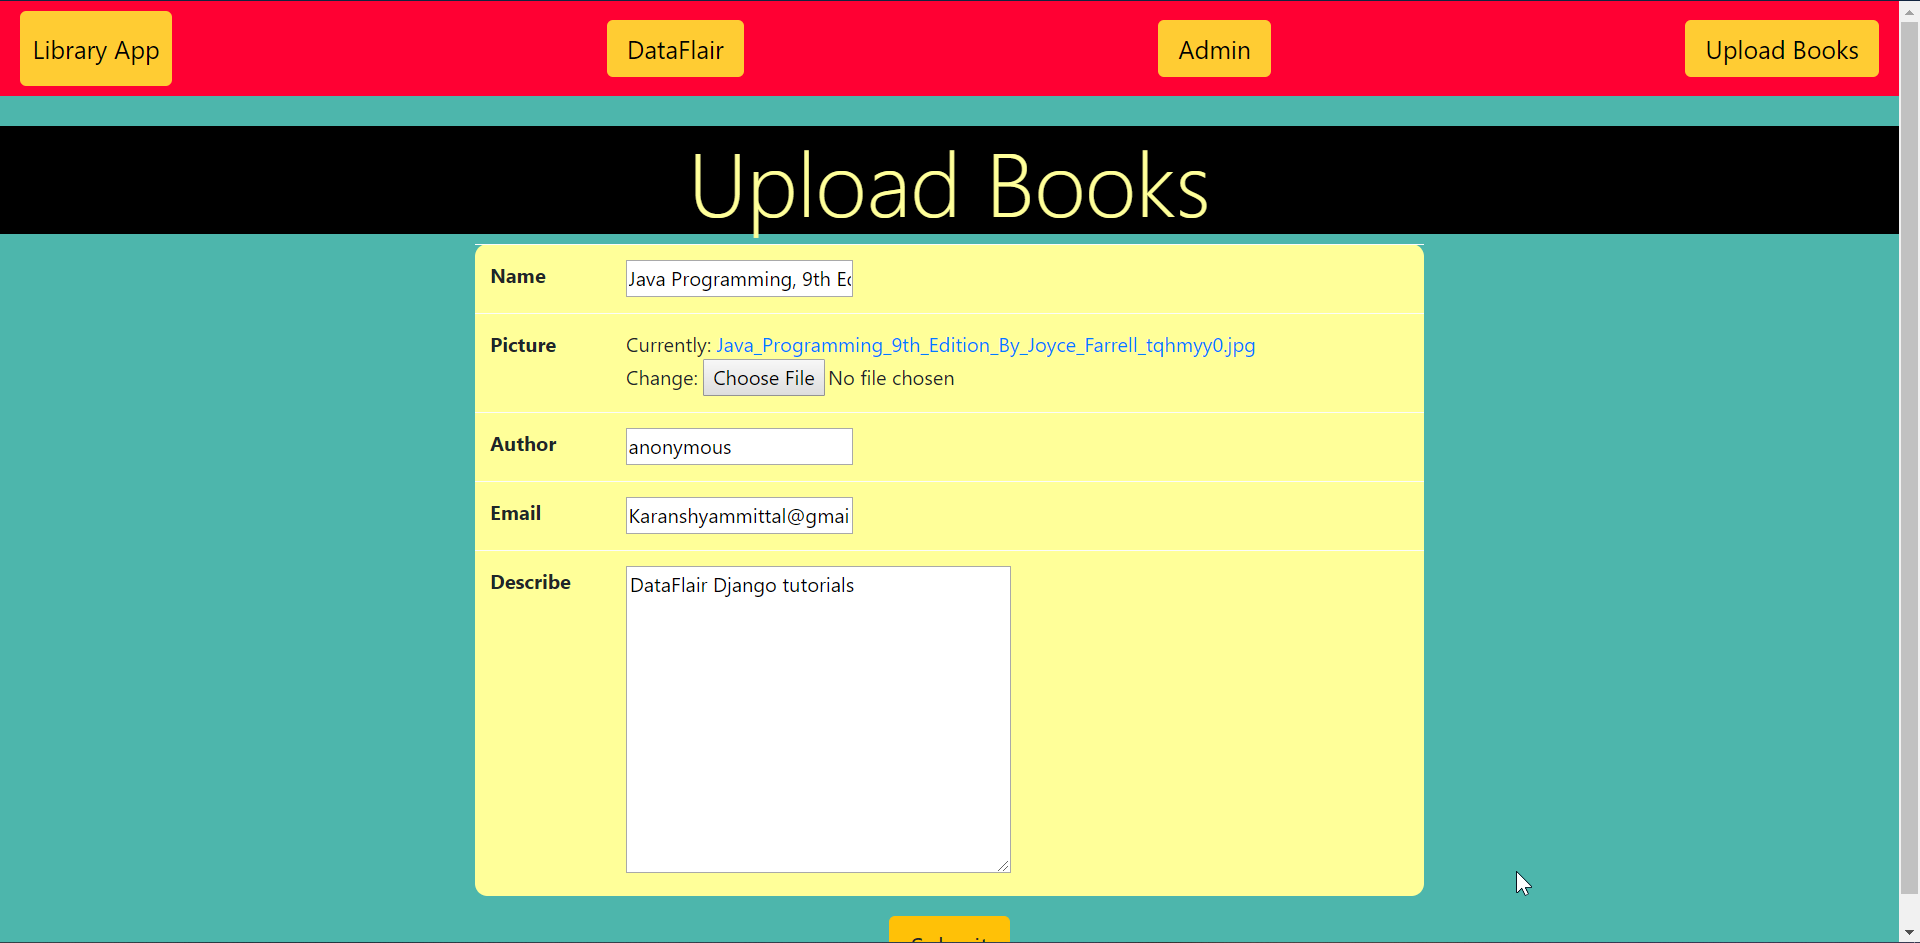
You can now change the information accordingly and submit again. This will change the data in the database.
Lastly, when you click the delete button in a book object, the book will be deleted from the database.
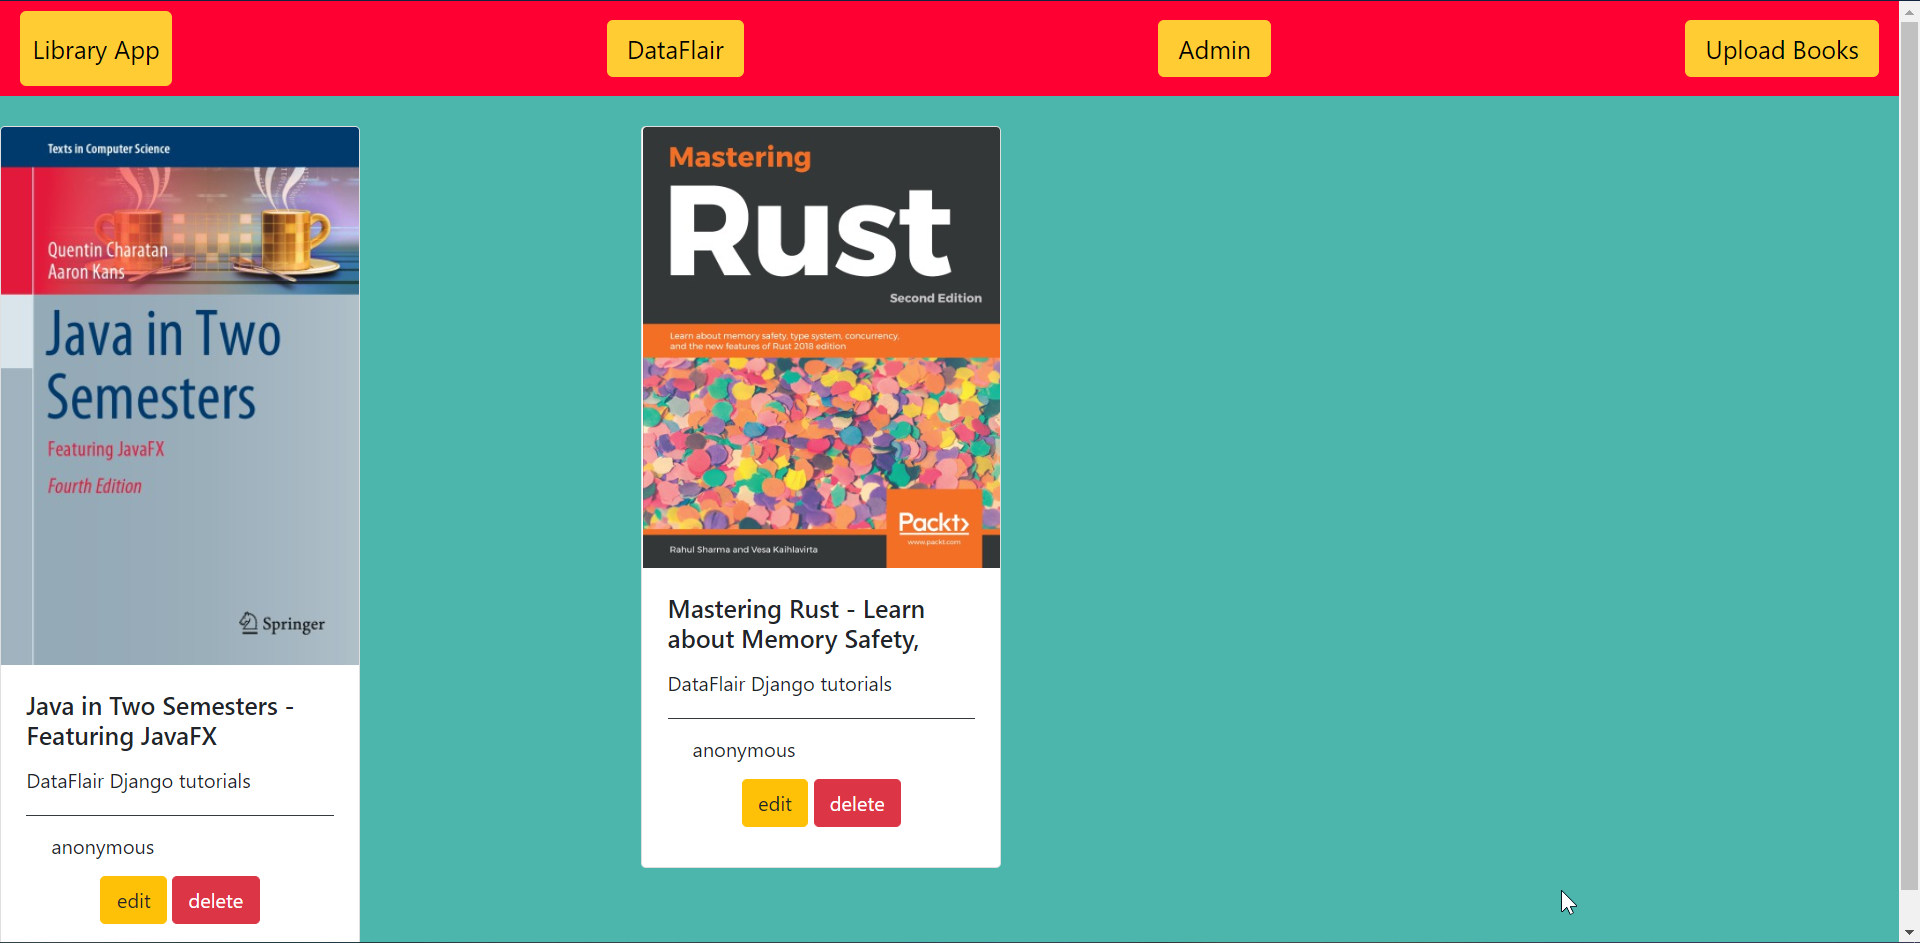
Now, there are only two books in the database. All these changes are occurring at the level of the database.
Summary
Lastly, you have a working prototype of a library app. Enhance it more or make something new using the basic CRUD operations in Django. The CRUD operations make it much easier for you to implement website solutions.
You can get the code for this project from:
Download the app from there and change some database settings.
Then you can run this app or follow the tutorial here itself to understand things better.
Any kind of confusion in Django CRUD tutorial? Mention your queries in the comment section. The DataFlair team will assist you in the best possible way.
Your opinion matters
Please write your valuable feedback about DataFlair on Google


Shows an error: No module named ‘book’
Are you sure you created a class Book in your models.py file and made it inherit from models.Model?
Running the Python manage.py makemigrations created an error.
Traceback (most recent call last):
File “manage.py”, line 15, in
execute_from_command_line(sys.argv)
File “C:\Users\MATURED MIND GLOBAL\.virtualenvs\DjangoProj-xgu6_iW5\lib\site-packages\django\core\management\__init__.py”, line 381, in execute_from_command_line
utility.execute()
File “C:\Users\MATURED MIND GLOBAL\.virtualenvs\DjangoProj-xgu6_iW5\lib\site-packages\django\core\management\__init__.py”, line 357, in execute
django.setup()
File “C:\Users\MATURED MIND GLOBAL\.virtualenvs\DjangoProj-xgu6_iW5\lib\site-packages\django\__init__.py”, line 24, in setup
apps.populate(settings.INSTALLED_APPS)
File “C:\Users\MATURED MIND GLOBAL\.virtualenvs\DjangoProj-xgu6_iW5\lib\site-packages\django\apps\registry.py”, line 112, in populate
app_config.import_models()
File “C:\Users\MATURED MIND GLOBAL\.virtualenvs\DjangoProj-xgu6_iW5\lib\site-packages\django\apps\config.py”, line 198, in import_models
self.models_module = import_module(models_module_name)
File “C:\Users\MATURED MIND GLOBAL\.virtualenvs\DjangoProj-xgu6_iW5\lib\importlib\__init__.py”, line 127, in import_module
return _bootstrap._gcd_import(name[level:], package, level)
File “”, line 1006, in _gcd_import
File “”, line 983, in _find_and_load
File “”, line 967, in _find_and_load_unlocked
File “”, line 677, in _load_unlocked
File “”, line 724, in exec_module
File “”, line 860, in get_code
File “”, line 791, in source_to_code
File “”, line 219, in _call_with_frames_removed
File “C:\Users\MATURED MIND GLOBAL\DjangoProj\library\libraryapp\book\models.py”, line 8
author = models.CharField(max_length = 30, default=’anonymous’)
^
SyntaxError: invalid character in identifier
You are getting this error because you might have copy-pasted the code. It is treating a single apostrophe character differently (‘). To solve this, you can manually delete and insert all the single apostrophe (‘) characters in the code.
File “C:\Users\USER\libraryapp\libraryapp\books\urls.py”, line 3
from libraryapp.settings import DEBUG, STATIC_URL, STATIC_ROOT, MEDIA_URL, MEDIA ROOT
^
SyntaxError: invalid syntax
i am getting this error in urls.py
can you please help what the error is happened
chwck id your project name is libraryapp or not .if not, change it
It is one of the good blog.
application is working fine no doubt.
One thing is missing is client validation for uploading file, at present it allows only images not pdf. So if user try to upload other than image, we need to show them error message.
image not shown and edit,delete,upload not working in my project please help me in this
Please Reply as soon as possible
show… parabéns
Hello
the server is running but I am getting error like this
TemplateDoesNotExist at /
book/library.html
Request Method: GET
Request URL: http://127.0.0.1:8000/
Django Version: 3.0.3
Exception Type: TemplateDoesNotExist
Exception Value:
book/library.html
Exception Location: C:\Users\user\Envs\test\lib\site-packages\django\template\loader.py in get_template, line 19
Python Executable: C:\Users\user\Envs\test\Scripts\python.exe
Python Version: 3.8.1
Python Path:
[‘C:\\Users\\user\\pythonprojects\\libraryapp’,
‘C:\\Users\\user\\Envs\\test\\Scripts\\python38.zip’,
‘C:\\Users\\user\\Envs\\test\\DLLs’,
‘C:\\Users\\user\\Envs\\test\\lib’,
‘C:\\Users\\user\\Envs\\test\\Scripts’,
‘c:\\users\\user\\appdata\\local\\programs\\python\\python38\\Lib’,
‘c:\\users\\user\\appdata\\local\\programs\\python\\python38\\DLLs’,
‘C:\\Users\\user\\Envs\\test’,
‘C:\\Users\\user\\Envs\\test\\lib\\site-packages’]
Server time: Thu, 6 Feb 2020 11:34:03 +0000
Hello, my server is running but showing error like this
TemplateDoesNotExist at /
book/library.html
Request Method: GET
Request URL: http://127.0.0.1:8000/
Django Version: 3.0.3
Exception Type: TemplateDoesNotExist
Exception Value:
book/library.html
Exception Location: C:\Users\user\Envs\test\lib\site-packages\django\template\loader.py in get_template, line 19
Python Executable: C:\Users\user\Envs\test\Scripts\python.exe
Python Version: 3.8.1
Python Path:
[‘C:\\Users\\user\\pythonprojects\\libraryapp’,
‘C:\\Users\\user\\Envs\\test\\Scripts\\python38.zip’,
‘C:\\Users\\user\\Envs\\test\\DLLs’,
‘C:\\Users\\user\\Envs\\test\\lib’,
‘C:\\Users\\user\\Envs\\test\\Scripts’,
‘c:\\users\\user\\appdata\\local\\programs\\python\\python38\\Lib’,
‘c:\\users\\user\\appdata\\local\\programs\\python\\python38\\DLLs’,
‘C:\\Users\\user\\Envs\\test’,
‘C:\\Users\\user\\Envs\\test\\lib\\site-packages’]
Server time: Thu, 6 Feb 2020 11:34:03 +0000
Hello Adheena,
Please check if the folder you have put the code in is named correctly. The name of the directory should be templates. It is a Django convention. Your path should look like this. book/templates/book/library.html. The directory name can sometimes lead to this.
I hope this will help you.
Wow sir thankyou for this beutiful tutorial. finally i’ll learned how to create a complete web project using django. really amazing content thank you for all it help me a lot…
Hello, thank you for your good training
I have an error when updating:
‘str’ object has no attribute ‘get’
i use Django 3.0.6
Book.objects.all() is not working in django. i have installed same version as your but it does not accept it. It showing “Unresolved attribute reference ‘objects’ for class ‘Book’ “
its working fine for somewhat but my question is how you integrate the pillow library with the template code for serving static files
I did not understand where it comes the page Django Administration.
I am updating some of fields in model from views.py file. All other fields are updated properly only ImageField is not updated.
Hello,
I have a similar application and I am facing one issue – every time I edit/update a record Django creates a new record in my database table rather than making updates to the existing one, I have no idea about how to fix this! Any suggestions?
Showing same page as it shown in beginning after following complete article… please help to resolve the issue
So error arises “Exception occurs during processing of request from (127.0.0.1′,54079)
When i run python manage.py runserver..Please Check this error arises “Exception occurs during processing of request from (127.0.0.1′,54079)
Thanks so much for the explicit tutorial. But then, there’s a little issue. Upon clicking DELETE, the file instantly gets deleted. but I’d like a little request for confirmation of the deletion. how can I achieve that. Thanks.
Code is run and webpage shows templatedoesnotexist at /
hello sir,
in my Django application i have only one project and the project name is vrsec
in the project vrsec i have 2 apps they are:
1. beyblade
2. books
but the problem is
when i run the command “python manage.py runserver”
it is executing the beyblade app but is not executing the books
so, please help me in this problem
awesome blog post!
good
# this written at wrong place — we are creating project but you mentioned command for creating app. django-admin startapp libraryapp
Sir what if I used an external front end template, I mean using external HTML CSS and JavaScript for the template, instead of the django inbuilt template, how will I integrate the django CRUD codes to it.
Very good and very beginner friendly CRUD example given here, and also explain every thing line by line. I like it.
Rate: 8.5 / 10.