Django Redirects – The Essential Guide of URL Redirects in Django
Master Python with 70+ Hands-on Projects and Get Job-ready - Learn Python
Placement-ready Online Courses: Your Passport to Excellence - Start Now
Websites, in general, have URL redirection to enhance the user experience and it’s necessary functionality to have in your websites. URL Redirection helps you gain control of your website’s flow; Django allows you to easily redirect URLs.
In this tutorial, we will learn about the complete concept of Django redirect. Before we understand any concept, we should know why there is a need for that process, so let’s start this article by learning the need for URL redirection.
Need for URL Redirection
We will discuss some implementations that will justify the need for URL redirection:
- When you try to access a social media page where you want to message or like the post, then the server redirects you to the login page if you haven’t done that before.
- Not only that, some good developers have made the system that, when you sign-in/sign-up, you reach to the page you wanted to access before.
- When you are performing some important operation on the website, like changing your password. The website should redirect you to a page showing you that the operation was successful.
These were the core implementations of Url Redirections, now, let’s see what Django offers for these tasks.
Django URL Redirection
This framework has been so thoughtfully built, it really takes care of everything out of the box. Let’s see how.
When you try to access a page of Django admin without authentication, it redirects you to the log-in page.
There when you input the right credentials, it redirects you to the same page you wanted to access before the log-in page. This kind of redirection not only limits to the Django Admin but there are more operations like, when adding new objects in models via admin, changing passwords and many more.
Page Redirection is an important factor in providing a great user experience to the user. A developer will make good use of this feature of Django.
How to Page Redirect in Django?
Django has a specially made redirects function, just for this sole purpose.
As we have learned in previous tutorials, every request has a response. Requests are always Http Requests, but there can be different Responses like we returned HttpResponse in our first views.py.
We will now return, an HttpResponseRedirect instance or class object to redirect the User. You need to write redirect in place of render in the views file. Let’s edit views.py file.
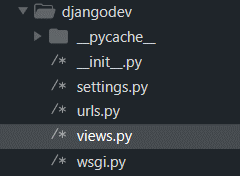
Here you can see, we created views.py file in our project’s main app, where our settings.py and main urls-config are saved. If you don’t have that file you will have to create it. It will be easy for you to follow-up.
Now open views.py file. We will make a new function which will redirect the view to a different URL, which we have already added in the urls.py.
Inside the views.py, enter;
Code:
from django.shortcuts import render, redirect
from django.http import HttpResponse
This is the previous function:
def index(request):
    return HttpResponse("<h1>Data Flair Django</h1>Hello, you just configured your First URL")
This is the Redirect Function:
def data_flair(request):
    return redirect('/dataflair')
Your file should look like this.

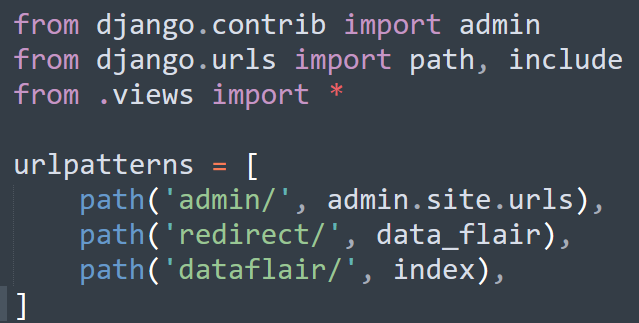
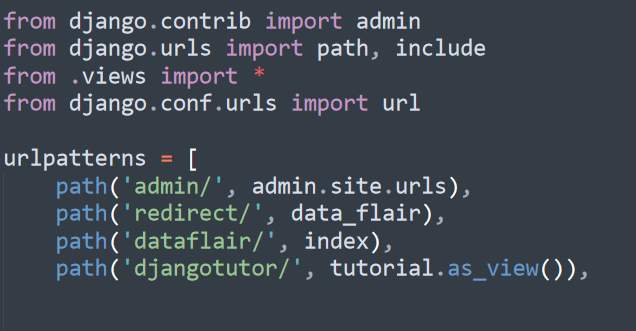
Now, open urls.py file
from django.contrib import admin
from django.urls import path, include
from .views import *

urlpatterns = [
    path('admin/', admin.site.urls),
    path('redirect/', data_flair),
    path('dataflair/', index),
]
We have completed the process of page-redirection, now lets run our server to see what happens.
Here we can understand the flow as when the URL associated with view function data_flair() called the response is given as HttpResponseRedirect instance. Then the server gets the response URL as a new request and it acts accordingly.
Here you can see this in the command line, after starting the server and searching for the URL redirect/ in the urls bar.
![]()
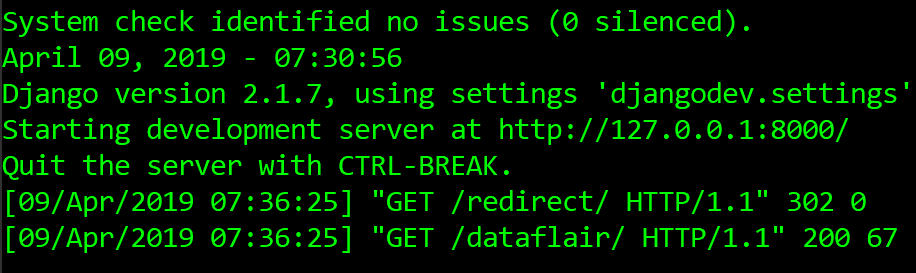
Here as you can see, in the last 2 lines, although you requested for redirect/ you get the dataflair/ page served.
Now, you can utilize this functionality, wherever you want to put it.
The redirect()
This function is capable of taking more than just URLs, you can redirect your users to models, redirect to a particular URL, while also passing the key values and other needed information. But, function-based redirects are most easy to use and are quite sufficient.
We will get more power with redirects, once we learn about dynamic URLs.
The RedirectView Class-Based Redirect
When our view function is only redirecting to a certain URL, without performing any function then, Django has provided us with a special Class:
django.views.generic.base.RedirectView
You can make your redirects more dynamic and custom with this usage of Class-Based redirect. Let’s make a view for understanding this better;
Edit your urls.py file in the root folder and add this code in it:
path(‘djangotutor/’, tutorial.as_view())
Then, open the corresponding views.py file and modify this code:
from django.views.generic.base import RedirectView
class tutorial(RedirectView): url = ‘https://data-flair.training/blogs/category/django/’
The URL is an attribute of RedirectView Class and contains the value of a URL, can take placeholders from Python, thus, your URLs can be more dynamic.
Also, instead of defining the URL in the views.py you can pass the URL in URL path itself.

from django.views.generic.base import RedirectView path('djangotutor/', RedirectView.as_view(url = ‘https://data-flair.training/blogs/category/django/’)),We can pass the URL as an argument directly.
No, let’s learn some attributes of RedirectView:
.url – If this attribute is used, then the value should be URL string which can have placeholders from python and they can be changed dynamically.
.pattern_name – This is the collection of URL patterns, its like urlpatterns list for redirects.
.permanent – This takes Boolean values of true and false. If it’s true, then the redirect becomes permanent. By default its value is false.
get_redirect_url( arguments, keyword_arguments) – This is a method that returns a string in the form of URL. this method is responsible for generating your URL, Django allows the developer to overwrite this method any way they want.
.query_string – This attribute takes values, true or false and by default it’s false. If this attribute is set to true then the view will add or append any query_string to the URL and return the same.
Advanced Usage of Django Redirect
redirect() can handle most of our simple redirection process which is perfect, but there are some use cases where the simple redirect() is not enough. There are some more ways for using the redirect() for advanced control over your website.
Let’s understand them according to some use cases.
1. Passing any parameter with Redirect()
When building a dynamic website, we need more than those static URLs, yes we need Dynamic URLs and also Redirections which can generate Dynamic URLs.
For example:
When defining a view function, we want that view function to redirect to another URL, which will generate dynamically and then will pass to redirect().
As we know, URLs are nothing but strings, so we can use something like this
url = ‘{}?{}’.format(base_url, Chosen_url)Then, this URL can pass to the redirect()
redirect(url)
Here you can see that we have formatted 2 Python variables in the string. You can format as many as you want, as long as it generates a valid URL.
That’s how we can generate dynamic URLs. Currently, we don’t have enough models in our Django project to display this but yes it’s very easy to achieve this.
2. Special Redirect Codes
Django’s HttpResponse class supports status codes 301 and 302. They are the majority of use cases but if we need to return for status codes 306, 307, etc, we can generate our own HttpResponse class, just make a subclass of the HttpResponse class.
Also, you can do the same with redirect(), just by changing the response object’s value.
There are different use cases and according to that, we can use redirect() but for even more control you can use the class-based views too. They are more powerful when you want high customization with your applications but at the same time, it can also lead to errors.
Limitations of Django Redirect
Here are some of the disadvantages of Django redirects:
1. Redirects that doesn’t have any effect
django.shortcuts.redirect() is very easy to use. redirect() just returns a response object. This response object shall be returned from our views component otherwise the redirect won’t work.
For example – When we are returning a response object from redirect which should get to the model and the response is rather going to templates directly without fetching desired data.
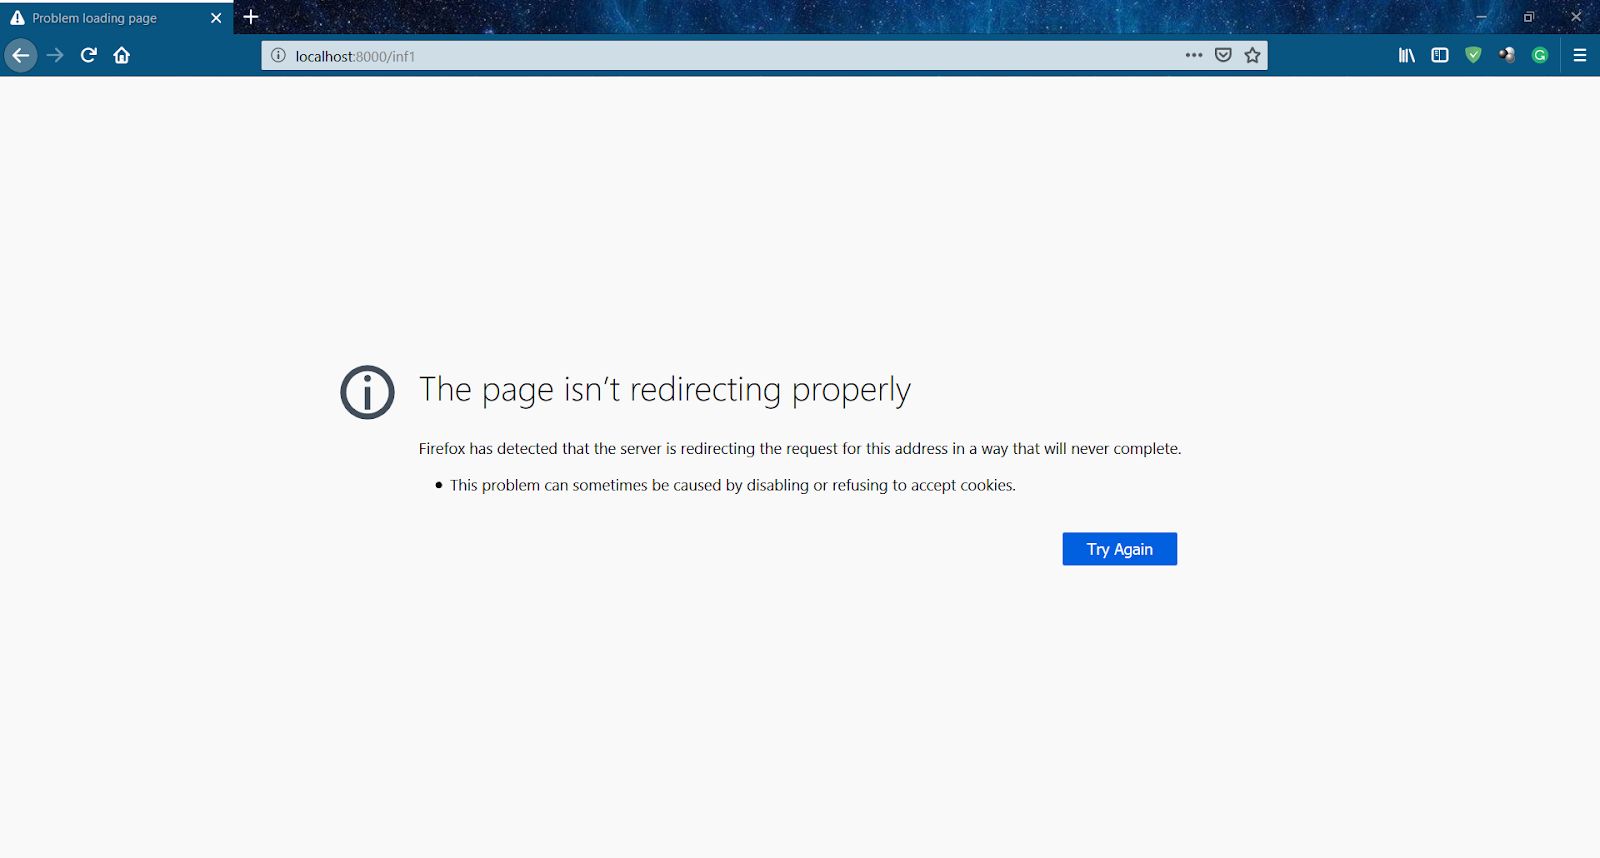
2. Infinite redirect Cycle
We can try this very easily. The infinite redirect cycle is when two redirects are pointing towards each other and the server just ends up redirecting over and over without stopping.
This can be disastrous for your server when working on a bigger project. The scenario where it can be harmful; when you have a redirect which is returning to some URL which then again is processed and somehow that redirection again goes to first function. This is now an infinite loop.
Just type in these two lines in your views.py.
def inf1(request):
    return redirect('/inf2')

def inf2(request):
    return redirect('/inf1')
Add these in the urlpatterns list:
    path('inf2', inf2),
    path('inf1', inf1),
The Browser shall generate this error.
Permanent & Temporary Redirects
Permanent Redirects are not so popular among developers, because of the permanent caching. Let’s understand it with a situation. Suppose you visit a website when it was in developing stage but some of its features were accessible.
And, when you tried visiting their homepage you were redirected to another page as it was in the development stage at that time.
If that redirection was permanent, then something interesting has happened. Because of the permanent redirection, your browser cached or stored that redirected page. Many would think that it’s a good thing and now the website will load faster.
But, when the website is completely developed and you want to visit their homepage by entering that URL, you will again be redirected to the page which was cached by the browser.
Notice the problem? By permanent redirection, the browser caches your page and now even if the page has been updated it will not send that URL request to the server. It will load the cached page as it is much faster without checking on the server.
Google Chrome, Mozilla and all the other browsers out there follow this pattern.
Therefore, temporary redirects are better, and you should apply permanent redirects only when you are 100% sure that the page need not be developed or want fast access to that page.
Summary
In this tutorial, we learned:
- URL redirects and why we need it
- How to make URL redirection with redirect()
- RedirectView class-based redirect
- Some advanced implementations of redirect()
- Some major limitations of Django redirect
- Difference between permanent & temporary redirects
These concepts will definitely help you get better control over the flow of your website and will make the user experience much better.
If you have any queries regarding Django redirect tutorial, feel free to enter in the comments section.
Did you like this article? If Yes, please give DataFlair 5 Stars on Google


hi
Thanks for sharing this tutorial.
can’t understand this concept : The RedirectView Class-Based Redirect . can you explain this with some detail example?
thanks for tutorial
I’m not sure why but this website is loading very slow for me.
Is anyone else having this issue or is it a problem on my
end? I’ll check back later on and see if the problem still exists.