How to Create a Countdown Timer in Python
Master Python with 70+ Hands-on Projects and Get Job-ready - Learn Python
A countdown timer is an ideal way to set targets to complete tasks eg keep a reminder for the oven etc. For large-scale applications such as industries, complex timers are used, which are custom-designed for various purposes such as triggering or flipping a switch after a delay of set time. We might have noticed a screensaver appearing on the desktop when left idle for sometime. This happens because of the timer which calculates our idle time. Similarly, automatic logging out of websites, OTP expiration, captcha expiration are all based on a timer which nullifies these password after the time period expires.
Python Countdown Timer Project:
We will create a simple countdown timer using python and display 2 notifications, one with the app created and another on the desktop to remind the user of the time elapsed. A good understanding of functions and Tkinter widgets to understand the code flow is ideal.
Project Prerequisites:
The python countdown timer project makes use of tkinter for GUI development, time module for creating a delay, and plyer to create desktop notifications. We make use of Tkinter, a built-in GUI library in python. To check its availability, import it:
python
>>> import tkinter
If the library is installed, it will not show an error. In case an error appears, use the following command to install Tkinter on a Linux system:
sudo apt-get install python3-tkinter
On Windows systems, reinstalling python will fix the issue. Time module is a built-in library and hence does not require any installation.
Now, to install plyer please run below command using pip:
pip install plyer
Download Countdown Timer Python code:
You can download the source code for the Countdown Timer in the given link: Countdown clock and timer
Project File Structure:
There are many GUI libraries in python such as PyQT5, Kivy, Pyside2 etc. Tkinter is widely used by many developers and is easy for beginners to practice.
Let’s have a look at the steps to python countdown timer project:
- Importing modules: time, tkinter, and plyer
- Initializing the window and declaring the dimensions
- Defining functions for timer and placeholders
- Creating the user input interface
- Addition of a button to activate the timer
Now let’s discuss the complete implementation in detail.
Feel free to play with the values and change your input methods.
1. Importing necessary modules:
#DataFlair Guide for python Countdown Timer
#Import necessary modules
from plyer import notification
from tkinter import messagebox
from tkinter import *
import time
Code Explanation:
- from plyer import notification: Plyer is a library that provides us with features to access bluetooth, wifi, battery details, send emails, gps and so on. Here we use notification to provide desktop notifications that displays on completion of python countdown timer.
- from tkinter import messagebox: To display prompts, we use messagebox. It can create messageboxes for errors, to display information, ask questions etc.
- From tkinter import *: We make use of Tkinter to create the user interface for the application. Tkinter is suitable for beginners and contains many widgets.
- Import time: To create a delay between every second, we use time module
2. Initialising the window and declaring the dimensions:
#Assign class and set dimensions of the interface
window = Tk()
window.geometry("300x200")
window.title("DataFlair - python Countdown timer and notification")
Code explanation:
- Window = Tk(): Tkinter class, Tk() is assigned to an object window. We use this python countdown timer window to set components on the object such as text boxes, buttons etc
- window.geometry(): Specify the length and the breadth of the application window of the application using geometry.
- window.title(): Specify the title of the application. It is optional
3. Defining functions for timer and placeholders:
#Remove the placeholders for every entry field based on click
def h_click(event):
       hour_entry.delete(0, 'end')
def m_click(event):
       min_entry.delete(0, 'end')
def s_click(event):
 sec_entry.delete(0, 'end')
Code explanation:
The placeholder functions are optional.
- def h_click(event): We add a placeholder in the hours, minutes and seconds entry widgets. Hence when the user selects an entry widget, the placeholder is removed by deleting using entry_widget.entry(0,’end’), where 0 is the start of the placeholder character and ‘end’ denotes the end of the placeholder string. Similarly we extend this for minutes and seconds entry widget mouse clicks
#Function to activate python countdown timer and show notifications once timer is up
def timer():
#Since we use placeholders, we check if the user entered an integer
try:
timer_time = int(hour_entry.get())*3600 + int(min_entry.get())*60 + int(sec_entry.get())
except:
messagebox.showerror(message="Enter Valid Time")
#The user cannot activate a timer with no time set
#To update the timer with every decreasing second and display a notification
if timer_time >0:
hour = 0
min = 0
sec = 0
#If minutes is more than 60, it has to be set to the next hour
while timer_time >= 0:
min, sec = divmod(timer_time,60)
if min > 60:
hour, min = divmod(min,60)
#Set the declared variables with the new values to display
hours.set(hour)
mins.set(min)
secs.set(sec)
#Sleep for 1 creates a delay of 1 second
time.sleep(1)
#Update the changes on the window for every second
window.update()
#Decrement the timer value by 1
timer_time -= 1
#Create a desktop notification
notification.notify(
#Title of the notification,
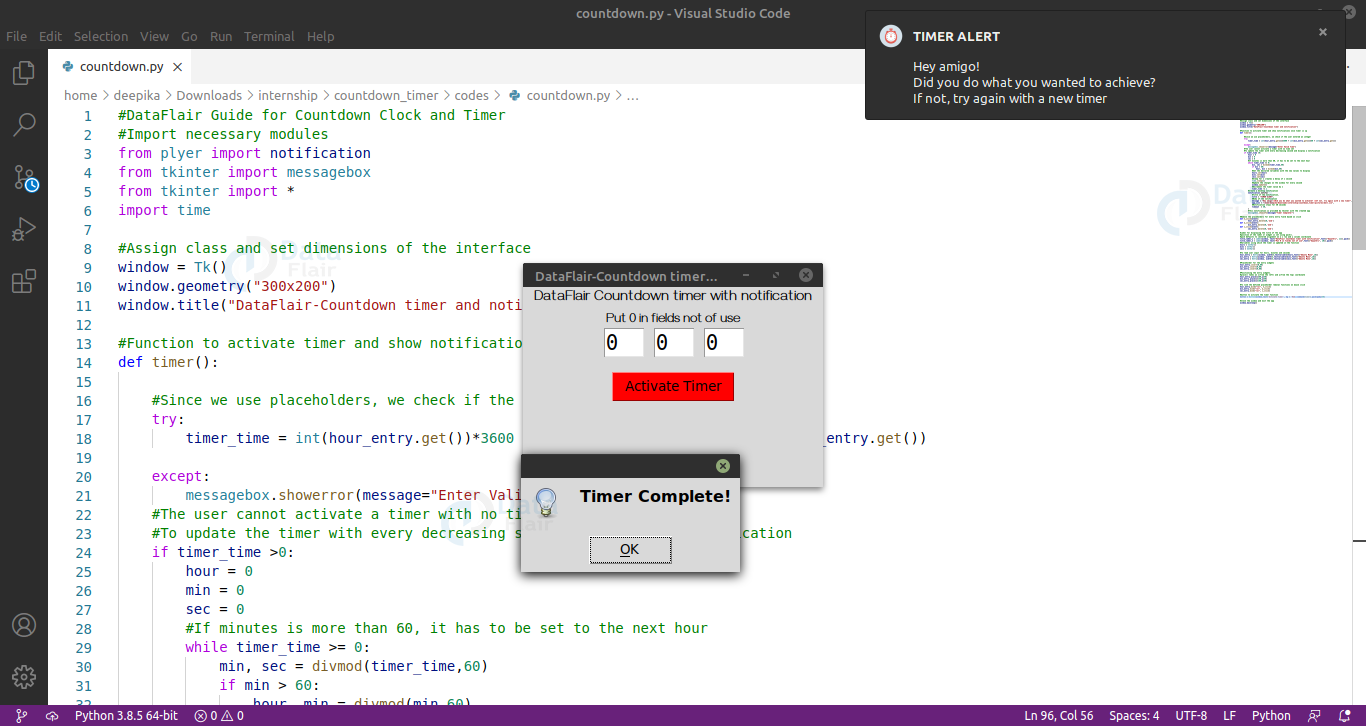
title = "TIMER ALERT",
#Body of the notification
message = "Hey amigo!\nDid you do what you wanted to achieve? \nIf not, try again with a new timer",
app_icon="/home/data-flair/Downloads/python-countdown-timer/bell.ico",
#Notification stays for 30 seconds
timeout = 30,
)
#This notification is provided by tkinter with the created app
messagebox.showinfo(message="Timer Complete!")Code explanation:
- def show_entry_fields(): Declaration of function to invoke the timer.
- timer_time: Set timer variable to contain the duration of the user timer in seconds. An hour contains 3600 seconds and a minute contains 60 seconds respectively. Thus we multiply hours with 3600 and minutes with 60, sum them up with the seconds
- try…except : If a user enters an integer, the try block will not pass into the except block. This is because we set the hour, minute and second variables to integer data type. If the user gives a float number or it is left empty, a warning will pop up
- If timer_time > 0: A timer can start only when the user enters a minimum of 1 second
- hour =0, min =0, sec =0: Declaration and initialisation of variables
- while timer_time >= 0: The loop decrements timer_time until it reaches 0 which marks the end of the time delay.
- min, sec: Converting timer_time to minutes and seconds to display on the app. divmod(value, divisor) is a function that returns 2 values. The first value is the quotient of the division of timer_time by 60 and the second value is the remainder obtained during the division.
- if min > 60: If minutes is greater than 60, it is converted to hours and minutes using hour, min = divmod(min,60)
- hours.set(hour), mins.set(min), secs.set(sec): Set the obtained hours, minutes and seconds to the integer variables declared outside the function.
- time.sleep(1): Creates a delay of 1 second
- timer_time -= 1: Decrement the timer_time by 1 to simulate the countdown timer
- notification.notify(): Creates a desktop notification. It takes the parameters: title – title of the alert, message – message of the notification, app_icon – (optional), a picture or icon, timeout – the duration after which the notification elapses. Replace the path for app_icon with your icon’s absolute path.
- messagebox.showinfo(): A prompt box which serves as a notification in the python countdown timer app.
4. Creating the user input interface:
#Label for displaying the title of the app
#position of the label or widget is set using pack().
#pack defaults to centered alignment on a x row and y column coordinate
title_label_1=Label(window,text="DataFlair-Countdown timer with notification", font=("Gayathri", 12)).pack()
title_label_2 = Label(window, text="Put 0 in fields not of use", font=("Gayathri", 10)).pack()
#Variables using which the timer is updated in the function
hours = IntVar()
mins = IntVar()
secs = IntVar()

#To read user input for hours, minutes and seconds
hour_entry=Entry(window,width=3,textvariable=hours,font=("Ubuntu Mono",18))
min_entry=Entry(window,width=3,textvariable=mins,font=("Ubuntu Mono",18))
sec_entry=Entry(window,width=3,textvariable=secs,font=("Ubuntu Mono",18))

#Placeholder for the entry widgets
hour_entry.insert(0,00)
min_entry.insert(0,00)
sec_entry.insert(0,00)

#Positioning the entry widgets.
#place() takes an x(from the left) and y(from the top) coordinate
hour_entry.place(x=80,y=40)
min_entry.place(x=130,y=40)
sec_entry.place(x=180,y=40)

#To link the defined placeholder removal functions on mouse click
hour_entry.bind("<1>", h_click)
min_entry.bind("<1>", m_click)
sec_entry.bind("<1>", s_click)
Code explanation:
- title_label: To display non-editable text in the countdown timer window, we use labels. Label() has 2 mandatory parameters: window and text to display. Position the label or any widget using pack().
- IntVar(): Declaring integer variables for hours, minutes and seconds. A prompt, in the try..except of the timer function, is raised if the user gives decimals or other characters.
- Entry(): To take user input, we use Entry widget. The parameters are window, width of the entry field, textvariable which denotes the integer variable declared previously. Font styling is optional.
- hour_entry.insert(): To insert a placeholder of 00 starting with the index 0. We extend the same for minutes and seconds entry widgets.
- hour_entry.place(): Similar to pack(), place() is another positioning function. This function takes 2 parameters which is the distances from the left margin and the top margin as coordinates (x,y)
- hour_entry.bind(): Removal of the placeholder when the mouse clicks on the entry fields. <1> indicates mouse button 1 which is the left click.
5. Addition of a button to activate the timer:
#button to activate the timer function
button = Button(window,text='Activate Timer',bg='Red', command=timer).pack(pady=40)
#Close the window and exit the app
window.mainloop()
Code explanation:
This snippet of code is optional
- Button(): When the user selects or clicks on a button, a function is called. Thus to call functions or a specific task based on user input (interaction), we make use of buttons.
Python Countdown Timer Output:
FInally, Enter the time for the countdown timer and view the notification:
Summary
Finally we have developed python countdown timer project using different modules like plyer, tkinter and time. The project explores many features of Tkinter such as entry widgets, mouse clicks, buttons and placeholders.
Your 15 seconds will encourage us to work even harder
Please share your happy experience on Google


Hello, I m student
Very good