Python Django WishList App – Fuel Your Aspirations
Master Python with 70+ Hands-on Projects and Get Job-ready - Learn Python
Interactive Online Courses: Elevate Skills & Succeed Enroll Now!
Wishlist is an essential part of everyone’s life. It’s always great to have a list of things that you want to do, achieve, or own. In this project, we will create a simple Wishlist Web Application using Django, where users can add their wishes, track their progress, and update them as they are fulfilled.
About Python Django WishList App
The objective of this project is to create a functional Django Web Application for managing Wishlist. By the end of this django wishlist app project, you will have a complete understanding of how to create a Django application from scratch, and how to design models, views, and templates.
Prerequisites for WishList App Using Python Django
Before starting this project, you should have a basic understanding of Django, HTML, CSS, and JavaScript. You will need Python 3 installed on your system, along with Django and Pillow packages. You can install them by running the following command in your terminal:
pip install Django
pip install Pillow
Download Python Django WishList App Project
Please download the source code of Python Django WishList App Project: Python Django WishList App Project Code
Steps to WishList App Using Python Django
Following are the steps for developing the Python Django WishList App Project:
Step 1: Create a new Django Project:
Step 2: Create a new Django App:
Step 3: Design Database Models:
Step 4: Create Views:
Step 5: Create Forms:
Step 6: Create Templates:
Step 7: Create URLs:
Step 8: Test Your Application:
Step 1: Create a new Django Project:
First, create a new Django project using the following command in your terminal:
django-admin startproject wishlist
This will create a new Django project called “wishlist” in your current directory.
Step 2: Create a new Django App:
Next, create a new Django app called “wishlist” using the following command:
python manage.py startapp wish
This will create a new Django app called “wish” in your project directory.
Step 3: Design Database Models:
In this step, we will create our database models. We need a model for a user’s wishlist and another for each wish. Add the following code to your “wish/models.py” file:
# Importing the required libraries
from django.db import models
import datetime

#---------------------------------Models---------------------------------#

# Creating the Wish model
class Wish(models.Model):

    # Defining the fields of the model
    wishtitle = models.CharField(max_length=250,unique=True)
    wish = models.CharField(max_length=1000)
    link = models.CharField(max_length=1000)
    date = models.DateField(default=datetime.date.today)
    is_achieved = models.BooleanField(default=False, blank=True)
    image = models.ImageField(upload_to='images/')

    # Defining the string representation of the model
    def __str__(self):
        return  self.wishtitle
Here, we have created a model named Wish, that has wishtitle, wish, link, date, is_achieved, and image field.
Step 4: Create Views:
In this step, we will create our views. We need views for displaying the list of wishes, adding and updating and deleting the wishes.
# Importing Required Libraries
from django.shortcuts import render, redirect
from .models import Wish
from .forms import WishForm

#---------------------------------Views---------------------------------#

# Creating the WishList view to display the list of wishes
def WishList(request):

    # Getting the list of wishes from the database
    wish = Wish.objects.all()

    # Defining the parameters to be passed to the html page
    params = {'wishes': wish}

    # Returning the wishes to the html page
    return render(request, 'Wishes.html', params)


# Creating the CreateWish view to create a new wish
def CreateWish(request):

    # Creating an instance of the WishForm
    form = WishForm(request.POST, request.FILES or None)

    # Checking if the form is valid
    if form.is_valid():

        # Saving the form and redirecting to the WishList view
        form.save()
        return redirect('WishList')

    # Returning the form to the html page
    return render(request, 'WishForm.html', {'form': form})

# Creating the UpdateWish view to update an existing wish
def UpdateWish(request, id):
    # Getting the wish from the database
    wish = Wish.objects.get(id=id)

    # Creating an instance of the WishForm
    form = WishForm(request.POST or None, instance=wish)

    # Checking if the form is valid
    if form.is_valid():

        # Saving the form and redirecting to the WishList view
        form.save()
        return redirect('WishList')

    # Returning the form to the html page
    return render(request, 'WishForm.html', {'form': form, 'wish': wish})

# Creating the DeleteWish view to delete an existing wish
def DeleteWish(request, id):
    # Getting the wish from the database
    wish = Wish.objects.get(id=id)

    # Checking if the request is a POST request
    if request.method == 'POST':

        # Deleting the wish and redirecting to the WishList view
        wish.delete()
        return redirect('WishList')

    # Returning the wish to the html page
    return render(request, 'DeleteConfirm.html', {'wish': wish})
Here, we have created following views
- WishList: It will display all the wishes of the user in the form of cards using the html template
- CreateWish: It will allow the user to add new wishes to his/her list.
- UpdateWish: It will update the users Wish.
- DeleteWish: It will delete the user’s wish from the database.
Step 5: Create Forms:
In this step, we will create our forms. We need forms for adding a new wishlist and adding a new wish to a wishlist. Add the following code to your “wish/forms.py” file:
# Importing required libraries
from django import forms
from django.forms import ModelForm
from .models import Wish

# Creating the WishForm class to create a form for the Wish model
class WishForm(ModelForm):

    # Defining the fields of the form
    wishtitle = forms.CharField(widget=forms.TextInput(attrs={'class':'form-control'}))
    wish = forms.CharField(widget=forms.TextInput(attrs={'class':'form-control'}))
    link = forms.CharField(widget=forms.TextInput(attrs={'class':'form-control'}))
    is_achieved = forms.BooleanField(widget=forms.CheckboxInput(attrs={'class':'form-check-input mt-0'}), required=False)
    image = forms.ImageField(widget=forms.FileInput(attrs={'class':'form-control'}))

    # Defining the Meta class to define the model and fields of the form
    class Meta:

        # Defining the model and fields of the form
        model=Wish
        fields=('wishtitle','wish','link','is_achieved','image')

        # Defining the labels of the form
        labels={
            'wishtitle':'Wish Title',
            'wish':'Wish',
            'link':'Link',
            'is_achieved':'Is Achieved',
            'image':'Image'
        }
Here, we have created forms for the `Wish` model. This form will be used in the views we have created earlier.
In this form we have the following field:
- Wishtitle: It is a Text field and it will input the Title of the wish
- Wish: It is a Text Field and it will input the description about the wish
- Link: It is a TextField and it will input the Link of the the wish
- Is_achieved: It is a Boolean field and it will use a checkbox to know the status of the wish.
- Image: It is an Image field for uploading the image of the wish.
We have also used widgets to give some styling to the input fields.
Step 6: Create Templates:
In this step, we will create our templates. We need templates for displaying the list of wishlists, creating a new wish, updating a wish, and deleting a wish. Create the following templates in your “wishlist/wish/templates/” directory:
- Wishes.html
- WishForm.html
- DeleteConfirm.html
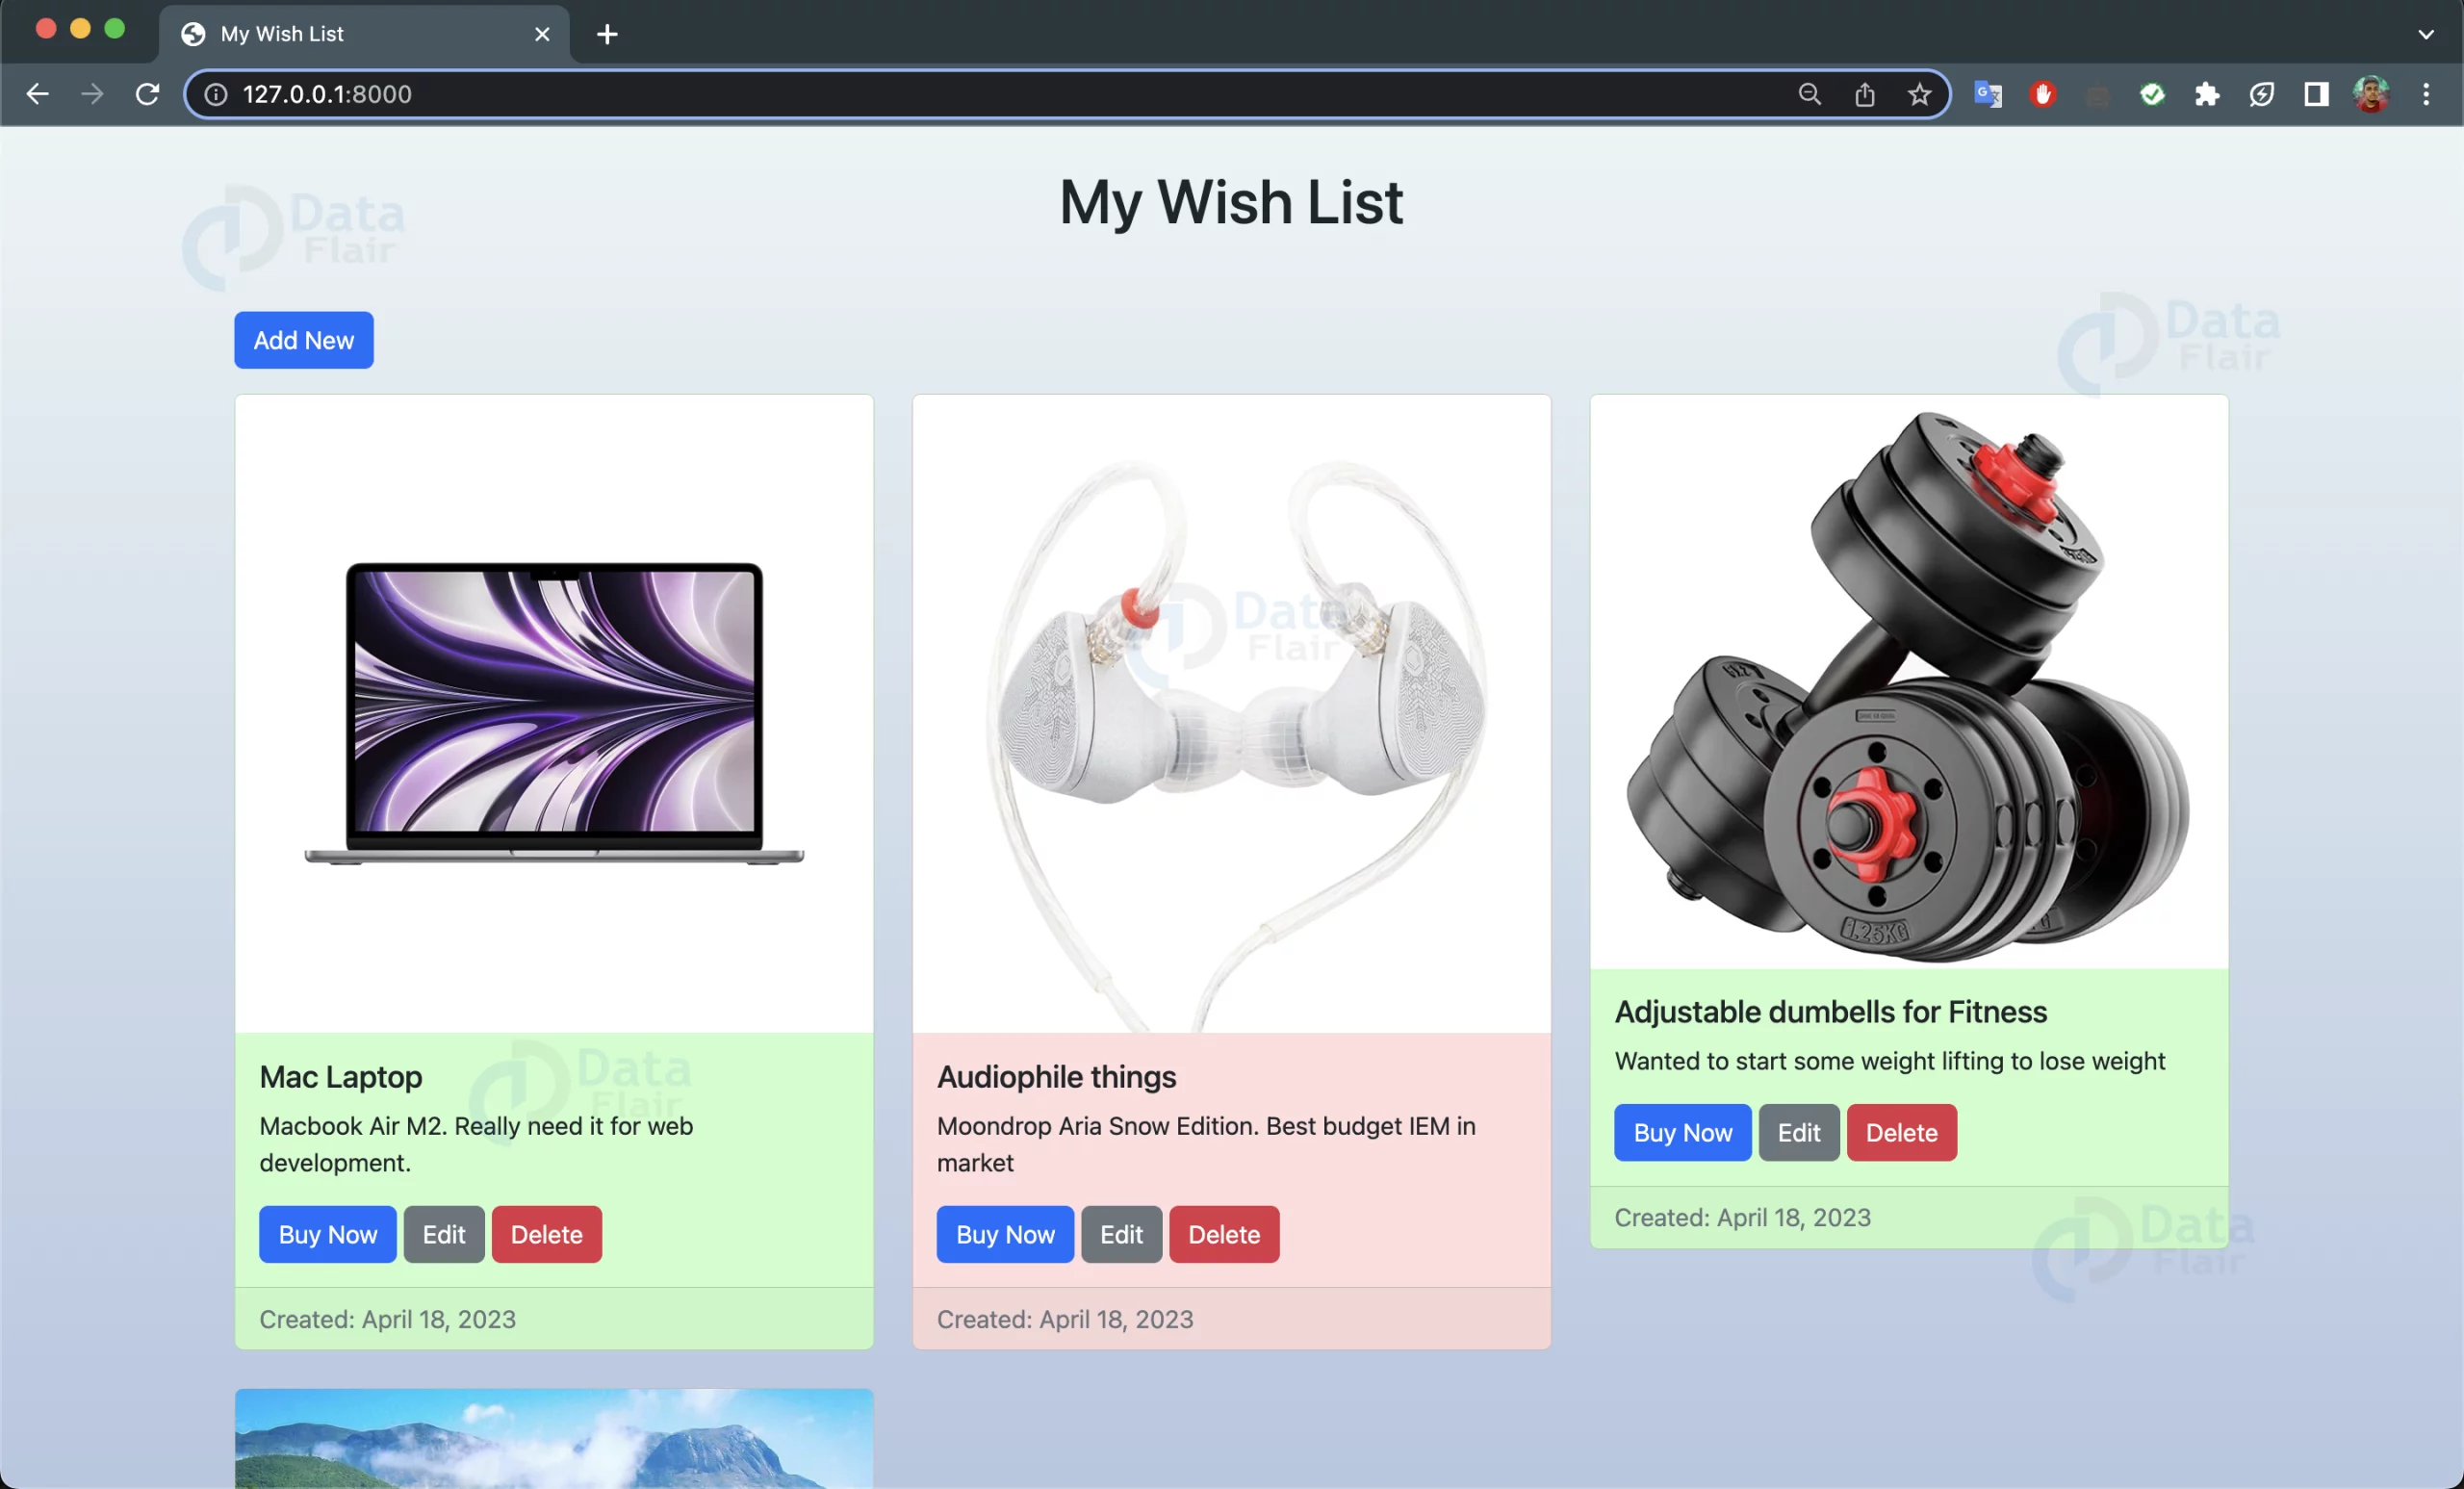
Wishes.html: This page will show the list of users wishes in the form of cards. Wishes that are achieved will be indicated by light-green background and not-achieved wishes will be indicated by light-red background.
<!DOCTYPE html>
<html lang="en">
<head>
    <meta charset="utf-8">
    <meta name="viewport" content="width=device-width, initial-scale=1">
    <title>My Wish List</title>
    <link rel="stylesheet" href="https://cdn.jsdelivr.net/npm/[email protected]/dist/css/bootstrap.min.css">

    <style>
        .light-red {
            background-color: #FFDDDD;
        }
        .light-green {
            background-color: #CCFFCC;
        }
        body {
          background: linear-gradient(180deg, #ebf4f5, #b5c6e0);
          background-size: 100% 100%;
          background-repeat: no-repeat;
          background-attachment: fixed;
          background-position: center;
          background-size: cover;
      }
    </style>
</head>
<body>
    <div class="container">
        <div class="row">
            <div class="col-md-8 mx-auto">
              <br>
                <h1 class="text-center mb-5">My Wish List</h1>
            </div>
        </div>

        <div class="row mb-3">
            <div class="col-md-12 mx-auto">
                <a href="{% url 'CreateWish' %}" class="btn btn-primary">Add New</a>
            </div>
        </div>


        <div class="row">
            {% for wish in wishes %}
                <div class="col-md-4 mb-4">
                    <div class="card {% if wish.is_achieved %}light-green{% else %}light-red{% endif %}">
                        <img src="{{ wish.image.url }}" class="card-img-top" alt="{{ wish.wishtitle }}">
                        <div class="card-body">
                            <h5 class="card-title">{{ wish.wishtitle }}</h5>
                            <p class="card-text">{{ wish.wish }}</p>
                            <a href="{{ wish.link }}" class="btn btn-primary" target="_blank">Buy Now</a>
                            <a href="{% url 'UpdateWish' wish.id %}" class="btn btn-secondary">Edit</a>
                            <a href="{% url 'DeleteWish' wish.id %}" class="btn btn-danger">Delete</a>
                        </div>
                        <div class="card-footer text-muted">
                            Created: {{ wish.date }}
                        </div>
                    </div>
                </div>
            {% endfor %}
        </div>
    </div>
    <script src="https://cdn.jsdelivr.net/npm/[email protected]/dist/js/bootstrap.bundle.min.js"></script>
</body>
</html>
WishForm: This page will be used to both create and update the wishes of the user.
<!DOCTYPE html>
<html lang="en">
  <head>
    <meta charset="utf-8" />
    <meta name="viewport" content="width=device-width, initial-scale=1" />
    <title>Add/Update Wish</title>
    <link
      rel="stylesheet"
      href="https://cdn.jsdelivr.net/npm/[email protected]/dist/css/bootstrap.min.css"
    />

    <style>
        body {
            background: linear-gradient(180deg, #ebf4f5, #b5c6e0);
            background-size: 100% 100%;
            background-repeat: no-repeat;
            background-attachment: fixed;
            background-position: center;
            background-size: cover;
        }
    </style>

  </head>
  <body>
    <div class="container mt-4">
      <div class="row justify-content-center">
        <div class="col-md-8">
          <div class="card">
            <div class="card-header bg-primary text-white">Add/Update Wish</div>
            <div class="card-body">
              <form action="" method="POST" enctype="multipart/form-data">
                {% csrf_token %}
                <div class="mb-3 input-group">
                  <span class="input-group-text">Wish Title</span>
                  {{ form.wishtitle }}
                </div>
                <div class="mb-3 input-group">
                  <span class="input-group-text">Wish</span>
                  {{ form.wish }}
                </div>
                <div class="mb-3 input-group">
                  <span class="input-group-text">Link of the Wish</span>
                  {{ form.link }}
                </div>
                <div class="mb-3 input-group">
                  <span class="input-group-text">is it achieved?</span>
                  <div class="input-group-text">{{ form.is_achieved }}</div>
                </div>
                <div class="mb-3 input-group">
                  <span class="input-group-text">Image</span>
                  {{ form.image }}
                </div>
                <div class="d-grid gap-2">
                  <button class="btn btn-success" type="submit">Save</button>
                </div>
                {% if wish %}
                <div class="d-grid gap-2 mt-2">
                  <a
                    href="{% url 'DeleteWish' wish.id %}"
                    class="btn btn-danger"
                    type="submit"
                    >Delete</a
                  >
                </div>
                {% endif %}
              </form>
            </div>
          </div>
        </div>
      </div>
    </div>
  </body>
</html>
DeleteConfirm: When a user will click on the delete button on the Wish card, This page will confirm whether to really delete the wish or not.
<!DOCTYPE html>
<html lang="en">
  <head>
    <meta charset="UTF-8" />
    <title>Confirm Delete</title>
    <!-- Bootstrap 5 CSS -->
    <link rel="stylesheet" href="https://cdn.jsdelivr.net/npm/[email protected]/dist/css/bootstrap.min.css"/>

    <style>
        body {
            background: linear-gradient(180deg, #ebf4f5, #b5c6e0);
            background-size: 100% 100%;
            background-repeat: no-repeat;
            background-attachment: fixed;
            background-position: center;
            background-size: cover;
        }
    </style>

  </head>
  <body>
    <div class="container my-5">
      <div class="row justify-content-center">
        <div class="col-md-6">
          <div class="card">
            <div class="card-body">
              <h2 class="card-title mb-4">Confirm Delete</h2>
              <h4 class="card-subtitle mb-3">"{{ wish.wishtitle }}"</h4>
              <p class="card-text mb-4">
                Are you sure you want to delete this wish?
              </p>
              <form method="POST">
                {% csrf_token %}
                <button class="btn btn-danger me-3" type="submit">Yes</button>
                <a class="btn btn-success" href="{% url 'WishList' %}">No</a>
              </form>
            </div>
          </div>
        </div>
      </div>
    </div>

    <!-- Bootstrap 5 JS -->
    <script src="https://cdn.jsdelivr.net/npm/[email protected]/dist/js/bootstrap.bundle.min.js"></script>
  </body>
</html>
Step 7: Create URLs:
In this step, we will create our URLs. We need URLs for our views. Add the following code to your “wish/urls.py” file:
# Importing the views from the wish app
from django.urls import path
from .views import CreateWish,UpdateWish,DeleteWish,WishList
from django.conf import settings
from django.conf.urls.static import static

# Defining the urlpatterns for the wish app
urlpatterns=[
    path('',WishList,name='WishList'),
    path('create',CreateWish,name='CreateWish'),
    path('update/<int:id>',UpdateWish,name='UpdateWish'),
    path('delete/<int:id>',DeleteWish,name='DeleteWish'),
]
Here we have imported the Views from the ‘Views.py’ file and mapped them with the url pattern. So that if the matched url pattern is accessed, it will guide the user accordingly.
Step 8: Test Your Application:
In this step, we will test our application. Start the development server using the following command:
python manage.py runserver
Open your web browser and go to “http://127.0.0.1:8000/”. You should see a list of wishes. You can add new wishes to the list by clicking on the “Add” button. You can update and delete the wish by clicking on the edit and delete buttons respectively.
Output:

Summary
Congratulations! You have successfully created a WishList Django Web Application. You can now add more features according to your needs. For example, you can add user authentication, search functionality, pagination, etc.
If you are Happy with DataFlair, do not forget to make us happy with your positive feedback on Google


