Google Search Console Tutorial – A Guide to refer (Part – 2)
Job-ready Online Courses: Knowledge Awaits – Click to Access!
If you have heard of Google Webmaster, then you should know that Google webmaster and Google Search Console are the same things. Google changed the name of Google webmaster to Google search console on May 2015. Google Search Console is like a lifejacket to all SEO-related problems. It is important to carry this lifejacket when doing SEO because it is a savior in the sense that it provides excellent features that can derive solutions for the problems and can ultimately help to drive traffic to the website.
Earlier we discussed Google Search Console in part 1, in which we studied an overview of the service. Now, in Google Search Console tutorial part 2, we will discuss, how to effectively use the service for increasing the number of visitors to your website.
What is Google Search Console?
Let’s start this Google Search Console tutorial from the very beginning.
Google Search Console is a free service that is offered by Google to provide every possible information about your website and also details of the people who visits your website. Few of them include: who visits your website, how visitors browse your web pages, their buying behavior, navigational details, how they reach your website, how they are visiting the website: through mobile phones or by desktops. You can also use it to check the most visited pages on your website, submit a sitemap, etc.
Website owners may utilise Google Search Console to better understand how their websites are doing in Google’s search results, find and address problems that can affect their search rankings, and ultimately enhance their website’s visibility and user experience in search engines. It is a crucial tool for SEO and website optimisation efforts.
Adding Your Website for Verification
Now, we will learn the process to add your website in the console for verification in this Google Search Console tutorial.
If you want to use Google search console to improve your website’s performance then first you should verify your website from Google search console. If you add your website on Google search console that means you are letting Google search console to detect if you are a website owner, a developer or any marketing professional.
Verifying means Google wants to make sure that all precious and valuable information remains in safe hands.
Adding a website in Google search console is easy. Just log in to the website, https://support.google.com/webmasters and in the search box type your website’s URL and click on “add property”.
Next step would be of verifying your website where you need to complete some steps. The steps include the size of your website, uploading data limit of your website, your Gmail id and some other questions.
Steps to Get HTML Tag for Your Website
Here, we will cover the steps to get an HTML tag for your website in Google Search Console tutorial. For the verification process, HTML is one of the easiest processes.
1. From the search console select “manage property” and then click on” verify this property”.
2. Click on HTML tag and if that option does not pop out then click on “alternate method” and select “HTML tag”. By clicking on it you will get the desired HTML tag to verify your website.
3. Copy the code by using your HTML code editor from your website’s home page. Paste the code in the <head > section of the code area. Save and update the changes made in the code section. Now you can view the changes made in the codes from your website’s home page.
4. Once your website accepts the code, come back to the Google search console and click on “verify”. Then, Google will check if the code is properly inserted in your coding section or not. If it finds the code, then it will display a message but if it does not, it will end up showing some error messages.
When the verification part is done, kindly do not remove the verification code. If you do so, it will revoke your website’s authentication.
Verification of Your Website
In Google Search Console tutorial, we will learn the steps to verify your website using different methods.
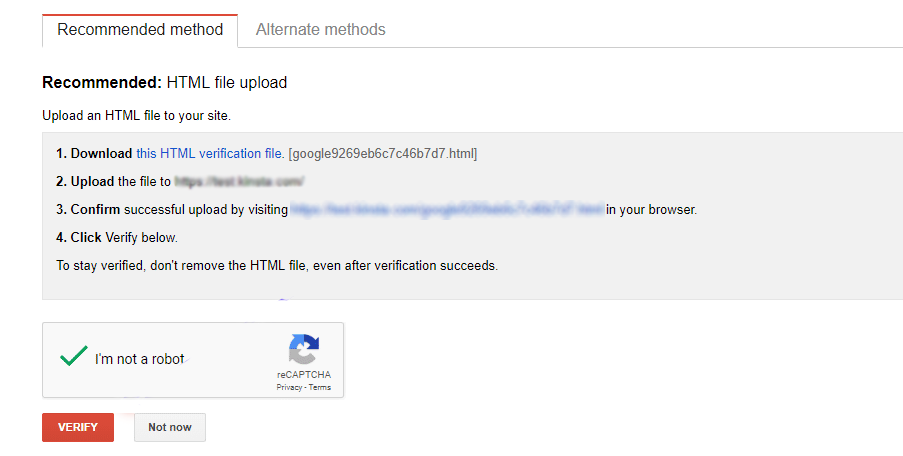
1. Using HTML tag
If you select to verify your website using this method, then you will be asked to download an HTML file. Then, you will need to upload this in the specific section of your coding area.
After doing that go back to the Google Search Console and click on “verify”. If you have done everything correctly, it will successfully verify your website.
2. Using Domain name provider
Domain name provider is also an option to verify your website where Google search console asks for the domain provider of your website. It’s the one from where you have purchased your domain name. Google search console will display some common domain sellers. If your domain host is not present in the list, then you can choose “others”. After that, it will tell you how to create a DNS TXT record for your provider. It not only verifies your website but also proves you are the real owner of all your domain names, dictionaries names and other sub-domain names.
Steps: Google search console < manage site < verify this site < alternate method < domain name provider.
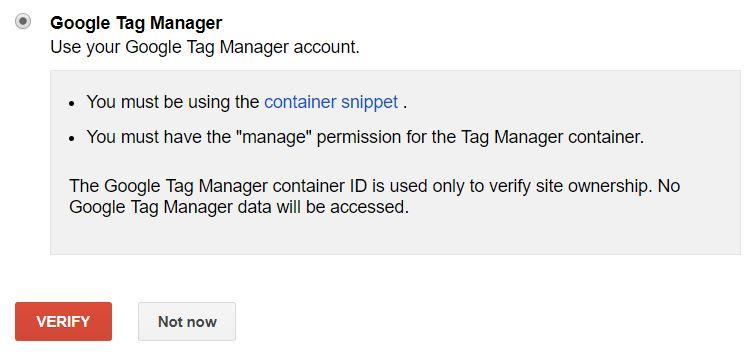
3. Using Google tag manager
It is the easiest way to verify your website but only if you are already using Google tag manager. If you are about to use this method, then you must have “view”, ”edit” and “manage” permission for your Google tag manager account.
One more thing should be taken care of is that your Google tag manager’s code should be properly attached to the HTML code editor inside the body tag section.
Steps: Google search console dashboard < manage site < verify the site < recommended method/alternate method < Google tag manager.
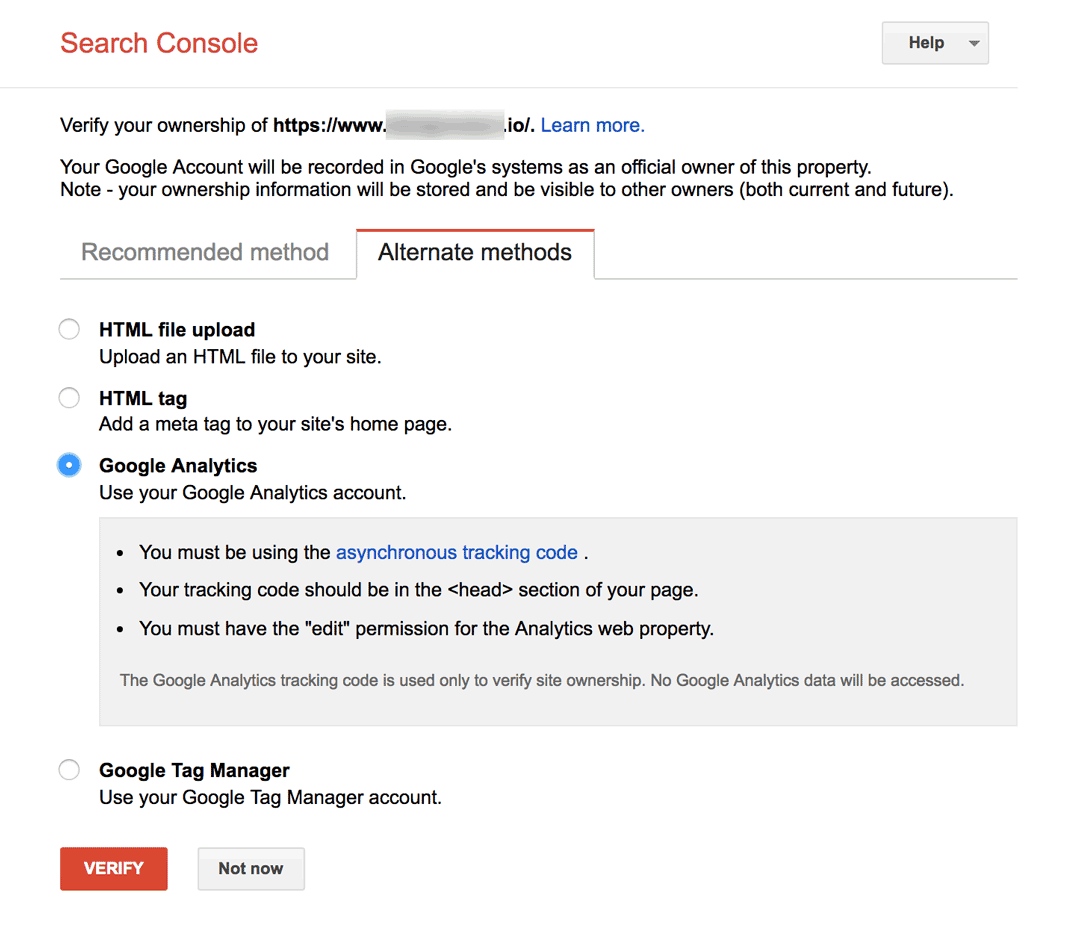
4. Using Google Analytics
Google analytics is another source to check your website’s vital and if you are already using it then it can be another option to verify your website using Google analytics. For this, a tracking code generated from Google analytics must be properly attached in “head” section of code editor of your website’s home page and not anywhere else.
A tracking code is inserted into your website pages by Google Analytics, which then gathers information about user activities and sends it to Google’s servers. You may then analyse and decipher the performance of your website using the data that is subsequently shown on a straightforward dashboard.
The service is extensively utilised by companies, website owners, and marketers to maximise their online visibility, improve user experiences, and accomplish their website goals because it is free to use.
To make it work, go to the dashboard of Google search console
Steps: Click on manage site<verify this site < alternate method< Google analytics tracking method< follow the instruction
Indexing of Website on Google
Lastly, in Google Search Console tutorial, we will discuss steps to index your website on Google. After giving updates to your website, it’s very important to inform Google about it. Only after that will Google index them and the best way to do is to do it manually. This allows on-page optimization of other tags to help your website getting a higher rank on SERP.
Google search console < select the page you need to submit < on the left side toolbar, select crawl < click on “Fetch as Google ”
Summary
This comes to the end of Google Search Console tutorial. Now comes the main part- how to drive traffic using this tool and how does it helps in increasing traffic. For this, you will have to refer to the final part of the Search Console Tutorial which will provide you amazing ways of driving traffic for your website.
Did this tutorial help? Please provide feedback about the blog in the comment section below and help us improve.
Did you like our efforts? If Yes, please give DataFlair 5 Stars on Google


