JavaScript DOM (Document Object Model) – Guide for Novice Learners
Full Stack Web Development Courses with Real-time projects Start Now!!
The most common thing you’ll need, as a web developer, is a means to manipulate the document structure in some way without much hassle. For this purpose, we use the Document Object Model (DOM), a set of APIs for controlling HTML and styling information that use the Document object. This JavaScript tutorial will discuss DOM in detail and walk you through the different methods of using them. We will learn about the different terminologies associated with the DOM and how to work with them.
The Document interface, mentioned above, represents any web page loaded in the browser. It serves as an entry point into the web page’s content, which is the DOM tree. It also describes the common properties and methods for any kind of document.
Before starting, we would suggest you to complete the JavaScript Class Tutorial
JavaScript Document Object Model (DOM)
A Document Object Model is a programming interface for HTML (HyperText Markup Language) and XML (eXtensible Markup Language) documents. It provides a data representation comprising all the objects, depicting the structure and content of the document on the web. Every webpage has its own DOM that represents the page so that programs can alter its structure, look, and content.
In simpler terms, when a browser loads a webpage, it creates a model of that page. This model is the DOM tree and is filed in the browser’s memory. It provides functionality globally to the document, including how to obtain the page details and create new elements in the document. Remember, DOM is neither a part of HTML nor JavaScript; it’s a separate set of rules. All the major browser makers implement it and it covers two primary sections:
- Creation of the DOM tree
- Manipulation of the DOM tree
We will cover both these areas in this tutorial so you will understand how JavaScript actually works with the DOM. For now, let’s see what a DOM tree looks like and its different components with the help of a program.
Program:
<html>
  <head>
    <title>DOM Model</title>
  </head>
  <body>
    <h1>DataFlair’s Tutorial</h1>
    <p>DOM Tree</p>
    <p id = "text">This is a text element in the DOM tree.</p>
  </body>
</html>
Screenshot: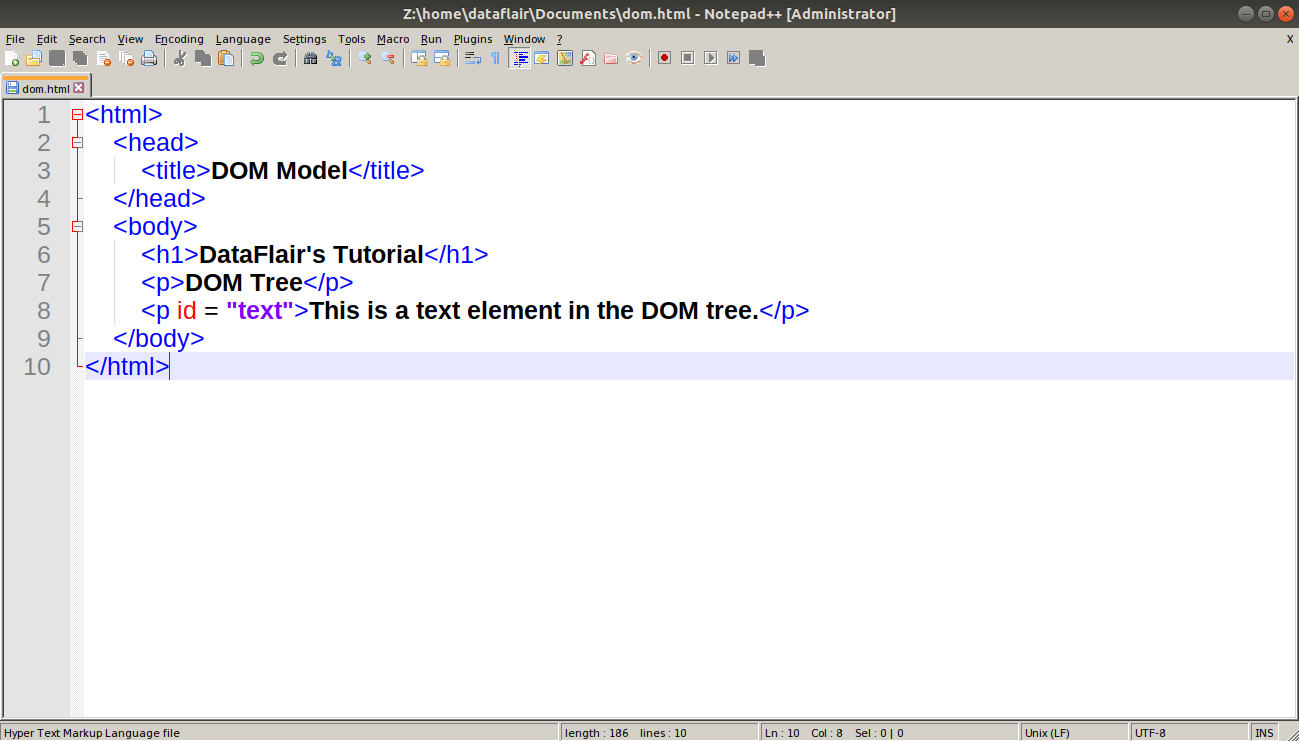
The diagram below depicts the DOM tree of the document.
JavaScript DOM Tree
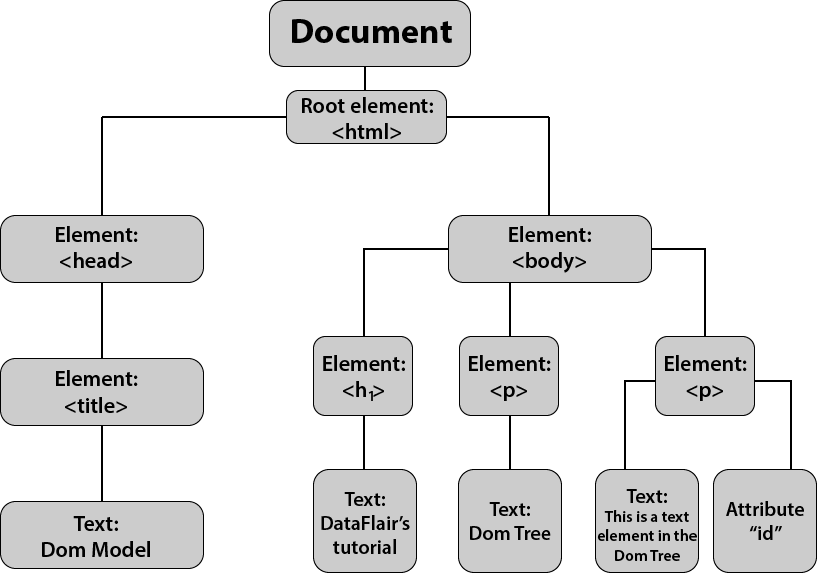
Every element, attribute, and text content in the HTML creates its own DOM node in the tree. A DOM tree consists of four main types of nodes:
Document node:
This is added at the top of the tree and represents the entire page in the browser. As stated above, it is the starting point in the DOM tree; you need to navigate via the document node to access any other node in your DOM tree.
Element nodes:
All the HTML elements like heading tags (<h1> to <h6>) and paragraph tags (<p>) in the page create an element node in the tree. You use these nodes to gain access to the elements’ attribute and text nodes.
Attribute nodes:
When the opening tags in the HTML document contain attributes, the tree represents them as attribute nodes. These are not the children of the element nodes but a part of them.
Text nodes:
Once you have access to the element node, you can reach the text content within that element, stored inside the text nodes of the DOM tree. These nodes cannot have child nodes. Thus, a text node always creates a new branch in the DOM tree, and no further branches come out of it.
Want to see it in action? Open your Browser Elements Tab (Ctrl + Shift + I). In the previous DataFlair’s tutorial of JavaScript Classes, we used this shortcut to use the Browser Console. Explore all the tabs that this shortcut provides and the changes you notice when you adjust the code a bit. If you want to become a good web developer, you will need these tabs a lot while developing.
Let’s see how our code above turned out into the browser window and how the DOM tree helps us in manipulating webpages very easily.
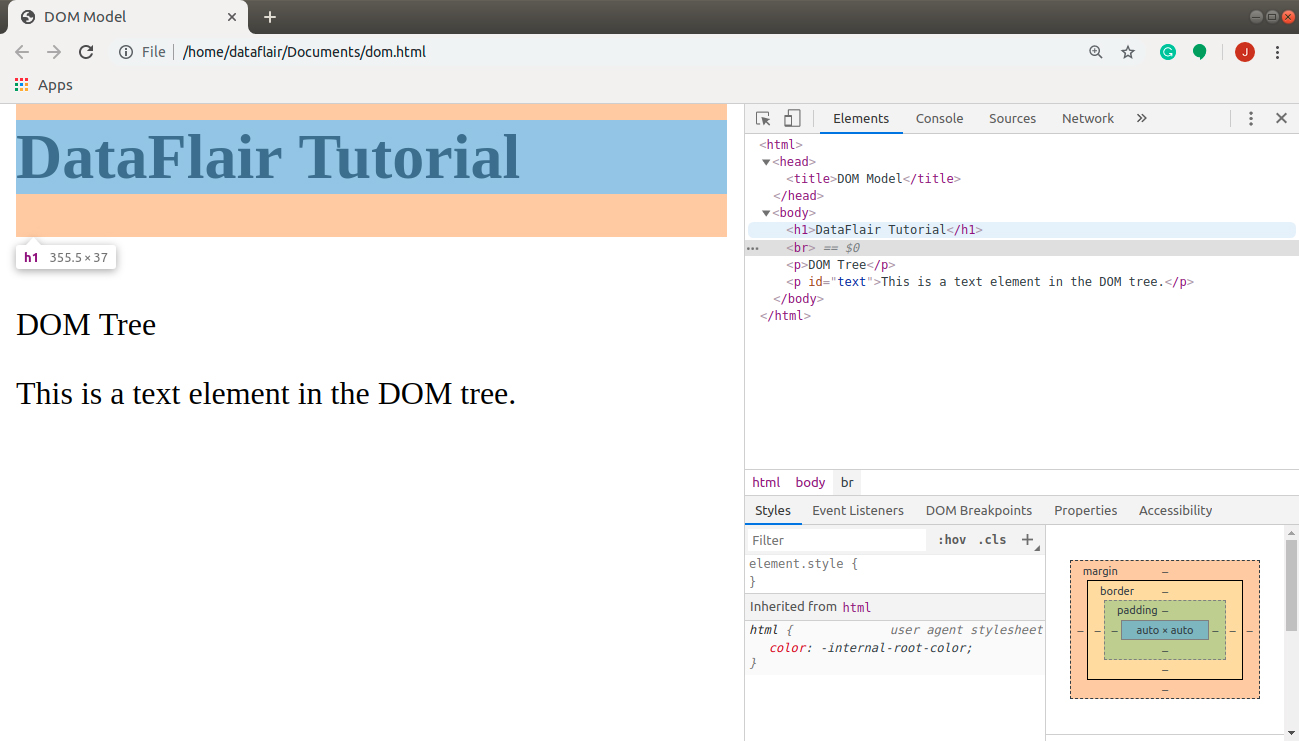
In the above image, I hovered over <h1> tag in the Elements Tab. On the left, notice how the browser highlighted the tag that I selected. It also shows the attribute you choose in your code on your browser window. When you right-click on your node, the browser provides you with the option to add/ remove an element directly without going to the source file. It also provides a live preview of what changes happened in the webpage when you altered the code.
Working with the DOM Tree in JavaScript DOM
To access and modify the DOM tree, you need to follow two steps:
- Locate the node representing the element you want.
- Works with the node’s content, child elements, and attributes.
This is only an overview of all the methods and properties that you will learn further in this tutorial. It acts as a guide when you search for a specific topic in the future. All the methods mentioned are detailed as you continue reading the tutorial, so you will have a strong understanding of all of them when you finish this tutorial. Some DOM methods only work in certain browsers or are buggy. Inconsistent browser support for the DOM was one of the reasons jQuery became popular.
We will discuss the various properties and methods in this tutorial based on the DOM tree given below.
Accessing the Elements
DOM Queries are the methods that find elements in the DOM tree. They may return one element or a collection of elements in a NodeList. You can select any element you desire from the NodeList with the help of an index number (starting with 0).
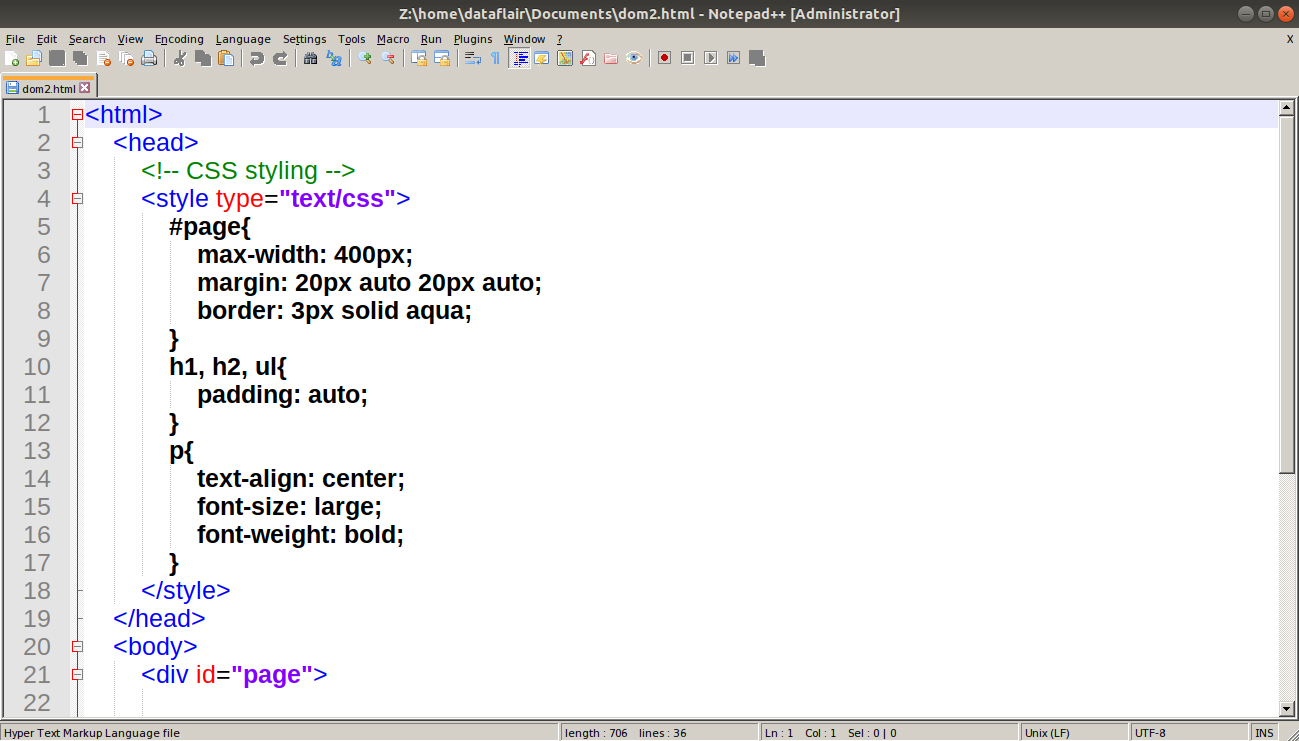
The code mentioned below is the HTML and CSS code, common to all the examples. All you would need to do is add the JavaScript code you want to execute.
Code:
<html>
  <head>
    <!-- CSS styling -->
    <style type="text/css">
      #page{
        max-width: 400px;
        		margin: 20px auto 20px auto;
        		border: 3px solid aqua;
      }
      h1, h2, ul{
        padding: auto;
      }
      p{
        text-align: center;
        font-size: large;
        font-weight: bold;
      }
    </style>
  </head>
  <body>
    <div id="page">

      <h1 id="header">TO DO LIST</h1>
      <ul>
        <h2>DataFlair’s JavaScript Tutorial</h2><DataFlair’s>
        <li id="one" class="mandatory">Learning the concepts</li>
        <li id="two" class="mandatory">Practising the codes</li>
        <li id="three">Taking quizzes</li>
        <li id="four">Solving Interview Questions</li>
      </ul>

      <!-- JavaScript code -->

    </div>
  </body>
</html>
Screenshot:
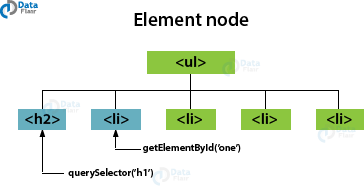
Methods to Select an Individual Element Node
Following are the methods to select an individual element in the tree:
- getElementById(‘id’): Uses the unique value of the element’s id attribute. The HTML must have an id attribute for the method to select it.
For example – getElementById(‘one’)
- querySelector(‘css selector’): Uses a CSS selector, returns the first matching element.
For example – querySelector(‘h1’)
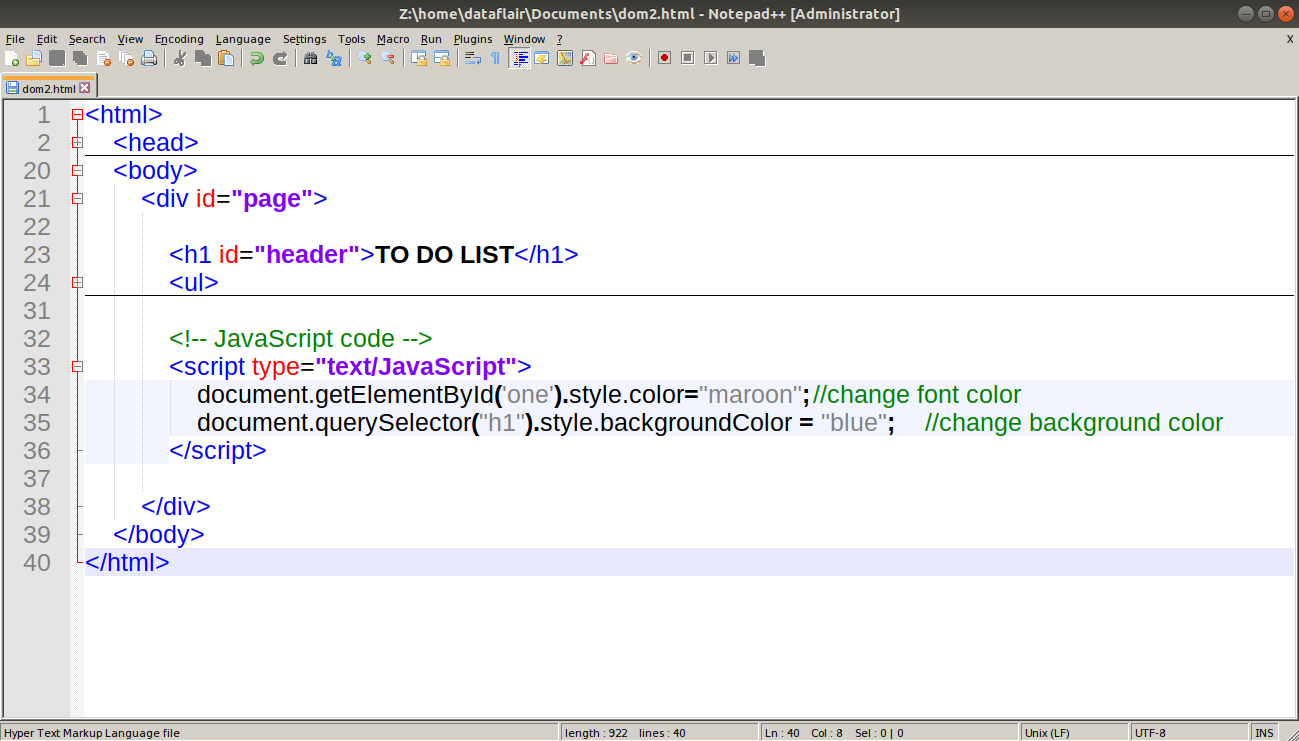
The code below combines these methods to add styling to the webpage.
Code:
<script type="text/JavaScript">
document.getElementById('one').style.color="maroon"; //change font color
document.querySelector("h1").style.backgroundColor = "blue"; //change background color
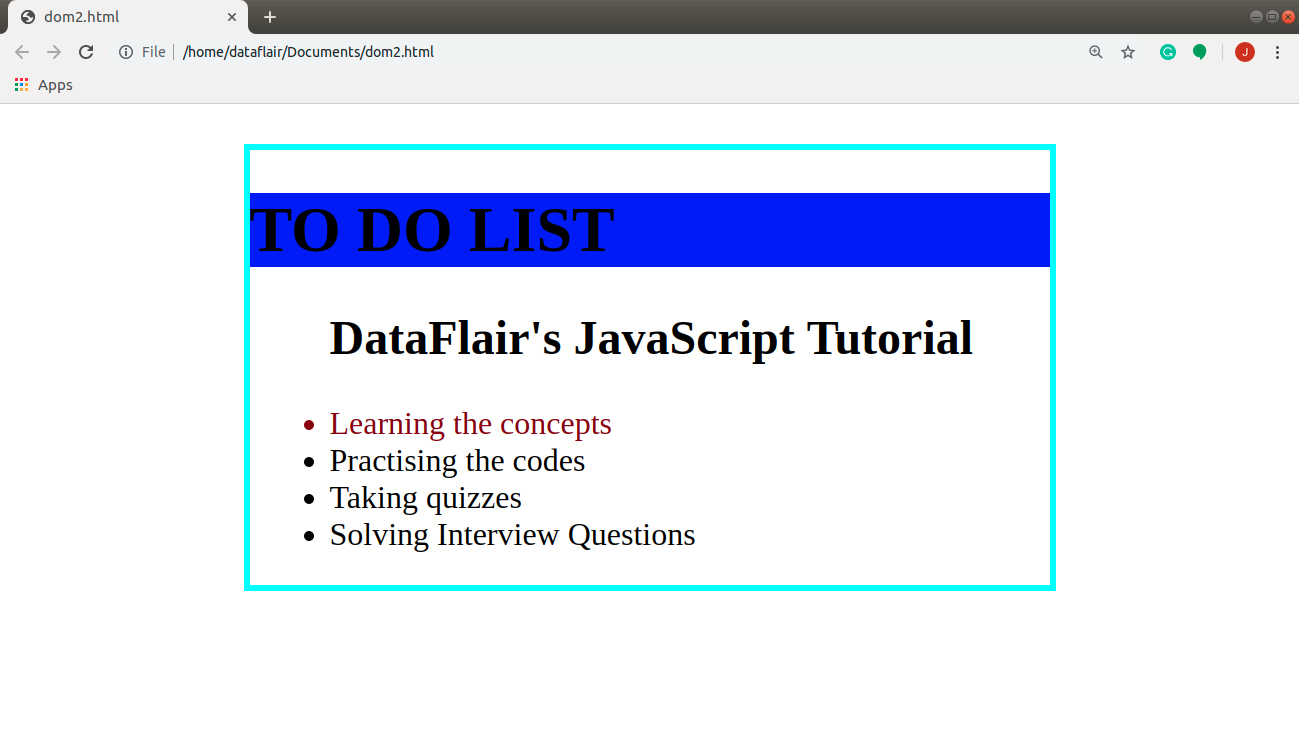
</script>Screenshot:
Output:
Did you check our latest article on JavaScript Functions?
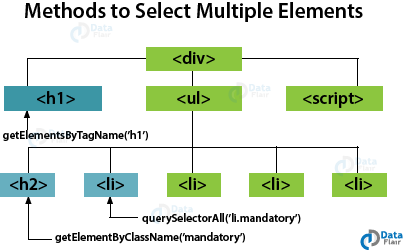
Methods to Select Multiple Elements (NodeLists)
There are three common ways to select multiple elements in the tree:
- getElementsByClassName(): Selects all the elements that have a specified value for the class attribute.
For example – getElementsByClassName(‘mandatory’)
- getElementsByTagName(): Selects all the elements that have the specified tag names.
For example – getElementsByTagName(‘h1’)
- querySelectorAll(): Uses a CSS selector, returns all the matching elements.
For example – querySelectorAll(‘li.mandatory’)
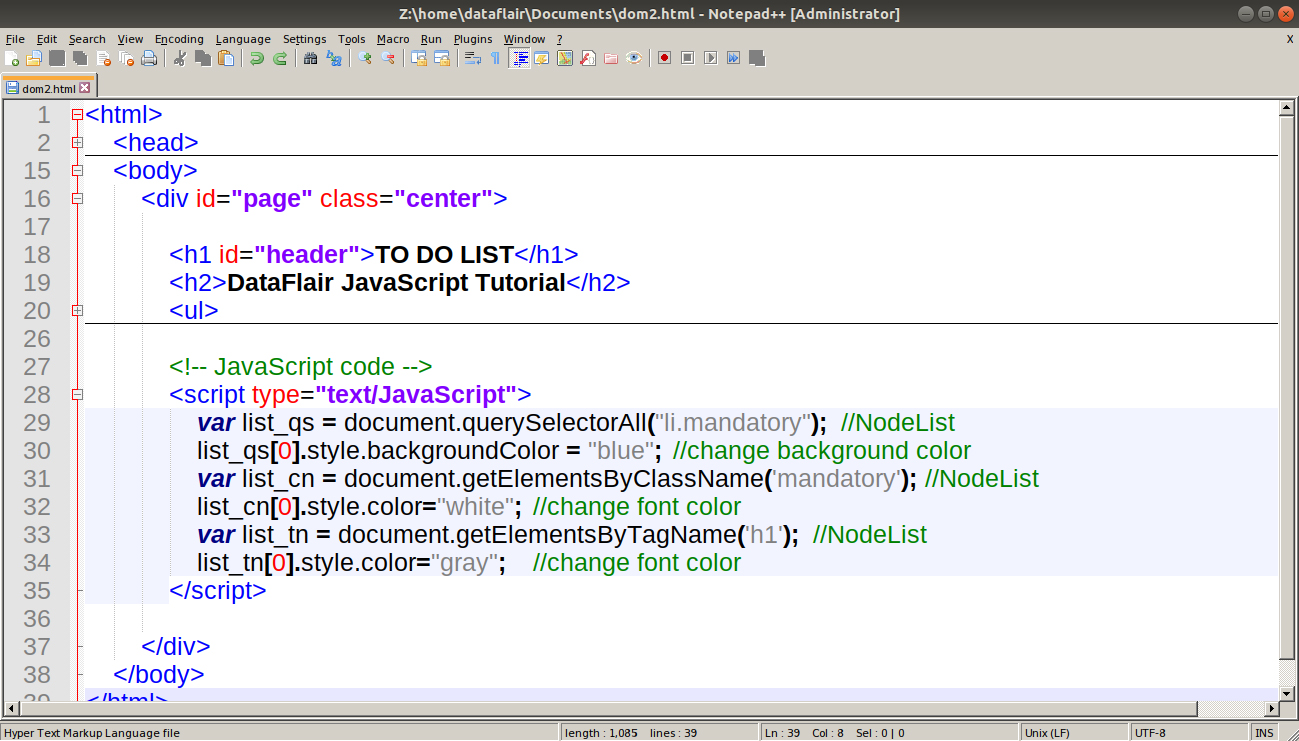
The above methods always return a NodeList, even if the list contains only a single element. This fact is important to remember because you need to use square brackets [ ] if you want to access any element in the NodeList. The following code explains all the methods of returning a NodeList.
Code:
<script type="text/JavaScript">
        var list_qs = document.querySelectorAll("li.mandatory"); //NodeList
        list_qs[0].style.backgroundColor = "blue"; //change background color
        var list_cn = document.getElementsByClassName('mandatory'); //NodeList
        list_cn[0].style.color="white"; //change font color
        var list_tn = document.getElementsByTagName('h1'); //NodeList
        list_tn[0].style.color="gray"; //change font color
      </script>
Screenshot:
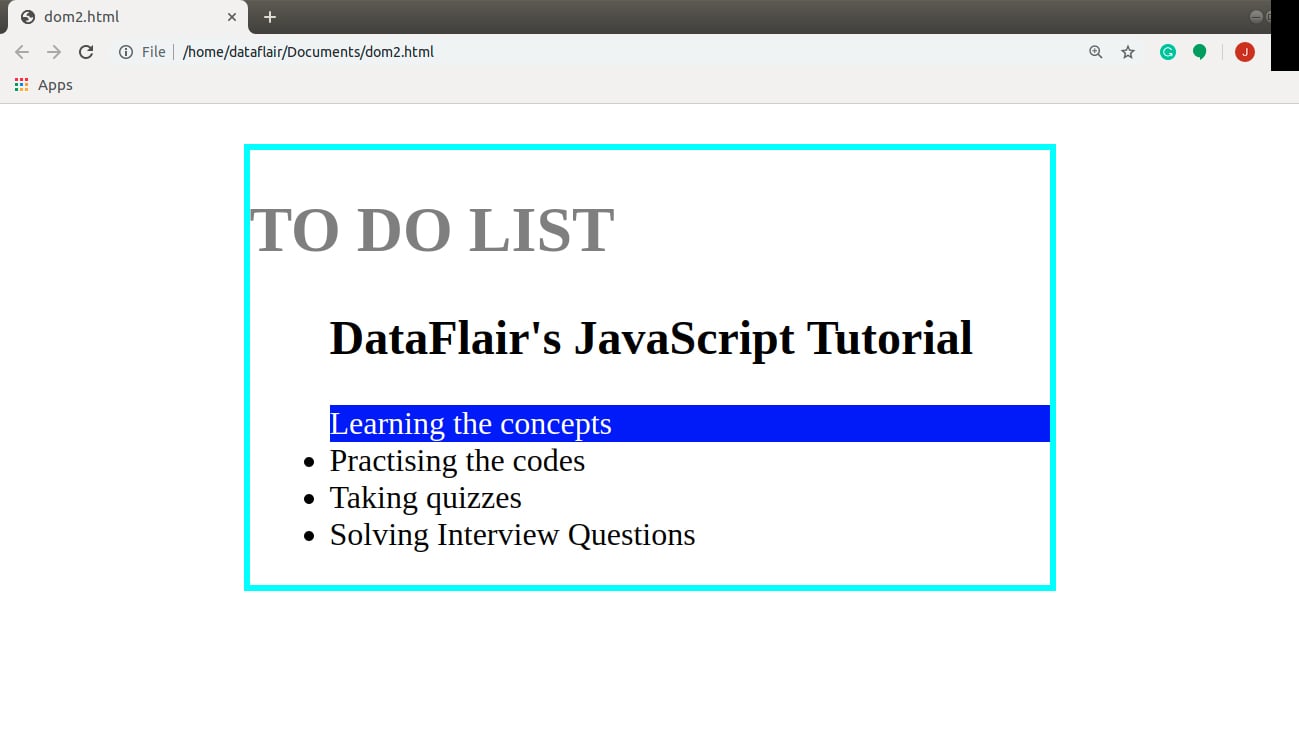
Output:
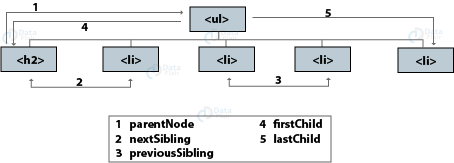
Traversing between Element Nodes
You have the facility to navigate between related element nodes. The techniques available for this purpose include:
- parentNode: Selects the parent of the current element node (returns a single element).
- previousSibling/ nextSibling: Selects the previous or next sibling from the tree.
- firstChild/ lastChild: Selects the first or last child of the current element.
But we usually avoid these properties for DOM traversal using JavaScript. The reason is whitespace nodes, explained below.
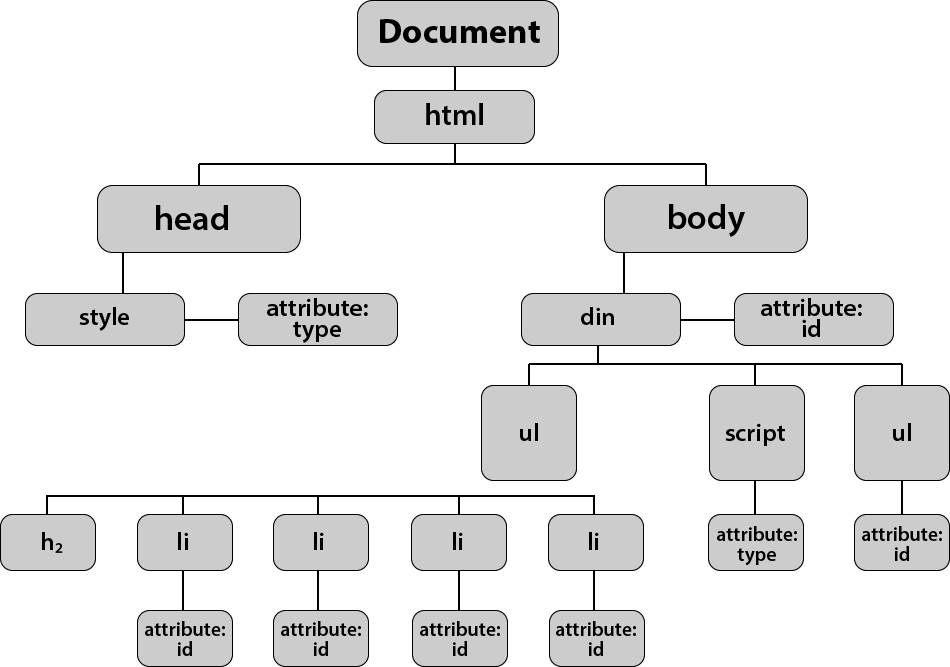
Whitespace Nodes
Traversing a DOM tree can be difficult because some browsers add a text node whenever they come across whitespace between elements, except in Internet Explorer. This means that JavaScript interpreter interprets the DOM tree (in the first image) as shown in the second image.
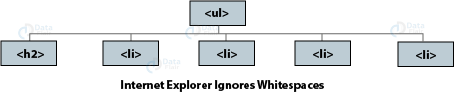

Thus, it is important to strip whitespaces, making the code smaller and faster to read. But this results in a code that is difficult to read. To avoid this, we use jQuery for traversing of DOM.
Get/ update Element Content
For Text only
You can access and update the text in the containing element (and its children) with the help of two properties:
- textContent
For example – document.getElementById(‘p’).textContent; (accessing)
document.getElementById(‘p1’).textContent = newText; (updating) - innerText
For example – document.getElementById(‘p’).innerText; (accessing)
document.getElementById(‘p2’).innerText = newText; (updating)
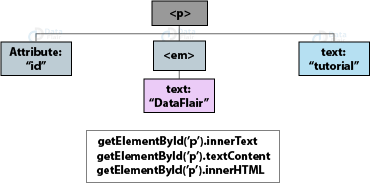
Both these properties replace the entire content of the element, including all the markup present. But you should avoid using innerText since it is not part of any standard. Also, this method slows the speed of content loading on the page.
For Text and Markup
The innerHTML property gets the content of the element and returns it as one long string, including the markup it contains. But you should be careful of where you use this property since there are some security risks associated with it.
For example – document.getElementById(‘p’).innerHTML; (accessing)
document.getElementById(‘p3’).innerHTML = newText; (updating)
We strongly recommend you to understand the concept of JavaScript Strings
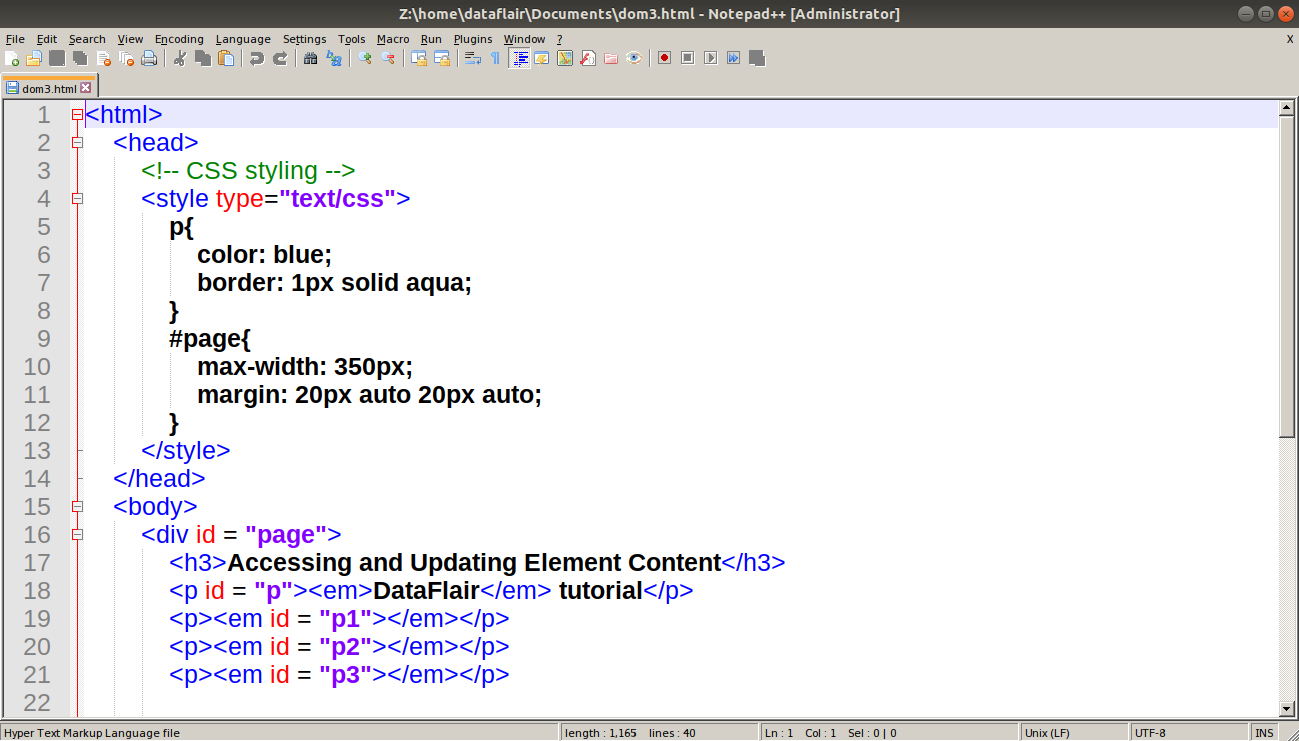
The code below shows the three properties clearly. Run the code on your browser, and see the output on your own. Play with the code, try adding and removing things, and see what happens. This will help you understand how these properties work.
Code:
<html>
  <head>
    <!-- CSS styling -->
    <style type="text/css">
      p{
        color: blue;
        border: 1px solid aqua;
      }
      #page{
        max-width: 350px;
        margin: 20px auto 20px auto;
      }
    </style>
  </head>
  <body>
    <div id = "page">
      <h3>Accessing and Updating Element Content</h3>
      <p id = "p"><em>DataFlair</em> tutorial</p>
      <p><em id = "p1"></em></p>
      <p><em id = "p2"></em></p>
      <p><em id = "p3"></em></p>

      <!-- JavaScript Code -->
      <script>
        document.write("<b>Accessing elements:</b></br>");
        var x = document.getElementById('p').textContent;
        document.write("textContent: " + x + "</br>");
        var y = document.getElementById('p').innerText;
        document.write("innerText: " + y + "</br>");
        var z = document.getElementById('p').innerHTML;
        document.write("innerHTML: " + z + "</br>");
        //updating elements
        document.getElementById('p1').textContent = "<strong>JavaScript</strong> tutorials";
        document.getElementById('p2').innerText = "<strong>JavaScript</strong> quizzes";
        document.getElementById('p3').innerHTML = "<strong>JavaScript</strong> interview questions";
      </script>
    </div>

  </body>
</html>
Screenshot:
Output:
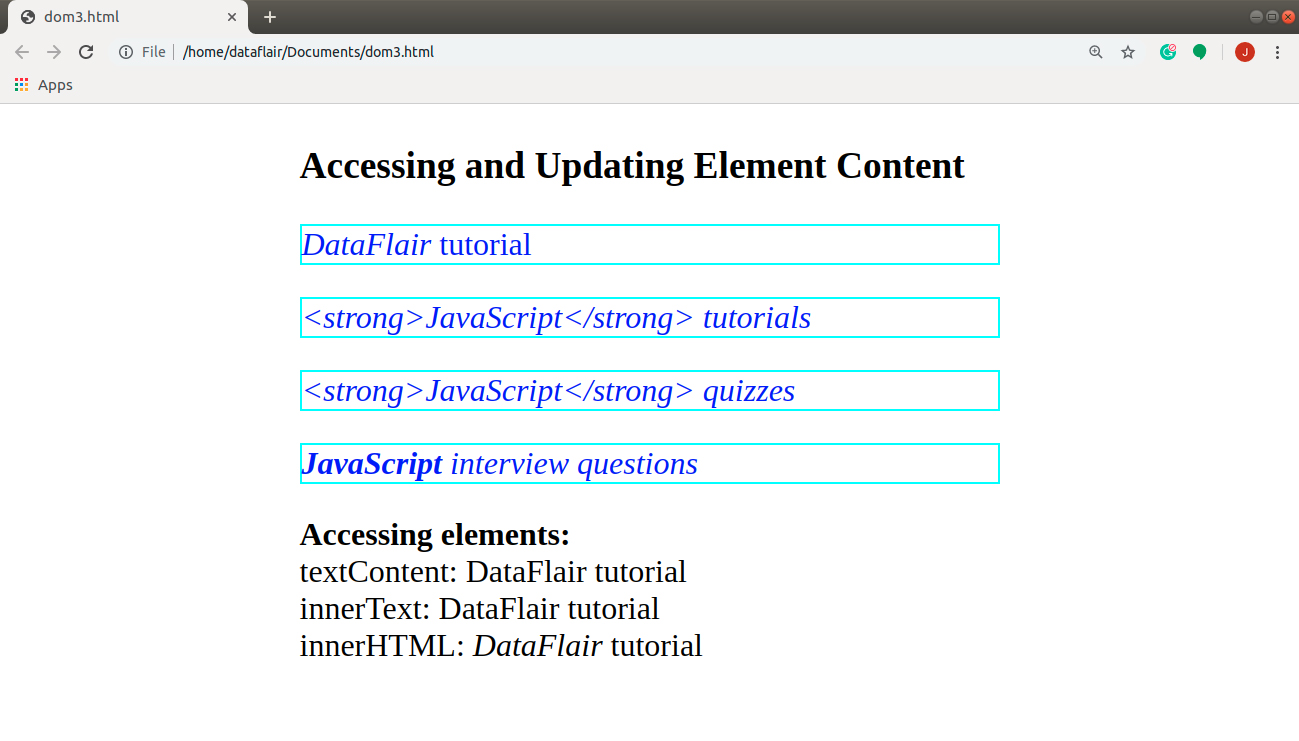
Adding/ removing HTML Content
In the above example, we added an HTML <strong> tag in the page with the help of innerHTML property. To remove any text content, all you need to do is store an empty string in the element.
document.getElementById(‘p3’).innerHTML = “ ”; (empty string)
This will remove the text nodes of the containing and its child elements from the HTML content.
DOM Manipulation
Another technique to add/remove HTML content is DOM Manipulation. To add HTML content to your webpage, you need to follow the three steps discussed below:
- Create a new element using createElement().
- Give it content by creating a text node using createTextNode() and adding it to the element using the appendChild() method.
- Add the element to the DOM tree by finding the location and then using appendChild().
To remove an element from the webpage, the steps are as follows:
- Store the element you want to remove in a variable.
- Store the parent of that element in another variable.
- Remove the element from its containing element using the removeChild() method.
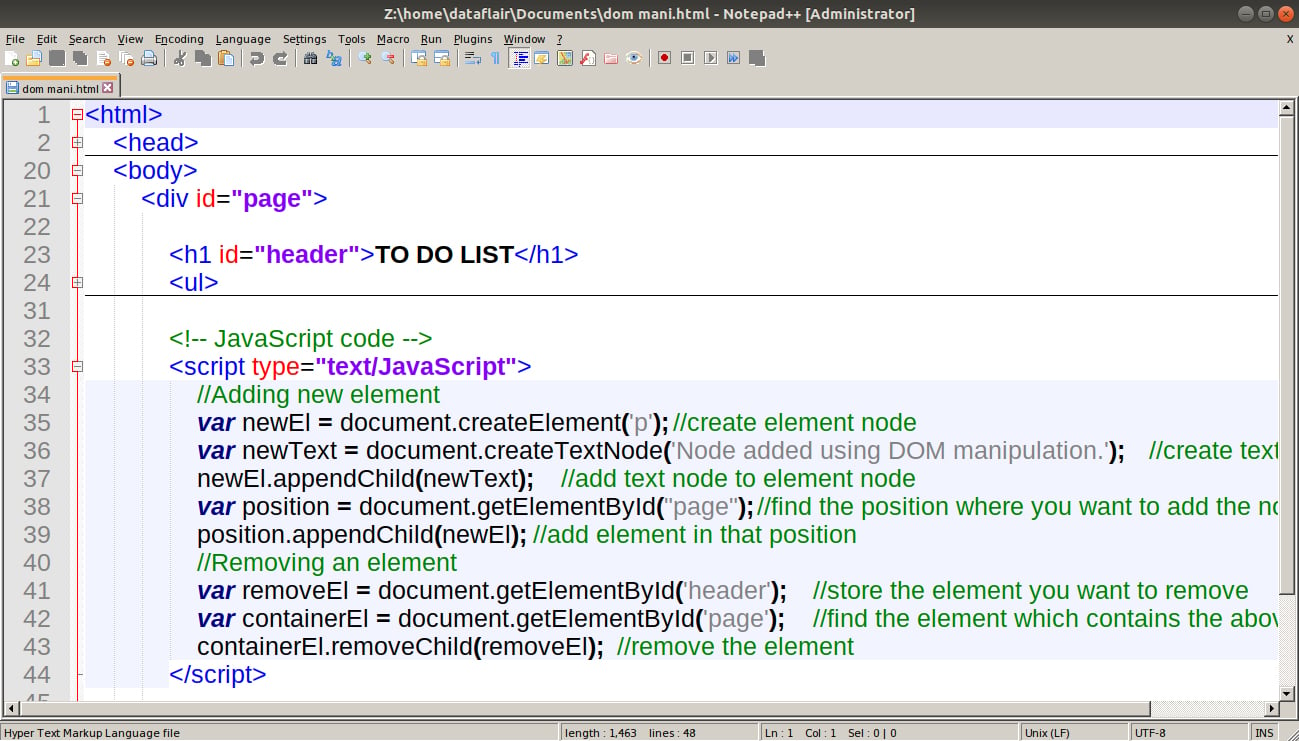
Let’s implement these methods with the help of a code. We will use the same HTML and CSS code we discussed at the beginning of this tutorial. All you need to do is change the JavaScript in your program. In this example, we will add a paragraph <p> tag in the page, and remove the <h1> tag from it.
Code:
<script type="text/JavaScript">
        //Adding new element
        var newEl = document.createElement('p'); //create element node
        var newText = document.createTextNode('Node added using DOM manipulation.'); //create text node
        newEl.appendChild(newText); //add text node to element node
        var position = document.getElementById("page"); //find the position where you want to add the node
        position.appendChild(newEl); //add element in that position
        //Removing an element
        var removeEl = document.getElementById('header'); //store the element you want to remove
        var containerEl = document.getElementById('page'); //find the element which contains the above element
        containerEl.removeChild(removeEl); //remove the element
      </script>
Screenshot:
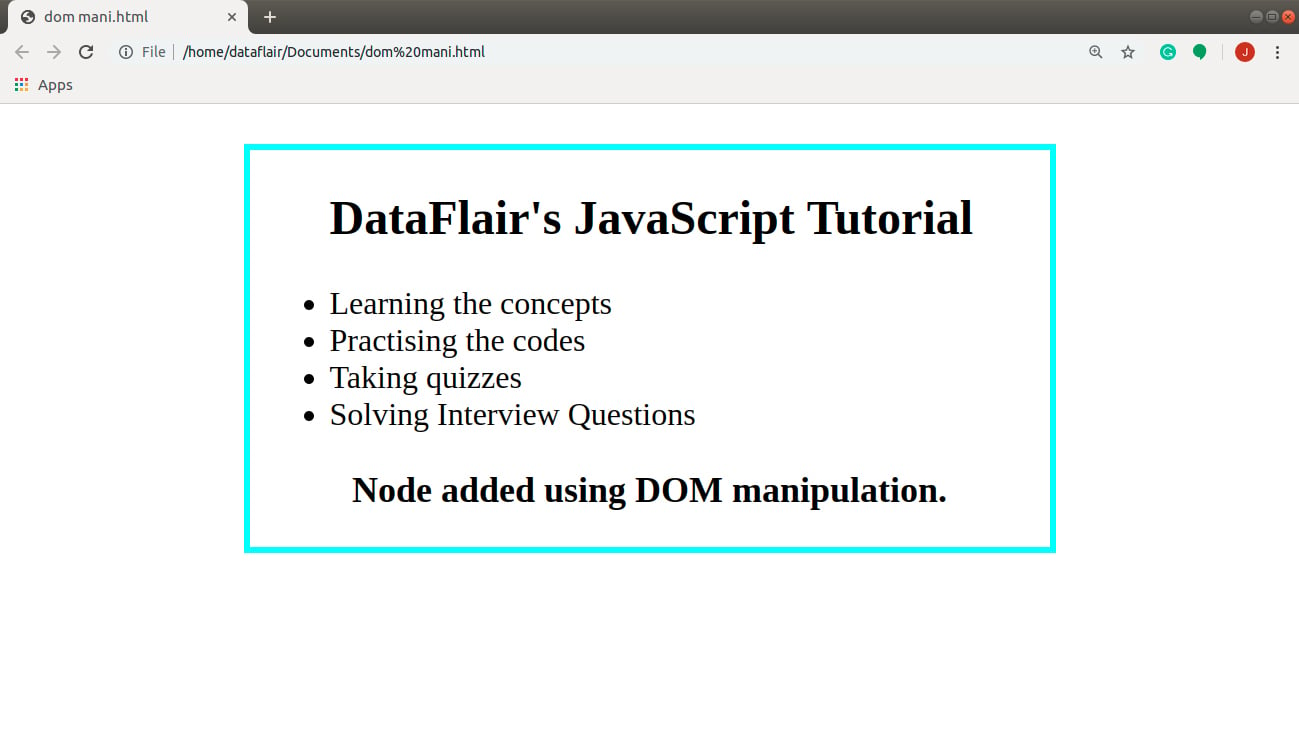
Output:
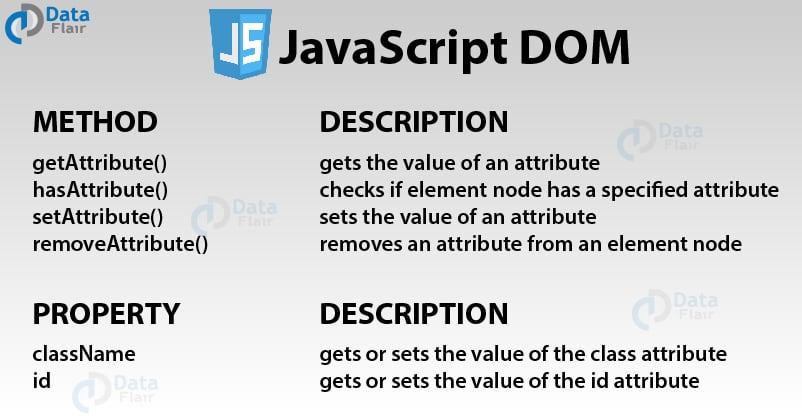
Attribute Nodes in JavaScript DOM
If you have an element, you can easily access its attributes and update them if you wish to. You can do this in two simple steps as shown below:
- Select the element node that carries the attribute you want to access, followed by a period symbol.
- Use one of the methods or properties to work with the attribute.
Summary
Here we come to the end of our article on JavaScript DOM. In this article, we discussed every aspect of the Document Object Model (DOM). We understood how we can access the elements of a DOM tree and how to update them. In the end, we also learned how to add and/or remove an HTML element.
The next tutorial lined up for you – JavaScript Events
Hope you liked our article. Still, having queries? Let us know through the comment section.
Your 15 seconds will encourage us to work even harder
Please share your happy experience on Google


