Steps to Create OLAP Connection in SAP HANA – You can’t Afford to Miss Out!
Job-ready Online Courses: Knowledge Awaits – Click to Access!
After understanding the relational connection in SAP HANA, we will learn about creating OLAP connections in SAP HANA. First, we will understand what is OLAP connection and then learn the process of creating a new OLAP connection in SAP HANA.
Let’s begin with the tutorial.
OLAP Connection in SAP HANA
The OLAP connection connects the user directly to the SAP HANA business layer to fetch data tables and information views for reporting. The business users from various reporting tools can establish a direct connection to the SAP HANA system and access data views and models instantly.
Reporting tools in SAP HANA such as SAP Lumira, SAP Design Studio, Business Explorer, Crystal reports, Analysis for OLAP use OLAP connection to connect to SAP HANA. As OLAP connections are direct connections, there is no need for creating an intermediate universe layer.
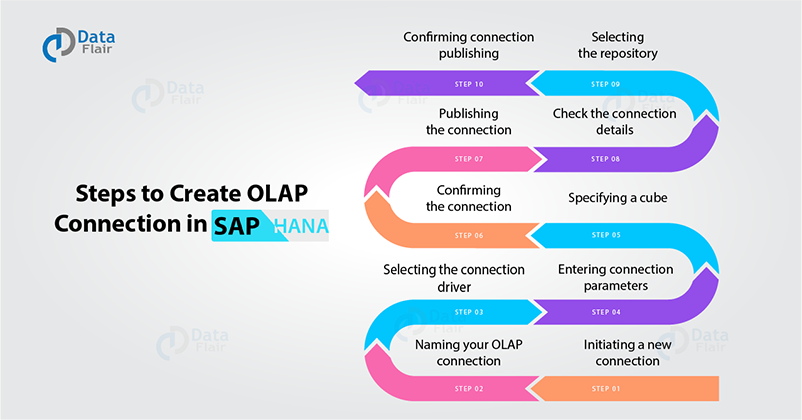
How to Create an OLAP connection in SAP HANA?
In this tutorial, we will learn to create an OLAP connection in SAP HANA using the Information Design Tool (IDT) interface.
Given below are the steps for establishing an OLAP connection:
Step 1: Initiating a new connection
Right-click on the project name. Click on New, then select OLAP Connection.
Step 2: Naming your OLAP connection
Then, enter a name for the connection in Resource Name column. You can also add a description for the connection in the Description box. Click Next> to continue.
Step 3: Selecting the connection driver
Select the connection driver as SAP HANA Client from the list of OLAP drivers. You can also select whether you want the list to be Hierarchical list or a flat list. After that, click Next>.
Step 4: Entering connection parameters
Enter the parameters for the connection. You can select the Authentication mode from three options.
- Specified user name and password
- Business Objects credential mapping
- Single Sign-On
Other columns that you have to fill are are Hostname, Instance Number, User Name, Password, Language, Auto Reconnect, Use SSL and Fetch Size. Then, click Next>.
Step 5: Specifying a cube
You can point at a specific cube to which you want to connect directly, or you can select the “Do not specify a cube in the connection” option.
Select a database cube from the list given below if you are specifying a cube in the connection. Click on Finish once you have made the selection.
Step 6: Confirming the connection
An OLAP connection with extension .cnx will be created. You can see the name of the connection in the Local Project tab under your project name. To confirm a successful connection, you can click on Test Connection. A “Test Successful” message will appear.
Step 7: Check the Connection details
You can also see the connection details on the General Information tab. It will show information regarding the connection such as:
- Network layer value
- Database name
- Catalog
- Cube
- Authentication mode
- Hostname
- Instance Number
- User Name
- Password
- Language
- Auto-Reconnect
- Use SSL
- Fetch size
Step 8: Publishing the connection
Now, we can publish this connection on the BO repository so that users from different reporting tools can use this connection later. To publish a connection, right-click on the connection name from the Local Projects tab and select Publish Connection to a Repository.
Step 9: Selecting the repository
The system will select the session with our connection automatically. If you wish to make any changes, you can edit it.
Select the repository from the list of connections in the next dialog box. Then click on Finish to complete the process.
Step 10: Confirming connection publishing
Then, a prompt will appear saying “The connection was published successfully”, confirming successful publishing of connection into the selected repository.
You can select the secured OLAP connection stored with .cns extension to fetch data tables and information views.
Summary
This concludes our tutorial on OLAP connection in SAP HANA. Here, we learned how to create an OLAP connection using the Information Design Tool. We hope the explanation was helpful.
In the upcoming tutorials, we will learn about the connections of different reporting tools with SAP HANA.
Have any queries related to OLAP Connection in SAP HANA? Feel free to ask in the comments section.
Did you know we work 24x7 to provide you best tutorials
Please encourage us - write a review on Google


