Java Time Converter – The Right Time Converter for Your Needs
Get Job-ready: Java Course with 45+ Real-time Projects! - Learn Java
This project will walk you through the process of creating a time converter using Java. The Java Time Converter allows the user to select a city from a drop-down list and add it to a table that displays the current time and date in that city.
About Java Time Converter
The objective of this project is to create a Time Converter using Java that allows the user to select a city and display the current time and date in that city in a table.
Prerequisites for Time Converter using Java
- Basic knowledge of Java programming
- Familiarity with Java Swing for creating GUI applications
Download Java Time Converter Project
Please download the source code of Java Time Converter project from the following link: Java Time Converter Project Code
Steps to Create Time Converter using Java
Following are the steps for developing the Java Time Converter project:
Step 1: Start by importing the necessary packages for the project at the top of the file.
These include:
- java.awt and its subpackages for creating the GUI layout and components.
- java.awt.event for handling events such as button clicks.
- java.time for working with date and time information.
- javax.swing for creating swing components such as JComboBox and JTable.
package com.training.DataFlair;
import java.awt.BorderLayout;
import java.awt.FlowLayout;
import java.awt.event.ActionEvent;
import java.awt.event.ActionListener;
import java.time.LocalDateTime;
import java.time.ZoneId;
import java.time.format.DateTimeFormatter;
import java.util.HashMap;
import java.util.Map;
import java.util.TimeZone;
import java.util.Timer;
import java.util.TimerTask;
import javax.swing.JButton;
import javax.swing.JComboBox;
import javax.swing.JFrame;
import javax.swing.JPanel;
import javax.swing.JScrollPane;
import javax.swing.JTable;
import javax.swing.table.DefaultTableModel;
Step 2: Creating the TimeConverter class
Next, we will create the TimeConverter class which will extend the JFrame class and implement the ActionListener interface. The ActionListener interface is used to handle the events that occur when the user clicks the “Add City” button.
public class TimeConverter extends JFrame implements ActionListener {
}
Step 3: Initializing the GUI components
In the constructor of the TimeConverter class, we will initialize the GUI components of our project. We set the title of the frame, set the size, and set the default close operation to exit the program when the frame is closed. We also set the layout of the frame to BorderLayout.
  private JComboBox<String> citySelector;
    private Map<String, String> cityTimeLabels;
    private JTable timeTable;
    private DefaultTableModel tableModel;
    private Timer timer;
    private DateTimeFormatter timeFormat;
    private DateTimeFormatter dateFormat;
public TimeConverter() {
    setTitle("Time Converter by DataFlair");
    setSize(400, 300);
    setDefaultCloseOperation(JFrame.EXIT_ON_CLOSE);
    getContentPane().setLayout(new BorderLayout());
    setLocationRelativeTo(null);
Step 4: Creating the top panel
We then create a JPanel called topPanel, set its layout to FlowLayout using topPanel.setLayout(new FlowLayout()), and add a JComboBox and JButton to it. The JComboBox is populated with the available time zones using TimeZone.getAvailableIDs() method, and the JButton is labeled “Add City” and has an action listener added to it using addActionListener(this) method. We add this topPanel to the NORTH of the JFrame using getContentPane().add(topPanel, BorderLayout.NORTH);
JPanel topPanel = new JPanel();
        topPanel.setLayout(new FlowLayout());
        citySelector = new JComboBox(TimeZone.getAvailableIDs());
        JButton addButton = new JButton("Add City");
        addButton.addActionListener(this);
        topPanel.add(citySelector);
        topPanel.add(addButton);
        getContentPane().add(topPanel, BorderLayout.NORTH);
Step 5 : Creating the Table to display the Cities with time
Next, we create a JTable called timeTable, set its model to a DefaultTableModel, create a new instance of it and add columns for “City,” “Time,” and “Date.” using tableModel.addColumn(“City”), tableModel.addColumn(“Time”), tableModel.addColumn(“Date”) methods. We also add a JScrollPane to the table using JScrollPane scrollPane = new JScrollPane(timeTable); to make the table scrollable and add it to the center of the JFrame using getContentPane().add(scrollPane, BorderLayout.CENTER);
tableModel = new DefaultTableModel();

     tableModel.addColumn("City");
     tableModel.addColumn("Time");
     tableModel.addColumn("Date");
     timeTable = new JTable(tableModel);
     timeTable.setShowVerticalLines(false);
     timeTable.setEnabled(false);
     JScrollPane scrollPane = new JScrollPane(timeTable);
     getContentPane().add(scrollPane, BorderLayout.CENTER);
Step 6 :
We then create a Map called cityTimeLabels to keep track of the cities added to the table and their corresponding times using Map<String, String> cityTimeLabels = new HashMap<>();, and create two DateTimeFormatter objects for formatting the time and date using DateTimeFormatter.
cityTimeLabels = new HashMap<>();
timeFormat = DateTimeFormatter.ofPattern("hh:mm:ss a");
dateFormat = DateTimeFormatter.ofPattern("EEE MMM d");
Step 7: Creating the timer to update the time every second
Next, we create a Timer object called timer, and schedule a TimerTask to run every second (1000 milliseconds) using the schedule() method. In this TimerTask, we loop through all the rows in the table and for each row, we get the city name from the first column of the table, use it to get the current time in that city using LocalDateTime.now(ZoneId.of(city)), and update the time and date columns of the table with the current time and date using the setValueAt() method of the DefaultTableModel.
Timer = new Timer();
     timer.schedule(new TimerTask() {
         public void run() {
             for (int i = 0; i < tableModel.getRowCount(); i++) {
                 String city = (String) tableModel.getValueAt(i, 0);
                 LocalDateTime currentTime = LocalDateTime.now(ZoneId.of(city));
                 tableModel.setValueAt(currentTime.format(timeFormat), i, 1);
                 tableModel.setValueAt(currentTime.format(dateFormat), i, 2);

             }
         }
     }, 0, 1000);
 }
Step 8: Creating the logic to add the new city to the table
In the actionPerformed() method, we get the selected item from the JComboBox and check if it is already in the cityTimeLabels map. If it is not, we use LocalDateTime.now(ZoneId.of(selectedCity)) to get the current time in that city, add the city and time to the cityTimeLabels map, and add a new row to the table with the city name, time, and date.
@Override
    public void actionPerformed(ActionEvent e) {
        String selectedCity = (String) citySelector.getSelectedItem();
        if (!cityTimeLabels.containsKey(selectedCity)) {
            LocalDateTime currentTime = LocalDateTime.now(ZoneId.of(selectedCity));

            cityTimeLabels.put(selectedCity, currentTime.format(timeFormat));
            tableModel.addRow(new Object[] { selectedCity, currentTime.format(timeFormat),currentTime.format(dateFormat) });
        }
    }
Step 9 :
Finally, in the main method, we create a new instance of the TimeConverter class and set its visibility to true using the setVisible(true) method to display the JFrame on the screen.
public static void main(String[] args) {
        TimeConverter converter = new TimeConverter();
        converter.setVisible(true);
    }
}
Java Time Converter Output:
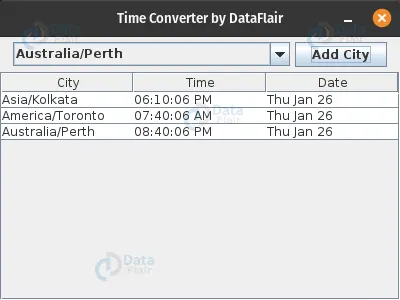
Summary:
We created a Java Swing project called “TimeConverter” that displays the current time of different cities. This project has a JComboBox where a user can select a city and a “Add City” button that adds the selected city’s time to a JTable. The JTable displays the city name, time, and date. We used the LocalDateTime and ZoneId classes of the java.time package to get the current time of the selected city. The Timer class and TimerTask inner class were used to continuously update the time in the JTable every second.
This project uses a BorderLayout and a FlowLayout for the GUI design. The actionPerformed method is implemented to handle the button click event and add the selected city’s time to the JTable.
If you are Happy with DataFlair, do not forget to make us happy with your positive feedback on Google


