In 5 Simple Steps – Establish JDBC Connection in Java
Get Job-ready: Java Course with 45+ Real-time Projects! - Learn Java
In our last tutorial, we discussed Socket Programming in Java. Here, we are going to learn about what a JDBC Connection is in Java. Moreover, we will discuss important details related to Java Database Connectivity. At last, we will see various JDBC connection steps involved in the creation of the connection and many other things.
Establishing the connection between the Database and Java makes the application dynamic. It gives robust power to store the user information and retrieve it when needed by them. If an application has no database to store data, it is of no use because nowadays data is a factor on which almost all industries depend. It is essential to equip the Java application with a database.
So, let us start a JDBC Connection in Java.
In 5 Simple Steps – Establish JDBC Connection in Java
JDBC Connection in Java
JDBC is an acronym for Java Database Connectivity. It’s a headway for ODBC (Open Database Connectivity). JDBC Connection in Java is a standard API specifically created with the specific end goal of moving information from the frontend to the backend. This Java API comprises of classes and interfaces written in Java. It fundamentally goes about as an interface (not the one we use in Java) or channel between your Java program and databases, i.e., a JDBC connection in Java, sets up a connection between the two so that a developer could send information from Java code and store it in the database for later use.
Do you know What is Java Character Class Methods
Why JDBC Connection in Java come into existence?
As previously mentioned, JDBC is a headway for ODBC, which, being platform-dependent, had a ton of downsides. ODBC API was composed in C, C++, Python, and Core Java, and as we are probably aware above dialects (aside from Java and some piece of Python) are platform-dependent. Accordingly, to reduce reliance, a JDBC connection in Java was created by a database merchant, which consisted of classes and interfaces written in Java.
How to Connect a Java Program and a Database
Here are the following steps for JDBC Connection in Java between the Java program & Database
Let’s Explore Types of Inner Classes in Java
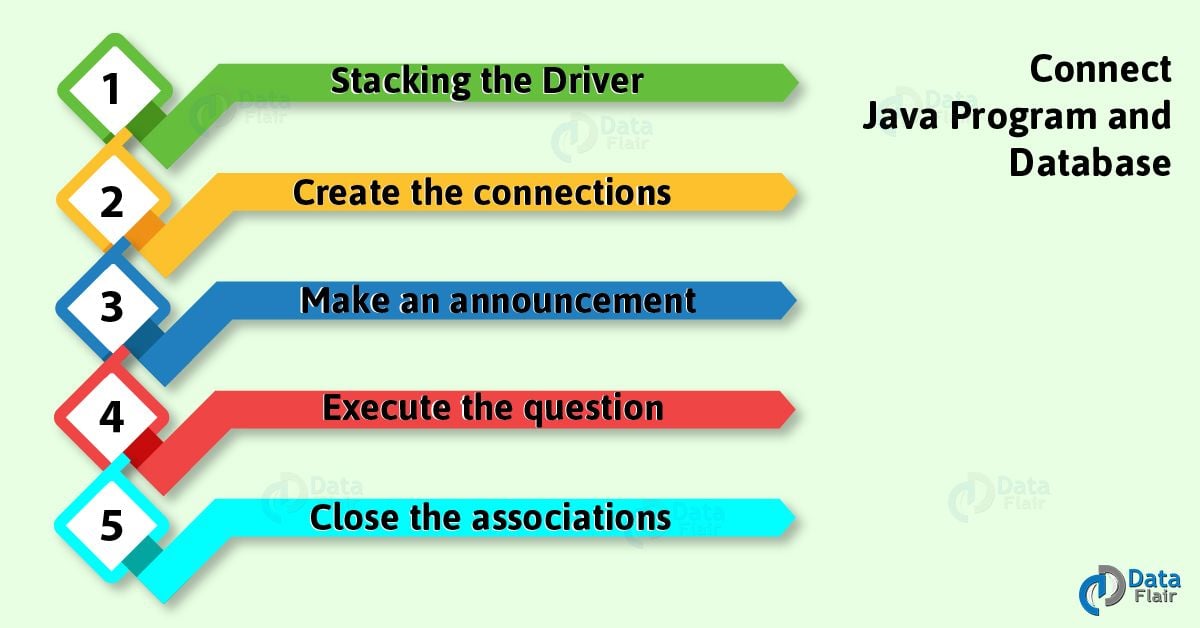
Establish JDBC Connection Between Java Program and Database
a. Stacking the Driver
Stacking the driver is the first step of JDBC Connection in Java. In any case, you first need to install the driver or install it before utilizing it in the program. Enlistment is to be done once in your program. You can enroll a driver in one of two courses specified below:
- forName(): Here we stack the driver’s class record into memory at runtime. No need to utilize new or formation of question. The accompanying illustration utilizes Class.forName() to stack the Oracle driver –
Class.forName(“oracle.jdbc.driver.OracleDriver”);
- registerDriver(): DriverManager is a Java built-in class with a static part enlist. Here we call the constructor of the driver class at an incorporated time. The accompanying illustration utilizes DriverManager.registerDriver()to enlist the Oracle driver –
DriverManager.registerDriver(new oracle.jdbc.driver.OracleDriver())
Read about Java String, Methods, And Constructor – Syntax and Example
b. Create the Connections
After stacking the driver, build up associations utilizing:
Connection con = DriverManager.getConnection(url,user,password)
- user – username from which your SQL summon provoke can get to.
- password – watchword from which your SQL summoner can get to.
- con- is a reference to the Connection interface.
- url- Uniform Resource Locator. It can be made as follows:
String url = ” jdbc:oracle:thin:@localhost:1521:xe”
Where Oracle database is utilized, thin is the driver utilized, @localhost is the IP Address where a database is stored, 1521 is the port number, and xe is the service name. Every one of the 3 parameters above is of String type and is to be announced by the software engineer before calling the capacity. Utilization of this can allude to conclusive code.
c. Make an Announcement
Once an association is built up, you can collaborate with the database. The JDBC Statement, CallableStatement, and PreparedStatement interfaces characterize the strategies that empower you to send SQL statements and get information from your database.
Do you Difference Between Abstract Class and Interface in Java
Utilization of JDBC Statement is as follows:
Statement st = con.createStatement();
Here, coa n is a reference to the Connection interface utilized as a part of past advance.
d. Execute the Question
Presently comes the most imperative part, i.e executing the question. A question here is an SQL Query. Presently, we know we can have numerous sorts of questions. Some of them are as follows:
- Query for refreshing/embeddings table in a database.
- Query for recovering information.
The executeQuery() technique for the Statement interface is used to execute questions of recovering esteems from the database. This strategy restores the protest of ResultSet that can be utilized to get all the records of a table.
The executeUpdate(SQL query) technique of the Statement interface is used to execute queries for refreshing/embeddings.
Let’s revise Java Garbage Collection Algorithm – Mark and Sweep Algorithm
Example:-
int m = st.executeUpdate(sql);
in the event that (m==1)
System.out.println("inserted effectively : "+sql);
else
System.out.println("insertion fizzled");
Here SQL will be a SQL query of the sort
String Close the Associations
So at long last, we have sent the information to the predetermined area, and now we are at the brink of fulfilling our undertaking.
By shutting the association, objects of Statement and ResultSet will shut naturally. The nearby() technique for the Connection interface is utilized to close the association.
Example –
con.close();
Implementation –
importjava.sql.*;
importjava.util.*;
class Main
{
    public static void main(String a[])
    {
        String url = "jdbc:oracle:thin:@localhost:1521:xe";
        String user = "system";
        String pass = "12345";
        Scanner k = new Scanner(System.in);
        System.out.println("enter name");
        String name = k.next();
        System.out.println("enter roll no");
        int roll = k.nextInt();
        System.out.println("enter class");
        String cls =  k.next();
        String sql = "insert into student1 values('"+name+"',"+roll+",'"+cls+"')";
        Connection con=null;
        try
        {
            DriverManager.registerDriver(new oracle.jdbc.OracleDriver());
            con = DriverManager.getConnection(url,user,pass);
            Statement st = con.createStatement();
            int m = st.executeUpdate(sql);
            if (m == 1)
                System.out.println("inserted successfully : "+sql);
            else
                System.out.println("insertion failed");
            con.close();
        }
        catch(Exception ex)
        {
            System.err.println(ex);
        }
    }
}Conclusion
Hence, in this Java tutorial, we learned what a JDBC Connection in Java is and how to establish a JDBC connection in Java between a Java program and a database with an example program. Furthermore, if you have any queries, feel free to ask in the comments section.
Related Topic: The Island of Isolation in Java with Example
Did you know we work 24x7 to provide you best tutorials
Please encourage us - write a review on Google


