Encapsulation in Java with Realtime Example and its Advantages
Get Job-ready: Java Course with 45+ Real-time Projects! - Learn Java
Encapsulation in Java looks very intimidating as a concept at first. Do not worry, we will take it down easily by breaking it down into simpler topics. Before we dive into the depths of the concept, let us look at a real-life example first.
Imagine you are traveling to your favorite getaway place. Let’s say the mountains or the beach. So you book your tickets and share photos of them throughout your social media accounts, announcing your vacations. But whenever traveling comes to mind, there is one specific thing we all do. Pack.
We arrange all the clothes we think we might need and carefully place them inside a bag or a trolley. This concept of wrapping up the required stuff to prevent other people from using it is Encapsulation.
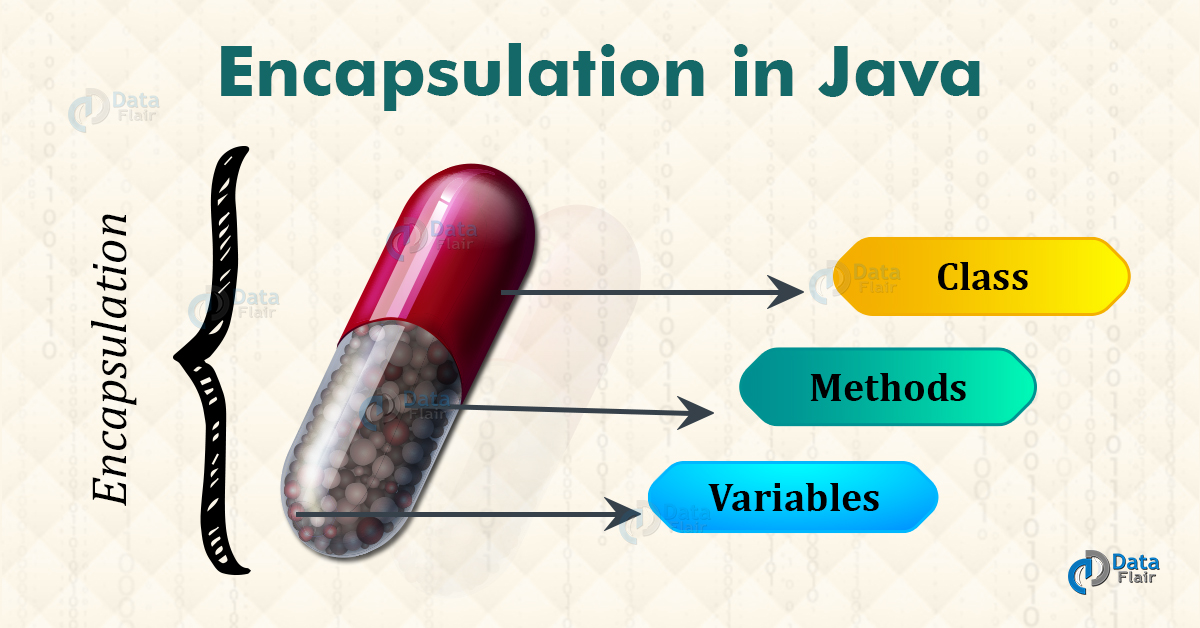
Encapsulation in Java
Encapsulation means the ‘encapsulating’ or ‘wrapping up’ of data. Encapsulation is holding the data in a single unit. The best example of encapsulation is a class itself, because a class packs up the methods and variables inside it.
When encapsulation is implemented, only the variables inside the class can access it. No class outside the current class can access the variables inside it. This is similar to the fact that no one except you can access the clothes inside your travel bag.
You do remember we learned about access specifiers in Java. One way to implement encapsulation in Java is to use ‘private’ access specifiers on all the variables inside the class so that no other class can access them.
You can also declare a method as abstract and add a private access specifier to limit its access outside the class. This is an example of Encapsulation and Abstraction.
Java program to illustrate the implementation of Encapsulation:
package com.dataflair.encapsulation;
class DataFlair {
  private String course;
  public String getCourse() {
    return course;
  }
  public void setCourse(String s) {
    this.course = s;
  }
}

public class Encapsulation {
  public static void main(String[] args) {
    DataFlair df = new DataFlair();
    df.setCourse("Java");
    System.out.println(df.getCourse());
    //System.out.println(DataFlair.course);
  }
}
Output:
Now, before you proceed further, there are a few things that you have to notice in this program.
- We have commented out one line. That line tries to access the private variable outside the main class. Hence, if you uncomment that, you will see that the compiler returns an error.
- The access of the methods is intentionally set to “public” for the class Encapsulation to be able to access them. Change the access specifier to private, and you will see that the compiler returns an error of inaccessibility.
- This essentially means that you can change the access specifier to private if you want the method calls to be from inside the class only.
Ways to achieve Encapsulation in Java
There are a few ways by which we can achieve encapsulation in Java. Some of them are:
- Declaring the class variables as private so that they are inaccessible from outside the scope of the class.
- Designing getter and setter methods for the class and using them accordingly. The presence of getter and setter methods in a class defines what type of class it is.
Getter & Setter methods
- Data Validation: The setter method is used for validating the data, to determine whether the data passed to the method satisfies the situation or not, before updating it.
- Authentication: The getter method allows only an authorized entity to fetch the information
Java program to illustrate the implementation of encapsulation by using private variables:
package com.dataflair.encapsulation;
public class TestEncapsulation {
  private String privateVar;
  TestEncapsulation() {
    privateVar = "java";
  }
}
public class PrivateVariables {
  public static void main(String[] args) {
    System.out.println(TestEncapsulation.privateVar);

  }

}
Output
System.out.println(TestEncapsulation.privateVar);
As you can see, the class cannot access the variable from the previous class. This is an example of the private access specifier.
Java program to illustrate the use of getter and setter methods in Java:
package com.dataflair.encapsulation;
class TestEncapsulation {
  private String privateVar;
  TestEncapsulation() {
    privateVar = "java";
  }
  public void getVariable() {
    System.out.println(privateVar);

  }
  public void setVariable(String setvalue) {
    privateVar = setvalue;
  }
}
public class PrivateVariables {
  public static void main(String[] args) {
    TestEncapsulation test = new TestEncapsulation();
    test.setVariable("Python");
    test.getVariable();

    //System.out.println(TestEncapsulation.privateVar);

  }

}
Output
Read-Only Class in Java
A read-only class is a class in which you can access the values of the variables but cannot change them. It is possible to change a class to a read-only class by deleting its setter methods. We will see an example to illustrate the following concept. We will be deleting the setter methods from the above program to render the class “read-only”.
Java program to illustrate the concept of Read-only classes in Java:
package com.dataflair.encapsulation
class DataFlair {
  private String course;
  DataFlair() {
    course = "Java";
  }
  public String getCourse() {
    return course;
  }
  /*
    public String setCourse(String CourseString)
    {
        this.course=CourseString;
    }
    */
}

public class Encapsulation {
  public static void main(String[] args) {
    DataFlair df = new DataFlair();
    System.out.println(df.getCourse());
    //System.out.println(DataFlair.course);
  }
}
Output
Write-only class in Java
Similar to the read-only classes, there can also be write-only classes, i.e, classes that allow you to write to variables but not read them. This essentially means that you can edit a variable, but cannot see it or view its value.
We can make a class write-only by deleting the getter methods from the class definition.
Java program to illustrate the concept of Write-Only classes in Java:
package com.dataflair.encapsulation
class DataFlair {
  private String course;
  DataFlair() {
    course = "Java";
  }
  /*public String getCourse()
    {
        return course;
    }*/
  public void setCourse(String course) {
    this.course = course;
  }

}

public class Encapsulation {
  public static void main(String[] args) {
    DataFlair df = new DataFlair();
    df.setCourse("java");
    System.out.println("You cannot see the value of the variable as there is no getter methods in the class definition");
    //System.out.println(df.getCourse());
    //System.out.println(DataFlair.course);
  }
}
Output
Why do we need Encapsulation in Java?
Encapsulation finds a ton of usage in everyday programming. Some of the very frequent uses are as follows:
- Encapsulation makes programming flexible. This essentially means that you can edit and update code according to new specifications.
- It helps you in achieving loose coupling.
- Encapsulation makes the application simple and easy to debug.
- You can change and make edits to your codebase without disrupting the normal functioning of your program.
- Allows the programmer to control the data accessibility of a class.
Real-life example of Java Encapsulation:
package com.dataflair.encapsulation
class Remote {
  private boolean OnValue;
  Remote() {
    OnValue = false;
  }
  public void changeOnValue() {
    System.out.println("The OnValue of the remote has toggled. Check TV ");
    OnValue = !OnValue;
  }
}
public class TvRemote {
  public static void main(String[] args) {
    Remote remote = new Remote();
    remote.changeOnValue(); //Equivalent to pressing the "Switch On" button on the remote once;
    remote.changeOnValue();
    remote.changeOnValue();
  }

}
Output
The OnValue of the remote has toggled. Check TV
The OnValue of the remote has toggled. Check TV
In this example, even though you can see that the changeOnValue is changing the value of the OnValue of the remote. But you can’t see its actual value. You can only see if the TV is on or off. This is because there are no getter functions for the remote class. Hence, this class is a “Write-Only” class. This is a very important point to consider while understanding encapsulation.
Advantages of Encapsulation in Java
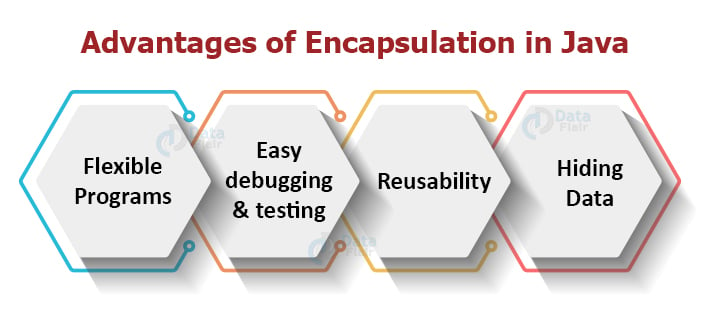
1. Flexible programs: We saw in the previous Java programs how we can implement polymorphism by using getter and setter methods; this method is actually very flexible.
For example, if we want the variables to be read-only, we can delete the setter methods, i.e., delete the “setCourse” method from the example above. Similarly, if you want to make the variables write-only, then you need to delete the getter methods from the example above.
2. Easy debugging and testing: The code, which is encapsulated, is easy to debug and enables unit testing.
3. Reusability: You can reuse the code and implement new requirements in your program.
4. Hiding Data: You can hide the implementation of the program definitions. For example, the user will never be able to know what variables are being stored in the program. They will interact with the getter and setter methods of the program.
Benefits of Encapsulation for Secure Code
Encapsulation plays a vital role in enhancing code security. By restricting direct access to a class’s internal variables using private access specifiers, you safeguard them from unauthorized modification. This approach prevents accidental or malicious code from altering critical data, potentially causing program malfunctions or security vulnerabilities.
Furthermore, by providing controlled access through getter and setter methods, you can implement additional security checks within these methods. For instance, a setter method could validate incoming data before assigning it to a variable, ensuring that only valid values are stored.
Summary
We learned about the various uses and implementations of encapsulation in Java. Encapsulation, paired with Abstraction, becomes a powerful tool to effectively hide data and reduce complexity in the code.
We work very hard to provide you quality material
Could you take 15 seconds and share your happy experience on Google


how is it easy to use a java
Beautiful piece sir.
Can we say
string1. toLowerCase is an example of data encapsulation in Java?
Variables should be private and method should be public..
Kindly change that..
“We can achieve this OOPs feature by declaring all the variables in the class as a public and private method, which will set and get the value of variables.”
In the above mentioned sentence.
Hey Ebinezer Perumala,
Thanx for pointing that. We have updated our article.
Very well explanation