SQL Query – Insert, Select, Update and Delete
Job-ready Online Courses: Click for Success - Start Now!
In this article, we will discuss some of the most important SQL queries – Insert, Select, Update, Delete. Insert, Update, and delete are the data manipulation query, and Select is the data query language. If you are not aware of basic SQL concepts, its recommended to learn what is SQL?
Let’s start our learning!!!
Creating SQL Database
First, we create our table DataFlair_Employee using the create query.
Syntax:
CREATE TABLE tableName(columnName1 datatype,
columnName2 datatype ,
columnName3 datatype,
…….) ;
Query :
CREATE TABLE DataFlair_Employee (
name_emp  varchar(50),
post_emp varchar(50),
email varchar(50),
age int,
salary int
);
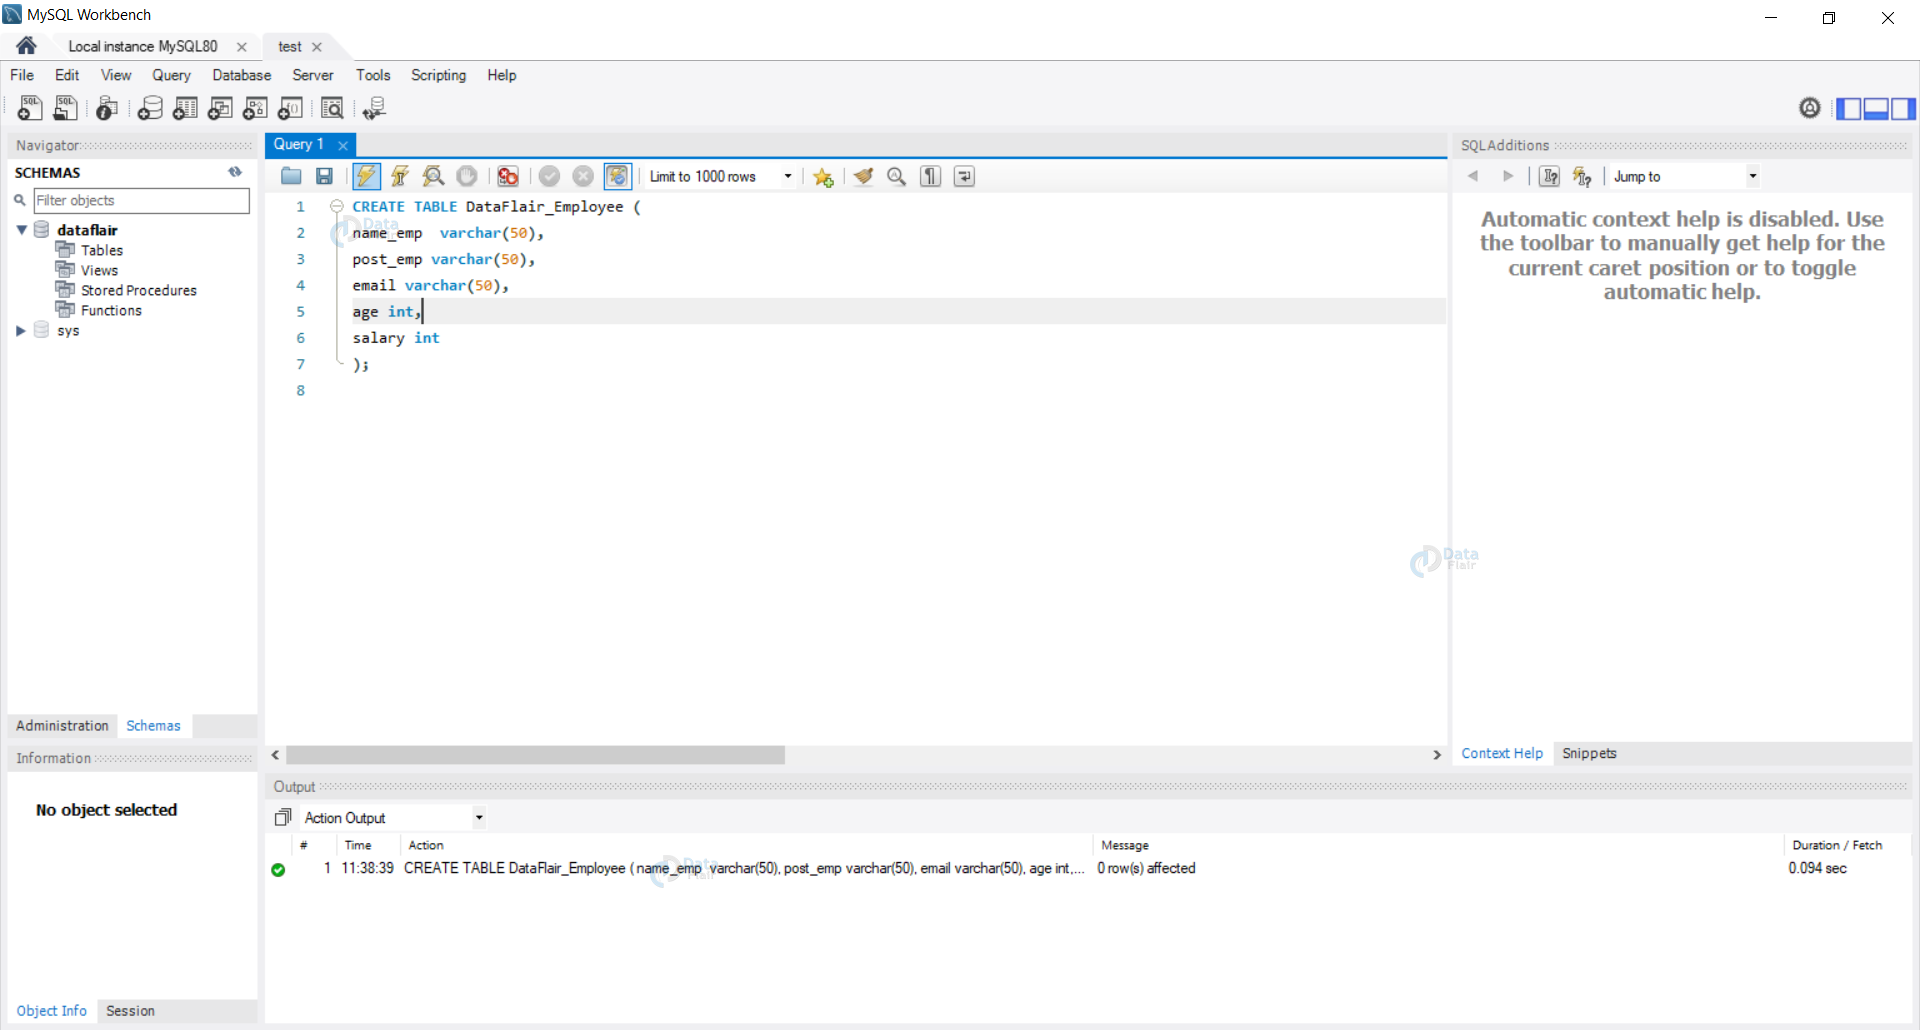
Executing the query, we get DataFlair_Employee table created with five columns namely –
- name_emp
- post_emp
- age
- salary
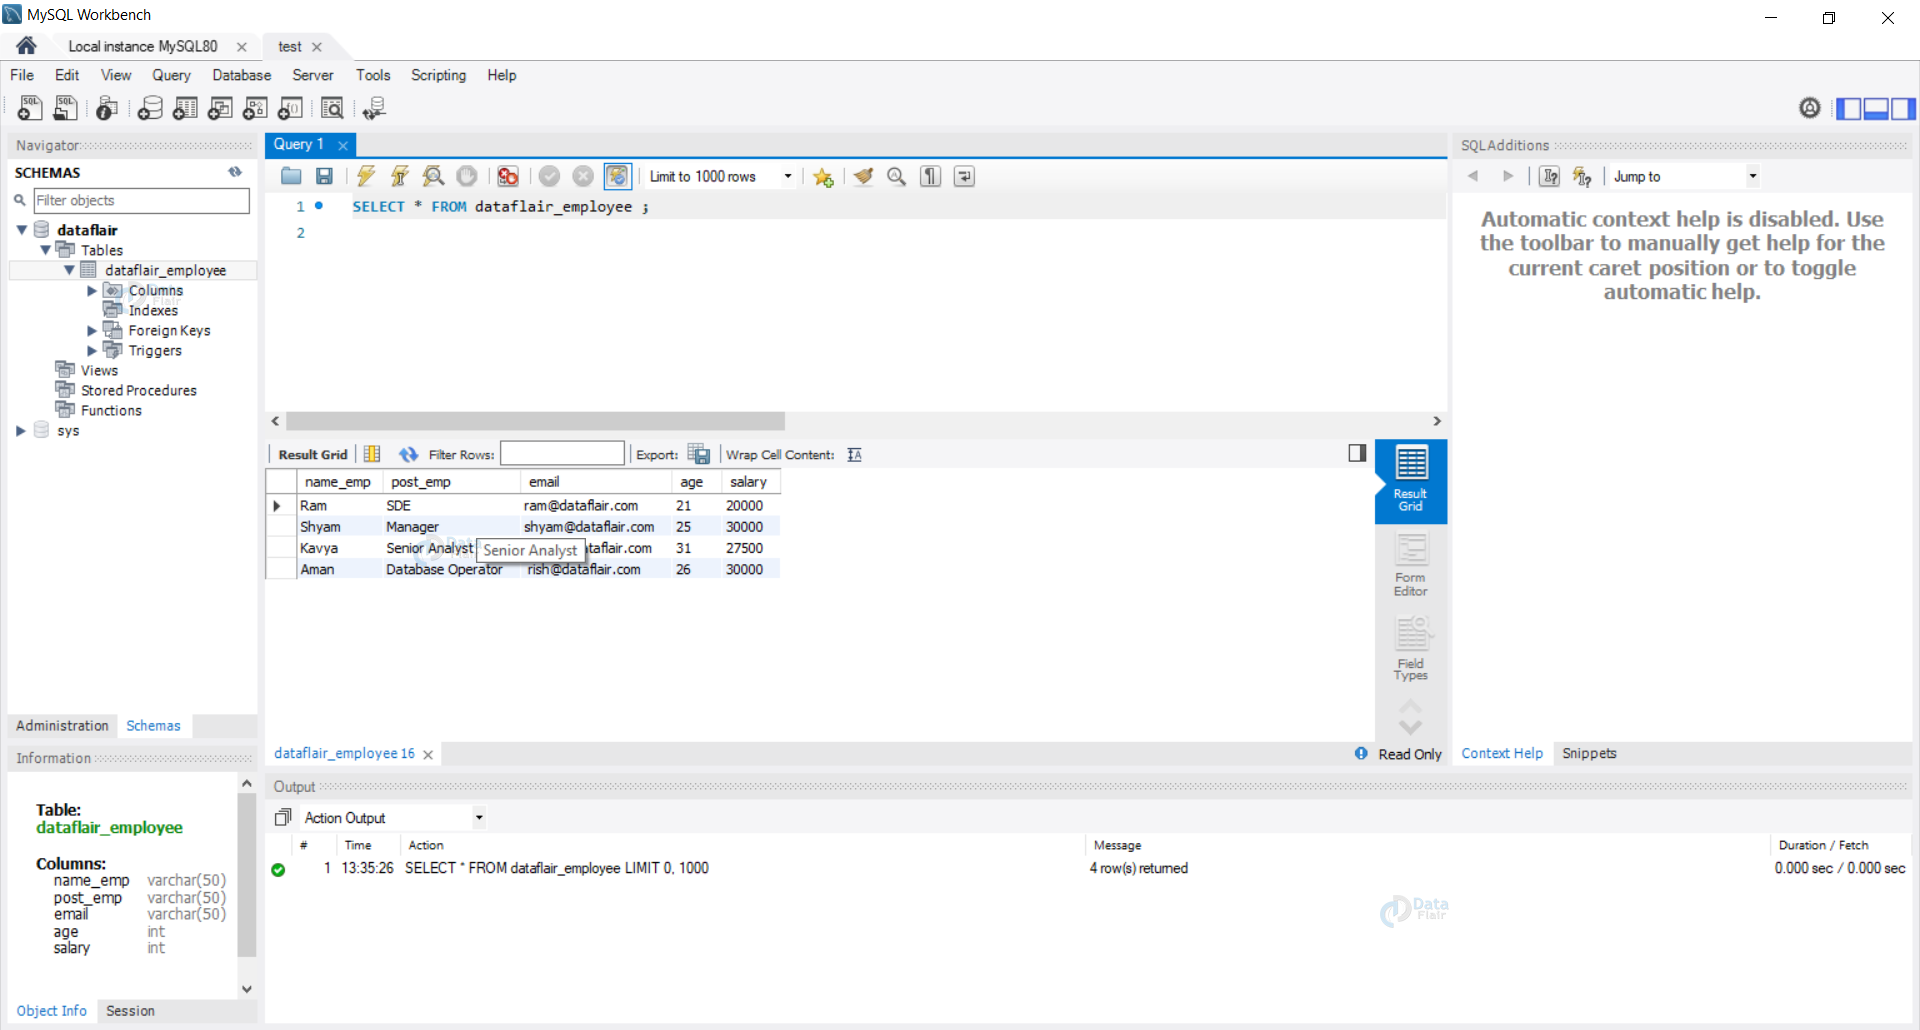
We can view the created table by executing a select query:
SELECT * FROM DataFlair_Employee ;
We can now store our data in the table using the insert query to enter data we obtain.
SQL INSERT Statement
Insert statement is used to create and store new records in our database. We can insert multiple records at once, or we can also insert data into some columns of the database.
Syntax:
INSERT INTO tableName(column1,column2,column3……..) VALUES(value1,value2,value3……) ;
Type 1: Inserting multiple records in our database
Let us insert records of five employees in our database DataFlair_Employee. We can do this by executing an insert query containing data of the five records to be inserted.
Query :
INSERT  INTO DataFlair_Employee (name_emp , post_emp , email , age , salary)
Values ('Ram' ,  "Intern", '[email protected]', 21 , 5000 ),
('Shyam', "Manager", '[email protected]' , 25 , 25000),
('Ria', "Analyst" , '[email protected]', 23 , 21000),
('Kavya', "Senior Analyst" , '[email protected]', 31 , 27500),
('Aman', "Database Operator",' [email protected]' , 26 , 30000) ;

Executing the insert query, five records are inserted in our table DataFlair_Employee.
Type 2: Inserting a single record in the DataFlair_Employee table
Let us insert a single row of data in our database DataFlair_Employee. We can do this by executing an insert query containing a single row of data to be inserted into the database.
Query :
INSERT INTO DataFlair_Employee (name_emp , post_emp , email , age , salary)
Values ('Arun' ,  "Intern", '[email protected]', 19 , 7000 );
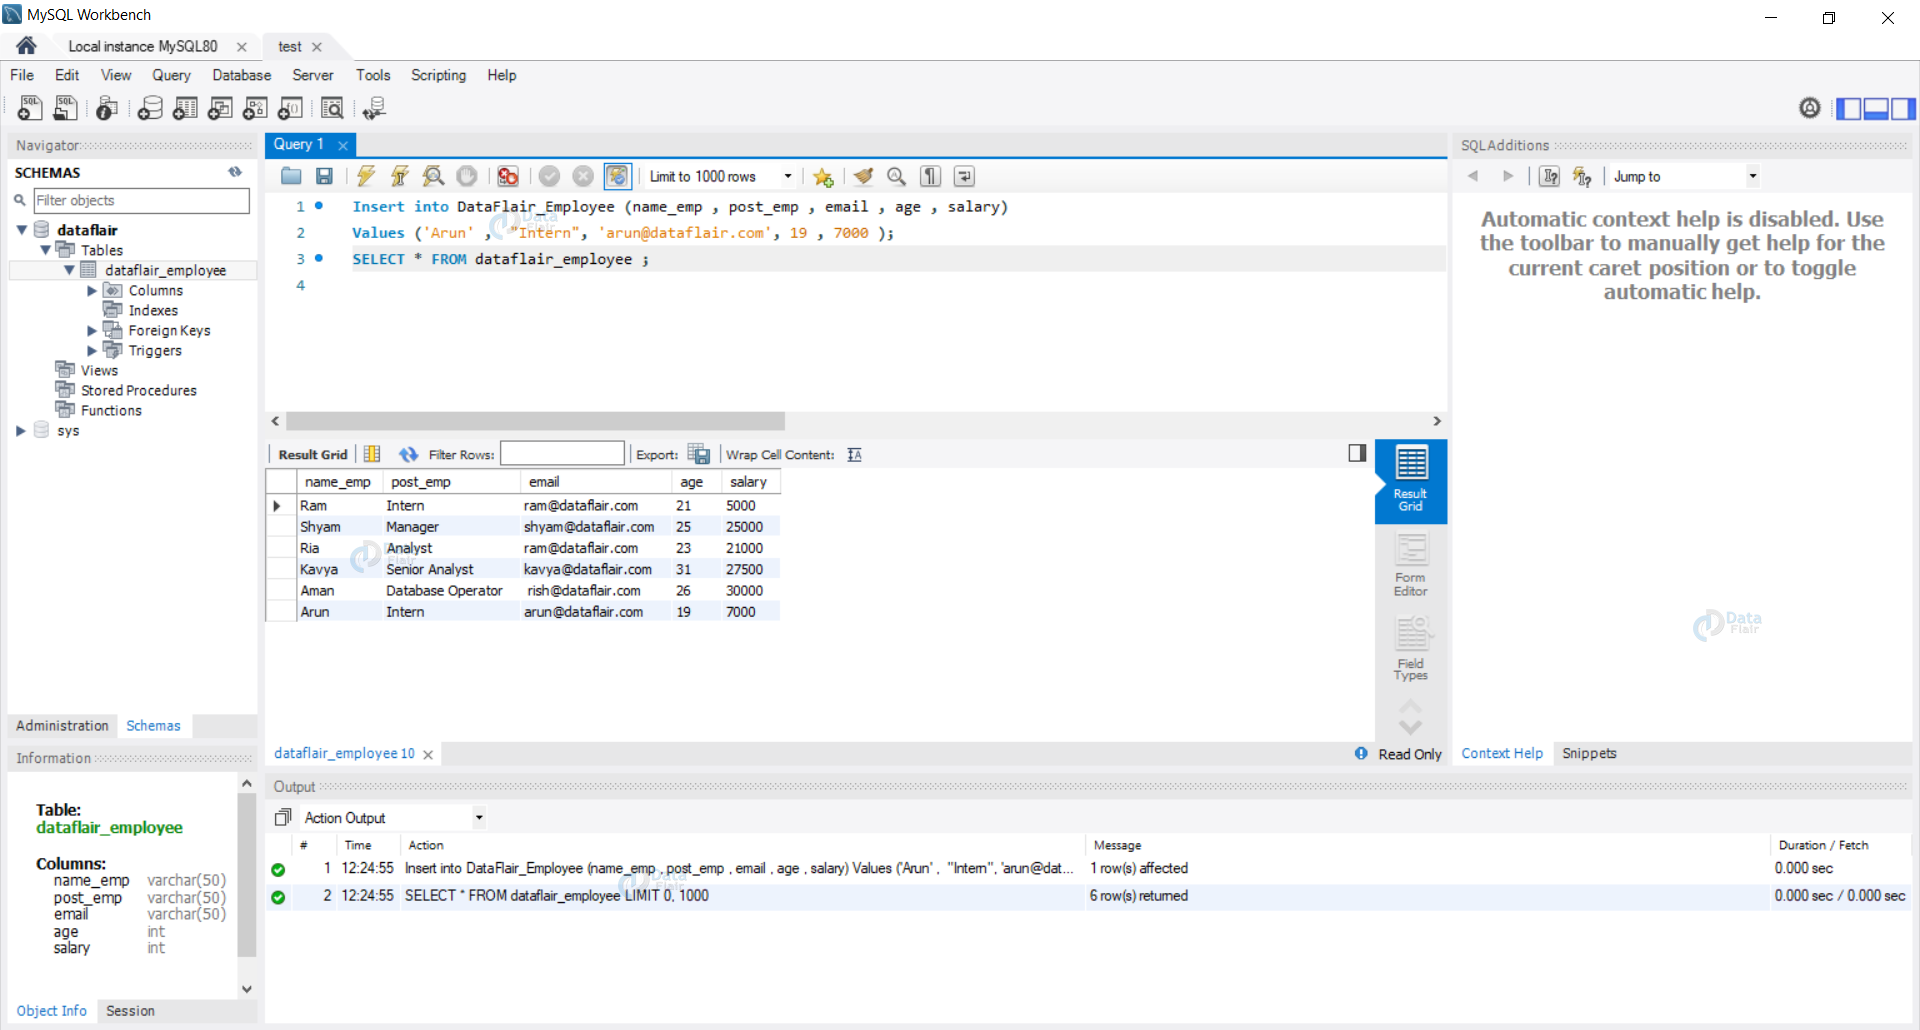
This way, we can insert a single record in our database.
Inserting data in specific columns only :
We have seen how to insert multiple and single records of data, but sometimes we have only some data available in that case, we can insert data into the specific columns.
Syntax :
INSERT INTO tableName (column1,column3) VALUES (value1, value2) ;
Let us assume we have a new intern at DataFlair, and we only know his name, and the position and salary offered to him is known to us by default. To insert this record, we can use the following
Query:
INSERT INTO DataFlair_Employee (
name_emp ,
 post_emp ,
salary)
Values ('Sachin' ,  "Intern", 7000 );
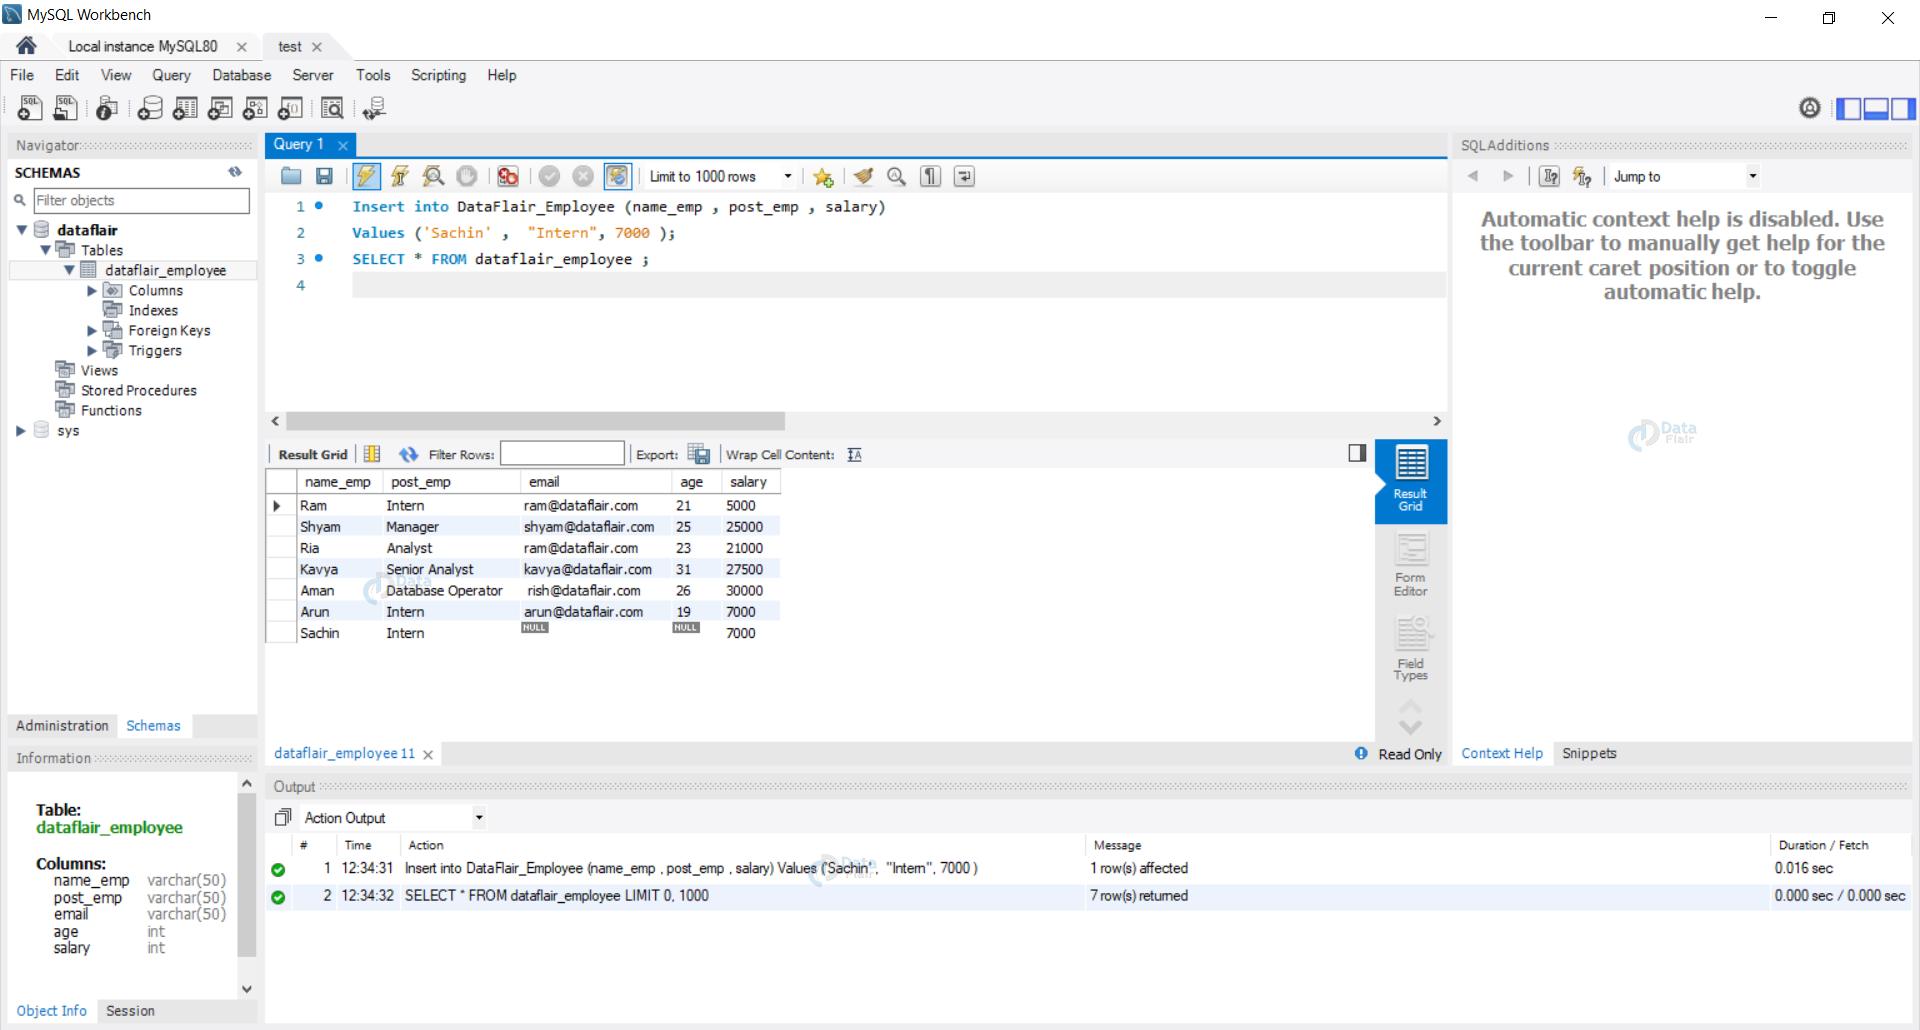
Execution of the query the available data of the intern is stored in the table, and the columns whose data was not available are automatically set to NULL. This feature comes in handy when we have large amounts of data, and some chunks are missing in the data here and there. Also, if there is already data present in different formats like XML then you can insert XML data into SQL tables.
SQL UPDATE Statement
Data stored in a database needs to be changed and updated time and again to maintain the value data holds. The process is made easy by using the UPDATE statement.
With the help of the Update statement, we are able to change and update the data by simply using the conditions required by us or the user.
We use the where clause to specify the condition that we need to follow for the update of the data in the database.
Syntax :
UPDATE tableName SET column1 = value1, column2 = value2,... where condition;
Type 1: Update a single column in the database
Suppose we want to increase the salary of our manager at DataFlair from Rs 25,000 to Rs 30,000 and we need to update the same in our database to avoid any data inconsistency.
We can do this by executing an update query on our database and changing the value of Shyam’s salary to Rs 30,000.
Syntax :
UPDATE tableName SET column1 = value1, column2 = value2,... where condition;
Query:
UPDATE DataFlair_Employee SET salary = 30000 WHERE name_emp = 'Shyam' ;
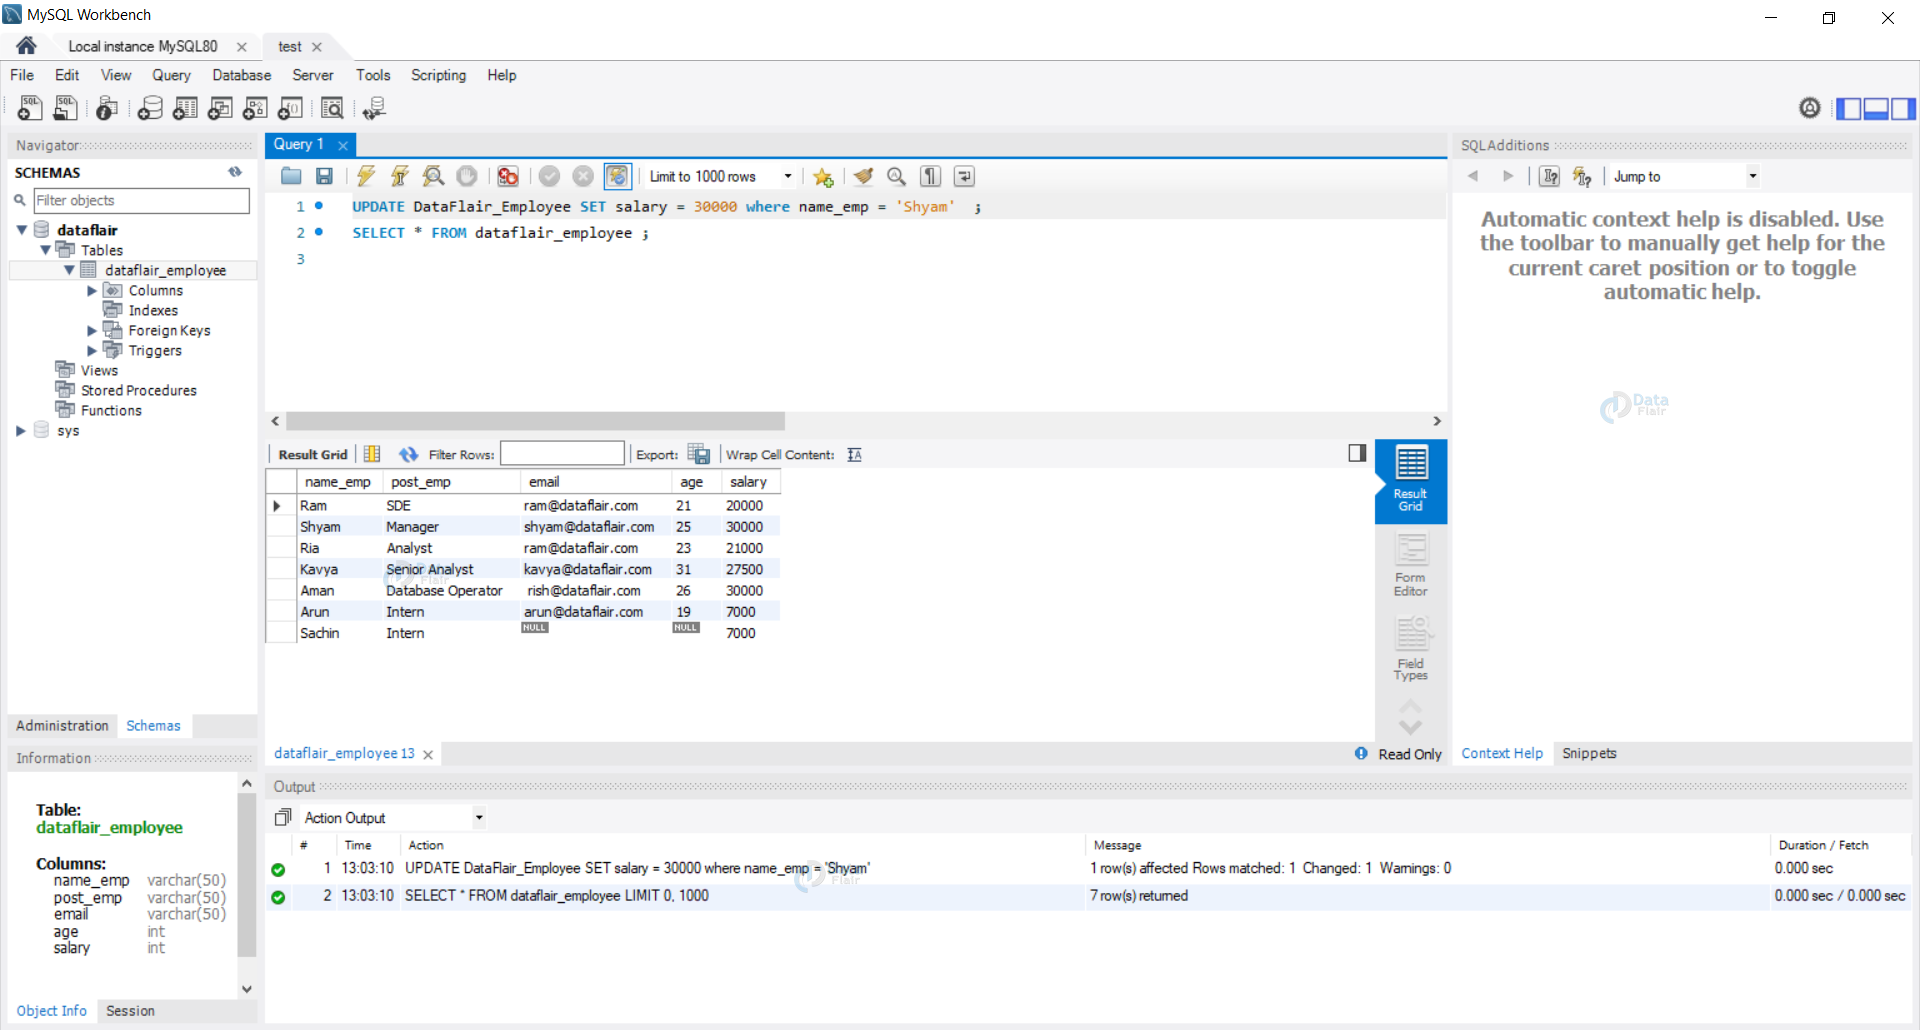
After the update query is executed, we can observe the salary of Shyam has changed to Rs 30,000.
Type 2: Update multiple columns in the database
Suppose Ram, who is an intern at DataFlair, is now promoted to a full-time employee and is offered a role of SDE now we need to update both his position and his salary.
We can do this by executing an Update statement on the database with a condition where the name of the employee should be Ram.
Syntax :
UPDATE tableName SET column1 = value1, column2 = value2,... where condition;
Query:
UPDATE DataFlair_Employee SET salary = 20000 , post_emp = 'SDE' where name_emp = 'Ram' ;
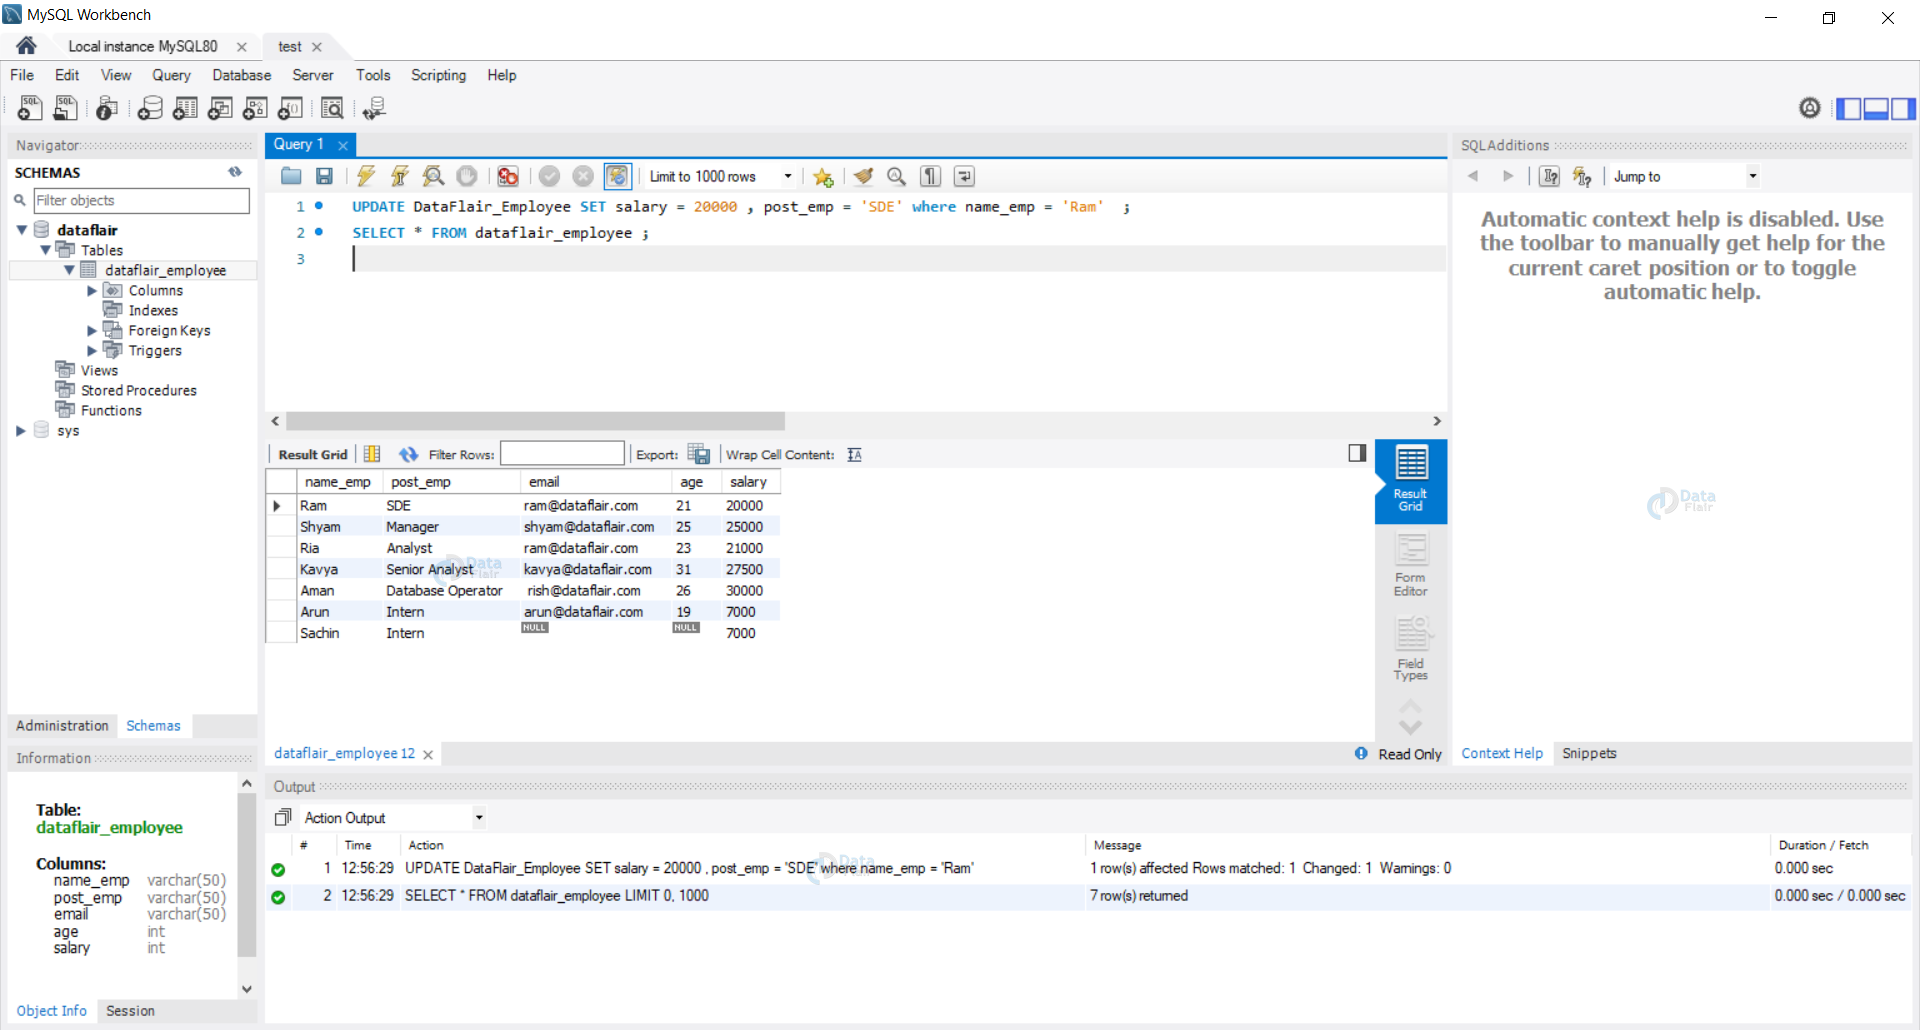
After the execution, we can clearly see Ram has been promoted to the position of SDE, and salary has changed to Rs. 20000.
SQL SELECT Query
Select is a type of DQL statement, i.e. Data Query Statement, it is used to peek into the data before starting any sort of analysis on it.
Select query helps us view whole data stored in data and gives us the power to view data that satisfies the conditions passed in by the user.
Syntax:
ELECT * FROM tableName ;
Type 1: View whole data stored in the table
We can display all the data stored in the table by using the select query.
Syntax:
SELECT * FROM tableName ;
Query:
SELECT * FROM DataFlair_Employee ;

The above query returns us the whole database with all the stored data.
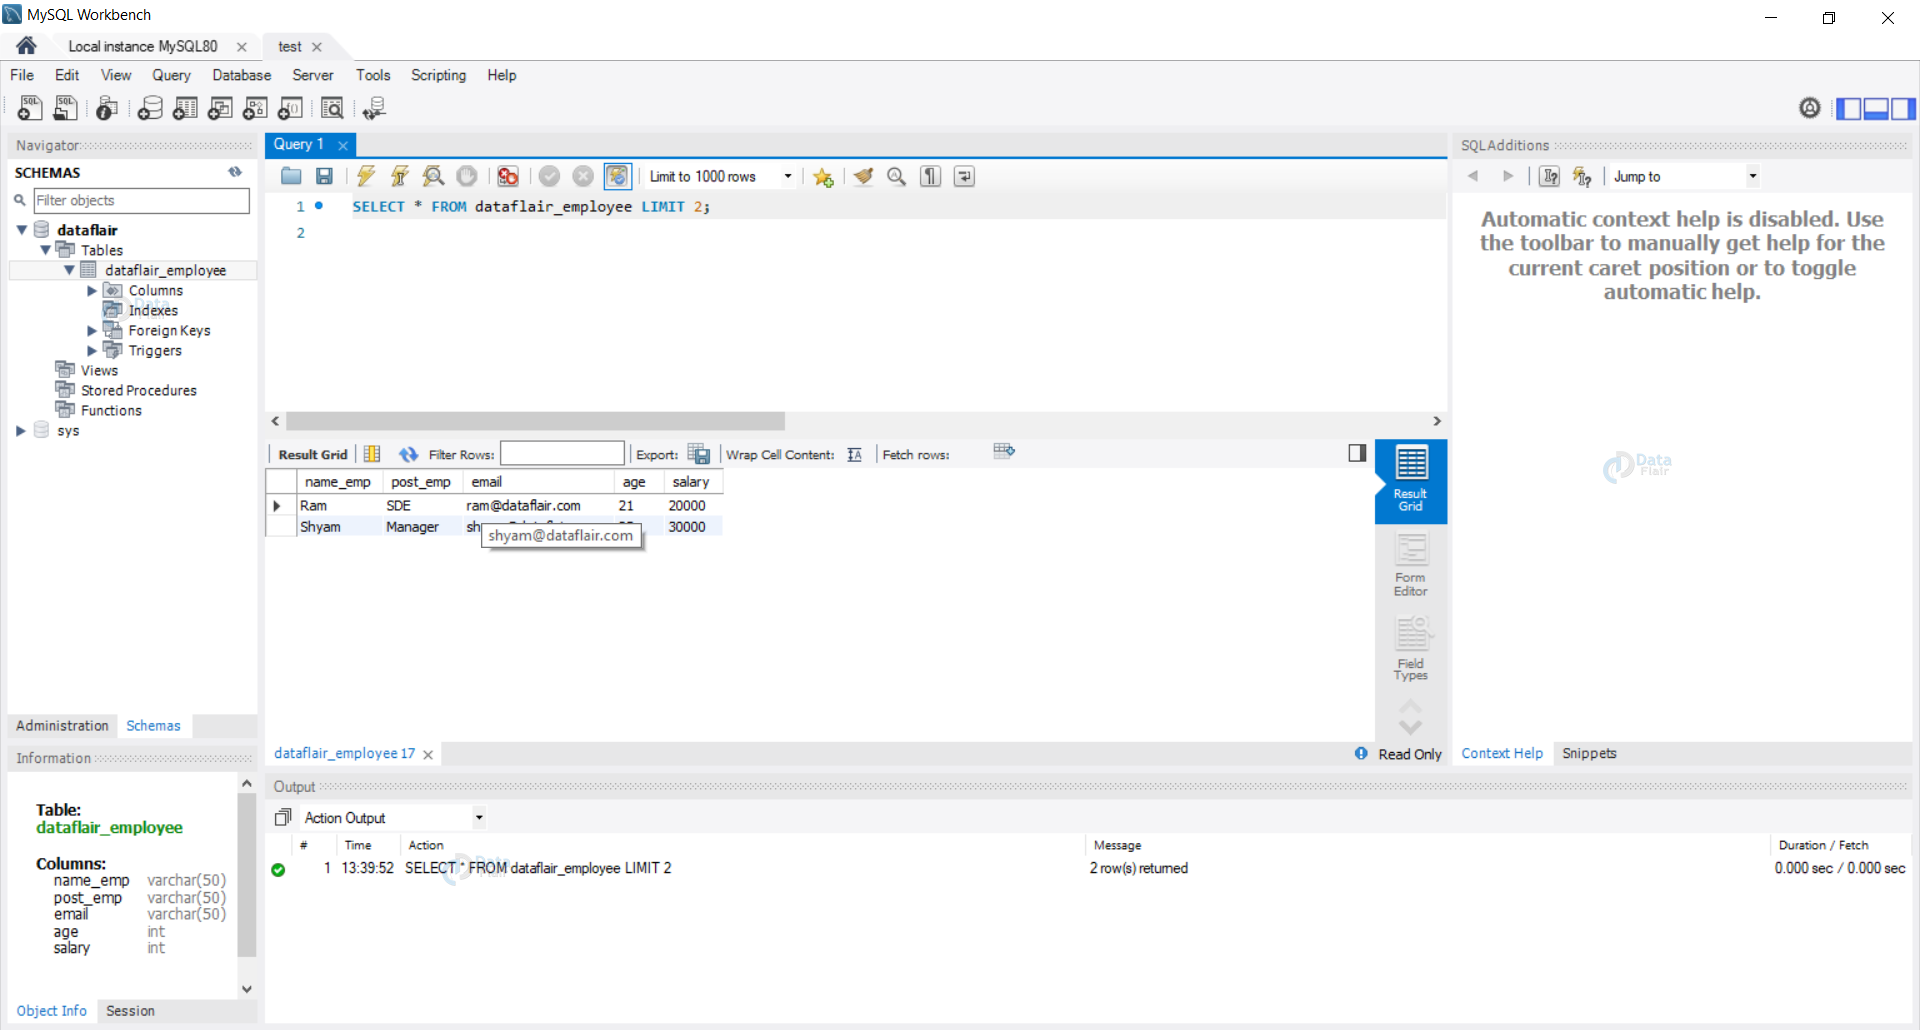
Type 2: View limited data using the LIMIT keyword
Let us view our database only with the first 2 rows of the data; we can do this by executing a Select statement with the LIMIT keyword.
Syntax:
SELECT * FROM tableName LIMIT n ;
Query:
SELECT * FROM dataflair_employee LIMIT 2 ;
Type 3: View data that satisfies conditions entered by the user
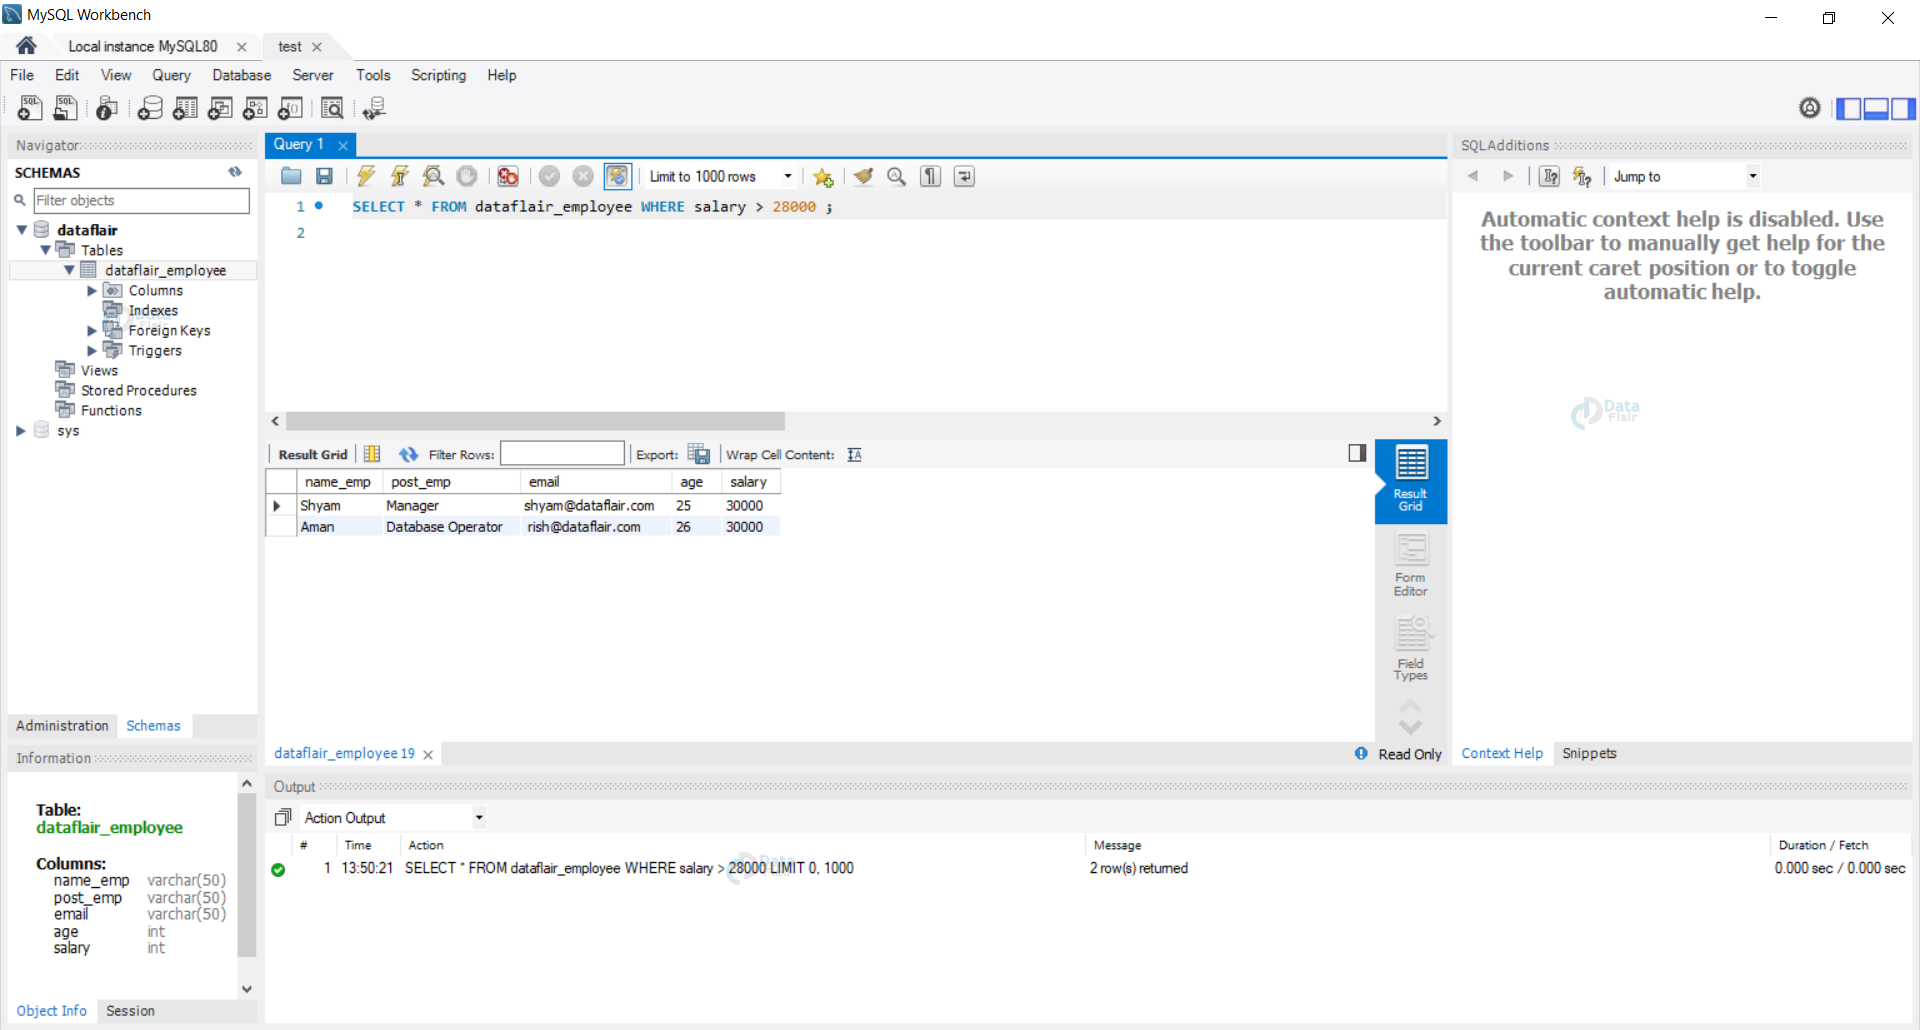
Suppose we want to view the list of employees who earn more than Rs 28,000 per month, to obtain this data we can execute a Select statement with the condition of salary being more than Rs 28,000.
Syntax:
SELECT * FROM tableName WHERE condition;
Query:
SELECT * FROM DataFlair_Employee WHERE salary > 28000 ;
SQL DELETE Query
We need to keep our database useful and efficient at all times, and for that, we need to keep deleting the dead data from the database.
The deletion of data not required by us is very important to keep the database clean. This helps us to get access to the current data without any filtering at the time of analysis of data stored.
Syntax :
DELETE FROM table_name WHERE condition;
Type 1: Delete a single column from the database
Suppose an employee by the name Ria quits her job at DataFlair, so we need to delete her record from our database.
We can do so by executing a delete query that deletes the column containing the data of Ria. This can be done by passing in the condition in where clause.
Syntax :
DELETE FROM table_name WHERE condition;
Query:
DELETE FROM DataFlair_Employee WHERE name_emp = 'Ria';

We can observe that after executing the delete query we no longer have an employee by the name Ria in our DataFlair_Employee database.
Type 2: Delete multiple columns from the database
Let us assume that the interns at DataFlair have completed their tenure and have left DataFlair with a great learning experience, but we need to keep our database updated no matter what.
So we need to delete the records of interns from our database DataFlair_Employee. We can do this by executing a delete query that deletes all the records corresponding to interns.
Syntax:
DELETE FROM table_name WHERE condition;
Query:
DELETE FROM DataFlair_Employee WHERE post_emp = 'Intern';
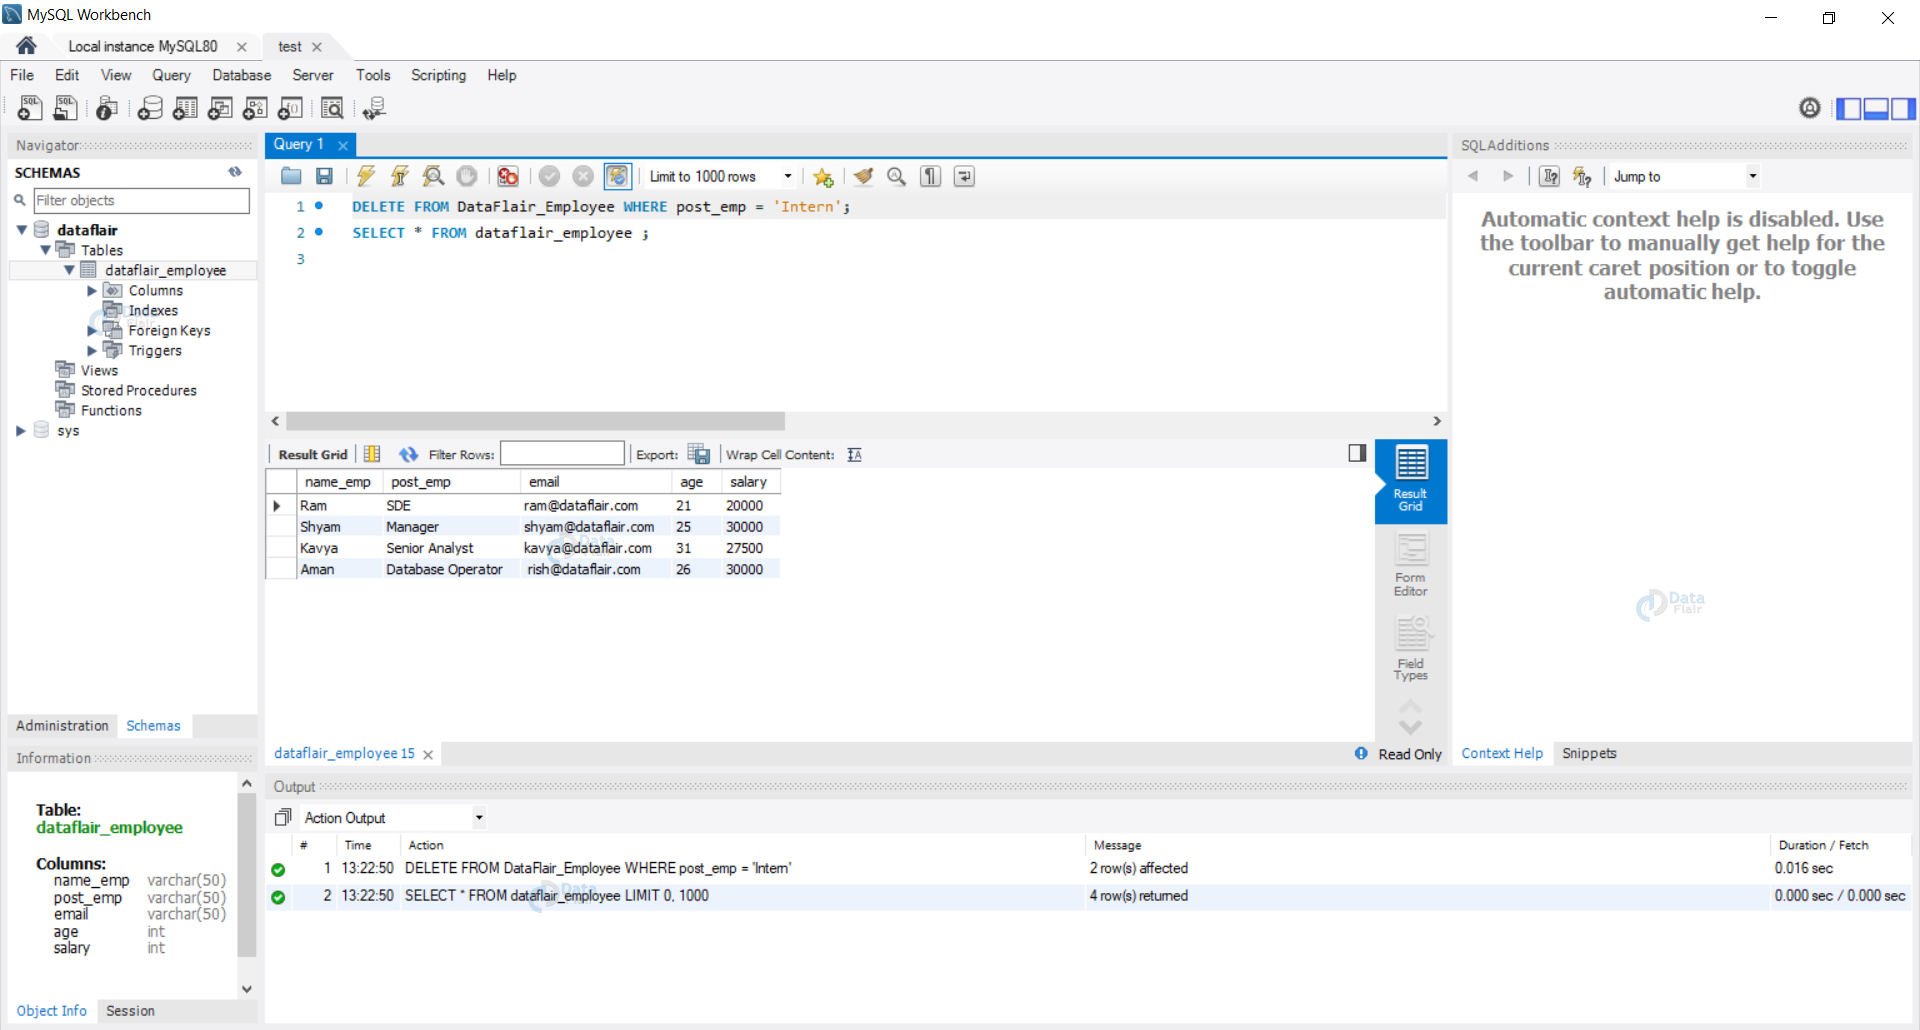
We can observe after the execution of the delete query all the records of the interns are removed from the database.
Type 3: Delete the table
We want to delete the whole table, and to do so, we need to execute a Delete query. It deletes all the data stored in the table, but the table attributes and the indexes remain intact.
Syntax :
DELETE FROM table_name;
Query:
DELETE FROM DataFlair_Employee;
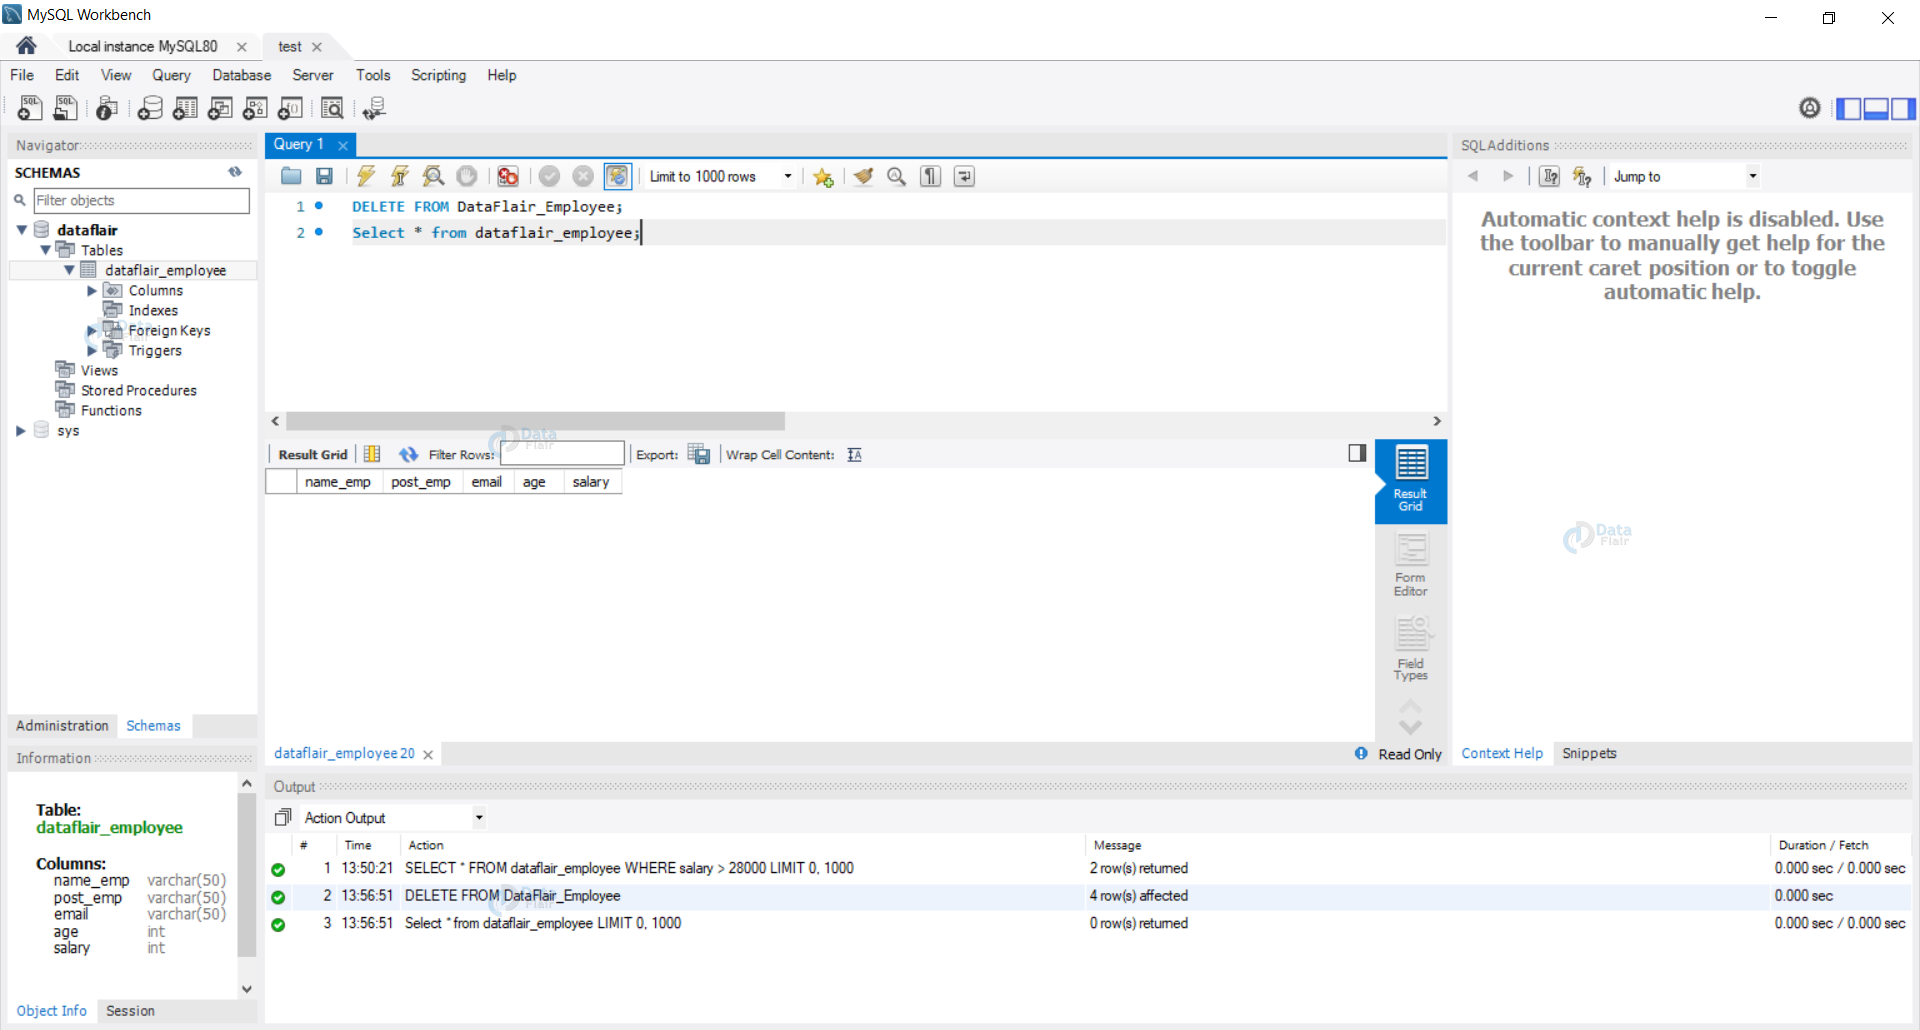
We can observe that the details or the data stored in the table are deleted, but the table attributes, i.e. the columns and the attributes, remain intact.
Summary
Finally, We have studied and analyzed the SQL statements Insert, Update, Delete, and Select with examples. While executing the delete query, we should take care that we always include a Where clause. It specifies the condition of the data to be deleted, else all the data stored in the table will be deleted.
We have learned how to output data according to the requirements of the user by using conditions in the Select statement.
Your 15 seconds will encourage us to work even harder
Please share your happy experience on Google


