Check Constraint in SQL | Default Constraint in SQL
Job-ready Online Courses: Knowledge Awaits – Click to Access!
In this tutorial, we will learn about what are constraints and why do we need them for our databases.
When we try to understand more about the constraints we see that they are just small inhibitors that help us maintain our database.
With the various constraints, we can maintain the data in our database. In this tutorial, we will try to understand all the use cases of the constraints and then the syntax and the examples of each of them.
Two of the popular constraints being Check and Default. Let us now dive deep into the world of constraints.
What are Constraints in SQL?
Constraints are the rules and qualifying standards we apply on our database columns. They help us to maintain the integrity of our data and help us to scan the data at the time we insert it in our records.
In SQL, we have two important constraints:
- Check Constraint
- Default Constraint
These both need to be applied when we create the table and are explicitly written with the CREATE query. Let us now understand each of these in detail.
What is Check Constraint in SQL?
Check constraint is explicitly put by the user while creating the table or is introduced when the table is being altered.
It can be applied to one single attribute or can be applied to the whole table. It helps us ensure that the value we are inserting in our database satisfies the required condition.
Syntax to create a Check Constraint:
CREATE TABLE tableName (
col1 datatype,
col2  datatype,
col3 datatype CHECK(expression),
……..
);
What is a Default Constraint in SQL?
The default constraint is used to set the value of the attributes in case no value is passed while insertion is taking place in the database.
This ensures that ambiguity does not arise in the stored data and the stored data remains meaningful. By the use of default constraints, we save the costs of cleaning and processing data before analysis.
Syntax of Default Constraint Creation:
CREATE TABLE Persons (
col1 datatype,
col2 datatype DEFAULT value,
col3 datatype,
…...
);
Uses of Constraints
Some of the uses of constraints in SQL are as follows:
- Helps to maintain data integrity and usability.
- Prevents ambiguities that would have arisen otherwise.
- Makes the data stored more informative and easy for analysis.
- Makes it easier to draw insights from the data.
Steps for a Default Constraint
We have two major steps when we talk about the default constraint:
1. Creation of Default Constraint with Create Query or the Alter Query
- Using the Create Query
Syntax:
CREATE TABLE Persons (
col1 datatype,
col2 datatype DEFAULT value,
col3 datatype,
…...
);
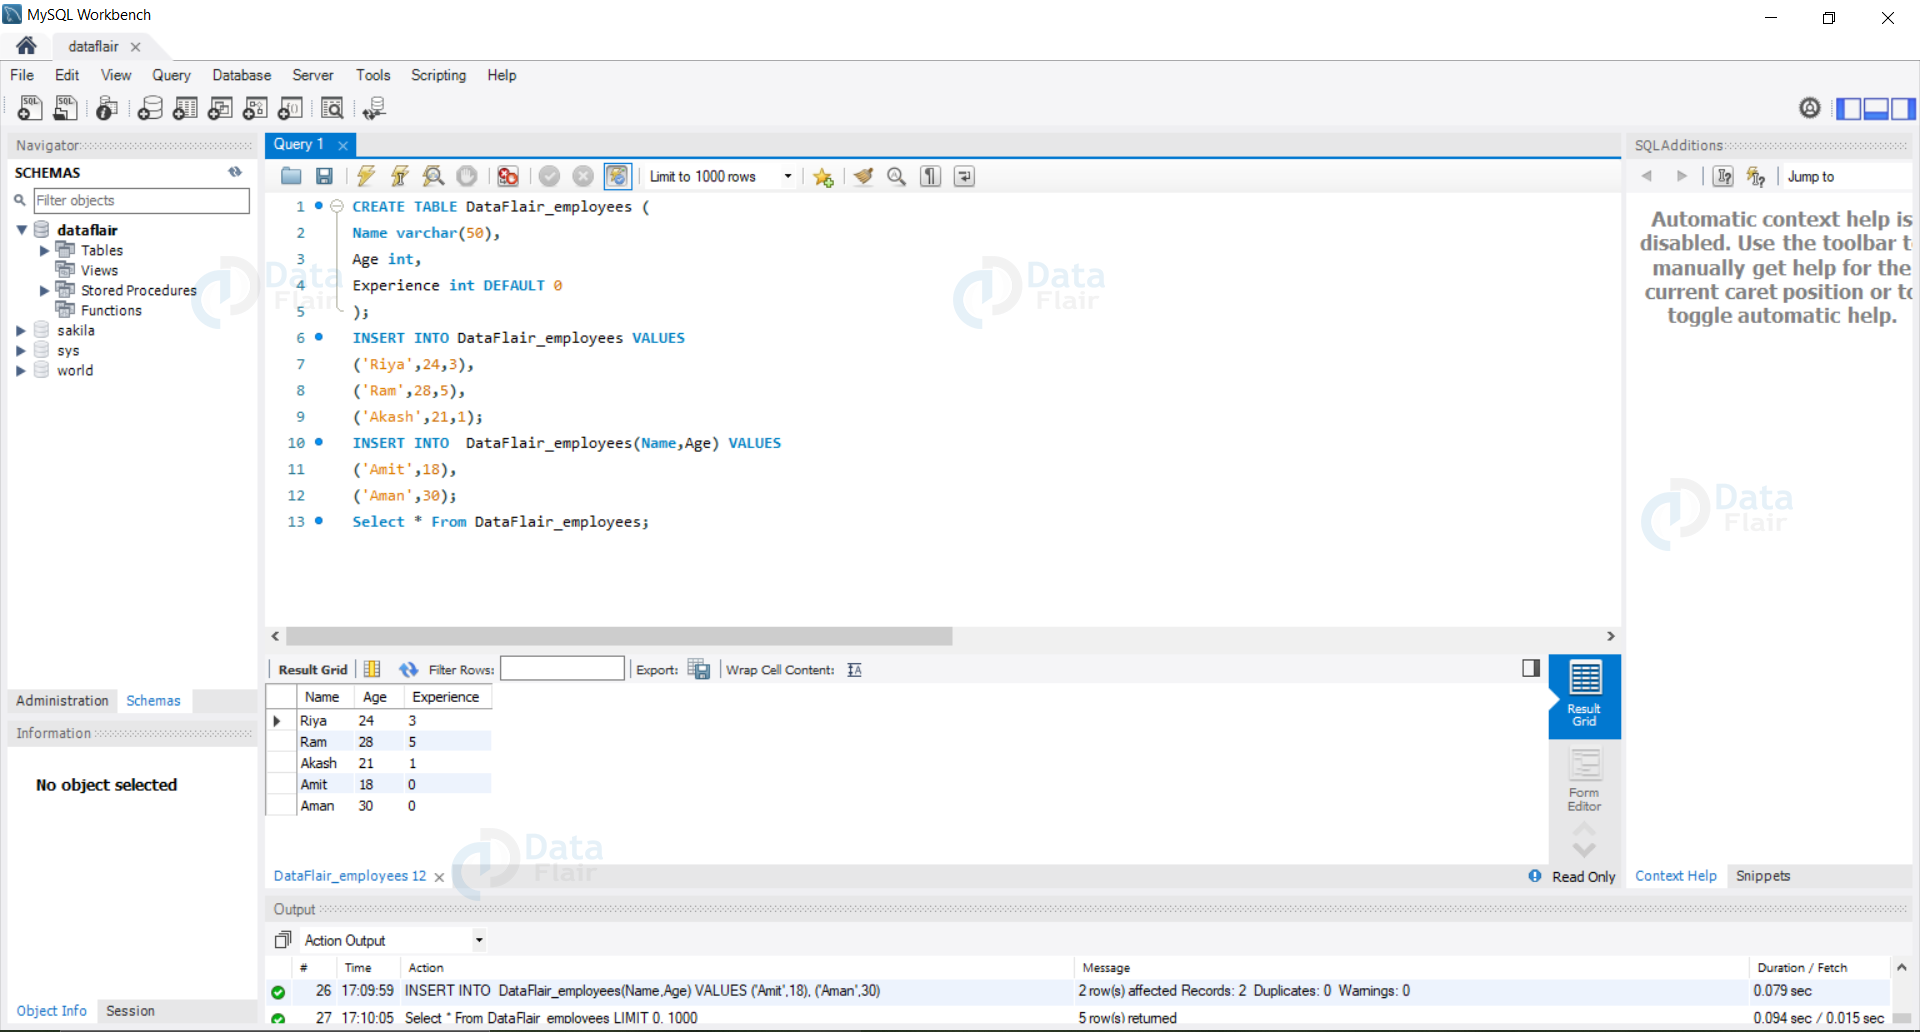
Example: Let us create a new table called DataFlair_employees with a default constraint on age column.
Query:
a. Create the table with the Default constraint.
CREATE TABLE DataFlair_employees (
Name varchar(50),
Age int,
Experience int DEFAULT 0 );
b. Insert Data into the table
INSERT INTO DataFlair_employees VALUES
('Riya',24,3),
('Ram',28,5),
('Akash',21,1);
INSERT INTO  DataFlair_employees(Name,Age) VALUES
('Amit',18),
('Aman',30);
c. View the table
Select * From DataFlair_employees;
Output:
- Using the Alter Query
Syntax:
ALTER TABLE tableName
ALTER col2 SET DEFAULT newValue;
Example: Let us now change our default value of the experience of the employee to 1 and insert a record and view the results.
Query:
ALTER TABLE DataFlair_employees
ALTER Experience SET DEFAULT 1;
INSERT INTO DataFlair_employees(Name,Age) VALUES
('Raj',23);
Select * From DataFlair_employees;
Output:

2. Drop the Default Constraint
Syntax:
ALTER TABLE tableName
ALTER colName DROP DEFAULT;
Example: Let us now see how we can Drop a Default constraint applied to our column.
Query:
ALTER TABLE DataFlair_employees
ALTER Experience DROP DEFAULT;
INSERT INTO DataFlair_employees(Name, Experience) VALUES
('Rajni',28);
Select * From DataFlair_employees;
Output:

Steps for a Check Constraint
The steps we need to follow for creating and disposing of, a Check constraint are as follows:
1. Create a table with Check Constraint
Syntax:
CREATE TABLE tableName (
colName1 datatype,
colName2 datatype CHECK(expression),
colName3 datatype,
…….
);
Example: Let us now create a new table DataFlair_employees with a Check on the age of employees and try to insert data into it.
Query:
- Create the table with Check constraint.
CREATE TABLE DataFlair_employees  (
Name varchar(50),
Age int CHECK(Age>=18),
Experience int );
- Insert data into the table.
INSERT INTO DataFlair_employees VALUES
('Rajni',28,5),
('Shyam',25,3),
('Nidhi',22,1),
('John',21,0),
('Anita',29,5),
('Raj',17,0);
- View the table.
Select * From DataFlair_employees;
Output:

2. Alter the Check Constraint
Syntax:
ALTER TABLE tableName
ADD CHECK (expression);
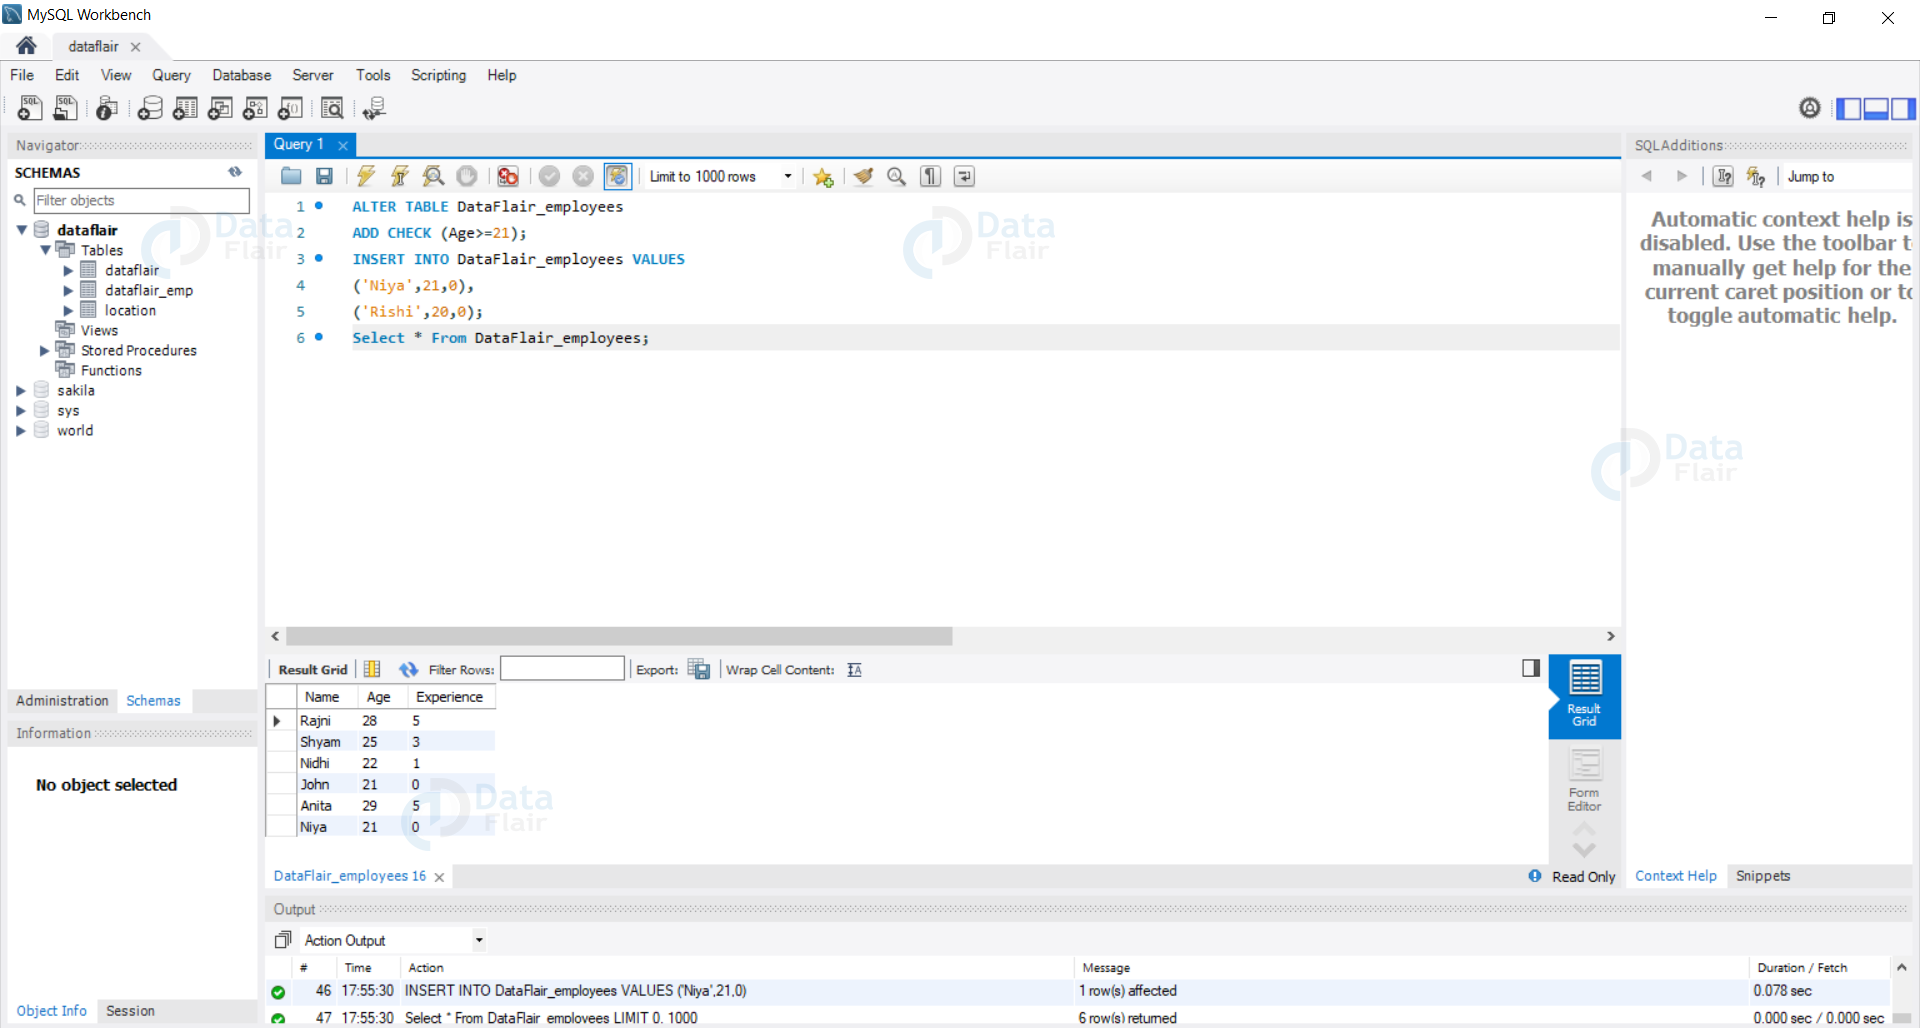
Example: Let us now make the minimum age to be 21 to join DataFlair.
Query:
- Alter the Check constraint of our database.
ALTER TABLE DataFlair_employees
ADD CHECK (Age>=21);
- Insert data into the table.
INSERT INTO DataFlair_employees VALUES
('Niya',21,0),
('Rishi',20,0);
- View the table.
Select * From DataFlair_employees;
Output:
3. Drop the Check Constraint
Syntax:
ALTER TABLE tableName
DROP CONSTRAINT constraintName;
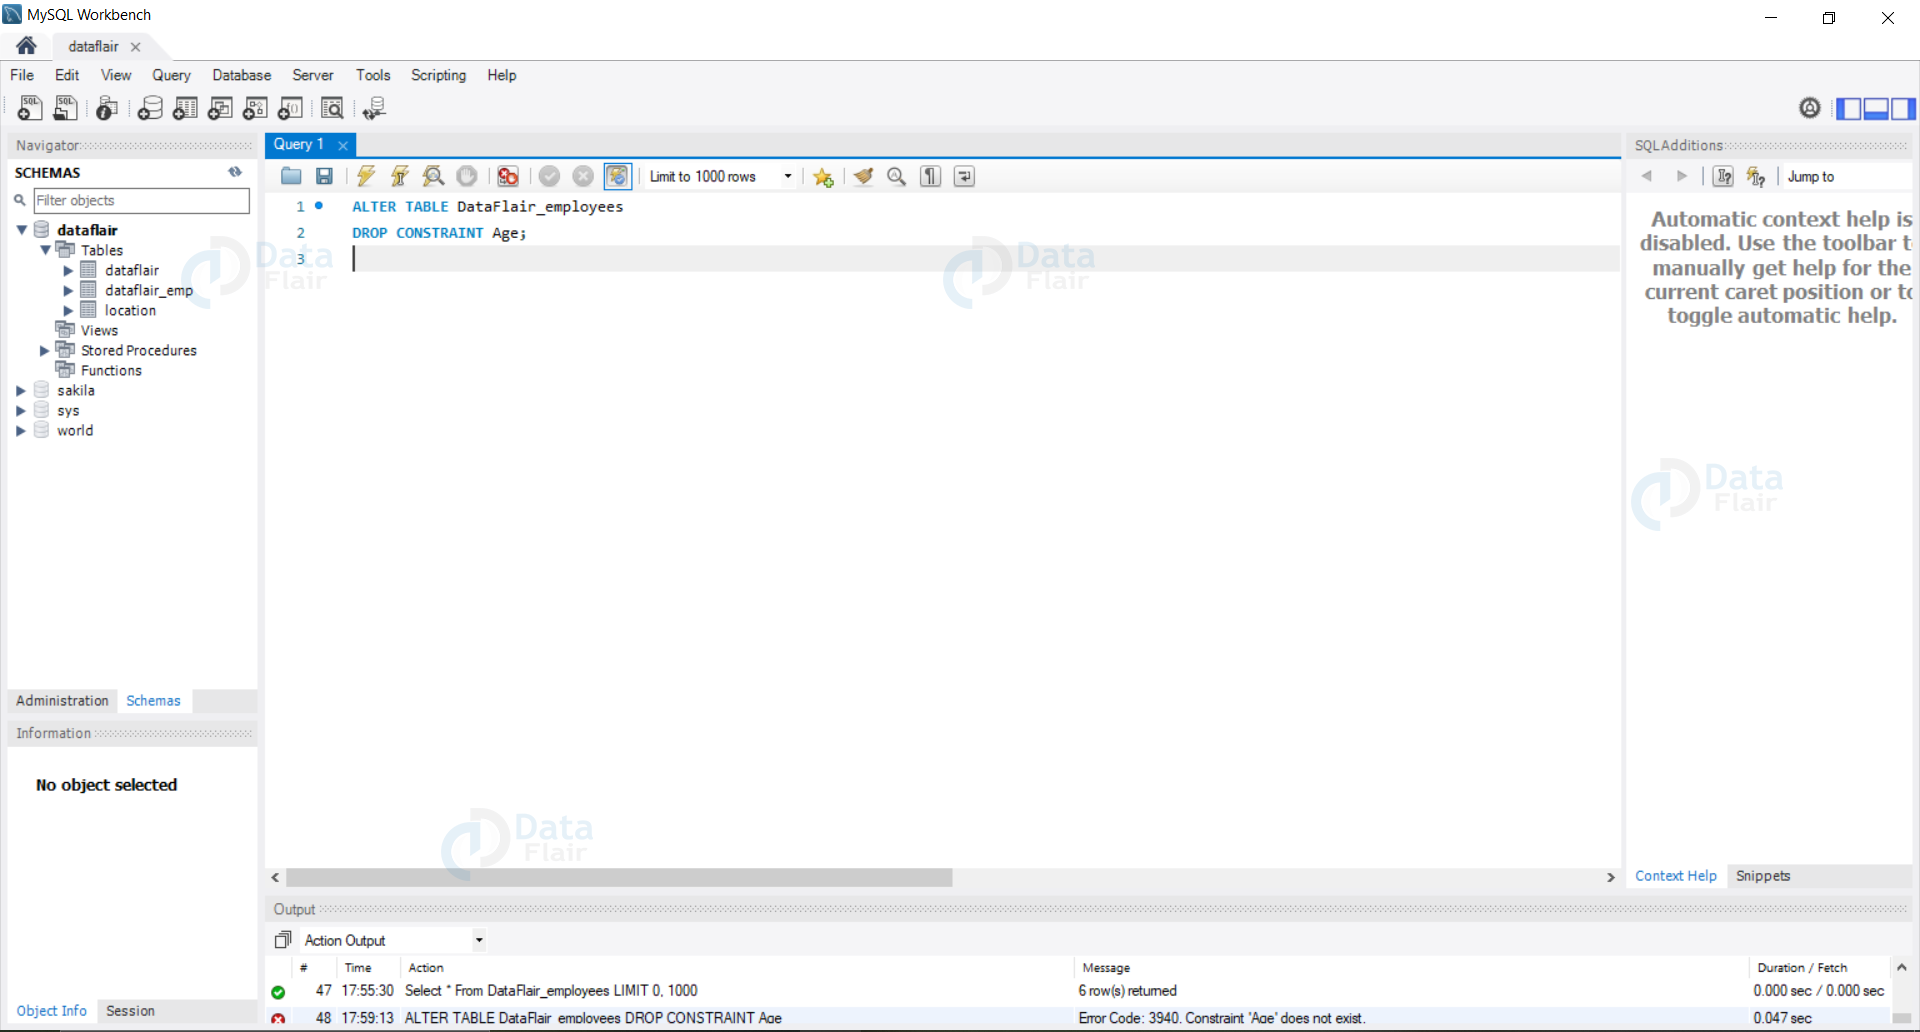
Example: Let us now drop the constraint on our Age column.
Query:
ALTER TABLE DataFlair_employees
DROP CONSTRAINT Age;
Output:
Summary
In this tutorial, we have seen all about constraints and their uses in a database.
Further, we have understood in detail about Check and Default constraint in detail.
We have started right from the definition and the syntax and then the uses and moving on we have seen steps of each enclosed with required examples.
With the help of constraints, we can keep a check on our data and maintain the data in our database so that it remains usable for a long time. For more information head over to the Constraints tutorial.
Did we exceed your expectations?
If Yes, share your valuable feedback on Google


