Using Views And Having Clause In SQL
We offer you a brighter future with industry-ready online courses - Start Now!!
In this tutorial, we will understand what SQL Views are and how to create views.
First, let us understand the views briefly. After that, we will move to the usage of having command.
Towards the end, we will learn about Syntax and discuss the examples of views and the having command.
What are SQL Views?
Views are tables created by the user virtually by the SQL command containing the required conditionals.
By using views we get the flexibility to decide which part of data more specifically how many rows and columns of data we need in our resulting virtual table.
A view can contain rows and columns from one or multiple tables of the same database.
Syntax:
CREATE VIEW viewName AS
SELECT column1, column2, ...
FROM tableName
WHERE condition;
Advantages of Using Views in SQL
We have various advantages of using views:
- Security: We can hide sensitive data by using views in SQL.
- Simplicity: We have multiple tables in a database, with the help of views we can select the content columns required by us specifically.
- Consistency: Many times in a SQL query, we need complex logic. By using views, we can hide the complex formulas and logic and avoid inconsistencies occurring in the data.
SQL Demo Database
We will be using two tables in this tutorial i.e. DataFlair_emp1 and DataFlair_emp2. Let us view both of the tables.
Syntax:
SELECT * FROM tableName ;
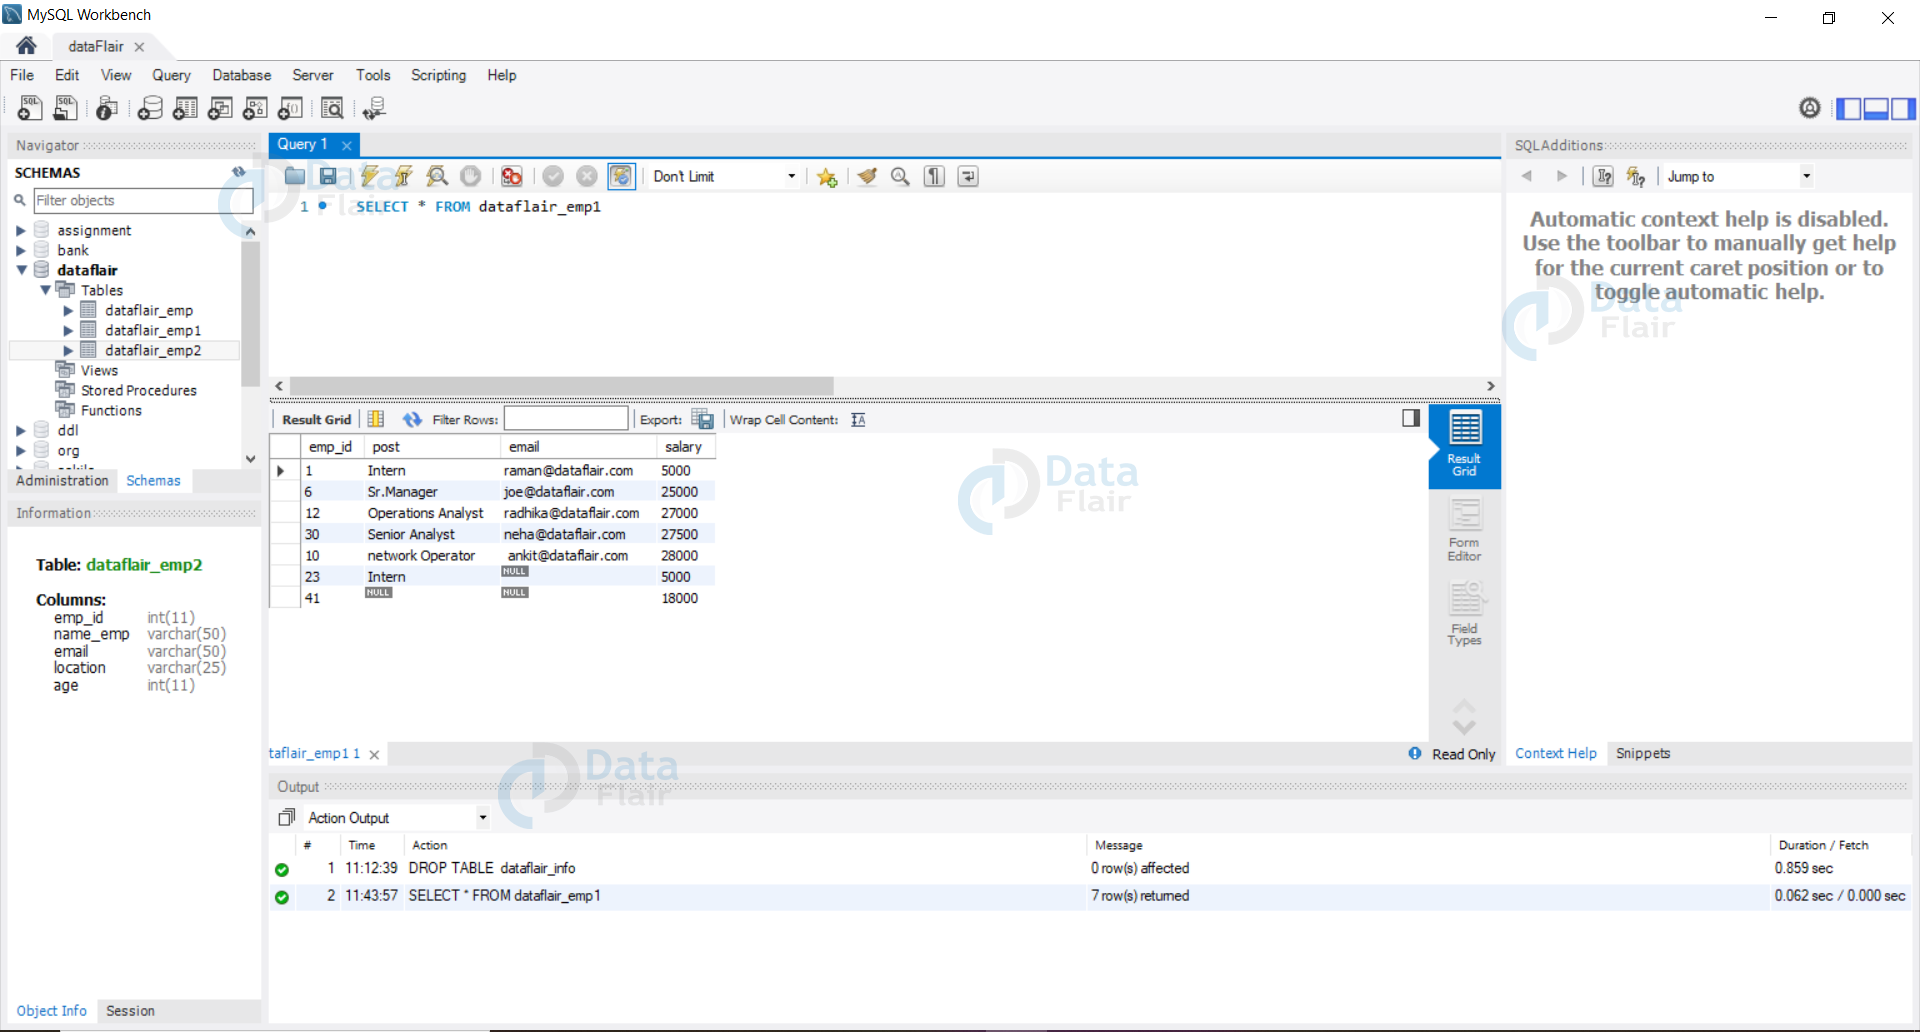
Query1:
SELECT * FROM DataFlair_emp1 ;
Output:
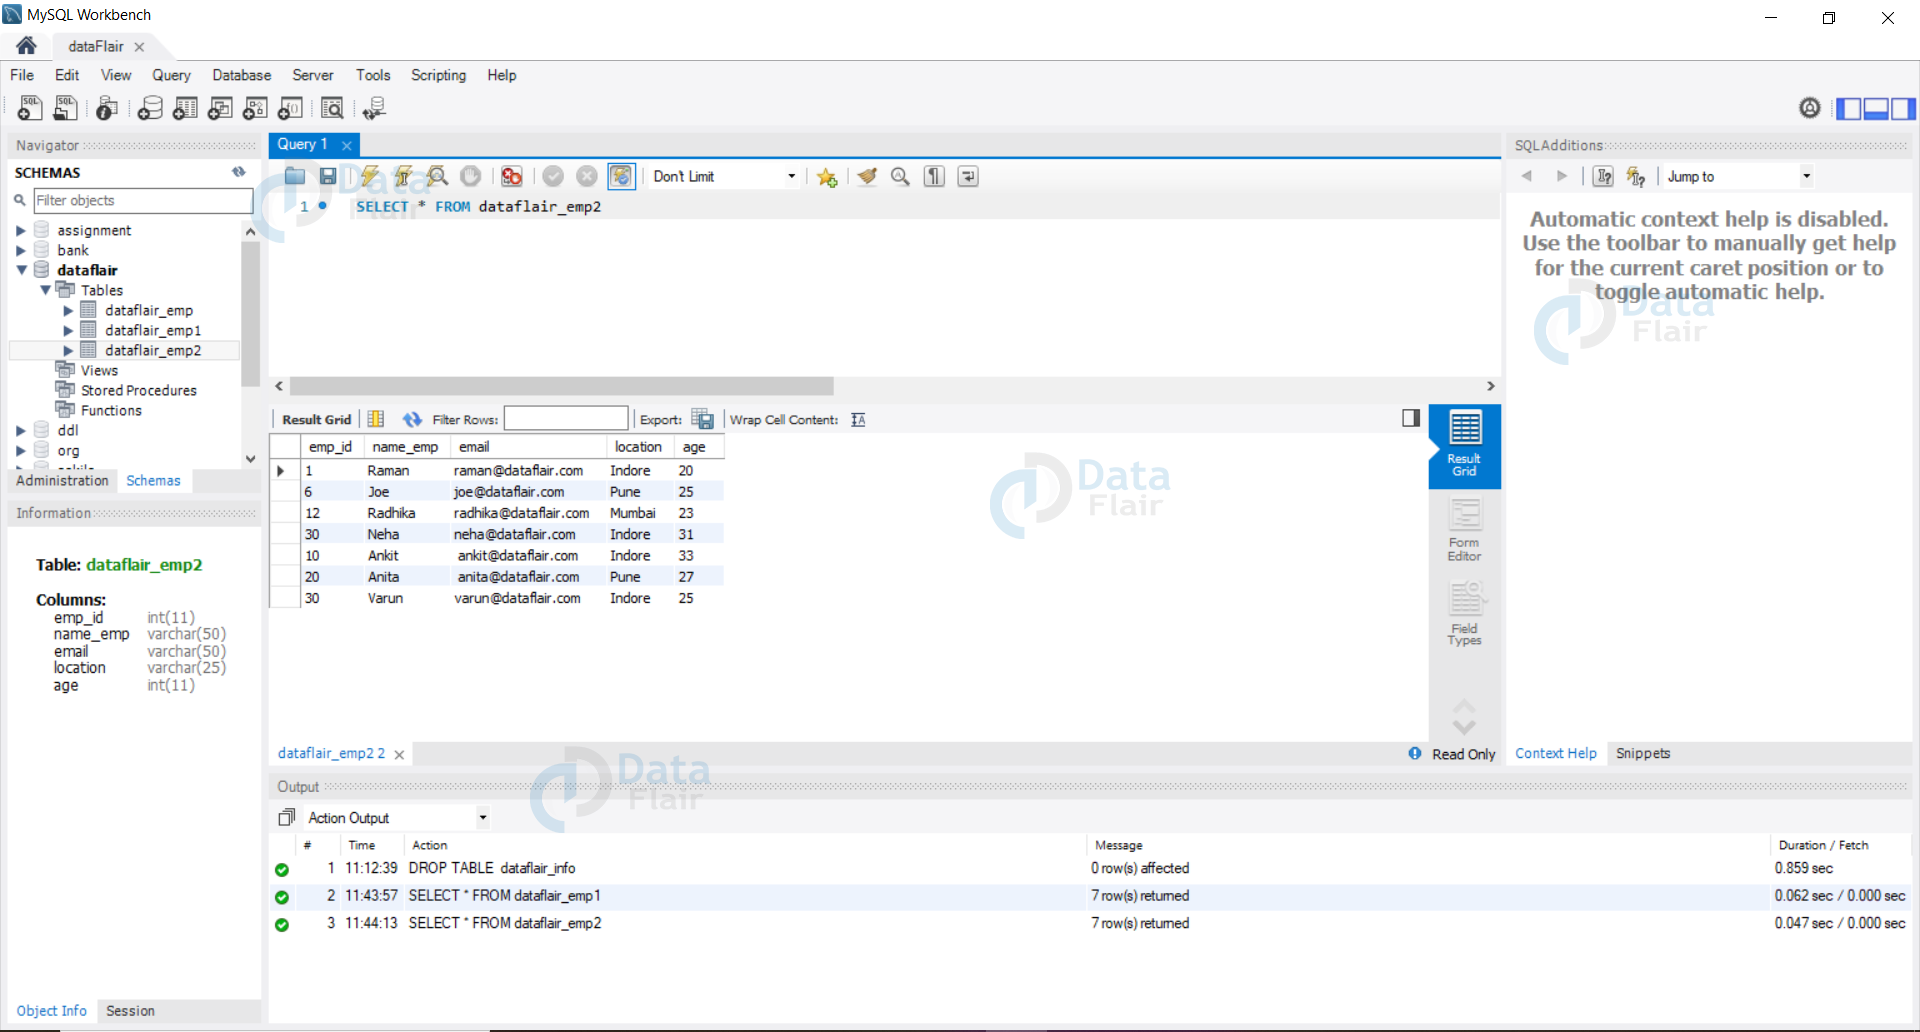
Query2:
SELECT * FROM DataFlair_emp2 ;
Output:
Let us move forward by using examples:
1. Create SQL View using only one table
Views can be created using one or multiple tables.
Syntax:
CREATE VIEW viewName AS
SELECT column1, column2, ...
FROM tableName
WHERE condition;
Example 1: Let us create a view from our DataFlair_emp1 table.
Query:
CREATE VIEW salaryAndpost AS
SELECT post, salary
FROM dataflair_emp1 ;
Output:
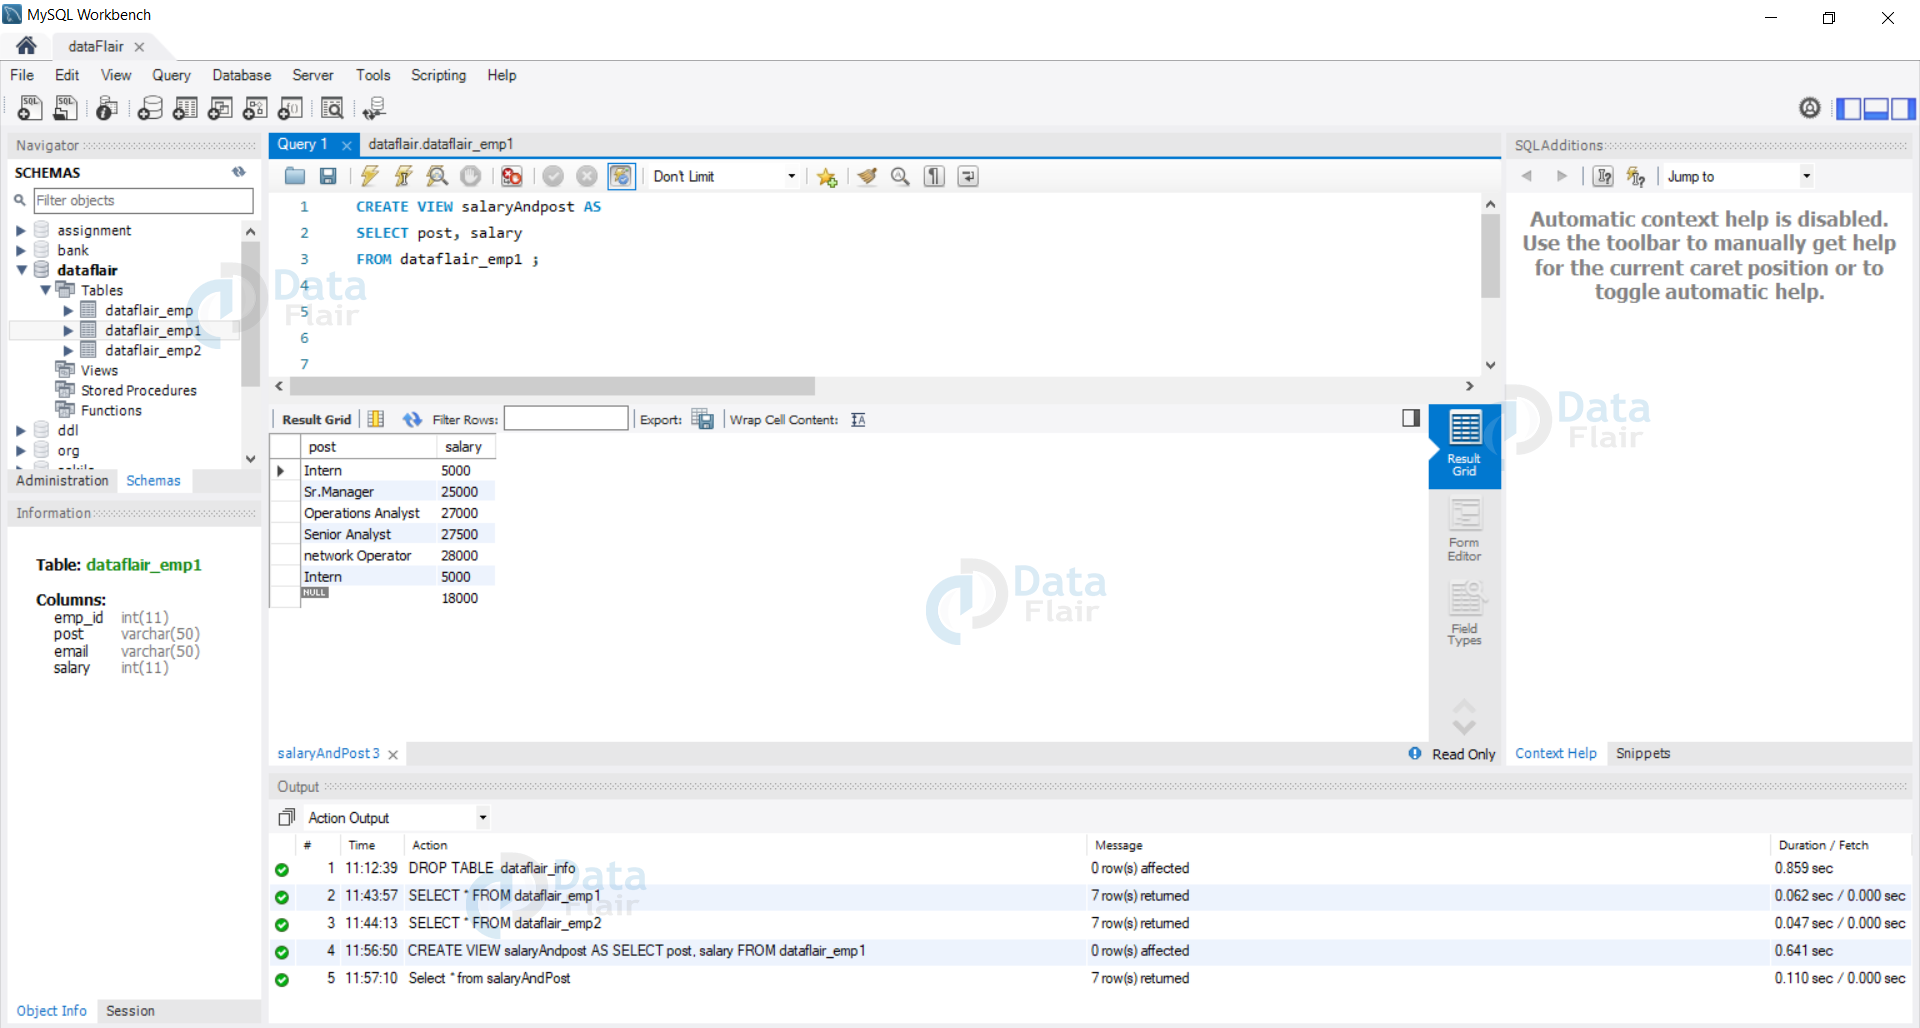
Here we can see our created view.
2. Creating views from multiple tables in SQL
Syntax:
CREATE VIEW viewName AS
SELECT tableName1.column1, tableName1.column2,tableName2.column1 ...
FROM tableName1, tableName2
WHERE condition;
Example 1: Let us create a view using tables DataFlair_emp1 and DataFlair_emp2.
Query:
CREATE VIEW salaryPostAge AS
SELECT dataflair_emp1.post, dataflair_emp1.salary , dataflair_emp2.age
FROM dataflair_emp1 , dataflair_emp2
WHERE dataflair_emp1.emp_id = dataflair_emp2.emp_id;
Output:
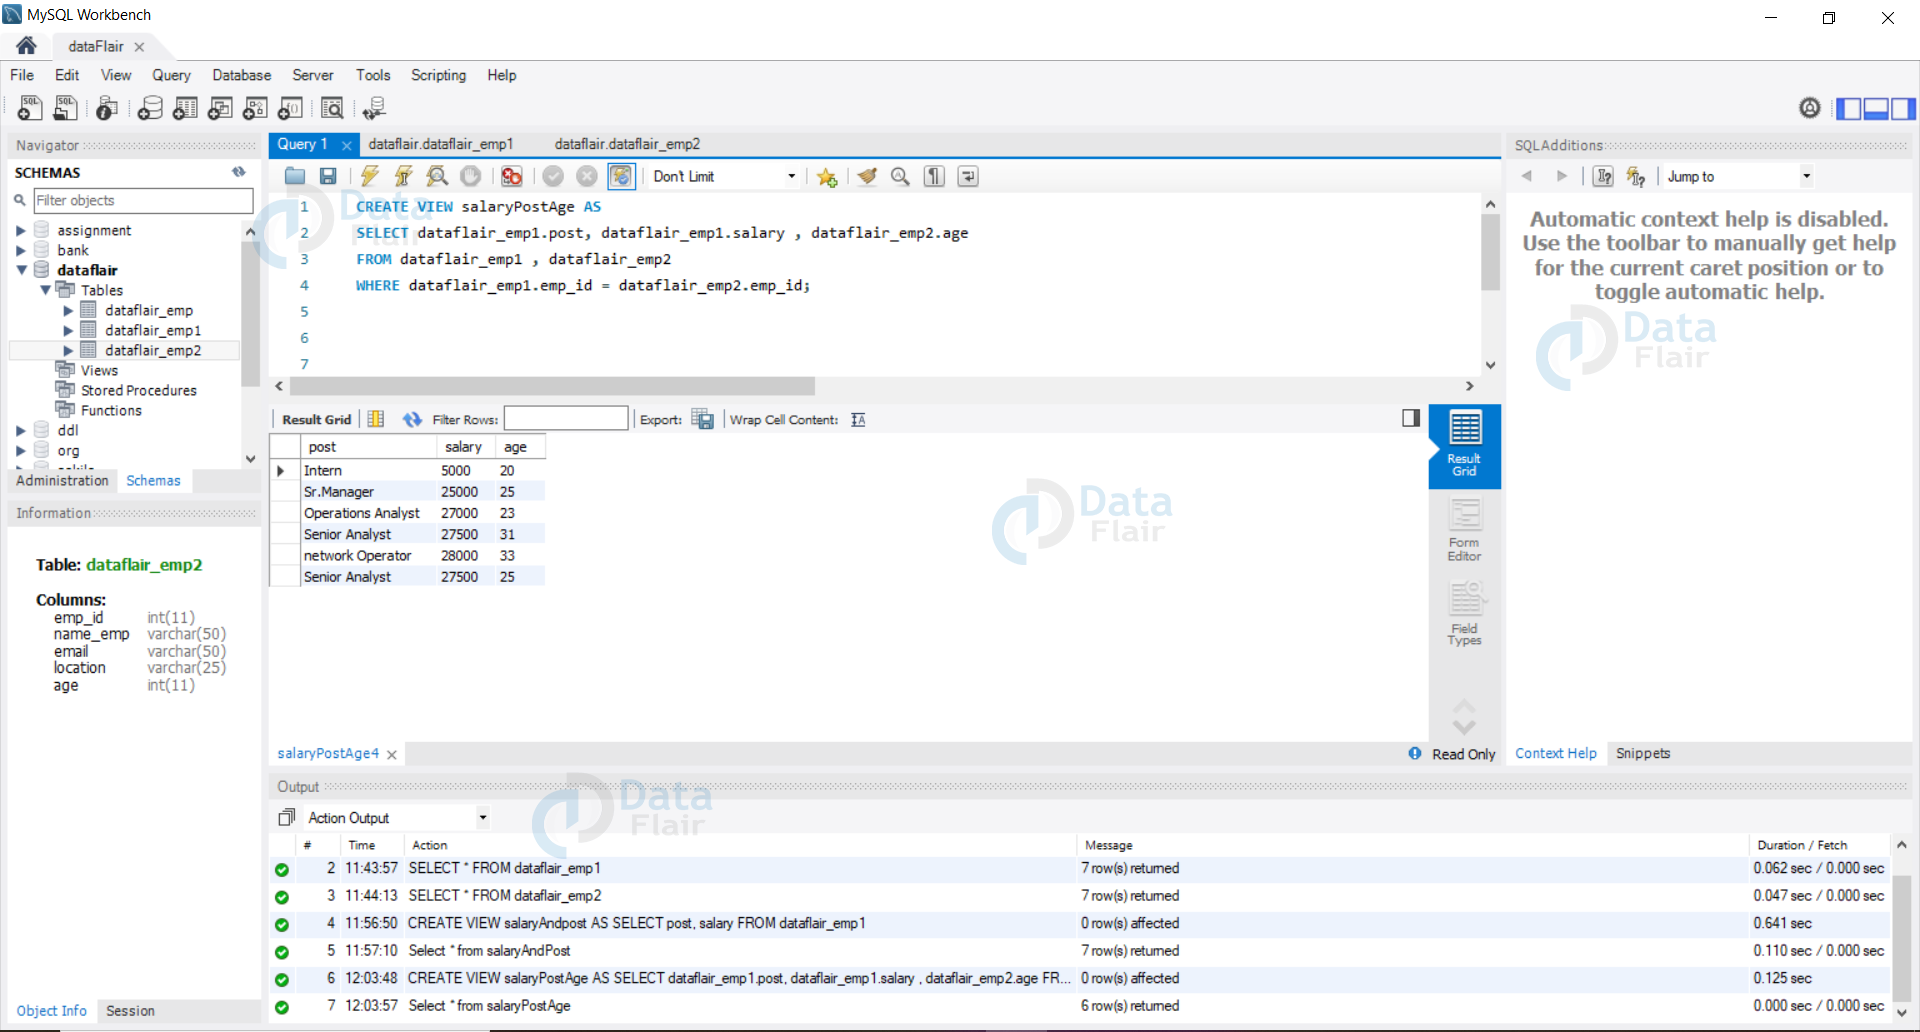
Here we can see the view we created and its contents.
3. Updating SQL View
We can update an already created view by using CREATE OR REPLACE query
Syntax:
CREATE OR REPLACE VIEW viewName AS
SELECT tableName1.column1, tableName1.column2,tableName2.column1 ...
FROM tableName1, tableName2
WHERE condition;
Example 1: Let us update our SalaryPostAge view and include the emp_id in the view as well.
Query:
CREATE OR REPLACE VIEW salaryPostAge AS
SELECT dataflair_emp1.post, dataflair_emp1.salary , dataflair_emp2.age , dataflair_emp1.emp_id
FROM dataflair_emp1 , dataflair_emp2
WHERE dataflair_emp1.emp_id = dataflair_emp2.emp_id;
Output:

Here we can see our updated view and the records.
4. Inserting a row in a View in SQL
Syntax:
INSERT INTO viewName (column1, column2,column3,......)
VALUES(value1,value2,value3,....);
Example 1: Let us insert a row in the SalaryAndPost view.
Query:
INSERT INTO salaryAndpost (post, salary)
VALUES("HR Intern" , 6000);
Output:

Here we can see the records we inserted into the database.
5. Deleting a row from the View in SQL
Syntax:
DELETE FROM viewName
WHERE condition ;
Example 1: Let us delete the record which has a salary of 18000 in salaryAndpost view.
Query:
DELETE FROM salaryAndpost
WHERE salary = 18000 ;
Output:
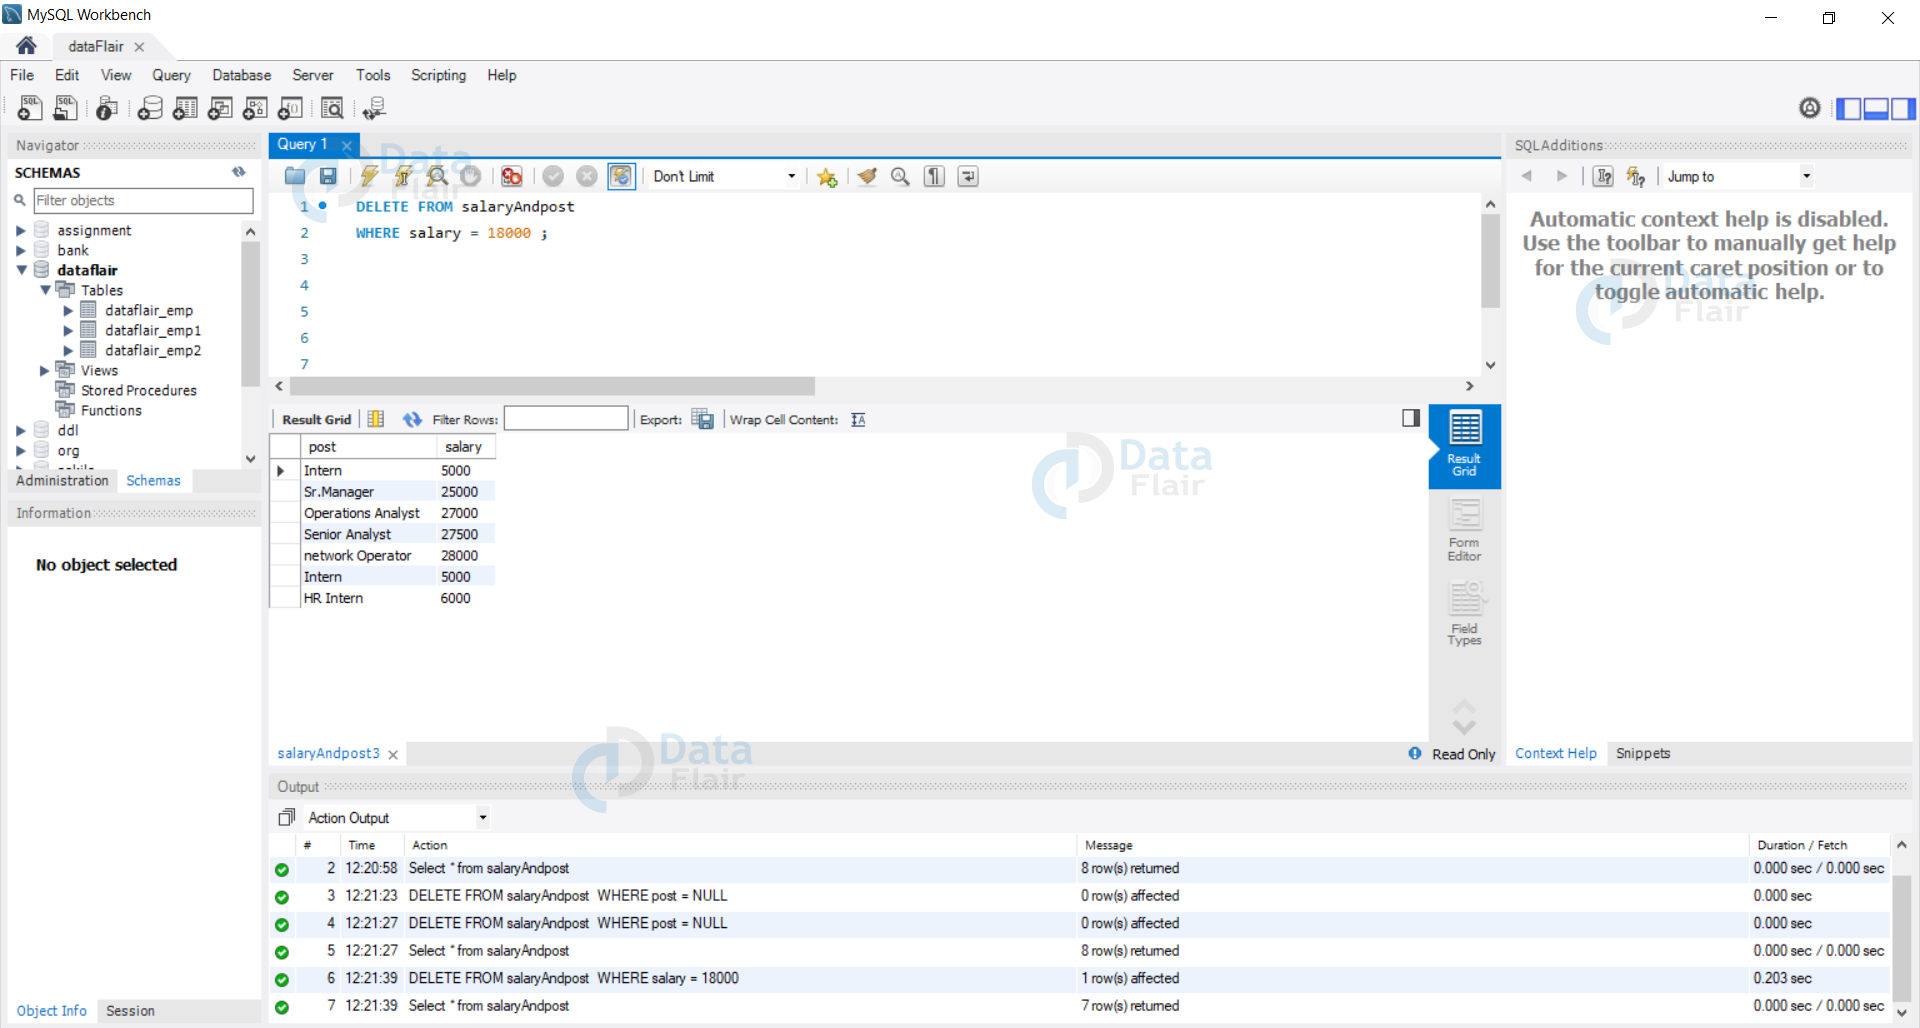
Here we can see the record corresponding to salary 18,000 is deleted.
6. Deleting the View in SQL
Syntax:
DROP VIEW viewName;
Example 1: Let us delete the view salaryAndpost.
Query:
DROP VIEW salaryAndpost;
Output:
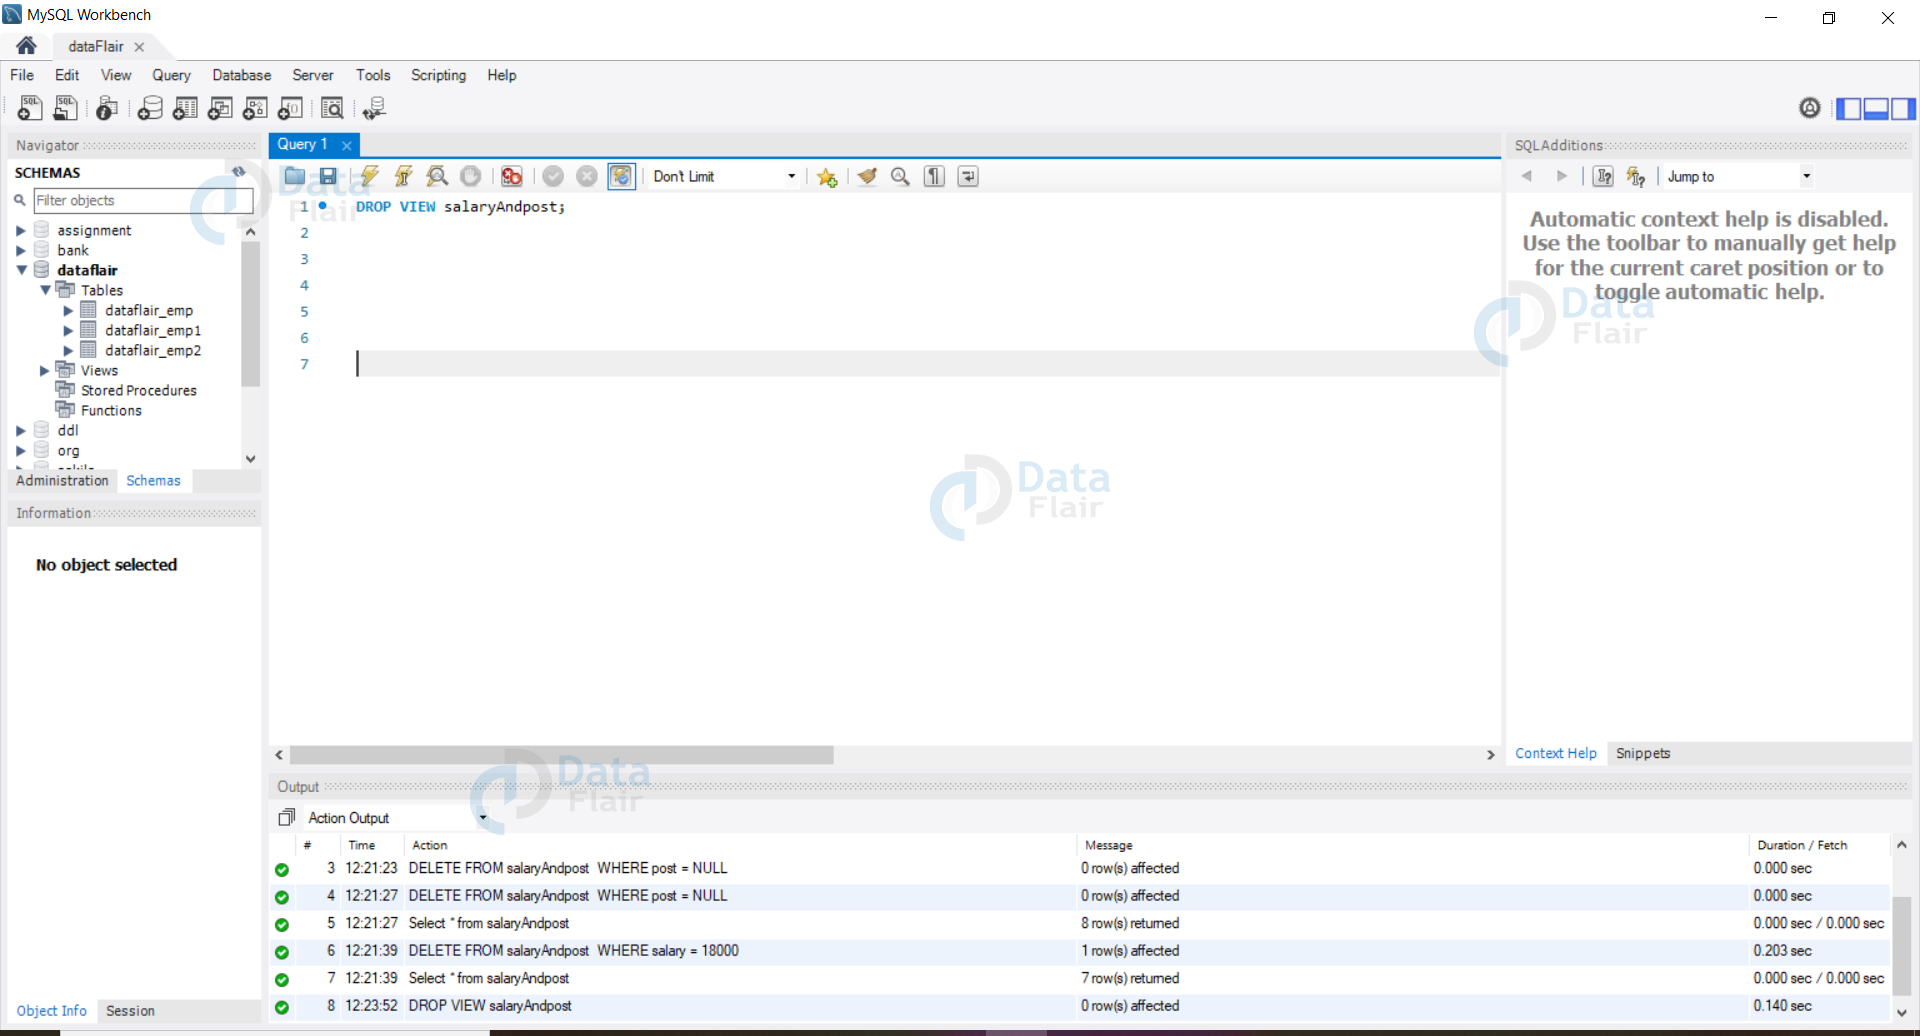
Here we can see the SalaryAndPost view no longer exists.
7. Creating a View by using the WITH CHECK option
The With Check is a very useful clause for the updatable views. This helps us to prevent the insertion of rows with null values.
We can use the WITH CHECK clause in the CREATE VIEW statement for the views which would be updated by us in the future. We can write the create view command as follows:
Syntax:
CREATE VIEW viewName AS
SELECT column1,column2,....
FROM  tableName
WHERE column1 IS NOT NULL
WITH CHECK OPTION;
Example 1: Let us create a view with the CHECK option.
Query:
CREATE VIEW salaryPost AS
SELECT salary, post
FROM  dataflair_emp1
WHERE post IS NOT NULL
WITH CHECK OPTION;
Output:

Here we can observe the new view we created with a check.
Let us try to insert a row with the null value in this view.
Query:
INSERT INTO salaryPost (salary)
VALUES(10000);
Output:
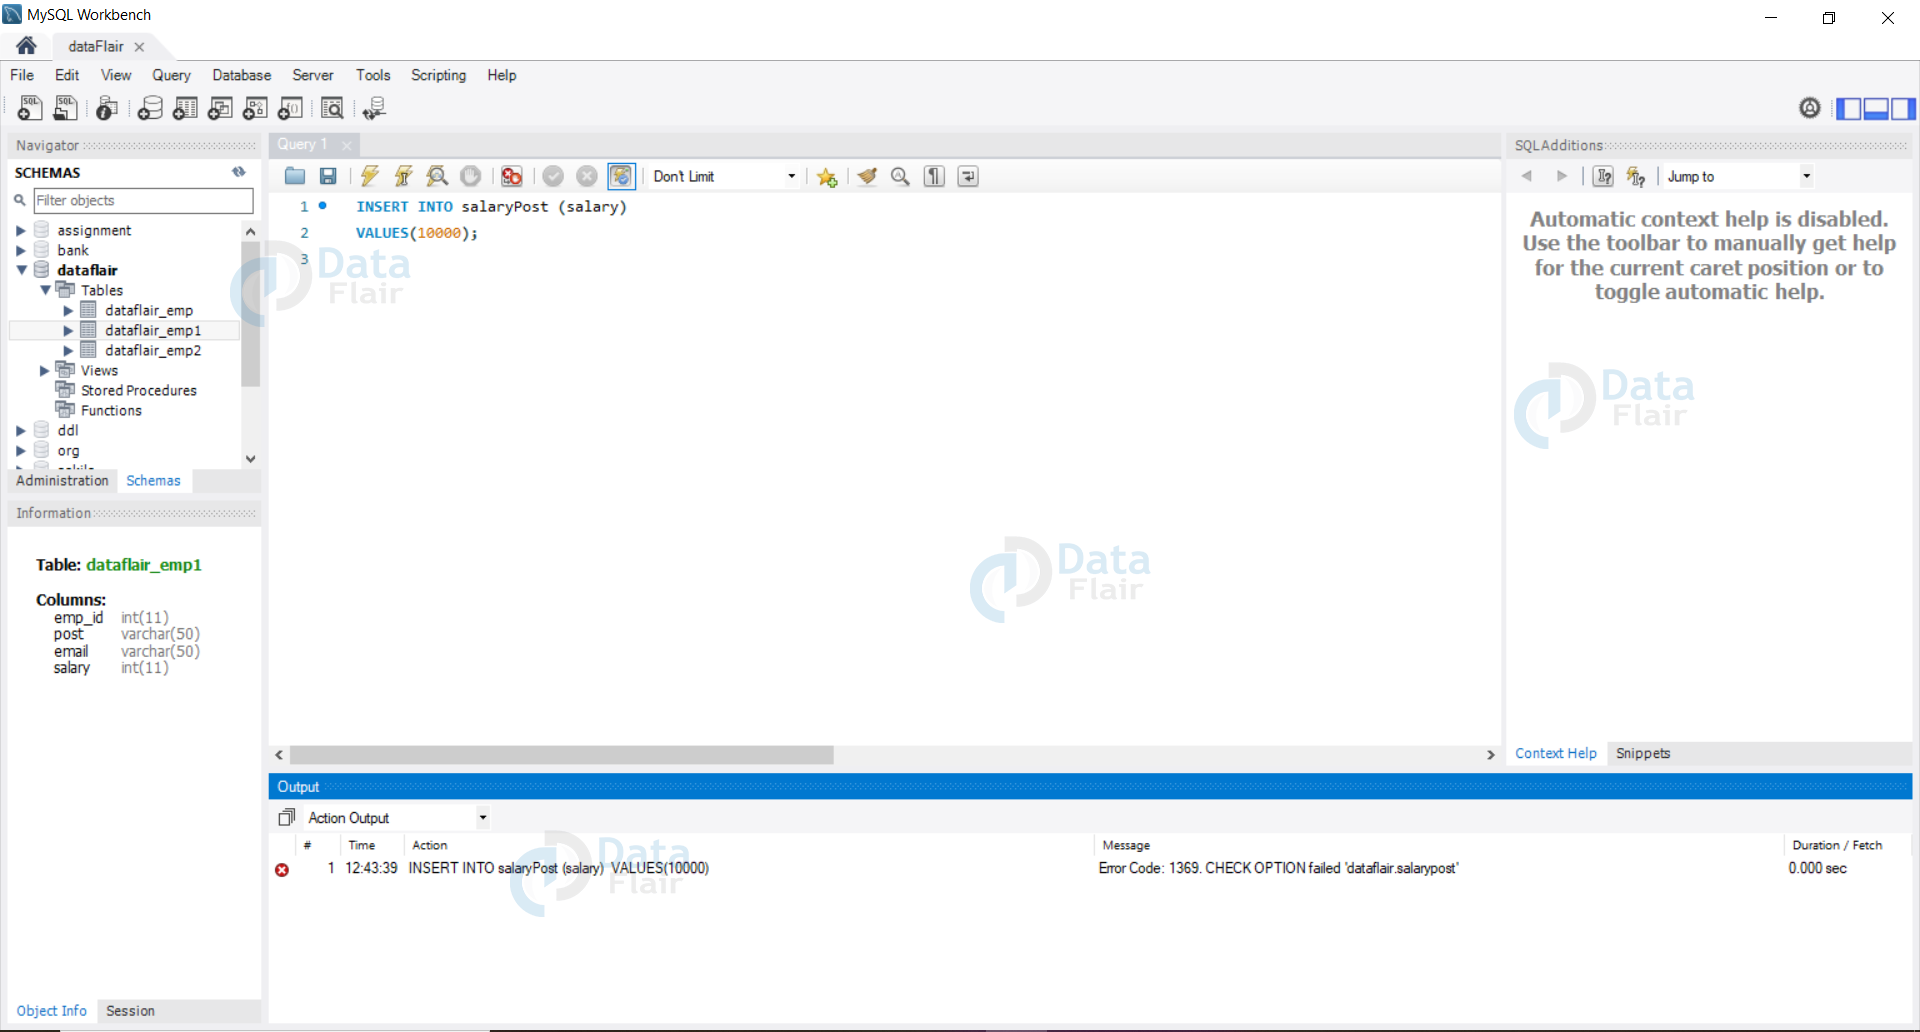
Here we view our view after inserting the record.
Here the default value null was being used for the post column. Thus the insert query gives an error and we are unable to insert data into the column.
If we specify both the columns then we can easily insert the required data.
Example Query:
INSERT INTO salaryPost (salary, post)
VALUES(20000,"Manager");
Output:

Here we can see the new row with data (20000, “Manager”) is inserted in our view without any error.
HAVING Clause in SQL
We use HAVING clauses at places where we can’t use the WHERE clause. We can’t use where clause with the aggregate functions. So in those queries, we use the Having clause to specify the conditions. Some of the most popular aggregate functions are:
- Count
- Sum
- Avg
- Max
- Min… etc.
Whenever we need to run a query involving aggregate functions, we need a Having clause to check if the aggregate follows the specified condition or not. We use the having clause in combination with the Group by clause in our queries.
Syntax:
SELECT column_name(s)
FROM table_name
WHERE condition
HAVING condition;
Example: Let us find the details of the employee whose count of emp_id is greater than 10.
Query:
select * from dataflair_emp2
group by age
HAVING count(emp_id>10);
Output:

Here we can see the data which satisfies the condition in the query.
Summary
In this tutorial, we have discussed how and when to use views. We have understood with examples of various applications of views.
In our discussion, we included creating a view, updating a view, insertion and deletion of data rows in the created views. We use views for security, simplicity, and consistency, which we have discussed in detail in our tutorial.
Did you like our efforts? If Yes, please give DataFlair 5 Stars on Google


