Convolutional Neural Network (CNN)| CIFAR 10 TensorFlow
Machine Learning courses with 100+ Real-time projects Start Now!!
In our previous Tensorflow tutorial, we discussed MNIST with TensorFlow. Today we’ll be learning how to build a Convolutional Neural Network (CNN) using TensorFlow in CIFAR 10 Model.
Moreover, in this Convolution Neural Network Tutorial, we will see CIFAR 10 CNN TensorFlow model architecture and also the predictions for this model. Along with this, we will learn training and launching of CIFAR 10 model with TensorFlow Convolutional Neural Network example.
So, let’s begin the Convolutional Neural Network (CNN) in TensorFlow.
Working With Convolutional Neural Network
Before we start, it’ll be good to understand the working of a convolutional neural network.
Basically, we will be working on the CIFAR 10 dataset, which is a dataset used for object recognition and consists of 60,000 32×32 images which contain one of the ten object classes including aeroplane, automobile, car, bird, dog, frog, horse, ship, and truck.
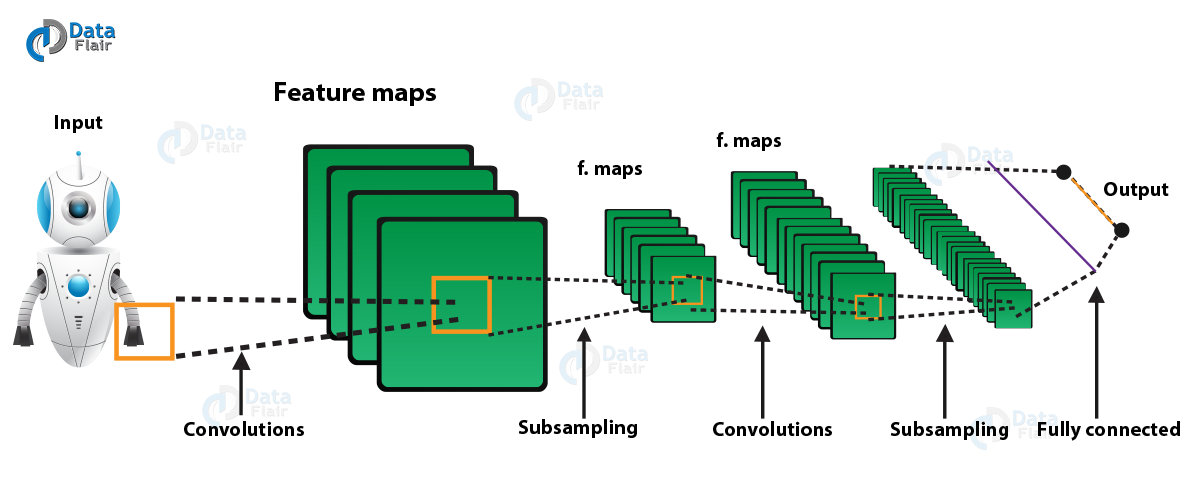
Working of Convolutional Neural Network
You can download the dataset from https://www.cs.toronto.edu/~kriz/cifar.html. You can use other datasets as well, but for the sake of convenience, CIFAR 10 is used here.
CIFAR 10 TensorFlow Model Architecture
This Convolutional neural network Model achieves a peak performance of about 86% accuracy within a few hours of training time on a GPU. Following is a list of the files you’ll be needing:
cifar10_input.py Reads the native CIFAR-10 binary file format.
cifar10.py Builds the CIFAR-10 model.
cifar10_train.py Trains a CIFAR-10 model on a CPU or GPU.
cifar10_multi_gpu_train.py Trains a CIFAR-10 model on multiple GPUs.
cifar10_eval.py Evaluates the predictive performance of a CIFAR-10 model.
a. Inputs
Basically, the input part of the CIFAR 10 CNN TensorFlow model is built by the functions inputs() and distorted_inputs() which read images from the CIFAR 10 binary data files.
These files contain fixed byte length records, so you can use tf.FixedLengthRecordReader. You can look at Reading Data to learn more about how the Reader class works.
First, crop the images are up to 24 x 24 pixels. To make the model insensitive to the dynamic range they are approximately whitened. For training, you can apply a series of random distortions like flipping the image horizontally, changing the brightness or the contrast, to artificially increase the data set size
Prediction for CIFAR 10 Model
The prediction part of the CIFAR 10 Convolutional Neural Network model is constructed by the inference() function which adds operations to compute the logic of the predictions. The following are the layers you need to build for the model to work properly:
- Conv1 convolution and rectified linear activation.
- Pool1 max pooling.
- Norm1 local response normalization.
- Conv2 convolution and rectified linear activation.
- Norm2 local response normalization.
- Pool2 max pooling.
- Local3 fully connected layer with rectified linear activation.
- Local4 fully connected layer with rectified linear activation.
- Softmax_linear linear transformation to produce logic.
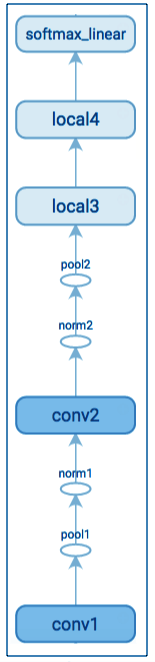
Prediction of CIFAR-10 CNN
Training the CIFAR 10 Model
Now, we can use multinomial logistic regression, which is softmax regression. Softmax regression applies a nonlinearity to the output of the network and calculates the cross-entropy between the normalized predictions and the label index as described in the previous articles.
The sum of the cross-entropy loss is the objective function of the model and all these weight decay terms, as returned by the loss() function.
CIFAR 10 Loss
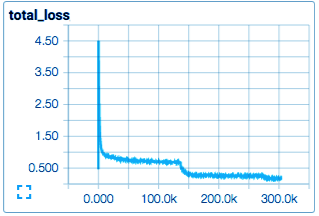
CIFAR 10 CNN TensorFlow Loss Graph
So, using standard gradient descent algorithm with a learning rate.
CIFAR-10 Learning Rate Decay
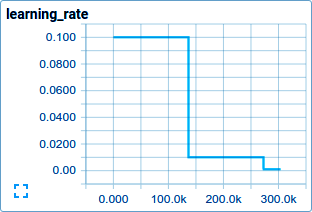
CIFAR-10- Learning Rate Decay
Launching the CIFAR 10 CNN Model
Now, you can launch and run the training operation with the script.
python cifar10_train.py
Here, the reported loss is the average loss of the most recent batch. This loss is the sum of the cross-entropy and all weight decay terms.
cifar10_train.py periodically saves all model parameters in checkpoint files but it does not evaluate the model. cifar10_eval.py use the checkpoint file to measure the predictive performance (see Evaluating a Model below).
TensorBoard provides the functionality of displaying data exported periodically from cifar10_train.py via a tf.summary.FileWriter.
Evaluation of CNN Model
By the given below script, a model is evaluated. It uses all 10,000 images in the evaluation set of CIFAR 10 and constructs a model with the inference. It calculates the precision at how often the top prediction matches the label of the image.
python cifar10_eval.py
So, do not run the evaluation and training binary on the same GPU as you can run out of memory.
Training a Model Using Multiple GPU Cards
Generally, workstations may contain multiple GPUs for scientific computation. Training a model in parallel, a distributed fashion requires coordinating training processes.
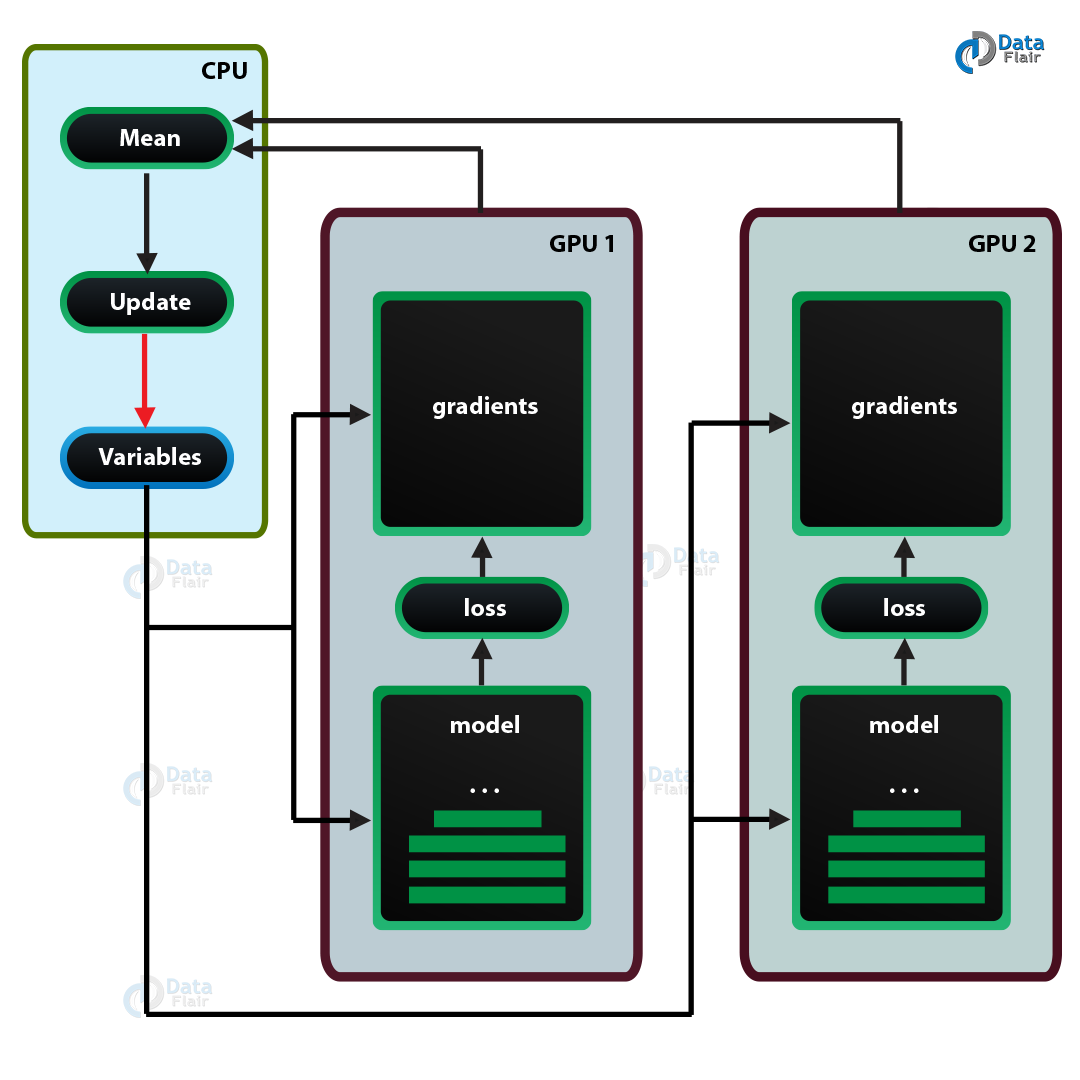
Convolutional Neural Network- Training Model Using Multiple GPU Cards
Now, a model copy might be trained on a stale copy of the model parameters, so employing asynchronous updates of model parameters leads to not so good training performance. Also, employing fully synchronous updates will be as slow as the slowest model replica.
Launching and Training the Model on Multiple GPU Cards
You can use multiple GPU cards installed on your system to train the model faster with the
cifar10_multi_gpu_train.py script.
Code Example
Now, you can browse through the following code for a better understanding.
classes = ['dogs', 'cats']
num_classes = len(classes)
train_path='training_data'
# validation split
validation_size = 0.2
# batch size
batch_size = 16
data = dataset.read_train_sets(train_path, img_size, classes, validation_size=validation_size)
def create_weights(shape):
   return tf.Variable(tf.truncated_normal(shape, stddev=0.05))
def create_biases(size):
   return tf.Variable(tf.constant(0.05, shape=[size]))
tf.nn.max_pool(value=layer,
                              ksize=[1, 2, 2, 1],
                              strides=[1, 2, 2, 1],
                              padding='SAME')
def create_convolutional_layer(input,
              num_input_channels,
              conv_filter_size,
              num_filters):
## Here, we shall define the weights that will be trained using create_weights function.
weights = create_weights(shape=[conv_filter_size, conv_filter_size, num_input_channels, num_filters])
## Now, we create biases using the create_biases function. These are also trained.
biases = create_biases(num_filters)
## Creating the convolutional layer
layer = tf.nn.conv2d(input=input,
                    filter=weights,
                    strides=[1, 1, 1, 1],
                    padding='SAME')
   layer += biases
## We shall be using max-pooling.
layer = tf.nn.max_pool(value=layer,
                           ksize=[1, 2, 2, 1],
                           strides=[1, 2, 2, 1],
                           padding='SAME')
## Now, the output of pooling is fed to Relu which is the activation function for us.
layer = tf.nn.relu(layer)
   return layer
def create_flatten_layer(layer):
   layer_shape = layer.get_shape()
   num_features = layer_shape[1:4].num_elements()
   layer = tf.reshape(layer, [-1, num_features])
   return layer
def create_fc_layer(input,
            num_inputs,
            num_outputs,
            use_relu=True):
#So, let’s define trainable weights and biases.
 weights = create_weights(shape=[num_inputs, num_outputs])
   biases = create_biases(num_outputs)
   layer = tf.matmul(input, weights) + biase
   if use_relu:
       layer = tf.nn.relu(layer)
   return layer
x = tf.placeholder(tf.float32, shape=[None, img_size,img_size,num_channels], name='x')
y_true = tf.placeholder(tf.float32, shape=[None, num_classes], name='y_true')
y_true_cls = tf.argmax(y_true, dimension=1)
layer_conv1 = create_convolutional_layer(input=x,
num_input_channels=num_channels,
conv_filter_size=filter_size_conv1,
num_filters=num_filters_conv1)
layer_conv2 = create_convolutional_layer(input=layer_conv1,
num_input_channels=num_filters_conv1,
conv_filter_size=filter_size_conv2,
num_filters=num_filters_conv2)
layer_conv3= create_convolutional_layer(input=layer_conv2,
num_input_channels=num_filters_conv2,
conv_filter_size=filter_size_conv3,
num_filters=num_filters_conv3)
layer_flat = create_flatten_layer(layer_conv3)
layer_fc1 = create_fc_layer(input=layer_flat,
num_inputs=layer_flat.get_shape()[1:4].num_elements(),
num_outputs=fc_layer_size,
use_relu=True)
layer_fc2 = create_fc_layer(input=layer_fc1,
num_inputs=fc_layer_size,
num_outputs=num_classes,
use_relu=False)
cross_entropy = tf.nn.softmax_cross_entropy_with_logits(logits=layer_fc2,
labels=y_true)
cost = tf.reduce_mean(cross_entropy)
batch_size = 16
x_batch, y_true_batch, _, cls_batch = data.train.next_batch(batch_size)
feed_dict_train = {x: x_batch,
y_true: y_true_batch}
session.run(optimizer, feed_dict=feed_dict_tr)
def train(num_iteration):
global total_iterations
for i in range(total_iterations,
total_iterations + num_iteration):
x_batch, y_true_batch, _, cls_batch = data.train.next_batch(batch_size)
x_valid_batch, y_valid_batch, _, valid_cls_batch = data.valid.next_batch(batch_size)
feed_dict_tr = {x: x_batch
y_true: y_true_batch}
feed_dict_val = {x: x_valid_batch,
y_true: y_valid_batch}
session.run(optimizer, feed_dict=feed_dict_tr)
if i % int(data.train.num_examples/batch_size) == 0:
val_loss = session.run(cost, feed_dict=feed_dict_val)
epoch = int(i / int(data.train.num_examples/batch_size))
show_progress(epoch, feed_dict_tr, feed_dict_val, val_loss)
saver.save(session, 'dogs-cats-model')
total_iterations += num_iterationSo, this was all about Convolutional Neural Network in TensorFlow using CIFAR 10 database. Hope you like our explanation.
Conclusion
Hence, in this TensorFlow Convolutional Neural Network tutorial, we have seen TensorFlow Model Architecture, prediction of CIFAR 10 Model, and code with the example of CNN.
Moreover, the example code is a reference for those who find the implementation hard, so that you can directly run it through Linux. At last, we saw training and launching of the CNN model.
Finally, we discussed it with multiple GPU cards. Furthermore, if you have any query regarding Convolutional Neural Network, feel free to ask in the comment section.
If you are Happy with DataFlair, do not forget to make us happy with your positive feedback on Google


In the below line as referenced from your code::
x_batch, y_true_batch, _, cls_batch = data.train.next_batch(batch_size)
When I type “data” I do not get any suggestion from PyCharm IDE. and I get “unressolved reference “data”. Can you please share your views on this please. I am using python 3.6 in windows environment,and python 3.5 in Ubuntu. Both has tensorflow version as 1.9.0. Can you please suggest me
Your tutorial is awesome I request you to make a tutorial on image data set where it can caption images.
Your tutorial is awesome I request you to make a tutorial on image data set where it can caption images.
at this code line: data = dataset.read_train_sets(train_path, img_size, classes, validation_size=validation_size)
getting this below mentioned error
AttributeError: module ‘dataset’ has no attribute ‘read_train_sets’
tried downgrading “dataset” library but still getting the same error. Please help me
here is my contact number incase you are okay calling me and telling the solution faster way.