Learn Sqoop Import Mainframe Tool – Syntax and Examples
While it comes to import all sequential datasets in a partitioned dataset (PDS) on a mainframe to HDFS we use Sqoop import mainframe tool. Apart from Sqoop import mainframe tool’s introduction, there is much more to know about this tool in Sqoop.
So, in this article, we will cover each aspect of Sqoop import-mainframe tool to understand well. Thus, we will start with purpose and syntax of mainframe tool in sqoop import. Also, we will cover all the possible arguments for this tool. Moreover, we will cover all its examples for better understanding of the topic.
Introduction to Sqoop Import Mainframe Tool and its Purpose
- In Sqoop, there is a tool which we use to import all sequential datasets in a partitioned dataset (PDS) on a mainframe to HDFS. Basically, that tool is what we call import mainframe tool.
- Also, A PDS is akin to a directory on the open systems. Likewise, in a dataset, the records can only contain character data.
- Moreover here, records will be stored as a single text field with the entire record.
Syntax of Sqoop Import Mainframe Tool
$ sqoop import-mainframe (generic-args) (import-args)
$ sqoop-import-mainframe (generic-args) (import-args)
However, we can type the import arguments in any order with respect to one another but the Hadoop generic arguments must precede any import arguments.
Table 1. Common arguments
| Argument | Description |
| –connect <hostname> | Specify mainframe host to connect |
| –connection-manager <class-name> | Specify connection manager class to use |
| –hadoop-mapred-home <dir> | Override $HADOOP_MAPRED_HOME |
| –help | Print usage instructions |
| –password-file | Set path for a file containing the authentication password |
| -P | Read password from console |
| –password <password> | Set authentication password |
| –username <username> | Set authentication username |
| –verbose | Print more information while working |
| –connection-param-file <filename> | Optional properties file that provides connection parameters |
a. Connecting to a Mainframe
As we discussed earlier, to import mainframe datasets into HDFS, Sqoop is designed. However, in the Sqoop we need to specify a mainframe hostname –connect argument to do so.
$ sqoop import-mainframe –connect z390
However, via ftp this will connect to the mainframe host z390.
In addition, to access it we need to authenticate against the mainframe host. Moreover, to supply a username to the mainframe we can use the –username. Although there are following ways to supply a password which Sqoop offers. Such as secure and non-secure. Let’s discuss them in detail.
- Secure way of supplying password to the mainframe
- By using the –password-file argument we need to specify the path to that file. Also, we need to save the password in a file on the user’s home directory with 400 permissions. Basically, this is the preferred method of entering credentials.
- Afterwards, using secure means without exposing the password in the job configuration Sqoop will then read the password from the file and pass it to the MapReduce cluster.
- Moreover, the location of the file containing the password can either the Local FS or HDFS.
For Example
$ sqoop import-mainframe –connect z390 \
–username david –password-file ${user.home}/.password
Likewise, the next possible method of supplying passwords is by using the -P argument. That will read a password from a console prompt.

Sqoop Import Mainframe Tool – Code generation

Sqoop Import Mainframe Tool – Type Mapping
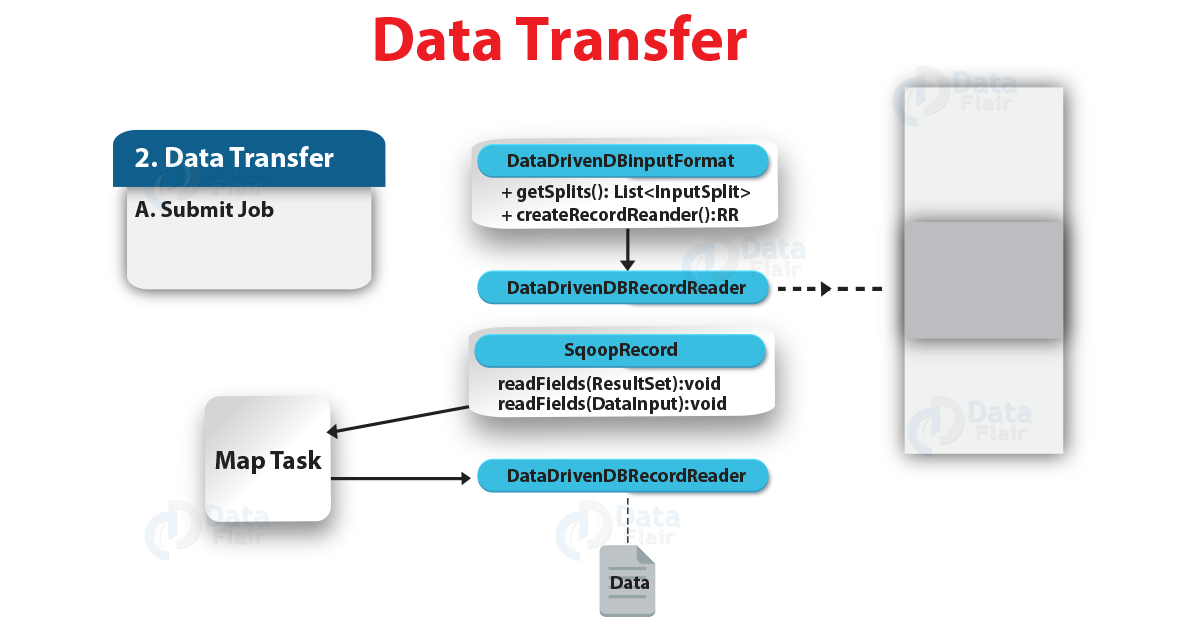
Sqoop Import Mainframe Tool – Data Transfer – 1
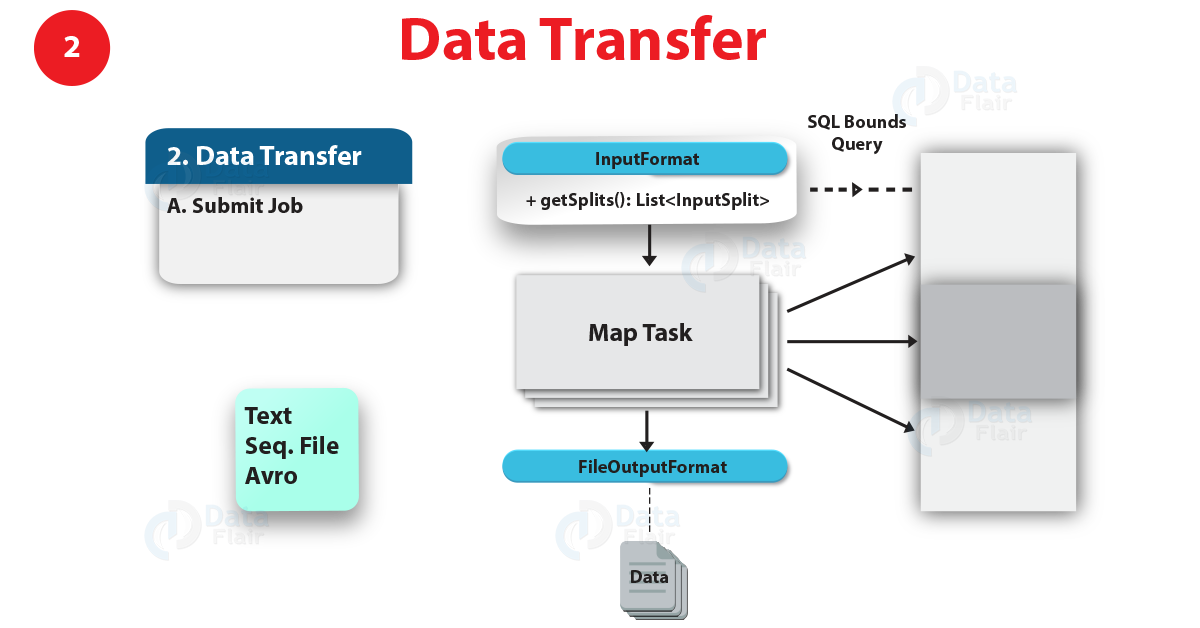
Sqoop Import Mainframe Tool – Data Transfer – 2
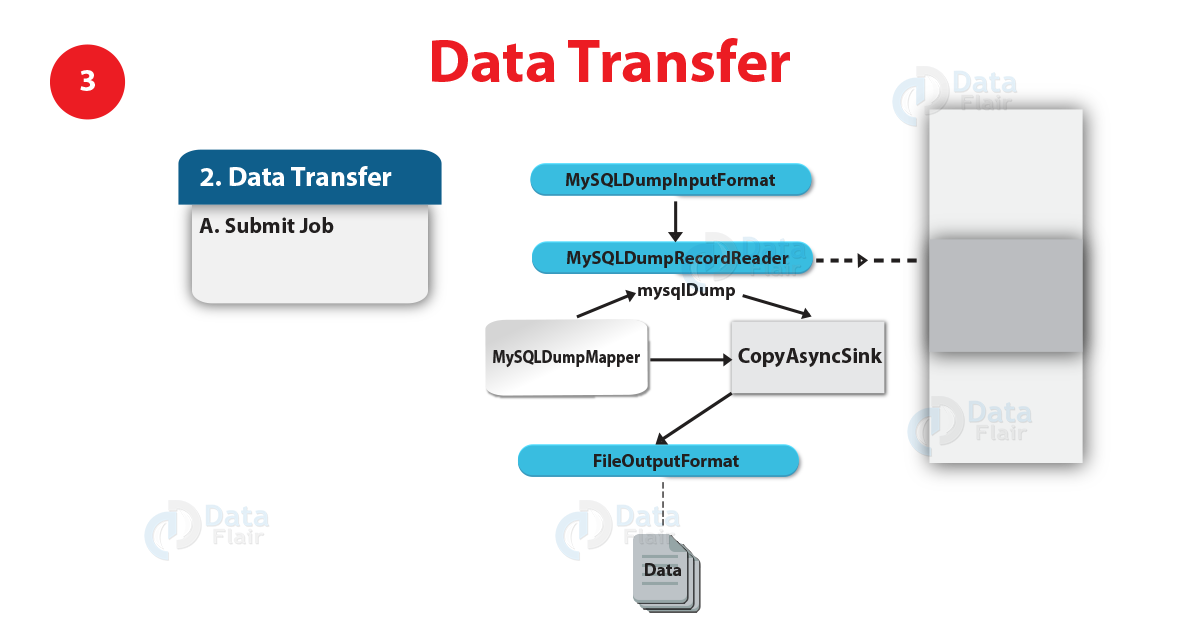
Sqoop Import Mainframe Tool – Data Transfer – 3
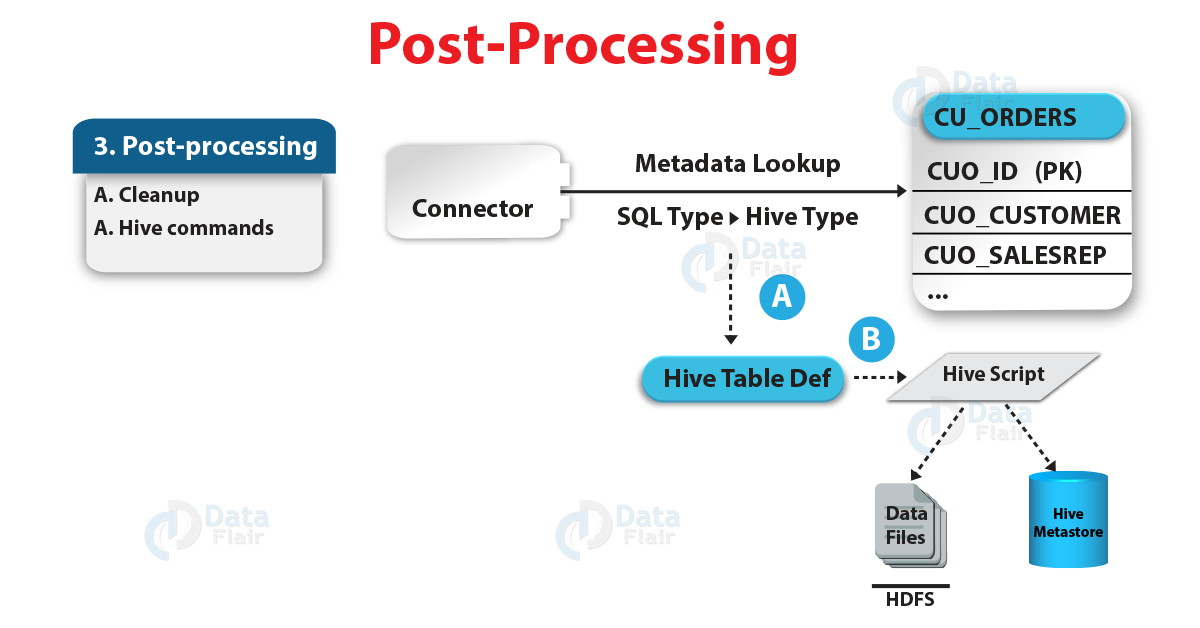
Sqoop Import Mainframe Tool – Post Processing
It is very important to note these following points:
- Here, –password parameter is insecure. Since it is possible that other users may be able to read our password from the command-line arguments by the output of programs like ps.
- However, using the -P argument is the more preferred method rather than using the –password argument. Also, keep an eye that using insecure means, Credentials may transfer between nodes of the MapReduce cluster.
For Example
$ sqoop import-mainframe –connect z390 –username david –password 12345
Table 2. Import control arguments
| Argument | Description |
| –as-avrodatafile | Imports data to Avro Data Files |
| –as-sequencefile | Imports data to SequenceFiles |
| –as-textfile | Imports data as plain text (default) |
| –as-parquetfile | Imports data to Parquet Files |
| –delete-target-dir | Delete the import target directory if it exists |
| -m,–num-mappers <n> | Use n map tasks to import in parallel |
| –target-dir <dir> | HDFS destination dir |
| –warehouse-dir <dir> | HDFS parent for table destination |
| -z,–compress | Enable compression |
| –compression-codec <c> | Use Hadoop codec (default gzip) |
b. Selecting the Files to Import
However, to specify a partitioned dataset name we can use the –dataset argument. Moreover, in the partitioned dataset, all sequential datasets will be imported.
c. Controlling Parallelism
- By making multiple ftp connections to the mainframe, Sqoop imports data in parallel in order to transfer multiple files simultaneously.
- Basically, to perform the import by using the -m or –num-mappers argument we can specify the number of map tasks (parallel processes) to use.
- Moreover, each of these arguments takes an integer value. That corresponds to the degree of parallelism to employ.
- Also, we can adjust this value to maximize the data transfer rate from the mainframe.
d. Controlling Distributed Cache
- While starting a Sqoop job Sqoop will copy the jars in $SQOOP_HOME/lib folder to job cache every time.
- Since Oozie uses its own Sqoop share lib which keeps Sqoop dependencies in the distributed cache hence this is unnecessary when launched by Oozie.
- For the Sqoop dependencies only once Oozie will do the localization on each worker node during the first Sqoop job. Also, reuse the jars on worker node for sub-sequential jobs.
e. Controlling the Import Process
- Basically, it will import all sequential files in a partitioned dataset pds to a directory named pds inside your home directory in HDFS.
- Let’s suppose if our username is someuser, hence the import tool will write to /user/someuser/pds/(files).
- Moreover, with the –warehouse-dir argument we can adjust the parent directory of the import.
For example
$ sqoop import-mainframe –connect <host> –dataset foo –warehouse-dir /shared \
…
Moreover, in the /shared/pds/ directory this command would write to a set of files.
Also, we can choose the target directory explicitly, like so:
$ sqoop import-mainframe –connect <host> –dataset foo –target-dir /dest \
…
Basically, this will import the files into the /dest directory. –target-dir is incompatible with –warehouse-dir.
However, imports go to a new target location, by default.
Note: In HDFS Sqoop will refuse to import and overwrite that directory’s contents if the destination directory already exists.
f. File Formats
However, each record in a dataset is stored as a text record with a newline at the end, by default. Also, with the name DEFAULT_COLUMN each record is assumed to contain a single text field. Moreover, it generates a Java class which can reinterpret the text files that it creates, whenever Sqoop imports data to HDFS.
Also, we can import mainframe records to Sequence, Avro, or Parquet files.
Table 3. Output line formatting arguments
| Argument | Description |
| –enclosed-by <char> | Sets a required field enclosing character |
| –escaped-by <char> | Sets the escape character |
| –fields-terminated-by <char> | Sets the field separator character |
| –lines-terminated-by <char> | Sets the end-of-line character |
| –mysql-delimiters | Uses MySQL’s default delimiter set: fields: , lines: \n escaped-by: \ optionally-enclosed-by: ‘ |
| –optionally-enclosed-by <char> | Sets a field enclosing character |
However, importing to delimited files will not contain any field delimiter because mainframe record contains only one field. Although, with enclosing character the field may be enclosed or by an escaping character field may be escaped.
Table 4. Input parsing arguments
| Argument | Description |
| –input-enclosed-by <char> | Sets a required field encloser |
| –input-escaped-by <char> | Sets the input escape character |
| –input-fields-terminated-by <char> | Sets the input field separator |
| –input-lines-terminated-by <char> | Sets the input end-of-line character |
| –input-optionally-enclosed-by <char> | Sets a field enclosing character |
Sqoop generates a Java class when it imports data to HDFS. While doing a delimited-format import, that can reinterpret the text files that it creates.
Table 5. Hive arguments
| Argument | Description |
| –hive-home <dir> | Override $HIVE_HOME |
| –hive-import | Import tables into Hive (Uses Hive’s default delimiters if none are set.) |
| –hive-overwrite | Overwrite existing data in the Hive table. |
| –create-hive-table | If set, then the job will fail if the target hive table exits. By default this property is false. |
| –hive-table <table-name> | Sets the table name to use when importing to Hive. |
| –hive-drop-import-delims | Drops \n, \r, and \01 from string fields when importing to Hive. |
| –hive-delims-replacement | Replace \n, \r, and \01 from string fields with user defined string when importing to Hive. |
| –hive-partition-key | Name of a hive field to partition are sharded on |
| –hive-partition-value <v> | String-value that serves as partition key for this imported into hive in this job. |
| –map-column-hive <map> | Override default mapping from SQL type to Hive type for configured columns. |
g. Importing Data Into Hive
The major function of Sqoop’s import tool’s is to upload our data into files in HDFS. It can also import the data into Hive by generating and executing a CREATE TABLE statement to define the data’s layout in Hive, if you have a Hive metastore associated with your HDFS cluster. Moreover, Importing data into Hive is as simple as adding the –hive-import option to your Sqoop command line.
It is important to note that this function is incompatible with –as-avrodatafile as well as –as-sequencefile.
However, as Hive supports escaping characters, still it does not handle escaping of new-line character. Although, it does not support the notion of enclosing characters that may include field delimiters in the enclosed string.
Table 6. HBase arguments
| Argument | Description |
| –column-family <family> | Sets the target column family for the import |
| –hbase-create-table | If specified, create missing HBase tables |
| –hbase-row-key <col> | Specifies which input column to use as the row key In case if input table contains composite key, then <col> must be in the form of a comma-separated list of composite key attributes. |
| –hbase-table <table-name> | Specifies an HBase table to use as the target instead of HDFS |
| –hbase-bulkload | Enables bulk loading |
h. Importing Data Into HBase
However, beyond HDFS and Hive, Sqoop supports additional import targets. Also, sqoop can import records into table in HBase.
In addition, you instruct Sqoop to import to a table in HBase by specifying –hbase-table, rather than a directory in HDFS. Also, Sqoop will import data to the table specified as the argument to –hbase-table.
Moreover, it is very important to note that this function is incompatible with direct import (parameter –direct).
Table 7. Accumulo arguments
| Argument | Description |
| –accumulo-table <table-nam> | Specifies an Accumulo table to use as the target instead of HDFS |
| –accumulo-column-family <family> | Sets the target column family for the import |
| –accumulo-create-table | If specified, create missing Accumulo tables |
| –accumulo-row-key <col> | Specifies which input column to use as the row key |
| –accumulo-visibility <vis> | (Optional) Specifies a visibility token to apply to all rows inserted into Accumulo. Default is the empty string. |
| –accumulo-batch-size <size> | (Optional) Sets the size in bytes of Accumulo’s write buffer. Default is 4MB. |
| –accumulo-max-latency <ms> | (Optional) Sets the max latency in milliseconds for the Accumulo batch writer. Default is 0. |
| –accumulo-zookeepers <host:port> | Comma-separated list of Zookeeper servers used by the Accumulo instance |
| –accumulo-instance <table-name> | Name of the target Accumulo instance |
| –accumulo-user <username> | Name of the Accumulo user to import as |
| –accumulo-password <password> | Password for the Accumulo user |
i. Importing Data Into Accumulo
Basically, into a table in Accumulo Sqoop supports importing records.
In addition, we can instruct Sqoop to import to a table in Accumulo rather than a directory in HDFS by specifying –accumulo-table. Moreover, Sqoop will import data to the table specified as the argument to –accumulo-table.
Again it is very important to note that this function is incompatible with direct import (parameter –direct). Also, it cannot be used in the same operation as an HBase import.
Table 8. Code generation arguments
| Argument | Description |
| –bindir <dir> | Output directory for compiled objects |
| –class-name <name> | Sets the generated class name. This overrides –package-name. When combined with –jar-file, sets the input class. |
| –jar-file <file> | Disable code generation; use specified jar |
| –outdir <dir> | Output directory for generated code |
| –package-name <name> | Put auto-generated classes in this package |
| –map-column-java <m> | Override default mapping from SQL type to Java type for configured columns. |
Basically, the class is typically named after the partitioned dataset name. Since a partitioned dataset named foo will generate a class named foo. It is possible that we may want to override this class name.
For example, if our partitioned dataset is named EMPLOYEES, we want to specify –class-name employee instead. In this way, we can specify just the package name with –package-name.
Here, the following import generates a class named com.foocorp.SomePDS:
$ sqoop import-mainframe –connect <host> –dataset SomePDS –package-name com.foocorp
While we run sqoop, the .java source file for our class will be written to the current working directory. Also, with –outdir we can control the output directory.
For example,
–outdir src/generated/.
Moreover, the import process compiles the source into .class and .jar files; these are ordinarily stored under /tmp. Also, with –bindir we can select an alternate target directory.
For example,
–bindir /scratch.
If you already have a compiled class that can be used to perform the import and want to suppress the code-generation aspect of the import process, you can use an existing jar and class by providing the –jar-file and –class-name options.
For example,
$ sqoop import-mainframe –dataset SomePDS –jar-file mydatatypes.jar \
–class-name SomePDSType
Basically, this command will load the SomePDSType class out of mydatatypes.jar.
j. Additional Import Configuration Properties
There are some additional properties which can be configured by modifying conf/sqoop-site.xml. Properties can be specified the same as in Hadoop configuration files.
For example
<property>
<name>property.name</name>
<value>property.value</value>
</property>
Moreover, in the generic arguments, we can also specify it on the command line.
For example
sqoop import -D property.name=property.value …
Sqoop Import Mainframe Tool – Example Invocations
Here, an example below shows that how to use the import tool in a variety of situations.
However, in the mainframe host z390, a basic import of all sequential files in a partitioned dataset named EMPLOYEES:
For example,
$ sqoop import-mainframe –connect z390 –dataset EMPLOYEES \
–username SomeUser -P
Enter password: (hidden)
Moreover, Controlling the import parallelism (using 8 parallel tasks):
$ sqoop import-mainframe –connect z390 –dataset EMPLOYEES \
–username SomeUser –password-file mypassword -m 8
Afterwards, Importing the data to Hive:
$ sqoop import-mainframe –connect z390 –dataset EMPLOYEES \
–hive-import
Conclusion
As a result, we have seen the whole concept of Sqoop import mainframe tool. Also, we have seen Sqoop import mainframe examples to understand well. Moreover, we have seen all the arguments associated with this tool. Also, we have learned its syntax to use it easily.
Still, if you want to ask any query regarding, feel free to ask in the comment section.
See Also- Sqoop Validation & Best Sqoop Books
For reference
Did you like our efforts? If Yes, please give DataFlair 5 Stars on Google


