Spring Beans Autowiring – Modes with Eclipse IDE Example
Placement-ready Courses: Enroll Now, Thank us Later!
1. Objective
In our previous tutorial, we studied Spring Batch and in this Spring Beans Tutorial, we will learn about Spring Beans Autowiring. Along with that, you will learn about the modes of Autowiring in Spring Framework, is used to instruct the Spring container to use autowiring for DI. There will also be working an example using Eclipse IDE.
So, let’s start Spring Beans Autowiring.
Spring Beans Autowiring – Modes with Eclipse IDE Example
2. What is Spring Beans Autowiring?
There are several collaborating beans used for developing the Spring application. Spring Beans Autowiring helps in making the relationship between them. In the previous sessions, you have understood the concept of using the <bean> to declare beans. Also, injecting <bean> using the elements like <constructor-arg> and <property> which helps in cutting down the amount of XML configuration. Autowiring in Spring Beans helps in reducing the efforts of writing properties.
Let’s know brief about Spring Beans
All the Spring Beans autowiring should be specified at autowire attribute inside element <bean>, </bean>.
3. Spring Autowiring Modes
Before you start let’s define a working example using Eclipse IDE with the following steps:
- Make a project named SpringEx under package com.example. It should be under src folder in the created project name.
- Put the required Spring libraries using External JARs option.
- Define classes TextEditor.java, SpellChecker.java, MainApp.java under the defined package.
- Define Bean config files Bean.xml.
- Use the Java files and bean configuration to run the application as defined below.
The code for java file TextEditor:
package com.example;
public class TextEditor {
   private SpellChecker spellChecker;
   private String name;
   public void setSpellChecker( SpellChecker spellChecker ){
      this.spellChecker = spellChecker;
   }
   public SpellChecker getSpellChecker() {
      return spellChecker;
   }
   public void setName(String name) {
      this.name = name;
   }
   public String getName() {
      return name;
   }
   public void spellCheck() {
      spellChecker.checkSpelling();
   }
}
The SpellChecker.java is as follow:
package com.example;
public class SpellChecker {
   public SpellChecker() {
      System.out.println("Inside SpellChecker constructor." );
   }
   public void checkSpelling() {
      System.out.println("Inside checkSpelling." );
   }
}
Read about Integration of Spring Logging with log4j – Eclipse IDE Coding
The code for MainApp java file:
import org.springframework.context.ApplicationContext;
import org.springframework.context.support.ClassPathXmlApplicationContext;
public class MainApp {
   public static void main(String[] args) {
      ApplicationContext context = new ClassPathXmlApplicationContext("Beans.xml");
      TextEditor te = (TextEditor) context.getBean("tetEditor");
      te.spellCheck();
   }
}
After creating those file run them. You will get the following message as output:
Inside SpellChecker constructor.
Inside checkSpelling.
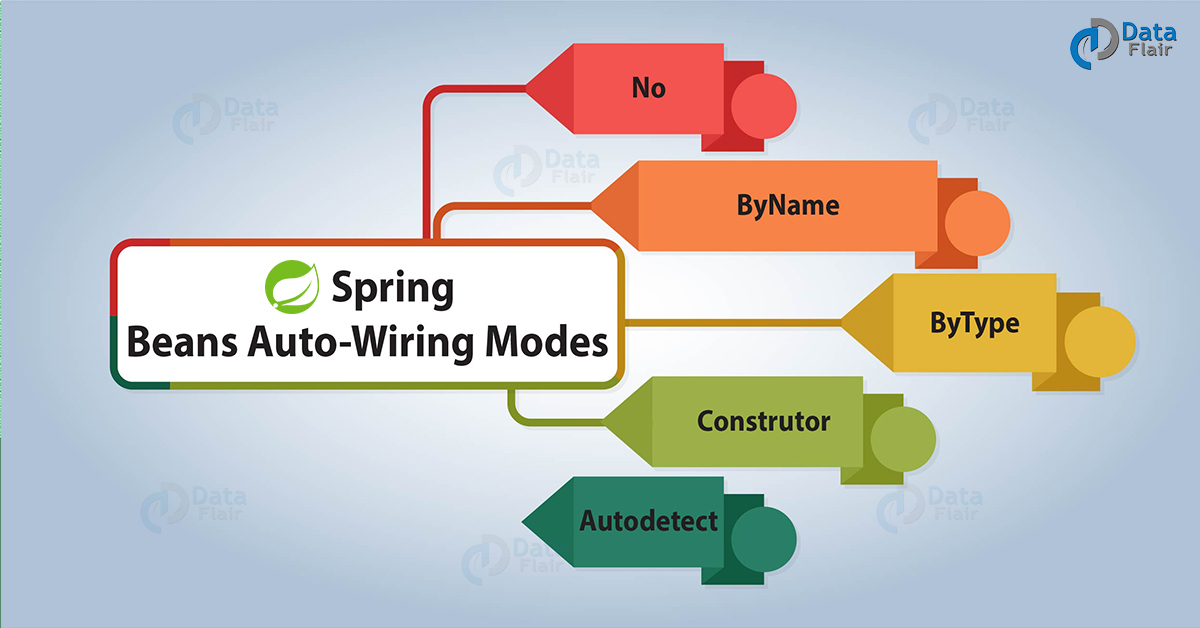
There are several Spring Beans Autowiring modes available used for instructing the Spring container to use autowiring for DI. The autowiring at bean level is controlled using the autowire attribute having possible values:
Spring Beans Autowiring Modes
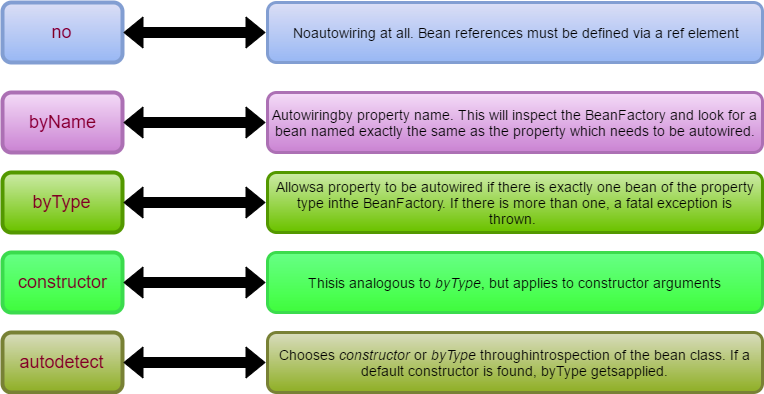
i. no
This is the default setting that is there is no autowiring in Spring Beans. Explicit bean reference is needed for wiring. The below is an example of autowiring ‘no’:
<bean class="com.example.sdnext.autowiring">
   <property name="center">
</property></bean>
<bean class="com.example.sdnext.autowiring"></bean>
Do you How to Design Customised Events in Spring framework
ii. byName
This autowiring mode is specified byName in the XML config file. It tries to match and wires the properties with beans which are defined by same names in a configuration file. Then if the match is found it will inject those beans else it won’t be wired.
The Beans.xml file with autowiring is as defined:
<?xml version = "1.0" encoding = "UTF-8"?>
<beans xmlns = "http://www.springframework.org/schema/beans"
   xmlns:xsi = "http://www.w3.org/2001/XMLSchema-instance"
   xsi:schemaLocation = "http://www.springframework.org/schema/beans
   http://www.springframework.org/schema/beans/spring-beans-3.0.xsd">
   <!-- Definition for textEditor bean -->
   <bean id = "textEditor" class = "com.example.TextEditor" autowire = "byName">
      <property name = "name" value = "Generic Text Editor" />
   </bean>
   <!-- Definition for spellChecker bean -->
   <bean id = "spellChecker" class = "com.example.SpellChecker"></bean>
</beans>
iii. ByType
This autowiring mode is specified byType in the XML config file. It tries to match and wires the properties with beans which are defined by same names in a configuration file. Then if the match is found it will inject those beans else it won’t be wired.
The same example can be taken just replacing the Beans.xml file which is defined as below:
<?xml version = "1.0" encoding = "UTF-8"?>
<beans xmlns = "http://www.springframework.org/schema/beans"
   xmlns:xsi = "http://www.w3.org/2001/XMLSchema-instance"
   xsi:schemaLocation = "http://www.springframework.org/schema/beans
   http://www.springframework.org/schema/beans/spring-beans-3.0.xsd">
   <!-- Definition for textEditor bean -->
   <bean id = "textEditor" class = "com.example.TextEditor" autowire = "byType">
      <property name = "name" value = "Generic Text Editor" />
   </bean>
   <!-- Definition for spellChecker bean -->
   <bean id = "SpellChecker" class = "com.example.SpellChecker"></bean>
</beans>
iv. constructor
This is similar to byType but it applies to the arguments of the constructor. The container of Spring sees the beans with an autowire attribute is set as a constructor in XML config file. Then it tries to match and wires with exactly one of the beans in the config file. If that match is found then it will inject those beans else it won’t get wired.
<?xml version = "1.0" encoding = "UTF-8"?>
<beans xmlns = "http://www.springframework.org/schema/beans"
   xmlns:xsi = "http://www.w3.org/2001/XMLSchema-instance"
   xsi:schemaLocation = "http://www.springframework.org/schema/beans
   http://www.springframework.org/schema/beans/spring-beans-3.0.xsd">
   <!-- Definition for textEditor bean -->
   <bean id = "textEditor" class = "com.example.TextEditor"
      autowire = "constructor">
      <constructor-arg value = "Generic Text Editor"/>
   </bean>
   <!-- Definition for spellChecker bean -->
   <bean id = "SpellChecker" class = "com.example.SpellChecker"></bean>
</beans>
Let’s Explore Spring MVC Framework – Integration of MVC with Spring
v. autodetect
If in a case where a default constructor is found Spring uses ‘constructor’. Else it tries to use the “byType”.
<bean autowire="autodetect" class="com.example.sdnext.autowiring"></bean>
<bean class="com.example.sdnext.autowiring"></bean>
So, this was all about Spring Beans Autowiring. Hope you like our explanation.
4. Conclusion
Hence, in this session, we learned about the autowiring in Spring Framework and how it is used in a Spring application. We also learned about the various auto wiring modes available along with the working example using Eclipse IDE. Furthermore, if you have any query, feel free to ask in the comment section.
Related Topic – Spring Bean Life cycle
For reference
Your 15 seconds will encourage us to work even harder
Please share your happy experience on Google


