Install Rockmongo in MongoDB in 8 min – Tool Application, Connect to Windows
Expert-led Courses: Transform Your Career – Enroll Now
In the last tutorial, we had learned about MongoDB Mapreduce. Today, we will look at an open source tool developed for MongoDB, Rockmongo.
In this rockmongo tutorial, we will learn how to install rockmongo in MongoDB and its tool application. At last, we will cover how rockmongdb connect on windows.
Rockmongo in MongoDB
Rockmongo is nothing but an open source tool developed for MongoDB administration tool which is written in PHP5. It is one of the best tools for MongoDB administration available currently.
Rockmongo in MongoDB is very easy to use interface for creating database, collections, documents, query collections, import, and export data and insert and fetch documents using a web interface.
It has many options similar to the PhpMyAdmin tool which is being used to develop web pages using PHP and MySQL.
How to Install Rockmongo?
For installing rockmongo we have to follow the steps given below:
i. Install Apache
To install Apache, open terminal and type the following commands:
sudo apt-get update
sudo apt-get install apache2
ii. Install MySQL
To install MySQL, open terminal and type the following command:
sudo apt-get install mysql-server libapache2-mod-auth-mysql php5-mysql
iii. Install PHP
To install PHP, open terminal and type the following command:
sudo apt-get install php5 libapache2-mod-php5 php5-mcrypt
iv. Install Rockmongo
For this we first have to install php-mongo on Ubuntu. Install PHP Pear package:
sudo apt-get install php-pear
After this install PHP-Mongo driver that connects PHP and MongoDB:
sudo apt-get install php5-dev

sudo apt-get install libpcre3 libpcre3-dev

sudo pecl install mongo
Now, configure PHP-Mongo driver in Apache2
nano etc/php5/apache2/php.ini
Add this line below:
extension=mongo.so
Now restart Apache2 server
sudo service apache2 restart
After this download Rockmongo.
Extract the downloaded file into var/www/folder
Rockmongo Tool Application
These are some basic database operations, which are mostly used when we work with MongoDB.
a. How to create new database in MongoDB with Rockmongo?
For creating a new database, click the Database tab. Click Create a New Database. After this provide a name for your database and click on Create. You will get to see a new database being added at the left panel.
b. How to create a new collection in MongoDB?
For this click on the database from the left panel. Click on New Collection link on top. Provide a name for the collection. Click on Create. A new collection will be created and you will see that at the left side of the panel.
c. How to creating new document in MongoDB?
For this click on collection under which you can create new documents. To create a new one, click on the Insert link at the top. You can enter the document’s data in either JSON or array format and click on save.
d. How to export/import a Data into MongoDB?
For performing this operation click on that collection and then click Export/Import link on the top panel. Follow few instructions to export your data in zip format and then import the same zip file to import back the data.
How to Connect to Rockmongo on Windows?
If you want to access Rockmongo on Windows then follow these steps:
- In the “Connection→SSH→Tunnels” section, add the following values: Source port: 8888 and Destination: localhost:80
- Now click on “Add” button to add secure tunnel configuration to the session.

Step-2 Connect to Rockmongo on Windows
- Click on “Save” button.
- Click the “Open” button to open an SSH session to the server.
- Access the Rockmongo console using http://127.0.0.1:8888/rockmongo.
- After this you have to login and after that you will get a page like this:
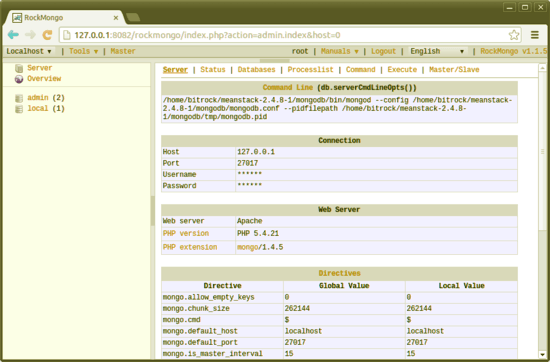
Step.6 Connect to Rockmongo on Windows
If you are unable to access it, verify the SSH tunnel that was created by checking the PuTTY event log.
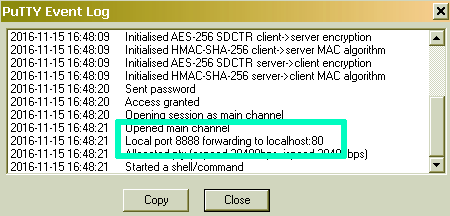
Result – Connect to Rockmongo on Windows
So, this was all about Rockmongo Tutorial. Hope, you liked our explanation.
Conclusion
Hence, we studied about step to install rockmongo with tool application. In addition, we discuss how to connect rockmongo to windows with example.
Still, if you have any query, feel free to ask in the comment section.
Did you know we work 24x7 to provide you best tutorials
Please encourage us - write a review on Google


