JSP Sending Email
Placement-ready Online Courses: Your Passport to Excellence - Start Now
In this article, we will discuss how to send emails using JSP. Along with it, we will see attachment Email, HTML Email, forms for Email, and authentication for Email using JSP. So let’s start JSP Sending Email tutorial.
Sending emails through the client’s machine is an important functionality provided by JSP.
JavaMail API and the Java Activation Framework (JAF) should be installed on the machine to send emails using JSP. Download these files and unzip them in newly formed directories. Amongst many jar files, add mail.jar and activation.jar file to the Classpath.
Flow of Creating Email in JSP
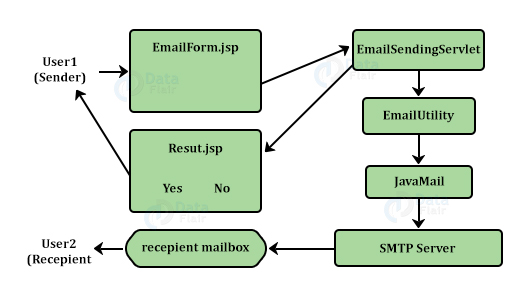
Here the result is determined by result.jsp whereas the mail goes over different steps and using Simple Mail Transfer Protocol, it reaches the recipient.
Sender fills out the mail form and sends it over the sending servlet. While result.jsp checks if the mail is sent successfully or not, it notifies the sender accordingly.
Java mails are sent over certain protocols. They are:
- SMTP Protocol: It is the most common protocol, better known as Simple Mail Transfer Protocol. This protocol is used to send mails over Internet Protocol. It supports later two protocols while sending messages between servers.
- POP Protocol: It is Post Office Protocol used to get mails at remote servers. POP2 sends mail over SMTP protocol, whereas POP3 can send email with or without SMTP.
- IMAP Protocol: As the name suggests Internet Message access protocol, it accesses the emails at remote servers as former protocol.
Steps to Create and Send Email
1. Get the Session Object: Java Mail Session object will do the work as follows:
For Example: // Get the Session object.
Session mailSession = Session.getDefaultInstance(properties)
2. Compose the message: This part consists of the main body. Create a Mime message object for the session. Methods like setSubject () and setText () will set the contents.
For Example: MimeMessage msg = new MimeMessage(mailSession)
message.setText(“This is actual message”)
3. Send the message: Java Mail API uses the method send () of Transport class to send email.
For Example: Transport.send(message);
result = “Sent message successfully….”
Send a Simple Email
Connect the localhost to the Internet and make sure that jar files from the Java Email API package and the JAF package are available in CLASSPATH. Following is the code:
For Example
SendEmail.jsp
<%@ page import = "java.io.*,java.util.*,javax.mail.*"%>
<%@ page import = "javax.mail.internet.*,javax.activation.*"%>
<%@ page import = "javax.servlet.http.*,javax.servlet.*" %>

<%
   String result;

   // Recipient's email ID needs to be mentioned.
   String to = "[email protected]";

   // Sender's email ID needs to be mentioned
   String from = "[email protected]";

   // Assuming email sent from localhost
   String host = "localhost";

   // Get properties object
   Properties properties = System.getProperties();

   // Setup mail server
   properties.setProperty("mail.smtp.host", host);

   // Get the Session object.
   Session mailSession = Session.getDefaultInstance(properties);

   try {
  	// Create a MimeMessage object.
  	MimeMessage msg = new MimeMessage(mailSession);

  	// Set From: header field
  	message.setFrom(new InternetAddress(from));

  	// Set To: header field
      message.addRecipient(Message.RecipientType.TO,
                           	new InternetAddress(to));
  	// Set Subject:
 	message.setSubject("This is the Subject Line!");

  	// Set the actual message
  	message.setText("This is actual message");

  	// Send message
  	Transport.send(message);
  	result = "Sent message successfully.";
   } catch (MessagingException mex) {
  	mex.printStackTrace();
  	result = "Error: could not send message....";
   }
%>

<html>
   <head>
  	<title>Send Email using JSP</title>
   </head>

   <body>
     	<h1>Send Email using JSP</h1>


     	<%
        	out.println("Result: " + result + "\n");
     	%>

   </body>
</html>
Call this program through http://localhost:8080/SendEmail.jsp. This will help send an email to the given email ID [email protected]. You will receive the following response –
Output:
()
To send email to multiple ids, use the following code:
void addRecipients(Message.RecipientType type, Address[] addresses)
Description of the parameters used above are −
- type – Type can be as follows – TO, CC, or BCC, where CC is Carbon Copy, and BCC stands for Black Carbon Copy. E.g., Message.RecipientType.TO, Message.RecipientType.CC
- addresses – Address here will be InternetAddress() method while specifying email IDs. This will be an array of mail ids that will receive the message.
Send an HTML Email
Connect the localhost to the Internet and make sure that jar files from the Java Email API package and the JAF package are available in CLASSPATH.
The difference between the former and latter is that in the following code, we will use setContent() method with a second parameter as text/html to mention that HTML content is there in the message.
For Example
<%@ page import = "java.io.*, java.util.*, javax.mail.*"%>
<%@ page import = "javax.mail.internet.*, javax.activation.*"%>
<%@ page import = "javax.servlet.http.*, javax.servlet.*" %>

<%
   String result;

   // Recipient's email ID needs to be mentioned.
   String to = "[email protected]";

   // Sender's email ID needs to be mentioned
   String from = "[email protected]";

   // Assuming email sent from localhost
   String host = "localhost";

   // Get properties object
   Properties properties = System.getProperties();

   // Setup mail server
   properties.setProperty("mail.smtp.host", host);

   // Get Session object.
   Session mailSession = Session.getDefaultInstance(properties);

   try {
  	// Create a MimeMessage object.
  	MimeMessage message = new MimeMessage(mailSession);

  	// Set From: header field
  	message.setFrom(new InternetAddress(from));

  	// Set To: header field
      message.addRecipient(Message.RecipientType.TO, new InternetAddress(to));

  	// Set Subject: header field
  	message.setSubject("Enter Subject Line!");

  	// Send the HTML message
  	message.setContent("<h1>This is actual message</h1>", "text/html" );

  	// Send message
  	Transport.send(message);
  	result = "Sent message successfully....";
   } catch (MessagingException mex) {
  	mex.printStackTrace();
  	result = "Error: unable to send message....";
   }
%>

<html>
   <head>
  	<title>Send HTML Email using JSP</title>
   </head>

   <body>

     	<h1>Send Email using JSP</h1>

           	<%
        	out.println("Result: " + result + "\n");
     	%>
     	</body>
</html>
Above JSP code will send an HTML message on a given email ID.
Send Attachment in Email
Send an email with attachment using following code −
For Example
<%@ page import = "java.io.*, java.util.*, javax.mail.*"%>
<%@ page import = "javax.mail.internet.*, javax.activation.*"%>
<%@ page import = "javax.servlet.http.*, javax.servlet.*" %>

<%
   String result;

   // Recipient's email ID
   String to = "[email protected]";

   // Sender's email ID
   String from = "[email protected]";

   // Assuming email is sent from localhost
   String host = "localhost";

   // Get properties object
   Properties properties = System.getProperties();

   // Setup mail server
   properties.setProperty("mail.smtp.host", host);

   // Get Session object.
   Session mailSession = Session.getDefaultInstance(properties);

   try {
  	// Create a MimeMessage object.
  	MimeMessage message = new MimeMessage(mailSession);

  	// Set From: header field
  	message.setFrom(new InternetAddress(from));

  	// Set To: header field
      message.addRecipient(Message.RecipientType.TO, new InternetAddress(to));

  	// Set Subject:
  	message.setSubject("This is the Subject Line!");

  	// Create the message section
  	BodyPart messageBodyPart = new MimeBodyPart();

  	// Fill the message
  	messageBodyPart.setText("This is message body");

  	// Create a multipart message
  	Multipart multipart = new MimeMultipart();

  	// Set text message part
  	multipart.addBodyPart(messageBodyPart);

  	// Second is attachment
  	messageBodyPart = new MimeBodyPart();

  	String filename = "file.txt";
  	DataSource source = new FileDataSource(filename);
  	messageBodyPart.setDataHandler(new DataHandler(source));
  	messageBodyPart.setFileName(filename);
  	multipart.addBodyPart(messageBodyPart);

  	// Send complete message
  	message.setContent(multipart );

  	// Send message
  	Transport.send(message);
  	String title = "Send Email";
  	result = "Sent message successfully....";
   } catch (MessagingException mex) {
  	mex.printStackTrace();
  	result = "Error: unable to send message....";
   }
%>

<html>
   <head>
      <title>Send Attachment Email</title>
   </head>

   <body>

         <h1>Send Attachment Email</h1>

     	<%out.println("Result: " + result + "\n");%>
   </body>
</html>
The above code will help to send an attachment email using JSP.
User Authentication
For authentication, we need an ID and password for user authentication purposes which can be set using the following properties:
- props.setProperty(“mail.user”, “my_user”);
- props.setProperty(“mail.password”, “my_pwd”);
These can be added to the above code to set user authentication.
Forms to Send Email
HTML forms can be used to accept email parameters. Use the request object to get all the information as follows –
String to = request.getParameter("to");
String from = request.getParameter("from");
String subject = request.getParameter("subject");
String messageText = request.getParameter("body");
Use the above-explained code after these steps.
Conclusion
In reference to the above article, we learnt the sending mechanism of Email using JSP. It consists of different parts like using forms, setting user authentication, HTML emails, attachment emails etc.
Did you like our efforts? If Yes, please give DataFlair 5 Stars on Google


