Flutter Project – Dice Roll App
Whether you’re playing board games, making decisions, or simply seeking a bit of randomness, a Dice Roll App in Flutter can provide you with endless fun and utility. It is a two-player app where a random number will be generated for each player and added to their scores at each turn, and the player with the highest score wins. Users can also clear the scores to start a new game.
About Flutter Dice Roll App
In this Flutter Dice Roll Project, we will embark on a journey to create a Dice Roll App using Flutter. You will learn the basics of Flutter development, including UI design, user interactions, and how to incorporate random number generation to simulate the roll of a physical die. By the end of this Flutter Dice Roll project, you’ll have a fully functional Flutter app that you can use and customize as you see fit.
Prerequisites For Flutter Dice Roll Project
First, let’s install the below-mentioned required software to build the Flutter Dice Roll app:
(i) Flutter – Refer to the link for installing Flutter, depending on your operating system.
(ii) Android Studio – You can download Android Studio. This is necessary as it will run the app in the Android emulator.
(iii) Visual Studio Code – Although this is not necessary, you can also build apps in Android Studio. But in our case, we have used VS code as it is a good code editor. You can also download it from here.
Now that the setup is ready, let’s get started!
Creating a New Dice Roll Project in Flutter
Let’s start with creating a new Flutter Dice Roll Project through the Flutter terminal. Go to the directory where you want to save the project using:-
cd $Project-directory-path
Then create a new project using the below command:-
flutter create tic-tac-toe
Download Flutter Dice Roll Project
Please download the source code of the Flutter Dice Roll Project: Flutter Dice Roll Project Code.
Steps to Build Flutter Dice Roll App Project
1. Starting with the Main Layout of the App
Let’s start with building the main structure of the app. For this, we have imported the material. dart package. We have used Scaffold to build the general layout and added the AppBar to give a title for the app. In the body, we are returning GradientContainer, which is a custom widget we will build next.
import 'package:flutter/material.dart';

import './gradient_container.dart';

const bgColor1 = Color.fromARGB(255, 26, 2, 80);
const bgColor2 = Color.fromARGB(255, 45, 7, 98);
void main() {
  runApp(
    MaterialApp(
      home: Scaffold(
        appBar: AppBar(
          title: const Text('Dice Roll by DataFlair'),
          backgroundColor: const Color.fromARGB(255, 40, 5, 73),
        ),
        body: const GradientContainer(bgColor1, bgColor2),
      ),
    ),
  );
}
The below code shows the GradientContainer widget, which is a stateless widget, as the state will remain the same in this widget. Through this, we add the gradient for the main screen of the app. Here in the build function, we return a Container and, using its decoration property sets the LinearGradient for the app. In the container’s child, we return a custom widget, DiceRoller, which we will see next.
import 'package:flutter/material.dart';

import './dice_roller.dart';

const bgStartAlignment = Alignment.topLeft;
const bgEndAlignment = Alignment.bottomRight;

// ignore: must_be_immutable
class GradientContainer extends StatelessWidget {
  const GradientContainer(this.color1, this.color2, {super.key});

  final Color color1;
  final Color color2;

  @override
  Widget build(BuildContext context) {
    return Container(
      width: double.infinity,
      height: double.infinity,
      decoration: BoxDecoration(
        gradient: LinearGradient(
          colors: [
            color1,
            color2,
          ],
          begin: bgStartAlignment,
          end: bgEndAlignment,
        ),
      ),
      child: const DiceRoller(),
    );
  }
}
2. Building the Home Screen of the App
Here DiceRoller is a custom widget through which we will show the content/home screen of the app. It is a StateFul widget, as the content on the screen needs to be changed when the user rolls the dice or the scores get updated. Here firstly, we initialize the variables to store the scores of players and keep track of which player’s turn is it.
We create two functions, one called rollDice, which will change the dice image as the user clicks on the button and updates the scores of players. Another function, called clearScores, as the name suggests, is to clear the scores of players and initialize them to 0.
Through this widget, we return the app’s content using the Column widget and set the main axis size to a minimum. In the children argument, we return the PlayerScores widget, which is a custom widget to show the scores of the player, an Image of the dice, text button to roll the dice, through which the rollDice function gets executed as we see above, and another text button to clear the scores of the players. In between each of these widgets, we use SizedBox to set the gap b/w various elements.
import 'dart:math';

import 'package:flutter/material.dart';
import 'widgets/player_scores.dart';

final randomizer = Random();

class DiceRoller extends StatefulWidget {
  const DiceRoller({super.key});
  @override
  State<DiceRoller> createState() {
    return _DiceRollerState();
  }
}

class _DiceRollerState extends State<DiceRoller> {
  var currentDiceRoll = 2;

  var player1Score = 0;
  var player2Score = 0;

  var player1Turn = true;

  void rollDice() {
    setState(
      () {
        currentDiceRoll = randomizer.nextInt(6) + 1;
        if (player1Turn) {
          player1Score += currentDiceRoll;
        } else {
          player2Score += currentDiceRoll;
        }
        player1Turn = !player1Turn;
      },
    );
  }

  void clearScores() {
    setState(() {
      player1Score = 0;
      player2Score = 0;
    });
  }

  @override
  Widget build(BuildContext context) {
    return Column(
      mainAxisSize: MainAxisSize.min,
      children: [
        Padding(
          padding: const EdgeInsets.symmetric(horizontal: 18, vertical: 24),
          child: PlayerScores(
              player1Score: player1Score, player2Score: player2Score),
        ),
        const SizedBox(
          height: 60,
        ),
        Image.asset(
          'assets/dice-$currentDiceRoll.png',
          width: 200,
        ),
        const SizedBox(
          height: 20,
        ),
        TextButton(
          onPressed: rollDice,
          style: TextButton.styleFrom(
            // padding: const EdgeInsets.only(top: 20),
            foregroundColor: Colors.white,
            textStyle: const TextStyle(fontSize: 28),
          ),
          child: const Text('Roll Dice!'),
        ),
        TextButton.icon(
          onPressed: clearScores,
          style: TextButton.styleFrom(
            // padding: const EdgeInsets.only(top: 20),
            foregroundColor: const Color.fromARGB(255, 190, 189, 189),
            textStyle: const TextStyle(fontSize: 21),
          ),
          label: const Text('Clear Scores'),
          icon: const Icon(Icons.refresh),
        ),
      ],
    );
  }
}
3. Helper Widgets
To help build the UI of the app, we created two custom helper widgets, PlayerScores and StyledText.
PlayerScores is a stateless widget which we built to show the scores of the players. Through the constructor function, we accept the player 1 and player 2 scores. In the build function, we return a Row widget as both player’s scores need to be displayed horizontally. In the children argument of the row widget, we return two Column widgets separated by a Spacer widget. In each of the Column widgets, we show which player score it is and the score below it, which we are accepting through the constructor function through the Text widget in which we have added the styling.
import 'package:flutter/material.dart';

class PlayerScores extends StatelessWidget {
  const PlayerScores(
      {required this.player1Score, required this.player2Score, super.key});

  final int player1Score;
  final int player2Score;
  @override
  Widget build(BuildContext context) {
    return Row(
      children: [
        Column(
          children: [
            const Text(
              'Player1',
              style: TextStyle(
                fontSize: 23,
                fontWeight: FontWeight.bold,
                color: Color.fromARGB(255, 215, 215, 5),
              ),
            ),
            const SizedBox(
              height: 10,
            ),
            Text(
              player1Score.toString(),
              style: const TextStyle(
                fontSize: 25,
                color: Color.fromARGB(255, 215, 215, 5),
              ),
            )
          ],
        ),
        const Spacer(),
        Column(
          children: [
            const Text(
              'Player2',
              style: TextStyle(
                  fontSize: 23,
                  fontWeight: FontWeight.bold,
                  color: Color.fromARGB(255, 215, 215, 5)),
            ),
            const SizedBox(
              height: 10,
            ),
            Text(
              player2Score.toString(),
              style: const TextStyle(
                  fontSize: 25, color: Color.fromARGB(255, 215, 215, 5)),
            )
          ],
        ),
      ],
    );
  }
}
In StyledText, we return a Text widget with custom styling which we can use in our app so that we don’t need to create each time and help with code redundancy in our app.
import 'package:flutter/material.dart';
class StyledText extends StatelessWidget {
const StyledText(this.text, {super.key});
final String text;
@override
Widget build(BuildContext context) {
return Text(
text,
style: const TextStyle(fontSize: 28, color: Colors.white),
);
}
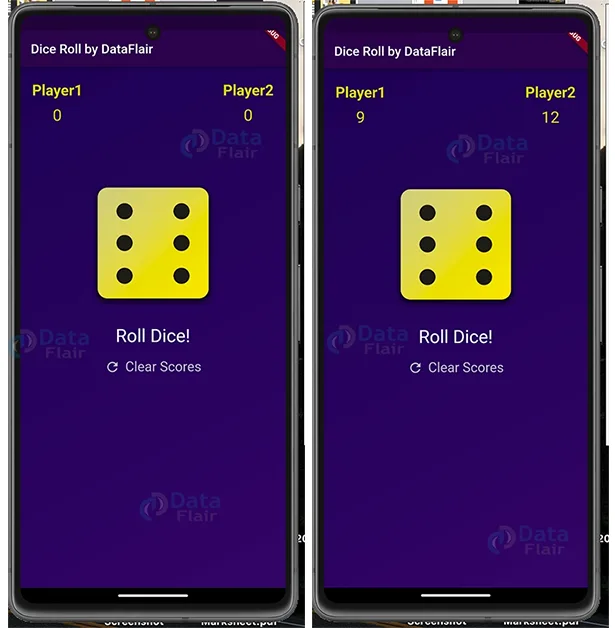
}Flutter Dice Roll Output
Conclusion
I hope you had a good time working on this Flutter Dice Roll Project! Through this Flutter Dice Roll project, we got to learn about how to apply gradients in the app, how to show images in the app, how to create text buttons with icons, and how to pass variables as well as functions as arguments through the constructor function. With this Flutter project, you can enjoy playing the game of rolling dice. You can also extend and use this project as part of your custom implementation.
I hope you enjoyed working on this project!
Thank you for reading! Keep Learning Flutter!
Did you know we work 24x7 to provide you best tutorials
Please encourage us - write a review on Google


