Flutter Installation
Mobile app development has never been more exciting and accessible than it is today, thanks to a remarkable toolkit called Flutter. Whether you’re an aspiring developer or a seasoned pro With only one codebase, Flutter offers up a world of possibilities for developing stunning natively built desktop, web, and mobile applications.
What is Flutter?
Imagine having a versatile toolbox that allows you to build stunning apps that run smoothly on both Android and iOS devices, all while writing code only once. Flutter is Google’s open-source UI software development kit that makes this dream a reality. With Flutter, you can craft intuitive, visually appealing user interfaces and deliver consistent experiences across various platforms.
Why Flutter Matters:
1. Fast Development: Flutter streamlines the app development process. You can make changes in real time and see them instantly, reducing development time and speeding up your project.
2. Cross-Platform Magic: Write your code once, and Flutter compiles it for Android, iOS, web, and even desktop platforms. This means less work and more reach for your apps.
3. Beautiful UIs: Flutter’s widgets are a game-changer. You can create customized, pixel-perfect designs and animations that will impress your users.
4. Vibrant Community: A thriving community surrounds Flutter, providing support, plugins, and a wealth of resources to help you along your development journey.
5. Cost-Effective: Flutter helps businesses save money by cutting down on development and maintenance costs since one codebase works across multiple platforms.
Setting up Flutter on your PC is the first step towards starting your journey. This article will guide you through the installation process, ensuring that you have all the tools you need for a smooth and successful development journey. Whether you’re using Windows, macOS, or Linux, we’ve got you covered.
Now let’s get started and ensure that Flutter is installed appropriately on your system. Once you’ve mastered this preliminary setup, you’ll have no trouble building amazing mobile applications that people will love.
Installing Flutter on Windows: A Step-by-Step Guide
Step 1: Prepare Your Environment
Before you begin, ensure that your Windows computer meets the following requirements:
- Operating System: Windows 7 or later (64-bit)
- Disk Space: 400 MB or more of available space
- Git: Download and install Git for Windows.
Visual Studio Code (Optional): You can use any text editor, but Visual Studio Code is recommended for Flutter development.
Step 2: Download Flutter
1. Open your web browser and visit the official Flutter website: [Flutter Downloads]
https://flutter.dev/docs/get-started/install
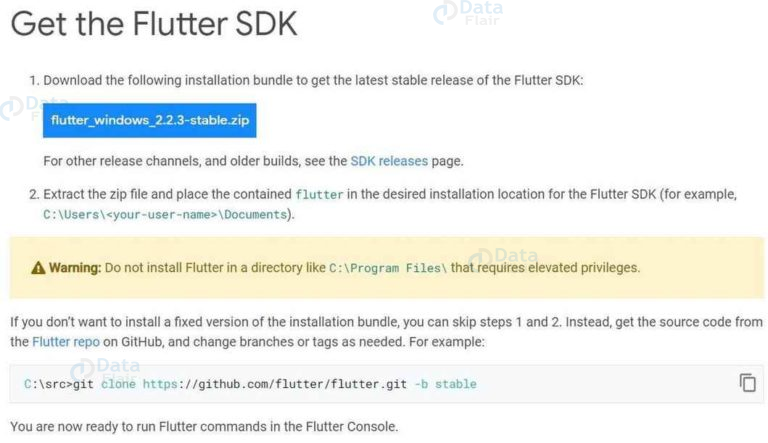
2. Click on the “Windows” icon to download the Flutter SDK for Windows.
Step 3: Extract Flutter
1. Locate the downloaded ZIP file (e.g., `flutter_windows_vx.x.x-stable.zip`) and extract it to a location on your computer (e.g., `C:\`).
Step 4: Add Flutter to System Path
1. Open the Windows Start menu and search for “Environment Variables.”
2. Click on “Edit the system environment variables.”
3. Click the “Environment Variables” button located at the bottom of the “System Properties” box.
4. In the “System Variables” section, scroll down and find “Path.” Select it and click “Edit.”
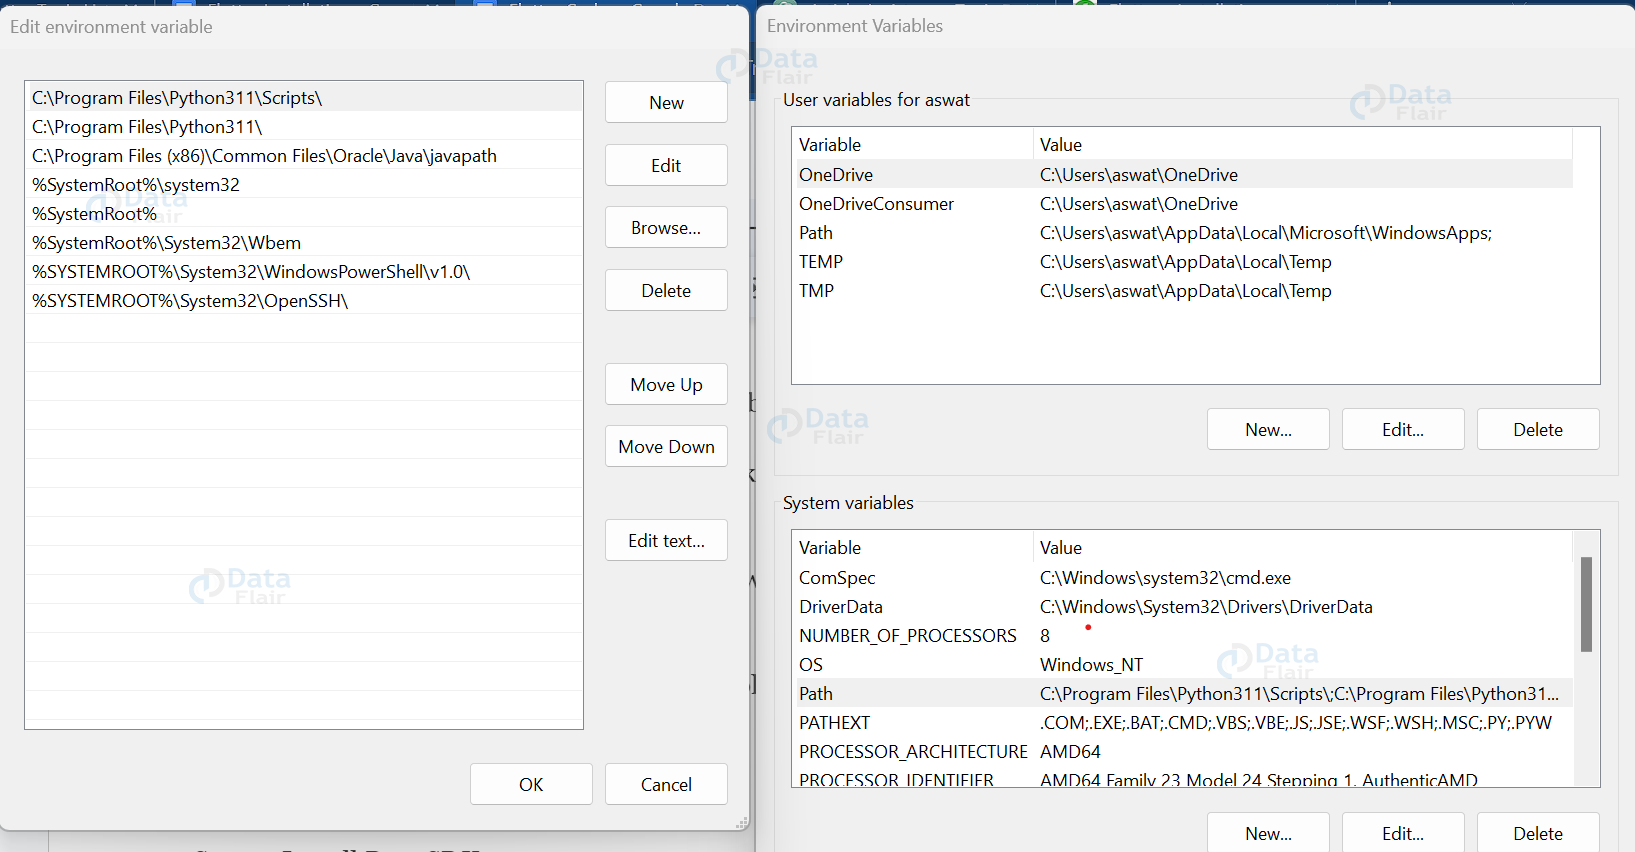
5. Click “New” and add the path to the “bin” folder inside the extracted Flutter directory (e.g., `C:\flutter\bin`).
6. Click “OK” to save your changes.
Step 5: Install Dart SDK
1. Visit the official Dart SDK download page: [Dart SDK]
(https://dart.dev/get-dart)
2. Download the Dart SDK for Windows.
3. Run the Dart SDK installer and follow the installation instructions.
Step 6: Verify Flutter Installation
1. Open a Command Prompt or PowerShell window.
2. Run the following command to verify that Flutter is installed correctly:
flutter --version
This command should display the Flutter version and Dart version, indicating a successful installation.
Step 7: Run flutter doctor
1. In the same Command Prompt or PowerShell window, run the following command:
flutter doctor
The Flutter Doctor command checks your environment for any missing dependencies or issues. It will provide a detailed report indicating whether your Flutter installation is complete and what if any, additional steps are needed. Follow the recommendations provided by `flutter doctor` to resolve any issues.
Step 8: Set Up an Android Emulator (Optional)
- To develop Android apps, you’ll need an Android emulator. You can set up one using Android Studio or use an existing Android device.
You’ve successfully installed Flutter on your Windows computer and verified its installation using Flutter Doctor. You’re now ready to start building amazing cross-platform mobile applications using Flutter and Dart.
Additional Tips:
- You can update Flutter by running Flutter upgrade in the Command Prompt or PowerShell.
flutter upgrade
Use the command flutter create project_name to launch a new Flutter project.
Installing Flutter on macOS: A Step-by-Step Guide
Step 1: Prepare Your Environment
Before you begin, make sure your macOS computer meets the following requirements:
- Operating System: macOS (64-bit)
Disk Space: 400 MB or more of available space
- Xcode: Install Xcode from the Mac App Store. You will also need to open it once to accept the license agreement and complete the installation.
Step 2: Install Homebrew
- Open Terminal, which you can find in the Applications > Utilities folder.
- Install Homebrew, a package manager for macOS, by running the following command:
/bin/bash -c "$(curl -fsSL https://raw.githubusercontent.com/Homebrew/install/HEAD/install.sh)"
Step 3: Install Git
1. With Homebrew installed, you can now install Git using the following command:
brew install git
Step 4: Download Flutter
1. If the Terminal is not already open, open it now.
2. Download the Flutter SDK by running the following command:
git clone https://github.com/flutter/flutter.git -b stable
This command clones the Flutter repository to your computer.
Step 5: Add Flutter to Your Path
1. In Terminal, open your `.zshrc` or `.bash_profile` file, which is used to set environment variables:
nano ~/.zshrc # Use this command if you're using the default zsh shell
or
nano ~/.bash_profile # Use this command if you're using the bash shell
2. Add the following line at the end of the file to add Flutter to your system’s PATH:
export PATH="$PATH:`pwd`/flutter/bin"
3. Press Ctrl + X to exit, then press `Y` to confirm the save, and finally press `Enter` to confirm the file name.
4. Reload your shell configuration by running:
source ~/.zshrc # Use this command if you're using the default zsh shell
or
source ~/.bash_profile # Use this command if you're using the bash shell
Step 6: Install Xcode Command Line Tools
1. Run the following command to install the Xcode command line tools:
xcode-select --install
Follow the prompts to complete the installation.
Step 7: Verify Flutter Installation
1. If the Terminal isn’t open already, open it now.
2. Run the following command to verify that Flutter is installed correctly:
flutter --version
This command should display the Flutter version and Dart version, indicating a successful installation.
Step 8: Run flutter doctor
1. In the same Terminal window, run the following command:
flutter doctor
You’ve successfully installed Flutter on your macOS computer and verified its installation using flutter doctor. You’re now ready to start building amazing cross-platform mobile applications using Flutter and Dart.
Installing Flutter on Linux: A Step-by-Step Guide
Step 1: Prepare Your Environment
Before you begin, ensure that your Linux-based computer meets the following requirements:
- Operating System: Linux (64-bit)
Disk Space: 400 MB or more of available space
- Git: Install Git using your package manager. For example, on Ubuntu, you can run:
sudo apt-get install git
Step 2: Install Dependencies
You’ll need some additional packages and libraries to support Flutter development. Use the package manager in your distribution to install them.
On Ubuntu, you can run:
sudo apt-get update
sudo apt-get install curl unzip xz-utils libglu1-mesa
On Fedora, you can run:
sudo dnf install curl unzip xz mesa-libGLU
Step 3: Download Flutter
1. Open your terminal.
2. Download the Flutter SDK by running the following command:
git clone https://github.com/flutter/flutter.git -b stable
This command clones the Flutter repository to your computer.
Step 4: Add Flutter to Your Path
1. Open your shell’s configuration file using a text editor. Depending on your distribution, you might use `.bashrc`, `.zshrc`, or another file. For example:
nano ~/.bashrc
2. Add the following line at the end of the file to add Flutter to your system’s PATH:
export PATH="$PATH:`pwd`/flutter/bin"
3. After saving the file, close the text editor.
4. Reload your shell configuration by running:
source ~/.bashrc
Step 5: Verify Flutter Installation
1. Open your terminal.
2. Run the following command to verify that Flutter is installed correctly:
flutter --version
This command should display the Flutter version and Dart version, indicating a successful installation.
Setting Up Visual Studio Code (VS Code):
1. Install VS Code: If you haven’t already, download and install Visual Studio Code. It’s a free, lightweight, and highly customizable code editor.
2. Install Flutter Extension: Launch VS Code and go to the Extensions view by clicking on the Extensions icon in the Activity Bar on the side of the window. Search for “Flutter” in the Extensions marketplace and install the official Flutter extension by Google. This extension provides essential Flutter support, including code completion, debugging, and more.
3. Install Dart Extension (Optional): You can enhance your Flutter development experience by installing the Dart extension for VS Code. It offers Dart language support and is beneficial for writing Dart code alongside Flutter. Search for “Dart” in the Extensions marketplace and install the Dart extension.
4. Set Up a Device: To run your Flutter apps, you’ll need a device or emulator. Connect a physical Android or iOS device to your computer or set up an Android emulator using Android Studio (covered in the next section). Ensure that your device/emulator is recognized and working correctly.
5. Create or Open a Flutter Project: You can create a new Flutter project or open an existing one by using the VS Code command palette (`Ctrl+Shift+P`) and typing “Flutter: New Project” or “Flutter: Open Folder.”
6. Configure Flutter SDK Path: If VS Code doesn’t automatically detect your Flutter SDK path, set it manually. Go to File > Preferences > Settings and search for “Flutter SDK Path.” Specify the path to your Flutter SDK directory (e.g., `/path/to/flutter`) in the settings.
7. Start Coding: Now, you’re all set up! You can start coding your Flutter app in VS Code. The Flutter extension provides helpful features like code completion, debugging, and hot reload, making your development process efficient and enjoyable.
Setting Up Android Studio:
1. Install Android Studio: Download and install Android Studio. Android Studio is a powerful IDE for Flutter development and offers integrated tools for Android app development as well.
2. Install Flutter and Dart Plugins: After installing Android Studio, open it and go to Configure > Plugins. Search for “Flutter” and “Dart” plugins and install them. These plugins provide essential Flutter and Dart support, including project templates, code analysis, and more.
3. Set Up a Device: To run Flutter apps, configure and start an Android emulator or connect a physical Android device to your computer. Android Studio provides an AVD (Android Virtual Device) Manager to create and manage emulators.
4. Create a New Flutter Project: In Android Studio, click on “Start a new Flutter project.” Follow the wizard to configure your project settings, such as project name, location, and Flutter SDK path. Android Studio will generate a Flutter project structure for you.
5. Coding and Testing: With your Flutter project created, you can now start coding. Android Studio provides powerful debugging tools, real-time preview of your app’s UI, and seamless integration with Flutter’s hot reload feature.
By following these steps, you can set up either Visual Studio Code or Android Studio for Flutter development. Both IDEs offer a fantastic development experience, and you can choose the one that suits your preferences and workflow best.
Troubleshooting in Flutter Development
1. Check Flutter Doctor:
- What it is: Flutter Doctor is a command that diagnoses and reports issues with your Flutter environment.
- How to use it: Open your terminal and run `flutter doctor`. It will identify any missing dependencies or configuration issues and provide recommendations on how to fix them.
- Common fixes: Follow the suggestions provided by `flutter doctor`. This often involves installing missing packages, setting environment variables, or updating components like Flutter and Dart.
2. Review Error Messages:
- What it is: Error messages are your friends. When something goes wrong, Flutter often provides descriptive error messages in the terminal.
- How to use it: Read the error message carefully. It usually tells you what the problem is and which file and line to check.
- Common fixes: Google the error message or check Flutter’s documentation and forums for solutions. Often, other developers have encountered and solved the same issues.
3. Update Flutter and Dart:
- What it is: Flutter and Dart are actively developed, and new versions are released frequently. Outdated versions can lead to compatibility issues.
- How to use it: Run `flutter upgrade` and `dart –version` in the terminal to update Flutter and Dart to the latest stable versions.
- Common fixes: Regularly update Flutter and Dart to ensure you have the latest features and bug fixes.
4. Verify Environment Variables:
- What it is: Flutter relies on environment variables to work correctly. Incorrect or missing environment variables can cause problems.
- How to use it: Ensure that your PATH includes the Flutter and Dart binaries and that you’ve set up any necessary variables as per the installation instructions.
- Common fixes: Recheck your environment variables and update them if needed. Restart your terminal or IDE to apply changes.
5. Check IDE and Plugin Versions:
- What it is: IDEs like Visual Studio Code and Android Studio have Flutter extensions or plugins. Outdated or incompatible versions can lead to issues.
- How to use it: Update your IDE to the latest version and ensure that you’re using compatible Flutter and Dart plugins/extensions.
- Common fixes: Update your IDE and plugins. Check the plugin’s documentation for compatibility with your Flutter version.
6. Clear Cache:
- What it is: Flutter stores various caches that can sometimes become corrupted and cause issues.
- How to use it: Run `flutter clean` to remove build artifacts and cached dependencies. This can resolve issues related to corrupted cache.
- Common fixes: When facing mysterious build or dependency problems, clearing the cache is often a good first step.
7. Search Online Communities:
- What it is: Online communities like Stack Overflow, the Flutter subreddit, and the Flutter GitHub repository are great places to seek help.
- How to use it: Describe your issue, provide relevant code and error messages, and ask for assistance. Be sure to search for similar problems as well.
- Common fixes: Often, other developers have encountered and solved similar issues and can provide guidance.
Remember, troubleshooting is a valuable skill in development. Don’t be discouraged by errors; view them as opportunities to learn and improve your skills. With patience and persistence, you can resolve most Flutter-related issues.
Summary
In conclusion, setting up Flutter for your development journey is an exciting first step in creating cross-platform mobile apps. Whether you choose Visual Studio Code or Android Studio, the process can be straightforward with the right guidance.
Troubleshooting is a vital skill in your toolkit, helping you overcome common challenges that may arise during installation and development. Don’t forget to ask for help from resources like Flutter Doctor, error warnings, and online communities. With Flutter’s powerful capabilities and solid installation, you’re well on your way to building amazing mobile applications. Happy coding!
Did you know we work 24x7 to provide you best tutorials
Please encourage us - write a review on Google