Android Kotlin Project – Grocery Shopping App
Hey there, Android enthusiasts! Today we are going to see and learn how to implement an Android Project called grocery shopping in Android Studio. We’ll understand the complete project’s development in this article.
Users typically forget to buy the goods they wish to buy because we can’t remember everything. But you may use this app to create a list of the items you want to buy so that you don’t forget anything. The Grocery Shopping application will help the user by maintaining a list of items along with price and quantity, which will make grocery shopping easier and hassle-free.
About Android Kotlin Grocery Shopping App
For those who are still learning the fundamentals of creating Android applications, here is an Android project. Users of this Android app can add things to their shopping lists by clicking the floating button in the bottom right corner of the main screen.
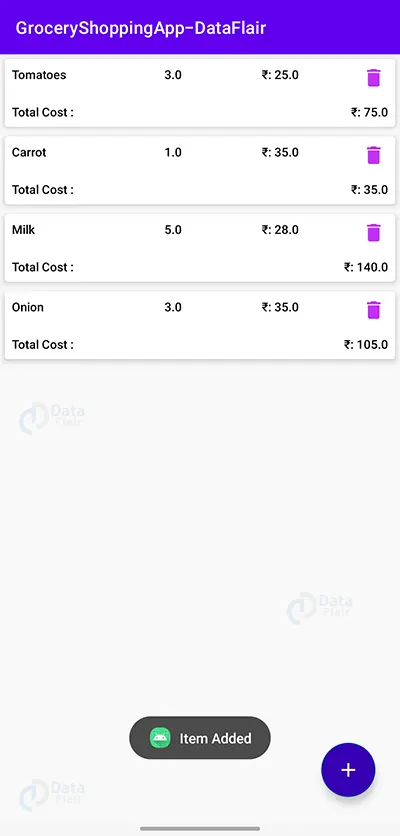
The home screen will display all the items entered by the user.
We will use Android Studio and the programming language Kotlin to develop this Android application.
Let’s look over the list of features that the user interface will include:
1. A floating “+” button will be included in the user interface at the bottom right corner of the home screen.
2. The ‘+’ button will display a bottom screen fragment with three text fields when clicked.
3. The user must input the item’s name and quantity in the two text areas.
4. The user must enter the item’s price in the third field.
5. The newly entered task details will be saved onto the ROOM database and made visible on the home screen by clicking the “Save” button at the bottom of the sheet fragment.
6. On the home screen, a checkbox that can be used to mark a task as completed is displayed alongside a list of all the tasks that the user has entered.
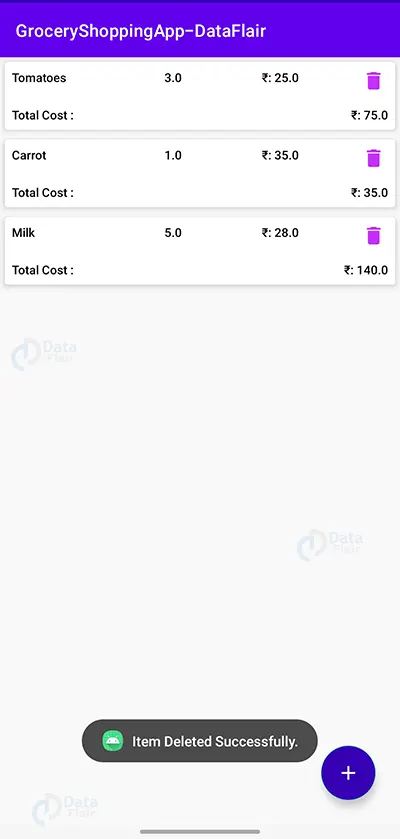
7. There will be a “trash” icon next to each item on the home screen, and clicking it will remove it from both the home screen and the database.
Prerequisites For Grocery Shopping App using Android Kotlin
To develop this Android application, the requirements and prerequisites are as follows:
1. Kotlin: You must first become acquainted with Kotlin programming. It is necessary since we will create the app’s code in the Kotlin programming language.
2. XML: XML is yet another essential element of our Android application. It will be used to create the user interface for the application.
3. Android Studio: Android Studio: Because that is how we will develop it, Android Studio is the foundation of our programme. An Android virtual device that can be used to test an application’s functionality is also available with Android Studio.
4. ROOM DAOs: The queries needed to insert/write data into the database are referred to as ROOM DAOs. Knowledge of fundamental database management is crucial.
Download Android Kotlin Grocery Shopping App Project
Please download the source code of the Android Kotlin Grocery Shopping App Project: Android Kotlin Grocery Shopping App Project Code.
Develop a Grocery Shopping app in Android Studio.
Let’s start by making a grocery-buying application in Android Studio. Step-by-step instructions have been provided for each and every file in this tutorial to help you better grasp how the program functions.
To develop this grocery shopping app for Android, you must follow a few steps.
1. At the location of your choice, extract all the files from the downloaded zip file.
2. Launch Android Studio.
3. Select File, then select Open.
4. Click OK when you locate and pick the extracted folder.
You have successfully opened the grocery shopping app’s source code in Android Studio.
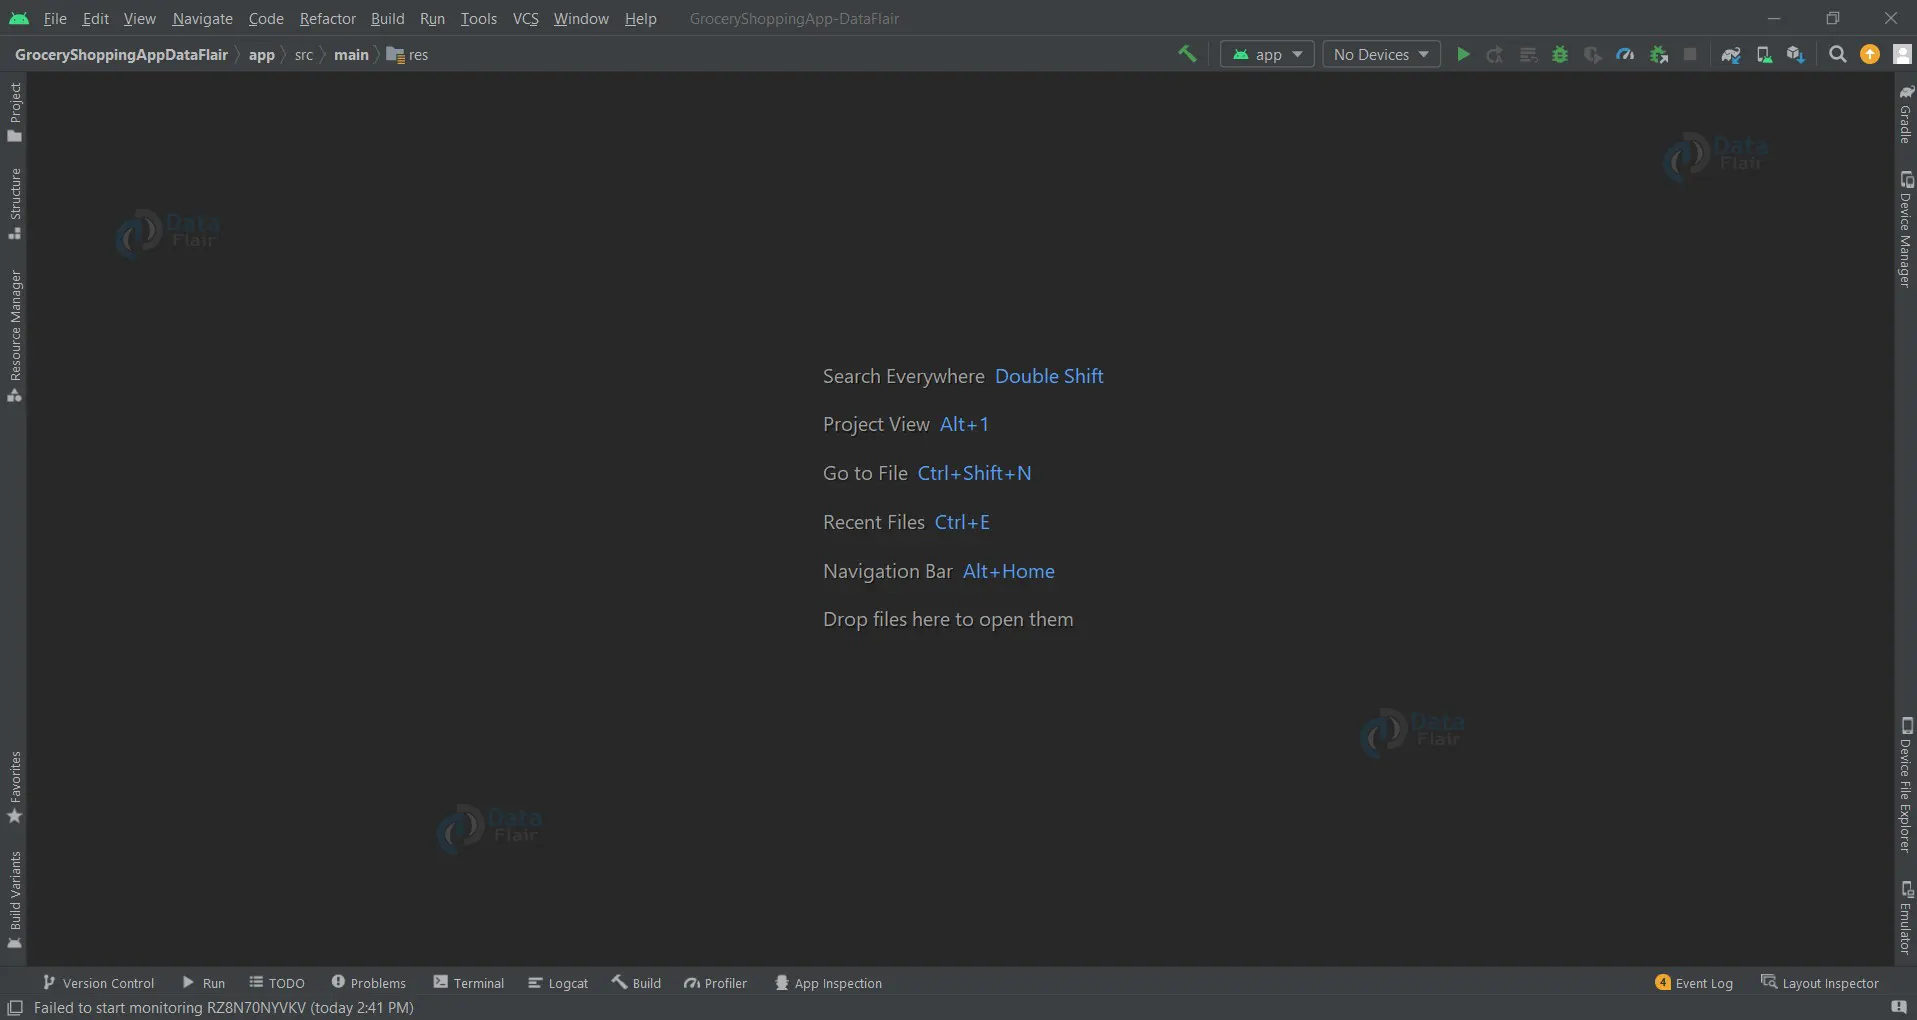
Let’s go through each file in this project one at a time as we comprehend how the application works.
1. The text fields and buttons found in the user interface are created by an XML file called “activity_main”.
Code:
<?xml version="1.0" encoding="utf-8"?>
<RelativeLayout xmlns:android="http://schemas.android.com/apk/res/android"
   xmlns:app="http://schemas.android.com/apk/res-auto"
   xmlns:tools="http://schemas.android.com/tools"
   android:layout_width="match_parent"
   android:background="#F9F9F9"
   android:layout_height="match_parent"
   tools:context=".MainActivity">


   <androidx.recyclerview.widget.RecyclerView
       android:id="@+id/rvitems"
       android:layout_width="match_parent"
       android:layout_height="match_parent"
       tools:listitem="@layout/grocery_rv_item">


   </androidx.recyclerview.widget.RecyclerView>


   <com.google.android.material.floatingactionbutton.FloatingActionButton
       android:id="@+id/fabAdd"
       android:layout_width="wrap_content"
       android:layout_height="wrap_content"
       android:layout_alignParentEnd="true"
       android:layout_alignParentBottom="true"
       android:layout_marginStart="25dp"
       android:layout_marginTop="25dp"
       android:layout_marginEnd="25dp"
       android:layout_marginBottom="25dp"
       android:backgroundTint="@color/purple_700"
       android:elevation="5dp"
       android:src="@drawable/ic_baseline_add"
       app:tint="@color/white" />


</RelativeLayout>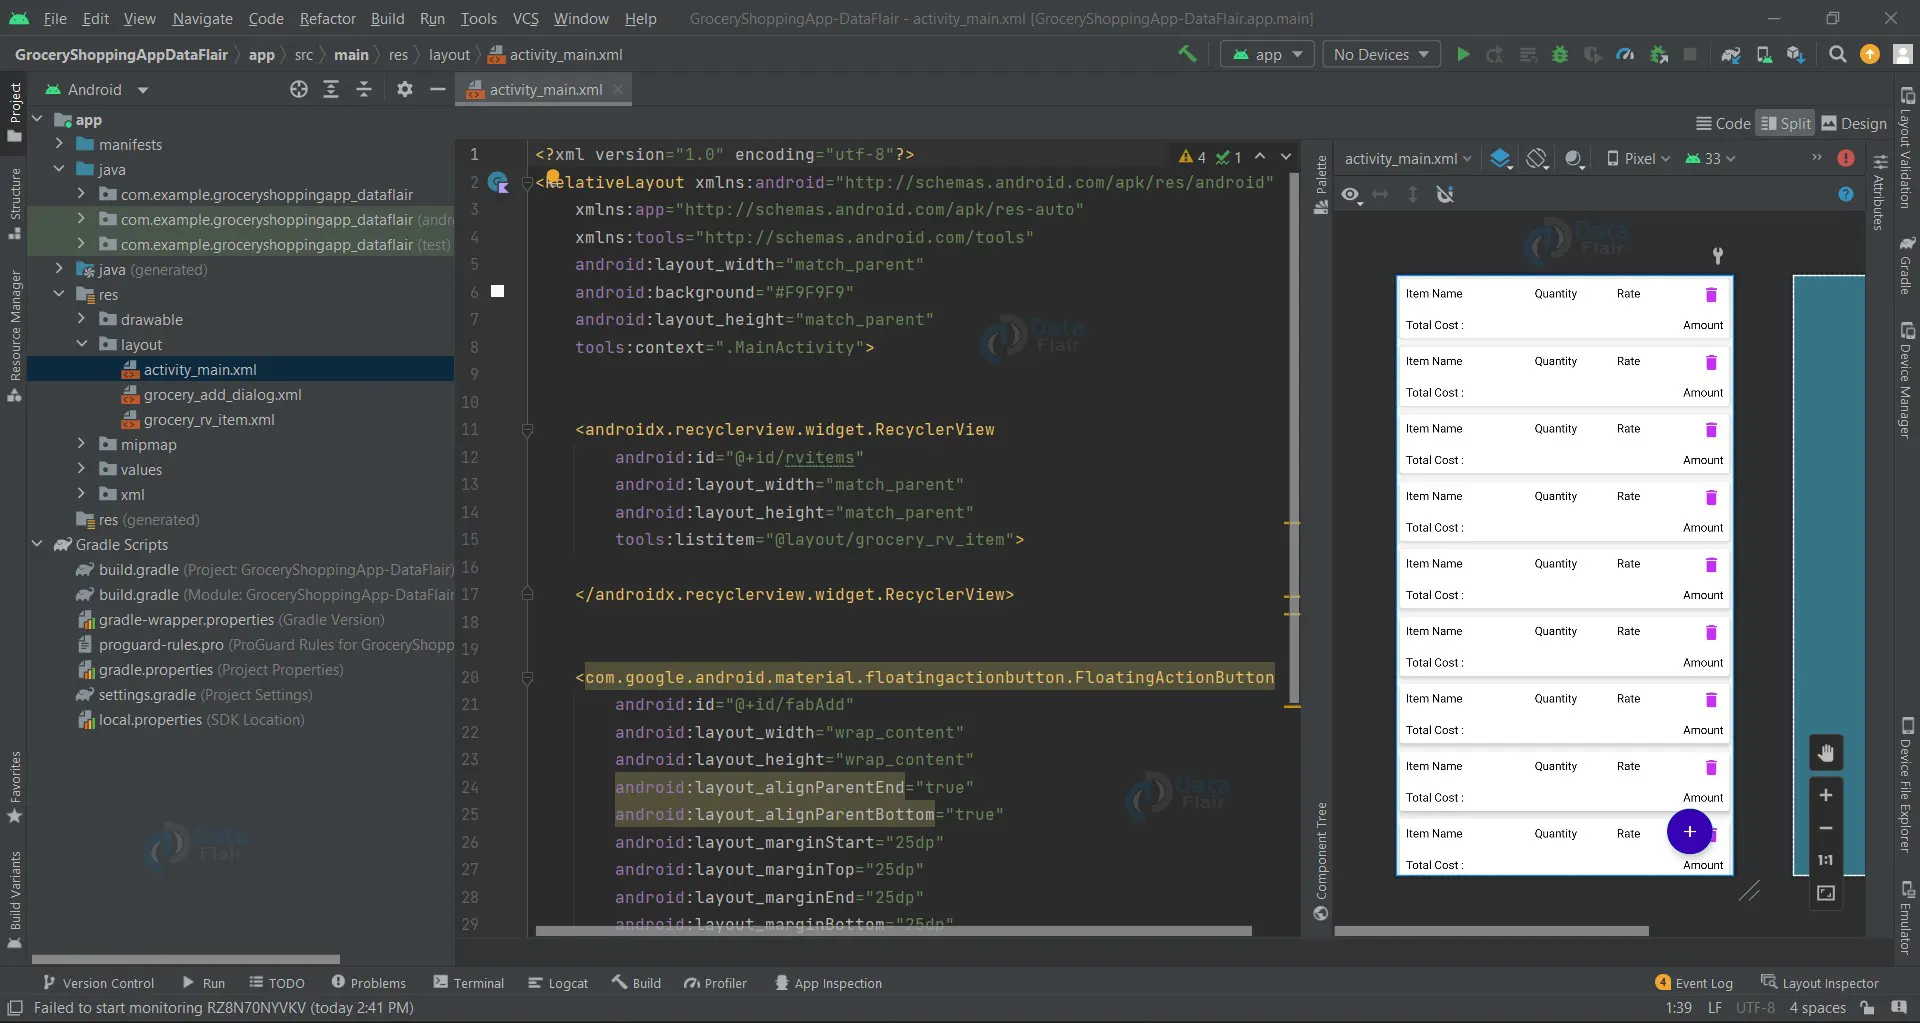
2. ‘grocery_add_dialog.xml’ is a file responsible for creating a user interface where the user will enter the required details about the newly added item.
The below XML code defines a CardView that contains a form for adding a new item to a list. The form consists of three text input fields for entering the item name, quantity, and price. There are also two buttons, Cancel and Add, for cancelling or adding the item to the list.
Code:
<?xml version="1.0" encoding="utf-8"?>
<androidx.cardview.widget.CardView xmlns:android="http://schemas.android.com/apk/res/android"
   android:layout_width="match_parent"
   android:layout_height="wrap_content"
   xmlns:app="http://schemas.android.com/apk/res-auto"
   android:layout_gravity="center"
   android:backgroundTint="#FEFBF6"
   android:background="@drawable/btn_bg"
   app:cardCornerRadius="10dp">
   <RelativeLayout
       android:layout_width="match_parent"
       android:layout_height="wrap_content"
       >


       <TextView
           android:id="@+id/idtvHeading"
           android:layout_width="match_parent"
           android:layout_height="wrap_content"
           android:layout_marginStart="4dp"
           android:layout_marginTop="4dp"
           android:layout_marginEnd="4dp"
           android:layout_marginBottom="4dp"
           android:background="@color/blue"
           android:gravity="center"
           android:padding="4dp"
           android:text="Add Item To List"
           android:textAlignment="center"
           android:textAllCaps="false"
           android:textColor="@color/white"
           android:textSize="20sp"
           android:textStyle="bold" />


       <ImageView
           android:id="@+id/imageView"
           android:layout_width="65dp"
           android:layout_height="45dp"
           android:src="@drawable/ic_baseline_local_grocery_store_24"
           app:layout_constraintBottom_toBottomOf="parent"
           app:layout_constraintEnd_toEndOf="parent"
           app:layout_constraintHorizontal_bias="0.797"
           app:layout_constraintStart_toStartOf="parent"
           app:layout_constraintVertical_bias="0.0" />


       <LinearLayout
           android:layout_width="match_parent"
           android:layout_height="wrap_content"
           android:layout_below="@id/idtvHeading"
           android:orientation="vertical">
           <com.google.android.material.textfield.TextInputLayout
               android:layout_width="match_parent"
               android:layout_height="wrap_content"
               android:layout_margin="10dp"
               android:padding="5dp"


               app:hintTextColor="@color/black"
               app:counterTextColor="@color/black">
               <com.google.android.material.textfield.TextInputEditText
                   android:layout_width="match_parent"
                   android:layout_height="wrap_content"
                   android:id="@+id/idEdtitemname"
                   android:textSize="14sp"
                   android:hint="Enter item Name"
                   android:inputType="text"
                   app:hintTextColor="@color/black"
                   app:counterTextColor="@color/black"
                   />
           </com.google.android.material.textfield.TextInputLayout>
           <com.google.android.material.textfield.TextInputLayout
               android:layout_width="match_parent"
               android:layout_height="wrap_content"
               android:layout_margin="10dp"
               android:padding="5dp"


               app:hintTextColor="@color/black"
               app:counterTextColor="@color/black">
               <com.google.android.material.textfield.TextInputEditText
                   android:layout_width="match_parent"
                   android:layout_height="wrap_content"
                   android:id="@+id/idEdtitemquantity"
                   android:textSize="14sp"
                   android:hint="Enter item Quantity in kg"
                   android:inputType="numberDecimal"
                   app:hintTextColor="@color/black"
                   app:counterTextColor="@color/black"
                   />
           </com.google.android.material.textfield.TextInputLayout>
           <com.google.android.material.textfield.TextInputLayout
               android:layout_width="match_parent"
               android:layout_height="wrap_content"
               android:layout_margin="10dp"
               android:padding="5dp"


               app:hintTextColor="@color/black"
               app:counterTextColor="@color/black">
               <com.google.android.material.textfield.TextInputEditText
                   android:layout_width="match_parent"
                   android:layout_height="wrap_content"
                   android:id="@+id/idEdtitemprice"
                   android:textSize="14sp"
                   android:hint="Enter item Price /kg"
                   android:inputType="numberDecimal"
                   app:hintTextColor="@color/black"
                   app:counterTextColor="@color/black"
                   />
           </com.google.android.material.textfield.TextInputLayout>
           <LinearLayout
               android:layout_width="match_parent"
               android:layout_height="wrap_content"
               android:orientation="horizontal"
               android:layout_margin="5dp"
               android:weightSum="2">
               <androidx.appcompat.widget.AppCompatButton
                   android:layout_width="0dp"
                   android:layout_height="wrap_content"
                   android:layout_weight="1"
                   android:layout_margin="8dp"
                   android:padding="5dp"
                   android:id="@+id/idbtncancel"
                   android:text="Cancel"
                   android:textColor="@color/white"
                   android:background="@drawable/btn_bg"
                   android:textAllCaps="false"
                   />
               <androidx.appcompat.widget.AppCompatButton
                   android:layout_width="0dp"
                   android:layout_height="wrap_content"
                   android:layout_weight="1"
                   android:layout_margin="8dp"
                   android:padding="5dp"
                   android:id="@+id/idbtnadd"
                   android:text="Add"
                   android:textColor="@color/white"
                   android:background="@drawable/btn_bg"
                   android:textAllCaps="false"
                   />
           </LinearLayout>
       </LinearLayout>


   </RelativeLayout>


</androidx.cardview.widget.CardView>
3. ‘grocery_rv_item.xmll’ is an XML file that is responsible for creating the user interface (UI) for items that are presented on the home screen.
The XML code mentioned above creates a CardView that has a layout for showing a grocery list item. The item name, quantity, rate, and total cost are displayed using four different text views in the layout. For deleting the item, there is also an image view available.
<?xml version="1.0" encoding="utf-8"?>
<androidx.cardview.widget.CardView xmlns:android="http://schemas.android.com/apk/res/android"
   android:layout_width="match_parent"
   android:layout_height="wrap_content"
   xmlns:app="http://schemas.android.com/apk/res-auto"
   android:layout_margin="5dp"
   android:backgroundTint="@color/white"
   app:cardCornerRadius="3dp"
   app:cardElevation="5dp">
   <RelativeLayout
       android:layout_width="match_parent"
       android:layout_height="wrap_content">
       <LinearLayout
           android:layout_width="match_parent"
           android:layout_height="wrap_content"
           android:orientation="horizontal"
           android:weightSum="5"
           android:id="@+id/idLL1">
           <TextView
               android:layout_width="0dp"
               android:layout_height="wrap_content"
               android:layout_weight="2"
               android:text="Item Name"
               android:textColor="@color/black"
               android:padding="4dp"
               android:layout_margin="3dp"
               android:id="@+id/idtvitemname"/>
           <TextView
               android:layout_width="0dp"
               android:layout_height="wrap_content"
               android:layout_weight="1.25"
               android:text="Quantity"
               android:textColor="@color/black"
               android:padding="4dp"
               android:layout_margin="3dp"
               android:id="@+id/idtvquantity"/>
           <TextView
               android:layout_width="0dp"
               android:layout_height="wrap_content"
               android:layout_weight="1.25"
               android:text="Rate"
               android:textColor="@color/black"
               android:padding="4dp"
               android:layout_margin="3dp"
               android:id="@+id/idtvrate"/>
           <ImageView
               android:layout_width="0dp"
               android:layout_height="wrap_content"
               android:layout_weight="0.5"
               android:id="@+id/idivdelete"
               android:padding="4dp"
               android:src="@drawable/ic_baseline_delete_24"
               app:tint="@color/blue_light"
               android:layout_margin="3dp"/>
       </LinearLayout>
       <TextView
           android:layout_width="match_parent"
           android:layout_height="wrap_content"
           android:padding="4dp"
           android:layout_margin="3dp"
           android:id="@+id/idtvheading"
           android:layout_toLeftOf="@id/idtvtotalamount"
           android:layout_below="@id/idLL1"
           android:text="Total Cost :"
           android:textColor="@color/black"/>
       <TextView
           android:layout_width="wrap_content"
           android:layout_height="wrap_content"
           android:padding="4dp"
           android:layout_margin="3dp"
           android:id="@+id/idtvtotalamount"
           android:layout_below="@id/idLL1"
           android:text="Amount"
           android:layout_alignParentEnd="true"
           android:textColor="@color/black"/>


   </RelativeLayout>


</androidx.cardview.widget.CardView>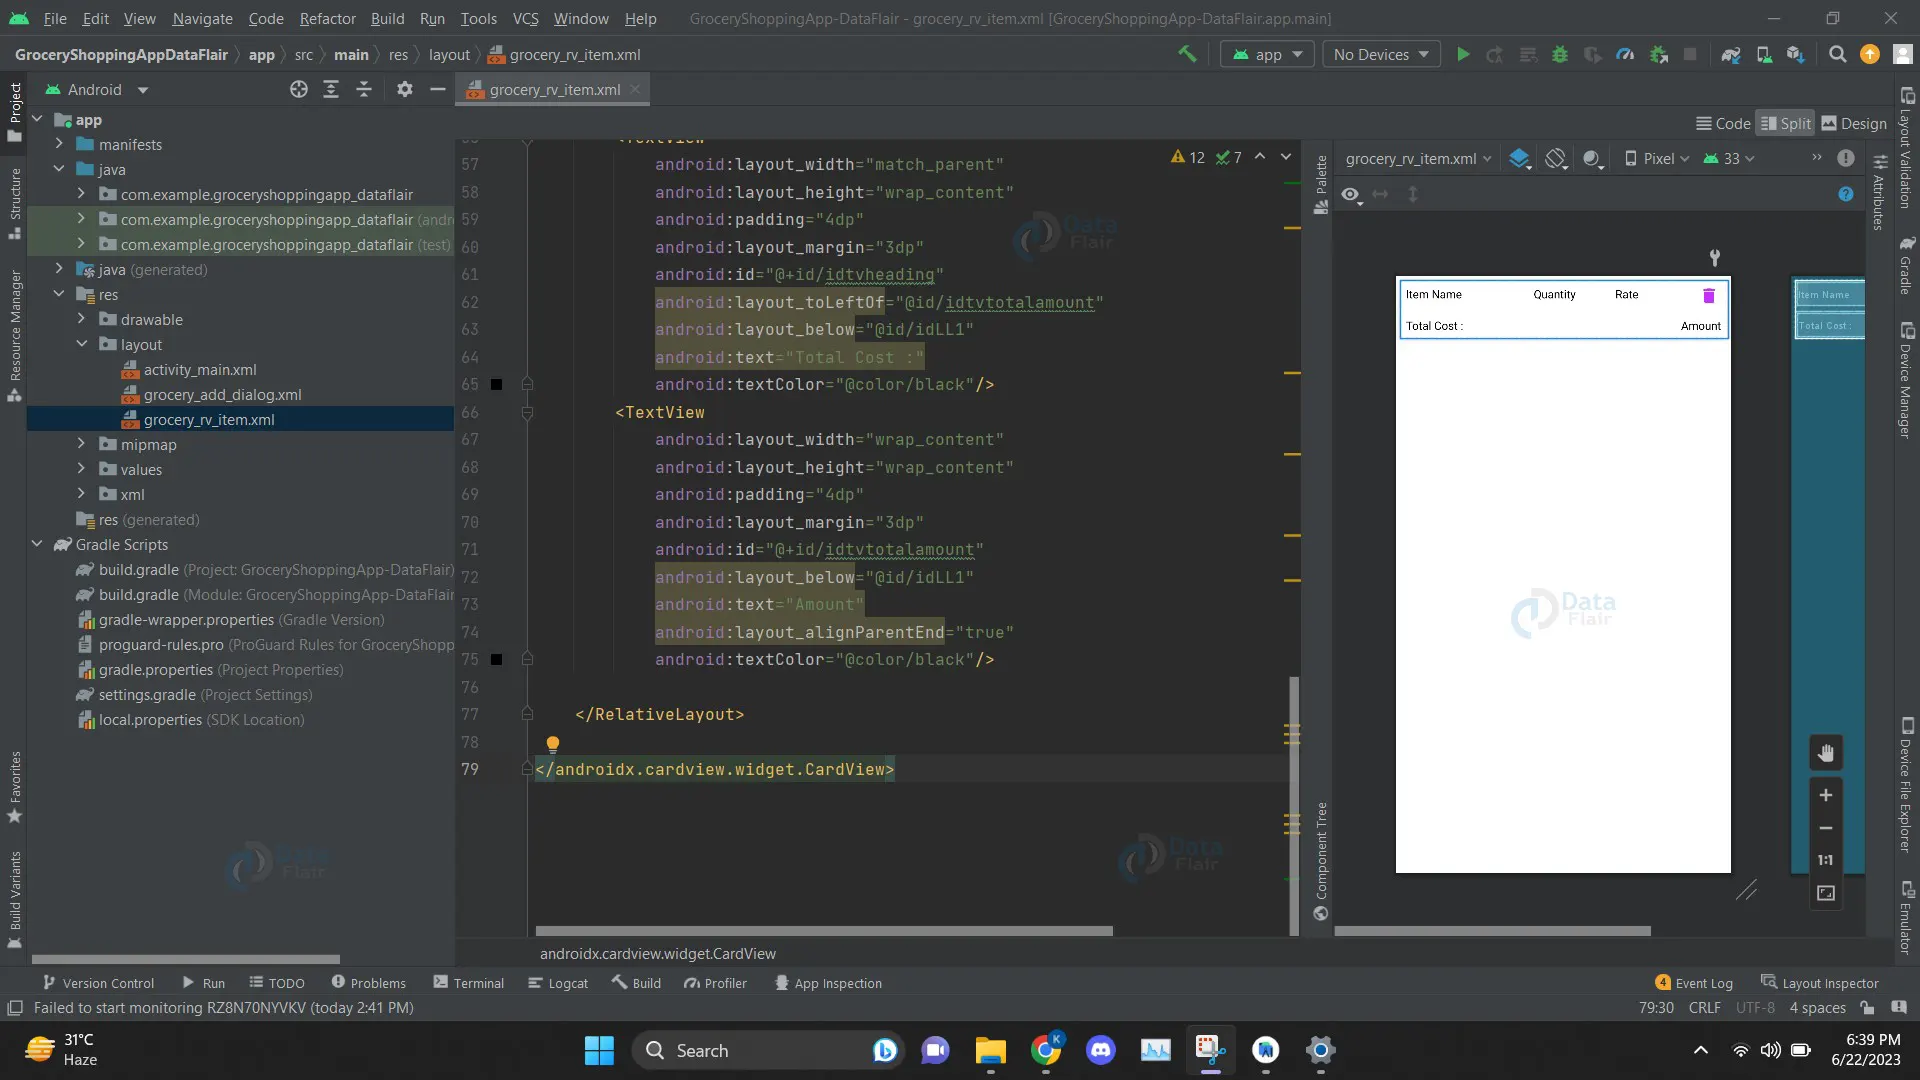
Let’s start with setting up the necessary files required for creating a ROOM database that will store the task’s name and description.
1. When the ROOM database is initialized, an entity file called “GroceryDatabase.kt” will be created. The database’s appropriate tables and columns will be constructed with the aid of this file.
Code:
@Database(entities = [GroceryItems::class], version = 1)


abstract class GroceryDatabase : RoomDatabase() {


   abstract fun getGroceryDao() : GroceryDao
   companion object {
       @Volatile
       private var instance: GroceryDatabase? = null
       private val LOCK = Any()


       operator fun invoke(context: Context) = instance ?: synchronized(LOCK) {
           instance ?: createDatabase(context).also {
               instance = it
           }


       }


       private fun createDatabase(context: Context) =
           Room.databaseBuilder(
               context.applicationContext,
               GroceryDatabase::class.java,
               "GroceryApp.db"
           ).build()
   }
}
2. The methods that can access the database are defined by the interface “GroceryDAO.kt,” which is a data access object. We have defined the ‘insert’ and ‘delete’ queries in this file using annotations. The ‘insert’ query will insert data into the designated database table, and the ‘delete’ query will allow the user to remove a previously saved item from the database.
Code:
import androidx.lifecycle.LiveData
import androidx.room.*


@Dao


interface GroceryDao {
   @Insert(onConflict = OnConflictStrategy.REPLACE)
   suspend fun insert(item: GroceryItems)
   @Delete
   suspend fun delete(item: GroceryItems)
   @Query("SELECT * FROM Grocery_items")
   fun getAllGroceryItems(): LiveData<List<GroceryItems>>
}
3. ‘GroceryItems.kt’ is a Kotlin file where the table name as well as the attributes that will be stored in the database are mentioned.
Code:
import androidx.room.ColumnInfo
import androidx.room.Entity
import androidx.room.PrimaryKey


@Entity(tableName = "Grocery_items")
data class GroceryItems (
   @ColumnInfo(name = "itemName")
   var itemName:String,


   @ColumnInfo(name = "itemQuantity")
   var itemQuantity:Double,


   @ColumnInfo(name = "itemPrice")
   var itemPrice:Double,
)
{
   @PrimaryKey(autoGenerate = true)
   var id:Int?=null
}
Moving on to the files that are responsible for the working and functioning of the application.
1. The RecyclerView adapter for showing a list of supermarket products is defined in the GroceryRVAdapter.kt’ Kotlin file. The adapter implements the GroceryItemClickInterface interface and derives from the RecyclerView.Adapter class.
- The GroceryViewHolder and GroceryItemClickInterface inner classes make up the adapter.
- The ViewHolder that will be used to hold the views for each item in the RecyclerView is defined by the GroceryViewHolder class.
- When an item in the RecyclerView is clicked, the GroceryItemClickInterface interface provides the methods that will be invoked.
Code:
class GroceryRVAdapter(
   var list: List<GroceryItems>,
   val groceryItemClickInterface: GroceryItemClickInterface
)
   : RecyclerView.Adapter<GroceryRVAdapter.GroceryViewHolder>() {


   inner class GroceryViewHolder(itemView:View):RecyclerView.ViewHolder(itemView){
       val nameTV = itemView.findViewById<TextView>(R.id.idtvitemname)
       val quantityTV = itemView.findViewById<TextView>(R.id.idtvquantity)
       val rateTV = itemView.findViewById<TextView>(R.id.idtvrate)
       val totalTV = itemView.findViewById<TextView>(R.id.idtvtotalamount)
       val deleteIV = itemView.findViewById<ImageView>(R.id.idivdelete)
   }


   interface GroceryItemClickInterface{
       fun onItemClick(groceryItems: GroceryItems)
   }


   override fun onCreateViewHolder(parent: ViewGroup, viewType: Int): GroceryViewHolder {
       val view = LayoutInflater.from(parent.context).inflate(R.layout.grocery_rv_item,parent,false)
       return GroceryViewHolder(view)
   }


   override fun onBindViewHolder(holder: GroceryViewHolder, position: Int) {
       holder.nameTV.text = list.get(position).itemName
       holder.quantityTV.text = list.get(position).itemQuantity.toString()
       holder.rateTV.text = "₹: " + list.get(position).itemPrice.toString()
       val itemTotal: Double = list.get(position).itemQuantity * list.get(position).itemPrice
       holder.totalTV.text = "₹: " + itemTotal.toString()
       holder.deleteIV.setOnClickListener {
           groceryItemClickInterface.onItemClick(list.get(position))


       }
   }
   override fun getItemCount(): Int {
       return list.size
   }
}
2. The “GroceryViewMode.kt’ defines a ViewModel class for the grocery shopping app. The ViewModel class inherits from the ViewModel class and has three methods: insert(), delete(), and getAllGroceryItems().
Code:
import androidx.lifecycle.ViewModel
import kotlinx.coroutines.GlobalScope
import kotlinx.coroutines.launch


class GroceryViewModel(private val repository: GroceryRepository):ViewModel() {
   fun insert(items: GroceryItems) = GlobalScope.launch {
       repository.insert(items)
   }
   fun delete(items: GroceryItems) = GlobalScope.launch {
       repository.delete(items)
   }
   fun getAllGroceryItems() = repository.getAllItems()
}
3. The above Kotlin code defines a ViewModelFactory class for the grocery shopping app. The ViewModelFactory class inherits from the ViewModelProvider.NewInstanceFactory class and has one method: create().
Code:
import androidx.lifecycle.ViewModel
import androidx.lifecycle.ViewModelProvider


class GroceryViewModelFactory(private val repository: GroceryRepository):ViewModelProvider.NewInstanceFactory() {
   override fun <T : ViewModel> create(modelClass: Class<T>): T {
       return GroceryViewModel(repository) as T
   }
}
4. The below Kotlin code defines the MainActivity class for the grocery shopping app. The MainActivity class inherits from the AppCompatActivity class and implements the GroceryRVAdapter.GroceryItemClickInterface interface.
class MainActivity : AppCompatActivity(), GroceryRVAdapter.GroceryItemClickInterface {
   lateinit var itemRV: RecyclerView
   lateinit var addFAB: FloatingActionButton
   lateinit var list: List<GroceryItems>
   lateinit var groceryRVAdapter: GroceryRVAdapter
   lateinit var groceryViewModel: GroceryViewModel
   override fun onCreate(savedInstanceState: Bundle?) {
       super.onCreate(savedInstanceState)
       setContentView(R.layout.activity_main)
       itemRV = findViewById(R.id.rvitems)
       addFAB = findViewById(R.id.fabAdd)
       list = ArrayList<GroceryItems>()
       groceryRVAdapter = GroceryRVAdapter(list,this)
       itemRV.layoutManager = LinearLayoutManager(this)
       itemRV.adapter = groceryRVAdapter
       val groceryRepository = GroceryRepository(GroceryDatabase(this))
       val factory = GroceryViewModelFactory(groceryRepository)
       groceryViewModel = ViewModelProvider(this,factory).get(GroceryViewModel::class.java)
       groceryViewModel.getAllGroceryItems().observe(this, Observer {
           groceryRVAdapter.list = it
           groceryRVAdapter.notifyDataSetChanged()
       })
       addFAB.setOnClickListener{
           openDialog()
       }


   }
   fun openDialog(){
       val dialog = Dialog(this)
       dialog.setContentView(R.layout.grocery_add_dialog)
       val cancelbtn = dialog.findViewById<AppCompatButton>(R.id.idbtncancel)
       val addbtn = dialog.findViewById<AppCompatButton>(R.id.idbtnadd)
       val itemEdt = dialog.findViewById<EditText>(R.id.idEdtitemname)
       val itemPriceEdt = dialog.findViewById<EditText>(R.id.idEdtitemprice)
       val itemQuantityEdt = dialog.findViewById<EditText>(R.id.idEdtitemquantity)
       cancelbtn.setOnClickListener {
           dialog.dismiss()
       }
       addbtn.setOnClickListener {
           val itemname:String = itemEdt.text.toString()
           val itemprice:String = itemPriceEdt.text.toString()
           val itemquantity:String = itemQuantityEdt.text.toString()
           val qty : Double = itemquantity.toDouble()
           val pr : Double = itemprice.toDouble()
           if (itemname.isNotEmpty() && itemprice.isNotEmpty() && itemquantity.isNotEmpty()){
               val items = GroceryItems(itemname,qty,pr)
               groceryViewModel.insert(items)
               Toast.makeText(applicationContext,"Item Added", Toast.LENGTH_SHORT).show()
               groceryRVAdapter.notifyDataSetChanged()
               dialog.dismiss()
           }
           else{
               Toast.makeText(applicationContext,"Please fill all details properly", Toast.LENGTH_SHORT).show()
           }


       }
       dialog.show()
   }


   override fun onItemClick(groceryItems: GroceryItems) {
       groceryViewModel.delete(groceryItems)
       groceryRVAdapter.notifyDataSetChanged()
       Toast.makeText(applicationContext,"Item Deleted Successfully.", Toast.LENGTH_SHORT).show()
   }
}
Android Kotlin Grocery Shopping App Output:
1. Home Screen:

2. New Item sheet fragment is created when the ‘add’ button is pressed.
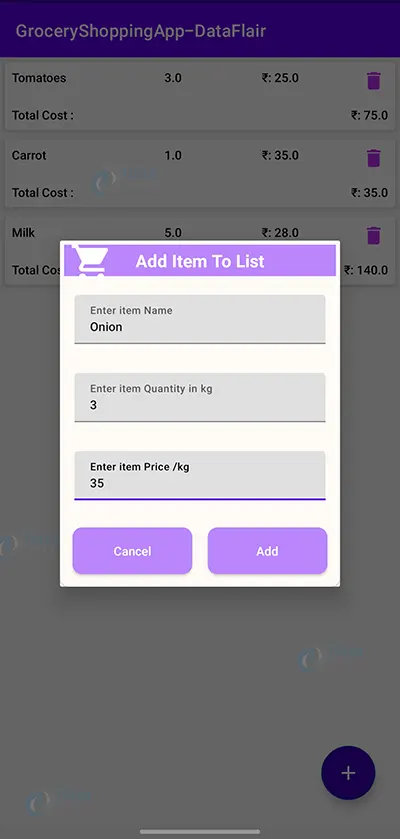
3. Home screen displays all the items stored in the database.
4. Deleting an item from the database.
Summary
Thus, in this Project, we learned how to use Android Studio to design and develop a android kotlin grocery shopping app. Beginners would greatly benefit from working on this project because it will familiarize them with using XML to design user interfaces, switching between tasks by clicking a button, using the ROOM database, particularly when putting data into the database, and understanding how the recycler view functions. We truly hope you found it enjoyable, and we have no doubt that you will love putting it into practice.
Did we exceed your expectations?
If Yes, share your valuable feedback on Google