Useradd Command in Linux
Job-ready Online Courses: Click for Success - Start Now!
In this article, we will go through what linux useradd is, what changes the computer does when you create a new user, the files it uses, and the syntax and options of the useradd command.
In the end, we will also look at some beautiful practical examples of the useradd command in the terminal of Ubuntu 20.04, So pay attention, grab a snack if you need, and read right till the end.
What is useradd in Linux?
Useradd is a command-line-based utility in Linux-based operating systems that helps in creating users on the desktop. The useradd command is basically a symbolic link to the “adduser” command. Yup! Don’t get confused, useradd and adduser are 2 slightly different commands.
The main difference between the 2 is that useradd is a native binary compiled with the system and adduser on the other hand is a Perl script that uses the useradd binary in the background.
We all know that Linux is a multi-user architecture, meaning more than one person can interact with the same system at the same time. It is the system administrator’s job to wisely manage these users, tasks like creating users, removing users, creating groups, removing groups, and assigning users to different groups come under user management.
One such user management command is useradd. We can also create a group for the new user we created by using the option “-g”. In fact user a range of options, you get to specify how the useradd command should work and print the output.
What happens when you create a user in Linux?
Before we even learn how to use the useradd command to create users, let us first look at what the system does when creating a new user.
When we are creating a user in Linux, the system does the following:
1. It assigns a UID to the new user.
2. It creates another new /home directory for the new user.
3. Sets the default shell as /bin/sh for the new user
4. Creates a private user group named after the user name you entered.
5. Contents of the directory “/etc/skel” are copied to the home directory of the new user.
6. It copies files containing environmental variables for the user’s session like .bashrc, .bash_profile, and .bash_logout to the new user’s home directory.
Syntax of Linux useradd command
The syntax of the useradd command is pretty simple:
useradd <options> <username>
Let us take a closer look at the fields in the syntax of the useradd command:
1. <options>
This field takes in a range of options that you can use to specify how the useradd command must function, format, and print the output.
2. <username>
This option takes in the name of the user you are creating.
Options used with Linux useradd command
In typical Linux fashion, useradd also has a long list of options that we can use to perform various tasks, let us look at some of them.
1. -c
This option specifies a short description of the login and is currently used as the field for the user’s full name. You can also write this option as “–comment”
2. -d <Home_dir>
This option creates a new user using the value of the specified “Home_dir” as the value for the user’s login directory. You can also write this option as “–home”
3. -D
This option sets new default values. You can also write this option as “–default”
4. -e
This option specifies the date on which the user account will be disabled. When you are specifying the date, you must follow the format “YYYY-MM-DD”. You can also write this option as “–expiredate”
5. -f
This option specifies the number of days after a password expires until the account is permanently disabled. You can also write this option as “–inactive”
6. -g
This option specifies the group name or number of the user’s initial login group. You must note that while specifying the group name it must already exist. You can also write this option as “–gid”
7. -G
This option specifies a list of groups containing the user as a member. Each group is separated from the next by a comma, with no space in between. You can also write this option as “–groups”
8. –l
This option does not add the user to the lastlog and faillog databases. You can also write this option as “–no-log-init.
9. -m
This option creates the user’s home directory if it does not exist.
10. -N
This option does not create a group with the same name as the user, but adds the user to the group specified by the -g options “-g” or “-G”. You can also write this option as “–no-user-group.
11. -o
This option specifies the encrypted password, as returned by crypt. The default is to disable the password. You can also write this option as “–password.
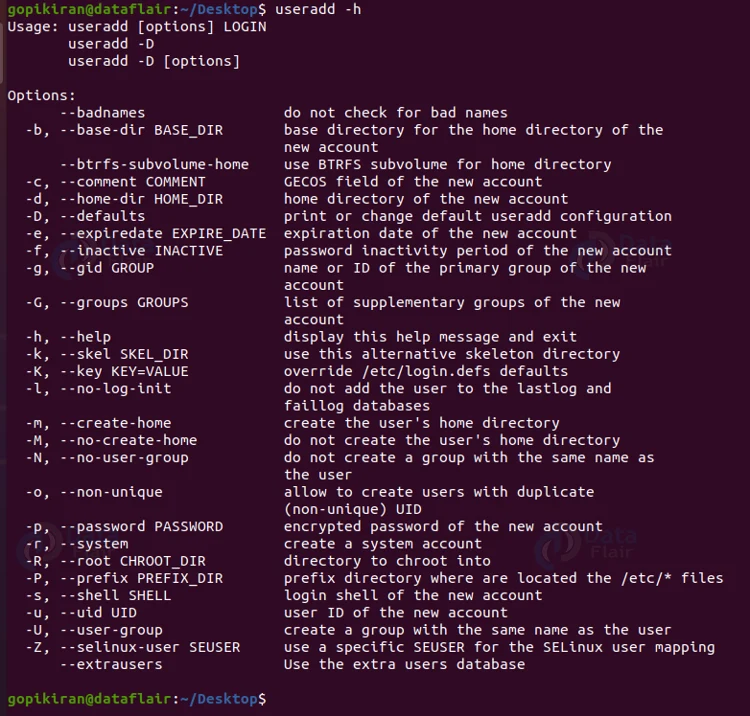
12. -h
This option prints the help menu as shown below:
12. -r
This option creates a system account. You can also write this option as “–system.
13. -R
This option specifies the name of the user’s login shell. You can also write this option as “–shell.
14. -u
This option specifies the numerical value of the user’s ID. This value must be unique unless you use the option “-o”. You can also write this option as “–uid.
15. -U
This option creates a group with the same name as the user and adds the user to this group. You can also write this option as “–user-group.
16. -z
This option specifies the SELinux user for the user’s login. You can also write this option as “–selinux-user.
Files used by the useradd command
Before we proceed further and look at how to use the useradd command, let us look at the files the command uses while creating a user.
1. /etc/passwd
The useradd command obtains user account information from this file.
2. /etc/shadow
The useradd command obtains secure user account information from this file.
3. /etc/group
The useradd command obtains group account information from this file.
4. /etc/shadow
The useradd command obtains secure group account information from this file.
5. /etc/default/useradd
The useradd command obtains default values for account creation from this file.
6. /etc/skel/
This is the directory containing default files.
7. /etc/login.defs
The useradd command obtains shadow password suite configuration from this file.
Now we are finished with the basics and the theory, let us look at some practical examples of how to use the useradd command.
Adding a new user in Linux
To add a new user in Linux, simply run the useradd command with no options followed by the name of the user. You must note that while using the useradd command, you either need to be a root user or use the sudo command to get elevated privileges.
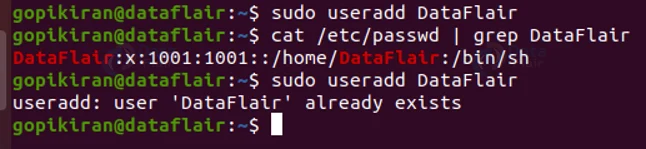
Once you create a user, how do you check if it has been successful or not? Well, you can cat the “/etc/passwd” file and search for the username by using the grep command. If you are too lazy to do all this, simply run the command again and you will not be able to as a user is already created with that name!
Giving home directory to new user
To give the new user a home directory, you can use the option “-d” followed by the path of the same when you are creating the user. Use the following syntax:
sudo useradd -d <path> <username>

Giving the user a specific user ID
Each user is identified by a unique UID, which is a “User Identification number”. When the operating system is installed, the UID 0 is given to the root user and the UID 1 to 199 are reserved for the system users. Meaning that as and when a new user is created they will be assigned a sequential number from 1 to 199. The UIDs for the local users begin from 1000.
If you want to give the user a specific UID at the time of creation, use the option “-u” followed by the UID you want to give. Use the following syntax:
sudo useradd -u <UID> <username>

To confirm if the UID has been set, use the “id” command to check the UID of the user you have created.
Creating a user with a specific group ID
Just Like UID, there is something called GID, a Group Identification number. If you want to create a user with a specific GID, use the option “-g” followed by the GUD. Use the following syntax:
sudo useradd -g <GID>

Again, to confirm if the UID has been set, use the “id” command to check the UID of the user you have created.
Creating a user without a home directory
If you want to create a user without a home directory use the option “-M” as shown below.

Creating a user with an expiry date
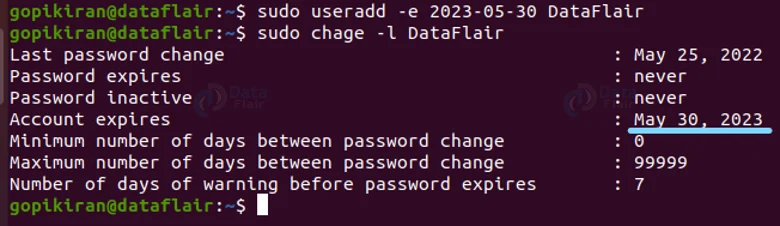
To create an expiry date for a user, use the option “-e” followed by the date of expiry in the format of “YYYY-MM-DD” as shown below:
sudo useradd -e <date> <username>
In the example below, we have set the expiry date of the user to the 30th of May 2023.
Creating a user with a comment
Comments are really helpful for future reference and also note something important. If you want to create a user with a comment, use the option “-c” followed by the comment in double-quotes as shown below:
sudo useradd -c "comment" <username>

Specifying the shell for a user
If you want to specify the shell for the user, you can do so by using the option “-s” followed by the path as shown below:
sudo useradd -s <shell path> <username>

Setting an encrypted password for the new user
While creating a new user, if you want to set a password, pair the useradd command with the option “-p” followed by the password as shown below:
sudo useradd -p <password> <username>

To check if the password was set successfully you can cat the “/etc/shadow” file (it is where the passwords are stored) and search for the username by using the grep command.
Changing the default useradd values
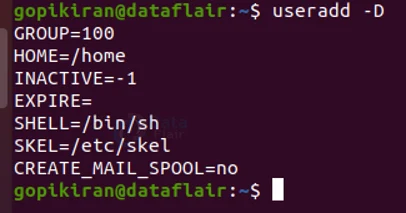
We can view the default useradd option by either using the options “-D” or “–defaults” as shown below:
If at all you want to change something, you can combine the option “-D” with the corresponding option of what you want to change. For example, if you want to change the default shell to bash, you can do so by using the command
sudo useradd -D | grep -i shell

To check if the value has been changed or not, you can pipe the useradd command with the option “-D” with the grep command to search for the category as shown in the above screenshot.
Creating a system user
Wait, what is a system user? Well, in Linux there are generally 2 types of users:
1. System user
The system user is the one that creates normal users. In other words, the system user is the root. The system user is automatically created when you first install the operating system. Moreover, you can also create system users for particular applications and programs.
2. Normal user
The normal users are the ones that are created by the system or root user, actually, even users with sudo privileges can create normal users
To create a system user, you can either use the option “-r” or “–system” as shown below:

Creating a User and Assign Multiple Groups
We can assign a user into a group but combining the option “-g” and “-G” as shown below:
sudo useradd -g users -G wheel,developers username
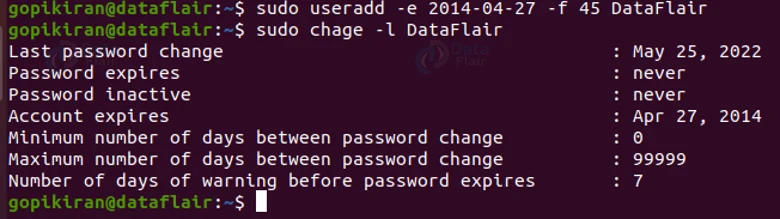
Creating a User with a password expiry date
Just like we created an expiry date for the user by using the option “-e” you can set the expiry of the account after a fixed number of days of the last password change. For example, to disable the account of “DataFlair” after 45 days of not changing the password, use the command shown below:
useradd -e
Now that we have covered pretty much everything, we can now use all of this information to use complex useradd commands that do multiple things at once. Let us look at 2 such examples:
Adding a user without a home directory, no shell, no group, and a comment
In the command shown below, the option ‘-M’ creates a user without the user’s home directory and the option ‘-N’ tells the system to only create a username (without group). The ‘-r’ argument is for creating a system user and the option ‘-c’ adds a comment.
useradd -M -N -r -s /bin/false -c "comment" <username>

Adding a user with a home directory, shell, comment, and user ID.
The command shown below will create a new user with a home directory, shell, comment and user ID:
useradd -m -d /var/www/navin -k /etc/custom.skell -s /bin/tcsh -c "comment" -u 1027 <username>

What is the difference between useradd and adduser commands?
It must be noted that both are actually not the same. In this section, we shall not only compare both these commands but also find out which command ‘you’ need to use.
The commands basically perform the same functions – creating users, but there are different. To put it in layman’s language, the adduser command is intended for the user or administrator, and the useradd command is intended for the system. But we are not here for layman’s language, are we?
Technically speaking, the “adduser” command provides a high-level interface for adding new users, and the “useradd” command provides a low-level interface. Most Linux users prefer and suggest the useradd command is more user-friendly and has more features?
The useradd command has an interactive prompt that asks you for information about the new user account you are trying to add. Useradd also receives very few updates when compared to the useradd command, and needs to remain backward compatible.
As an average Joe (basic Linux user), it is recommended for you to use the “adduser” command instead of “useradd”. However, if you are little more mainstream like a developer, use the “useradd” in your scripts or programs you create, to ensure compatibility across different distros and future updates.
Summary
As you have seen, the useradd command is one of the tools that help in creating new users, and with its various options, we can perform tasks like creating a home directory, assigning a UID and GID to a user, specifying a shell, adding a custom comment, and so many more.
You have now learned what the useradd command is, why we use it, what happens when we create a new user in Linux, the syntax and options of the useradd command, the files the useradd command uses to access different information while creating users, and 15 beautiful practical examples.
Did you like this article? If Yes, please give DataFlair 5 Stars on Google


