Unzip Command in Linux
Expert-led Courses: Transform Your Career – Enroll Now
In this article, we will learn everything about the unzip command in Linux. We will look at what the unzip command is, why it is used, how to install it, the syntax of the unzip command and the options used along with it.
In the end, we will also look at some fantastic practical examples of the unzip command by pairing it with various options to understand its working. So pay attention, take notes, and read all the way to the end for the best benefits.
What is the unzip command in linux?
Unzip is a command-line-based file packaging utility in Linux-based operating systems that decompresses files and directories in your filesystem. We can deal with all types of “.ZIP” files in the Linux filesystem by using the unzip command.
The unzip command is available in many other operating systems like Windows, Unix, and more. The unzip command extracts files from the ZIP archive. The default behavior of the unzip command is to extract into the current directory, all files from the specified ZIP archive.
On the contrary, The zip command puts one or more compressed files into a single zip archive, along with information about the files like the time of last modification, protection, name, path, date, and a lot more.
Most compression ratios for text files are usually between 2:1 to 3:1. The compression method used by the zip command is known as deflation. To explain it in a nutshell, the zip command is useful for packaging a set of files for distribution, archiving files, and saving disk space by temporarily compressing unused directories or files.
Syntax of linux unzip command
The simple and straightforward syntax of the unzip command is shown below:
unzip <options> <filename(s)>
Let us take a deeper look at the fields that are present in the syntax of the unzip command:
<options>
This field takes in a range of options that specify how the unzip command must function, format, and print the output. You can also specify multiple options in this field.
<filename(s)>
This field takes in the name of the file that you want to compress. You can also specify the names of directories and multiple filenames in this field.
Options used with linux unzip command
In typical Linux fashion, the unzip command has a huge truckload of options. Let us take a brief look at each of these options.
1. -f
This option extracts only those files that already exist on the disk and also provided that they are newer than the disk copies
2. -l
This option lists archive files in short format. It displays the names, uncompressed file sizes, modification dates, and the times of the specified files printed, along with totals for all files specified.
3. -p
This option extracts files to standard output. The option “-p” sends the file data to stdout (standard output) and the files are always extracted in binary format.
4. -t
This option extracts each of the specified files in memory and compares the cyclic redundancy check of the expanded file with the original file’s stored CRC value.
5. -T
This option sets the timestamp on the archive or archives to that of the newest file in each one.
6. -u
This option performs the same function as the option “-f”, extracting (with query) files that are newer than those with the same name on disk.
7. -v
This option provides verbose to the output so that the user gets a better understanding of what is happening.
8. -a
This option causes files identified by zip as text files to be automatically extracted as such, converting line endings, end-of-file characters, and the character set itself as necessary.
9. -i
This option ignores filenames stored in MacOS extra fields. Instead, the most compatible filename stored in the generic part of the entry’s header is used.
10. -L
This option converts any filename originating on an uppercase-only operating system or file system to lowercase.
11. -M
This option pipes all output through an internal pager similar to the Unix “more” command.
12. -n
This option never overwrites existing files. This means that If a file already exists, the “-n” option skips the extraction of that file without prompting.
13. -o
This option overwrites existing files without prompting. You must use this option with caution as the overwritten files cannot be retrieved back.
14. -P
This option uses a password to decrypt encrypted zip file entries. This option is very insecure!
15. -q
This option enables quiet mode, where nothing will be printed on the screen. This option also suppresses many errors.
16. -s
This option converts spaces in filenames to underscores. Why does it do this? Because all operating systems allow spaces in filenames. However, unzip by default extracts filenames with spaces intact and conversion of spaces to underscores can eliminate the awkwardness in some cases.
17. -V
This option retains the version numbers
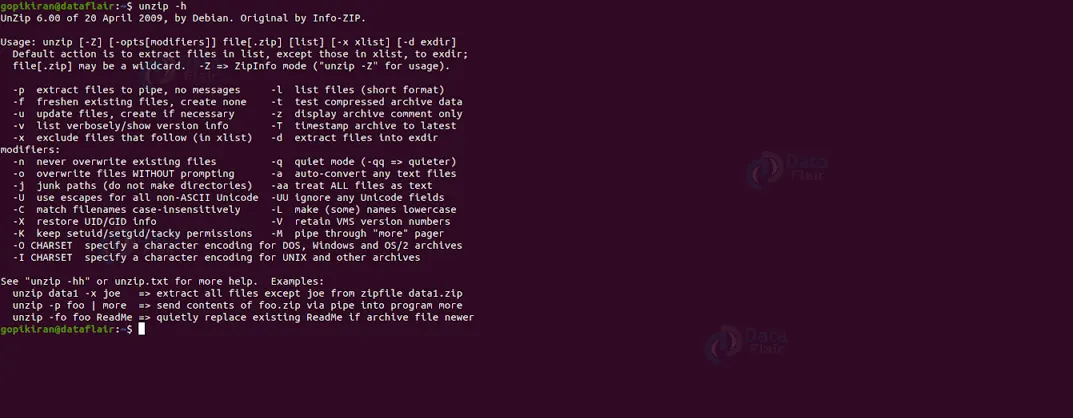
18. -h
This option displays the help menu of the unzip command as shown below:
How to install unzip?
The reason I did not address this at the beginning is that most of the Linux distributions already come with the unzip command preinstalled. However, if your Linux distro does not have it, or if you uninstalled it, you can always install it using the commands shown below with respect to your Linux distro:
Installing unzip on Debian-based Linux distributions
If you want to download unzip on Debian-based Linux distros like Kali, Ubuntu, Deepin, ParrotOS, Mint, MX Linux, Pure OS, AntiX, etc, use the command shown below:
sudo apt install unzip
Installing unzip on Fedora-based Linux distributions
If you want to download unzip on Fedora-based Linux distros like Berry Linux, Qubes, Fedora spins, Clear OS, Korora, Hanthana, Arquetype, etc, use the command shown below:
sudo yum install zip
Now that we have laid down the fundamentals, let us look at some Practical examples of the unzip command in the terminal of Ubuntu 20.04.
Extracting a zip file
To extract all the files from a zip archive into the current directory, run the unzip command followed by the filename as shown:
unzip <filename>.zip

Unzipping the file to another directory
If you don’t want to extract the contents of a zip file into the current directory and want to extract them to another directory, run the unzip command using the syntax shown below:
unzip <filename> -d <directory path>

Extracting a zip file by suppressing the output
If you have noticed, in the previous examples, the unzip command provides some information about what’s happening in the background. However, if you don’t want the unzip command to print anything on the screen, you can enable the quiet mode by paring the unzip command with the option “-q”.

Excluding files from extracting a zip file
While extracting from a zip archive, You can exclude directories and files by combining the unzip command with the option “-x” as shown below:
unzip <filename.zip> -x <name(s) of file(s) to be excluded>

Overwriting the existing unzipped files
If you observe the previous examples carefully, we have already covered this topic! Yes, when we extract a zip archive and a file in the zip file matches the name of an already existing file in that directory, the unzip command prompts you to choose any one of the following actions:
1. [y]es – confirm to replace the existing unzipped files with the new one
2. [n]o – don’t replace the existing unzipped files with the new one
3. [n]one – Do nothing
However, if you don’t want the unzip command to deliberately ask you and you want to replace the existing unzipped files, pair the unzip command with the option “-o”. You must use this option very cautiously as the files lost cannot be retrieved.

Listing the contents of a zip file
To list the contents of a zip file, you can run the unzip command by combining it with the option “-l” followed by the name of the file as shown:
unzip -l <filename.zip>

Unzipping multiple zip files
To extract all of the zip files in your current working directory, use the wildcard to select all of the “.zip” files as shown:
unzip '*.zip'
IMAGE
Unzipping password-protected zip files
If you want to extract files from a password-protected zip file, execute the unzip command by pairing it with the option “-P” followed by the password and then the name of the file you want to unzip as shown below:
unzip -P <password> <filename.zip>
Summary
As you have seen, the unzip command is extremely simple yet advanced at the same time. It helps us in the simple task of decompressing or extracting zip files and directories in our filesystem. You have now understood what the unzip command is, why it is used, the syntax of the unzip command, and the various options used with it.
Your opinion matters
Please write your valuable feedback about DataFlair on Google


