Sendmail Command in Linux
Job-ready Online Courses: Dive into Knowledge. Learn More!
In this article, you will learn about the Sendmail command in Linux. We will go through the various parameters and options that are used with the Sendmail command.
What is Sendmail command in Linux?
As the name suggests, the Sendmail command on Linux/UNIX operating systems is an email routing facility that supports many kinds of mail transfer and delivery methods like Simple Mail Transfer Protocol (SMTP) for transporting e-mail over the internet.
Sendmail is Linux’s way of making emailing hard! Other programs provide way better user front end, like thunderbird, Gmail, and many more. Sendmail is not intended as a user interface routine, as it is only used to send pre-formatted messages.
How to use the Sendmail command?
The Sendmail utility can be invoked, by using the syntax given below in the terminal.
sendmail <flags> <address>
Alternative syntaxes
The Sendmail tool can also be invoked by using special functionalities using the following syntaxes:
- newaliases
- mail <-v>
- hotstat
- purgestat
- smtp
Let us look at the various flags that are used with the Sendmail command.
Linux Sendmail Command Parameters
1. -Ac
This parameter uses the submit.cf even if the operation mode does not show an initial mail submission.
2. -Am
This parameter uses the submit.cf even if the operation mode shows an initial mail submission.
3. -Btype
This parameter sets the body type to ‘type’
4. -ba
This parameter goes to ARPANET mode. All of the input lines have to end with a CR-LF, and all the messages will be generated with CR-LF at the end. In addition to this the fields containing “from” and “sender” are also examined.
5. -bd
This parameter runs the mail as a daemon (running in the background without user interaction). Sendmail will fork and run in the background listening for incoming SMTP connections.
6. -bD
This parameter performs the exact same task as the flag ‘-bd’, except Sendmail runs in the foreground rather than in the background.
7. -bh
This parameter prints the persistent host status address.
8. -bH
This parameter purges (removes) the expired entries from the persistent host status database.
9. -bi
This parameter initializes the alias database
10. -bm
This parameter delivers mail in the default way.
11. -bp
This parameter prints the mails that were queued.
12. -bP
This parameter prints the number of entries in the queue.
13. -bs
This parameter uses the SMTP protocol on standard input and output.
14. -bt
This parameter runs the email tool in address test mode. This mode reads the addresses and shows the step in parsing.
15. -bv
This parameter verifies only names. The verify mode is usually used for validating users.
16. -C<file>
This parameter used an alternate configuration file. If an alternate configuration file is specified, Sendmail gives up any enhanced privileges.
17. -d<category><file>
This parameter sets the debugging flag for a category to level
18. -D<logfile>
This parameter sends the debugging output to the given log file instead of the standard output.
19. -F<name>
This parameter sets the full name of the sender.
20. -f<name>
This parameter is used to set the name of the person in the “from” field.
21. -G
This parameter relays the submission of a message.
22.- h<n>
This parameter sets the hop count (it is the number of network devices through which data passes from source to destination) to the number you specify. The count is increased every time the mail is processed.
23. -i
This parameter ignores dots alone on lines by themselves in incoming messages (this should be used when reading data from a file).
24. -L<tag>
This parameter sets the identifier used in Syslog messages to the supplied tag.
25. -Ndsn
This parameter sets the delivery status notification to dsn.
26. -n
This parameter does not perform aliasing.
27. -O <option = value>
This parameter sets the <option> you specify to the <value> you enter
28. -o<x value>
This parameter sets the option <x> to the specified value. This option used single character names only.
29. -p<protocol>
This parameter sets the name of the protocol used to receive the message. For example, -p” UUCP:ucbvax”.
30. -q<time>
This parameter process saved messages in the queue at given intervals. If at all you omit entering the time, the process will be executed only once.
31. -qp<time>
This parameter performs the exact same task as the flag “-q<time>”, except that instead of periodically forking a child (subdirectory) to process the queue.
32. -qf
This parameter processes saved messages in the queue once you do not fork but run in the foreground.
33. -qG<name>
This parameter processes jobs in queue with the “name” you give.
34. -q[!]I<substr>
This parameter limits processed jobs the substring you specify of the queue ID or not when “!” is specified.
35. -q[!]Q<substr>
This parameter limits processed jobs to quarantined jobs containing the substring you specify of the quarantine reason or not when “!” is specified.
36. -q[!]R<substr>
This parameter limits processed jobs to those containing the substring you specify of one of the recipients and not when “!” is specified.
37. -q[!]S<substr>
This parameter limits processed jobs to those containing the substring you specify of one of the senders and not when “!” is specified.
38. -Q<reason>
This parameter quarantines normal queue items for the reason you specify. It also unquaratines quarantine queue items if no reason is given.
39. -R<return>
This parameter sets the amount of the message to be returned if the message bounces.
40. -r<name>
This parameter is used to set the name of the person in the “recipients ” field.
41. -t
This parameter reads messages for recipients. The fields “To:”, “CC:”, and “BCC:” will be scanned for the recipient addresses.
42. -V<envid>
This parameter sets the original envelope ID. This is generated across SMTP to servers that support DSNs and is returned in DSN-compliant error messages.
43. -v
This parameter goes into verbose mode and provides better readability.
44. -X<logfile>
This parameter logs all the traffic in and out of the mailers in the indicated log file.
45. —
This parameter stops processing command flags and uses the rest of the arguments as addresses.
Options used with Linux sendmail command
Apart from the parameters mentioned above, there are also many processing options that can be used with the sendmail command.
Options can be set by using the flags “-o” for short names, “-O” for long names or in the configuration files. Here are a couple of long name options:
1. AliasFile = <file>
This option uses an alternate alias file.
2. HoldExpensive
This option initiates an immediate connection on mailers that are considered “expensive” to connect to.
3. CheckpointInterval = <n>
This option checkpoints the queue file after every “n” successful deliveries.
4. DeliveryMode = <x>
This option sets the delivery mode to “x” here is the list of delivery modes:
a. i – interactive
b. b – background delivery
c. q – queue
d. d – deferred
5. ErrorMode = <x>
This option sets the processing mode to “x” here is the list of delivery modes:
a. m – mail back error message
b. w – write back the error message
c. p – print the errors in the terminal
d. q – throw away error messages
e. e – special processing for BerkNet
6. SaveFomLine
This option saves UNIX style “from” lines at the front of the message.
7. MaxHopCount = <n>
This option specifies the maximum number of times a message is allowed to hop before we decide it is in a loop.
8. IgnoreDots
This command ignores dots alone on lines by themselves as a message terminator.
9. SendMimeErrors
This command sends error messages in MIME (Multipurpose Internet Mail Extensions) format. If this is not set, the DSN (Delivery Status Notification) SMTP is disabled.
10. ConnectionCacheTimeout = <time out>
This option sets the connection cache timeout
11. ConnectionCacheSize = <N>
This option sets the connection cache size
12. LogLevel = <n>
This option specifies the Log level.
13. MeToo = False
This option will not send to “me” (the sender) if they are an alias expansion.
14. CheclAliases
This option validates the right side of aliases during the “NewAliases” command.
15. OldStyleheader
If this option is set, the message will have old-style headers. If not set, it will have new style headers.
16. QueueDirectory = <directory>
This option selects the directory for putting the queue messages.
17. StatsFile = <file>
This option saves statistics in the file you have specified.
18. Timeout.QueueReturn = <time>
This command sets the timeout on undelivered messages in the queue to the time you have specified
19. UserDatabaseSpec = <userdatabase>
If this option is set, a user database is consulted to get forwarding information. This option will not be available if your Sendmail does not have the USERDB option compiled in it.
20. ForEachJob
This option forks each job during queue runs.
21. SevenBitInput
This option strips the incoming messages to only 7 bits.
22. EightBitMode = <mode>
This option sets the handling of 8-bit input to 7-bit destinations. Here are the different modes for this option:
a. m – converts to 7 bit MIME format (mimefy)
b. p – passes as 8 bit (pass)
c. s – bounces back the message (strict)
23. MaxDaemonChildren = <n>
This option sets the maximum number of children (like subfile) that an incoming SMTP allows spawning at any time to the time you specify.
24. ConnectionRateThrottle = <n>
This option sets the maximum number of connections per second to the SMTP port to the port you specify.
25. DefaultCharSet = <char>
This option sets the default character set used to label 8-bit data that is otherwise labeled.
Exit status of Sendmail
After finishing the command you specified, Sendmail returns an exit status describing what it did. It is important to know what each exit status means.
1. EX_OK
This exit status means that Sendmail has successfully completed all addresses.
2. EX_NOUSER
This exit status means that Sendmail has not recognized a username
3. EX_UNAVAILABLE
This exit status means all the necessary resources were not available.
4. EX_SYNTAX
This exit status means that Sendmail found errors in the address
5. EX_SOFTWARE
This exit status means that there is an internal software error.
6. EX_OSERR
This exit status means that there is a temporary operating system error.
7. EX_HOSTNAME
This exit status means that Sendmail has not recognized the hostname.
8. EX_TEMPFAIL
This exit status means that Sendmail could not send the message immediately. Hence the message has been queued.
Alternative invocations of sendmail
We have seen above that the send mail took can also be invoked using special function syntaxes. Let us look at what these syntaxes do.
1. newaliases
If invoked with this syntax, Sendmail rebuilds the alias database.
2. mailq
If invoked with this syntax, sendmail prints the contents of the mail queue.
3. hotststat
If invoked with this syntax, sendmail prints the persistent host status address.
4. purgestat
If invoked with this syntax, sendmailpurges expired entries from the persistent host database.
5. smtp
If invoked with this syntax, sendmailacts as a daemon, just like the if the option “-bd” was used.
Files used by sendmail
Before we see the practical examples, we need to cover 1 last topic regarding the files used by Sendmail. Except for the file in the address “/etc/mail/sendmail.cf”, the following pathnames are all specified in the file path “/etc/mail/sendmail.cf”. Let us look at the different files used by sendmail in the same path.
1. /etc/mail/aliases
This file contains the raw data for alias names.
2. /etc/mail/aliases.db
This file contains the databases of the alias names.
3. /etc/mail/sendmail.cf
This files contains the configuration file.
4. /etc/mail/helpfile
This file contains the help file.
5. /etc/mail/statistics
This file contains the collected statistics.
6. /var/spool/mqueue/*
This file contains the temporary files.
Examples of Linux Sendmail command
It would be really obnoxious to see an example using each of the parameters and options (let alone you even using this command!). So let us see simple examples on how to send e-mails using different Sendmail tool Commands.
1. Sending an e-mail using the Sendmail command
We have seen that Sendmail is one of the most popular SMTP servers used in Linux-based operating systems. Use the instructions below to send an email using the Sendmail command
First, create a .txt file where you shall write the content of the email.
Now you can the mail using the following syntax:
sendmail <email address> <[file name.txt]
2. Sending an e-mail using the mail command
Mail command is the most popular command that is used to send emails from the terminal in Linux-based operating systems.
To install the mail tool in ubuntu, use the following command:
![]()
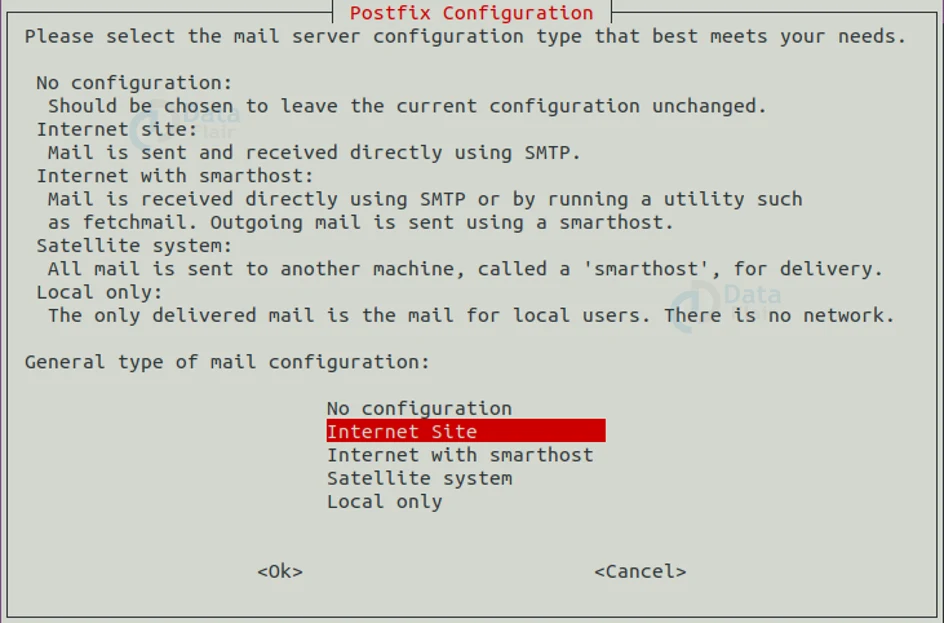
After writing the command in the terminal, a popup and shown below appears. Use the “tab” to navigate to “internet site” and press “enter”.
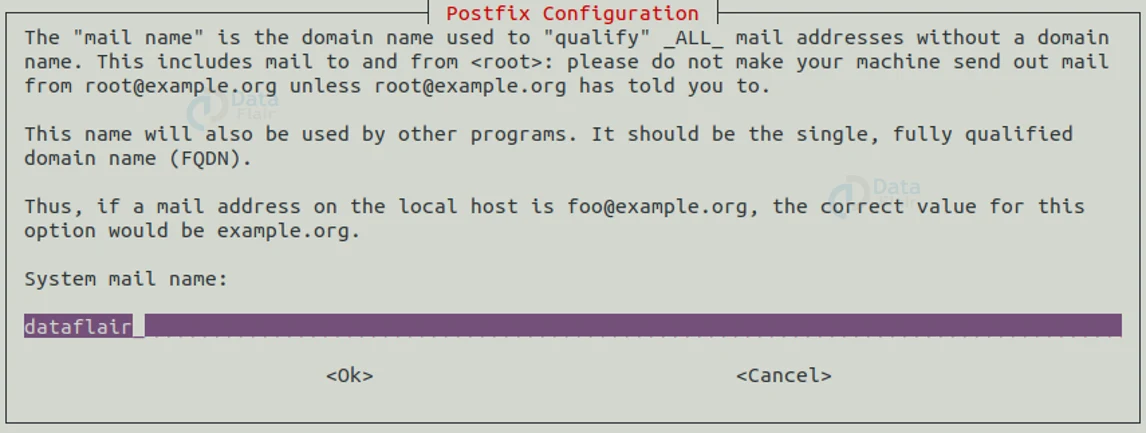
After choosing the option, another popup menu will appear for you to choose the name with which you want to be sending emails. This is the name that will be visible to the receiver. Once you finalize your name press ok.
Upon pressing “ok” the installation will be complete in a couple of seconds and you are now ready to send your first e-mail using the mail command!
To send e-mails using the mail command, type the command: “mail -s <subject> email address”. When you press “enter”, the command will take you to the next line with “CC:” written, you can add a carbon copy if you want. Press “enter” again to write the body od the e-mail. Once you have finished writing the email and want to send it, press “ctrl” + “d”.

You can also pipe the echo command to write your e-mails as follows:

The pipe symbol will make the output of the echo command, the input of the mail command.
3. Sending an e-mail using the mutt command
The mutt command is very similar to the mail command. The mutt tool is used for reading emails from the Linux terminal from the local user mailboxes. To send an e-mail using the mutt command, use the following syntax:
mutt -s “<subject>” <e-mail address> < /dev/null
4. Sending an e-mail using the ssmtp command
The SSMTP tool allows users to send emails from the SMTP server from the Linux terminal. To send an e-mail using the SMTP command, use the following syntax:
This command will take the cursor to the next line where you can write the subject, upon pressing enter again, you can write the body of the email. Once you finish writing and want to send the e-mail, you can press “ctrl” + “d”.
5. Sending an e-mail using the telnet command
Telnet is useful the system administrators to test remote port connectivity or to login to a remote server. However, telnet can also send e-mails.
6. Attaching a file to an email
Using the mail command, you can also send emails with files attacked by using the option “-A” followed by the path of the file you want to send.
Summary
You have seen the different parameters and options useful with the Sendmail command. To be honest, Sendmail is just another hard way of sending emails. You can use many applications with amazing GUI and features which makes the process of sending emails a lot easier.
Did we exceed your expectations?
If Yes, share your valuable feedback on Google


