PWD Command in Linux with Examples
Interactive Online Courses: Elevate Skills & Succeed Enroll Now!
By the end of this article, you will learn all there is to the Linux PWD command. We will be going through what PWD is, and directly dive headfirst into the practical examples of the PWD command in the terminal.
What is PWD Command in Linux?
Pwd is an abbreviation for Present Working directory, And that sums up the command. Seriously, there is nothing much to the PWD command than it telling which directory you are currently in.
This tool was put in Linux-based operating systems for you to find your path in the giant filesystem of Linux. PWD is one of the most basic and frequently used Linux commands.
Pwd is a built-in tool in different shells like bash and zsh. The behavior of this command is slightly different than the standalone /bin/pwd executable. When invoked it does a simple job of printing the complete path of the directory you are in starting from the root directory (/).
What is the current working directory?
The present or current working directory is the directory that the user is currently in. We all know that everything in Linux is a file, we also know that any file in Linux is within the root directory. Hence at any given time, no matter what you are doing, you are always within a directory.
You may either be in just the root directory or deep inside the filesystem. And the directory you are in is simply called the current working directory. When lost, simply invoke the PWD command to know where you are.
Syntax of Linux PWD command
For a simple command like PWD, it does not even need a syntax, it is so simple that it only has 2 options and such a simple syntax:
pwd <options>
Options used with Linux PWD command
As I mentioned above, the PWD command has only 2 options, when was the last time you heard that for any Linux command? Nonetheless, let us take a look at the 2 options of PWD:
1. -L
This option prints the value of PWD if it names the current working directory
2. -P
This option prints the physical directory, without printing any symbolic links
Apart from these 2 options, there are 2 more options that actually don’t qualify as options as they are not for technical purposes, they are:
a. –version
This option prints information about the version of the PWD command present in your system.
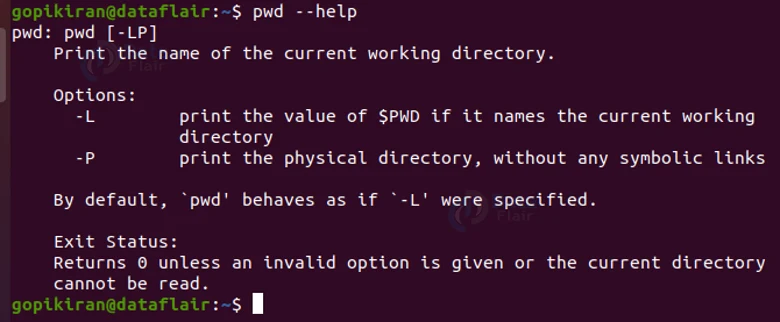
b. –help
This option displays the help menu with the information about its options
Understanding the exit status of PWD
Before we head any further, let us look at the very simple exit states of the PWD command:
- 0 – success
- Non-zero – Failure
Now that we have seen the basics and the theory part, let us look at some practical examples of how to use the PWD command in the terminal.
Printing your current working directory
To print your current working directory, simply use the PWD command with no options.

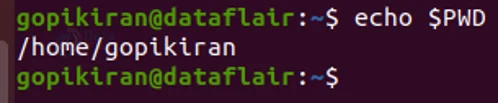
Printing the variable contents of PWD
To print the pwd variable contents, use the command “echo $PWD”
Personalizing the output of PWD
When we invoke the PWD command, we see that it just prints the path of the directory you are in. What is it could be personalized to show a message preceding the path of the directory?
Well, you can personalize the output by using the command “vi directory.sh”. This command will open a vi editor with the name “directory”
![]()
As soon as the Vi editor opens, you will be in command mode, press the letter “i” to go to insert mode and write the following 3 lines of code:

Once you have written the 3 lines, press “ESC” to come back to command mode and press “:” to go to escape mode, once you are in escape mode, press wq to save and exit. Once you have successfully exited, change the permission of the file by typing the command “chmod +x directory.sh”

Now, you can run the file by using the command “./directory.sh” and you can now see your customized message before the path of the directory you are in.

The moral of the story and the key takeaway is that the path od you cwd will be stored in the variable “$p”, since you assign it as “p = $(pwd)”
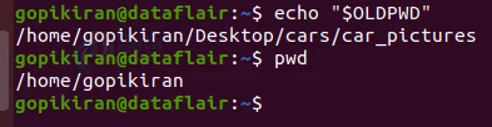
Displaying the previous working directory
To display the previous working directory, or the last time you used pwd in a different directory, use the command:
echo “$OLDPWD”
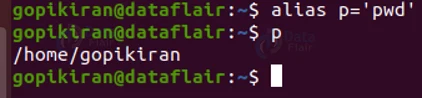
Setting an alias for the PWD command
If you are lazy and impatient like me and don’t want to type all the 3 Letters each time you want to check your cwd, you can create an alias for the command by using the following command:
alias <new name>=’pwd’
To unalias it, simply type “unalias p”
Using PWD in scripting
We can also print values of PWD from a scrpy program. First, type the command vi directory.sh to open a vi editor.
![]()
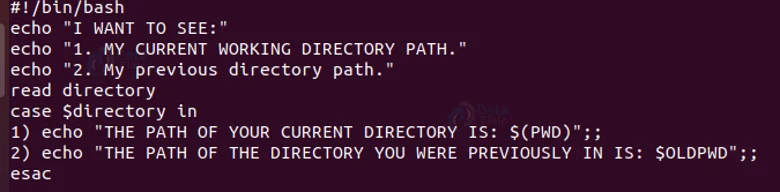
As soon as the Vi editor opens, you will be in command mode, press the letter “i” to go to insert mode and write the following lines of code:
Once you have written the 3 lines, press “ESC” to come back to command mode and press “:” to go to escape mode, once you are in escape mode, press wq to save and exit. Once you have successfully exited, change the permission of the file by typing the command “chmod +x directory.sh”
Now, you can run the file by using the command “./directory.sh”:

The program lets you choose which option you want to select, and based on your input, it shows the relevant output. For example, in the above output, I entered the value 2, and hence it showed my last PWD value.
Using the options “-L” and “-P”
Before we actually try out the option “-L”, we need to create a symbolic link of a folder. Once you have created it, move to the newly-created directory.


Now if i use the PWD with the option -L, it will print the following:

And with the option “-P”, it will show the following:

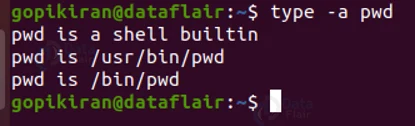
Printing locations containing executable named PWD
If you want to print all of the locations that contain an executable named PWD, type the command “type -a pwd”
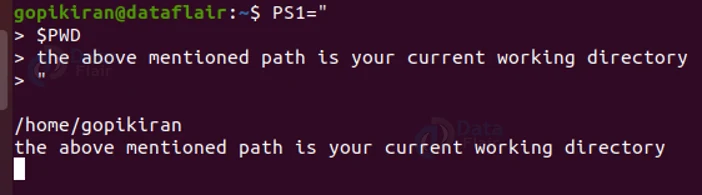
Multiline command line prompt with PWD
Type PS1=” on your terminal to start a multiline prompt, once you write the lines shown below, terminate it by typing another double quote at the end.
Check the CWD and previous CWD in one command
If you want to check both your current working directory and previously current working directory, use the following command:
echo “$PWD $OLDPWD ”

Using PWD in a simple shell script program
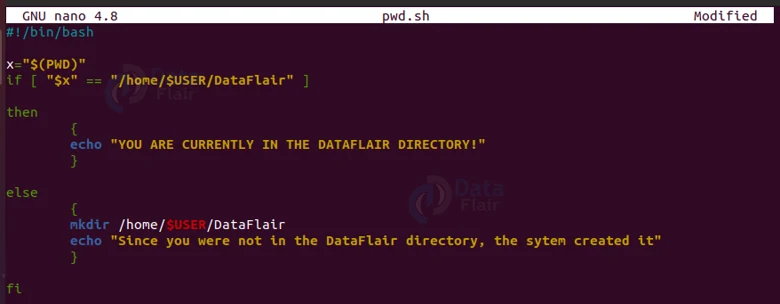
Let’s use PWD in a simple shell program. Let us keep the aim of the program simple; If you are in the ‘DataFlair’ directory, the program will print a message “YOU ARE CURRENTLY IN THE DATAFLAIR DIRECTORY” and if you are not, it will create a new directory called ‘DataFlair’ and print the message of creation.
To start of, let us create a directory and then open a nano editor to write our shell program in. Note that the extension of the program must be “.sh”.

After opening a nano editor, write the following lines of code:
After writing the code, press “ctrl” + “x” to exit. Give execute permission:
After changing the permissions, execute it.
Summary
As you have seen, Linux PWD command is a simple and helpful tool that is used to print out your current and your previous current working directory. You have now learned what PWD is, what the current working directory is, the different options used with the options, and a lot of practical commands of the PWD command.
We work very hard to provide you quality material
Could you take 15 seconds and share your happy experience on Google


