Process in Linux
Placement-ready Online Courses: Your Passport to Excellence - Start Now
In this article, you will learn all there is about the processes in Linux. We will be going through different topics like types of processes, states of a process, what are daemons, the creation of a process, how Linux identifies processes and so many more.
Apart from the above-mentioned theory stuff, we will also be going through different practical commands that help us in the management of processes. So buckle up, pay attention and read right till the end.
What are processes in Linux?
Before we begin, let us look at what the word process even means, in layman’s terms, a process is a series of steps taken to do something. In computer science the definition of ‘something’ changes.
A process is a program in execution. It consists of the data read from files, input from a user, program instructions, and many more.
A process in Linux starts every time you start an application or run a program or command. A program or command creates only one process, but an application on the other hand has the capability to start multiple processes to accomplish various tasks.
The term process cannot be more straightforward than this, let us now deep dive into the various technical aspects of processes.
Types of rocesses in Linux
In Linux, processes are of 2 types, let us go through each of them:
1. Foreground processes
Foreground processes are also called as interactive processes. These processes are launched and controlled through the command line in a terminal session. There has to be a user in the system to start such foreground processes as they cannot start automatically by themselves.
2. Background processes
Background processes are also called as non-interactive processes. These processes are the complete opposite of the Foreground process. They don’t need any user input and are not connected to the terminal. One such example of background processes is daemons.
What are Daemons?
Since we touched on the topic of Daemons, might as well learn what they are. Daemons are a special type of background process that starts when the system boots and keeps running forever, till eternity — they never die. Daemons can be controlled by a user through the init process
What is an init process?
Now, what on earth is an init process you may ask, well it is a parent of all the processes that are happening in the system. The init process is the very first program that is executed when the system starts up and it is started by the kernel itself. Since the init process is the holy mother of all processes, it manages all the processes on the system, and it does not have a parent.
Linux Child and parent processes
Before we proceed further, let us get our terminology straight, let us look at what the terms child process and parent process mean.
Parent process in Linux
These are the processes that create other processes.
Child process in Linux
These are the processes that are created by other processes.
How are processes created in Linux?
In Linux, a process is normally created when an application or program makes an exact copy of itself in the memory. The child process will have the exact environment ad that of the parent process. The only difference between them is the ID number.
In Linux, there are 2 ways of creating a new process, let us look at them:
1. system()
The first method of creating a process in Linux is by using the function system(). This on the easiest of the 2 methods, however, it has security risks and is inefficient.
2. fork() / exec()
The second method of creating a process in Linux is by using either the fork() function or the exec() function. This method is slightly advanced yet is more flexible. It also offers security and speed.
How does Linux identify processes?
Why did we ask this question in the first place, Linux is the greatest of the greatest operating system, and yet here we are questioning its abilities?
Well, we are asking this question to get a better understanding of how Linux works, because if you see Linux is a multi-user system and different users can be running different applications and programs and each actuation of a program must be identified by the Linux kernel.
Linux identifies processes by a unique ID given to processes called PID (process identity) and PPID (parent process identity), as simple as that.
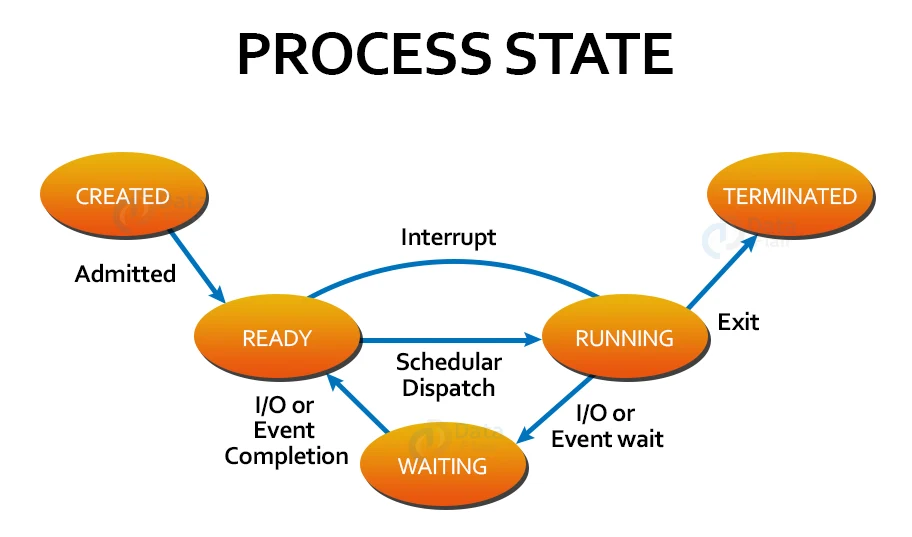
Life cycle of a process in Linux
Now that we already know different stuff like Daemons, parents and child processes, types of processes, PID, PPID, and more, let us go through the different stages a process goes through in its lifecycle, straight from its creation to the point where it turns into a zombie (no pun intended).
1. Creation
We already saw how a process is created, so let us skip this part and se what happens after the creation of a process.
2. Running
In this stage, a process is either up and running or ready to run, meaning it is waiting to be assigned to one of the CPUs.
3. Waiting
In this phase, the process is waiting for something (or an event) to occur. It could also be waiting for a particular system resource.
4. Stopped
In this phase, a process is stopped. Processes usually stop by receiving a signal.
5. Zombie
In this state the process, as the name suggests, is dead, meaning it has been stopped and still has an entry in the process table.
Now that we have cover the theory part, let us explore the different commands that we use to manage processes.
WOAH! Let’s slow down there a little and take a brief glance at the syntax and options used with the processes command before jumping to the process management command.
Syntax of Linux ps command
The syntax is extremely straightforward, the ps command is used in the following syntax: ps [options]
Options used with the ps command
In the syntax of the ps command, we saw that there is a field for entering options, we use options to get the output as we prefer. Let us look at some of the frequently used options with the ps command.
1. -a
This option lists all the processes for all the users.
2. -A
This option lists all the processes on the system
3. -d
This option lists all processes except session leaders.
4. -N
Thi option list all processes except those that fulfill a user-defined condition.
5. -f
This option shows all the processes with the full data.
6. -j
This option displays output in the format of the job.
7. -T
This option lists all processes associated with this terminal.
8. -r
This option lists only the processes that are running.
9. -u
This option defines a user whose processes you want to list.
10. -x
This option includes processes without a TTY.
Now let us look at the commands that we use to manage processes in the terminal.
Tracking ongoing processes in Linux
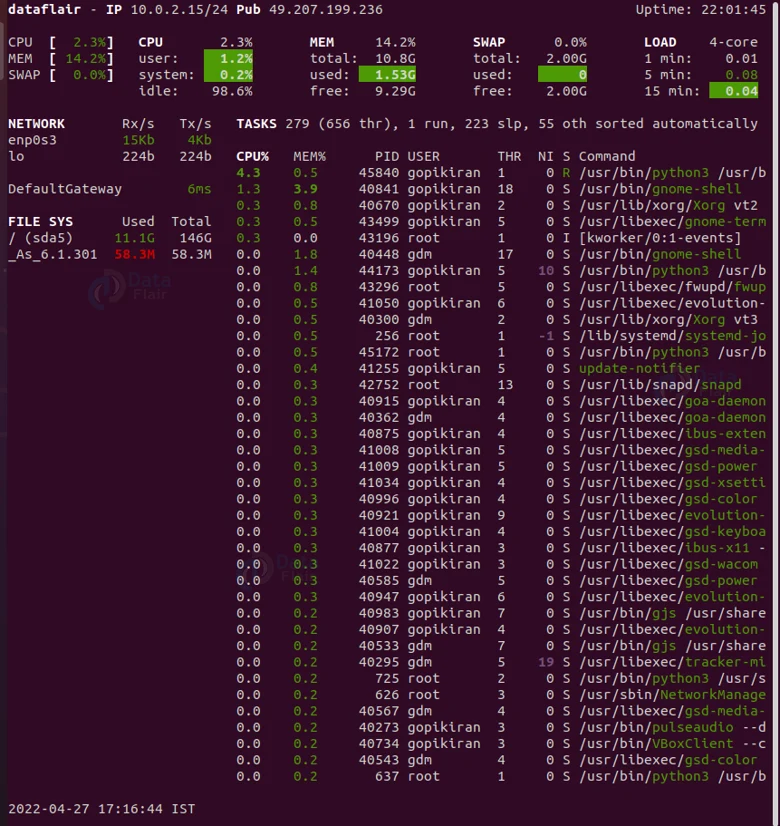
You use two commands to display the ongoing processes, one is the top command, which shows all the processes in realtime:
![]()
And the other command is the ps command:
![]()
If we pair the ps command with the -f option, it displays the full data. Before we proceed further let us understand what the different column names mean.
1. UID – user identity
2. PID – process identity
3. PPID – parent process identity
4. C – CPU utilization of the process
5. STIME – start time
6. TTY – terminal type
7. TIME – time of the CPU taken by process
8. CMD – the command that started the process
If you are not satisfied with the information the option ‘-f’ give you, you can ask for more information by combining ‘a’, ‘u’ and ‘x’ as follows: “ps aux”
Before we see the output let us understand the additional information its shows:
1. USER – the name of the user running the process
2. %CPU – the percentage of CPU usage
3. %MEM – the percentage of memory usage
4. VSZ – virtual memory used my process on kilobytes
5. RSS – resident set size
6. STAT – current process state
7. START – time the process tarted
Now let us take a look at the output of the command “ps aux”:
![]()
If you wish to display the running processes in a hierarchical view, use the option ‘x’, however, just for additional information I am using other options as well: ps axjf
![]()
If you want to filter the processes by the user, you can use the following command:
ps -U <real user name> -u <effective user name> u
![]()
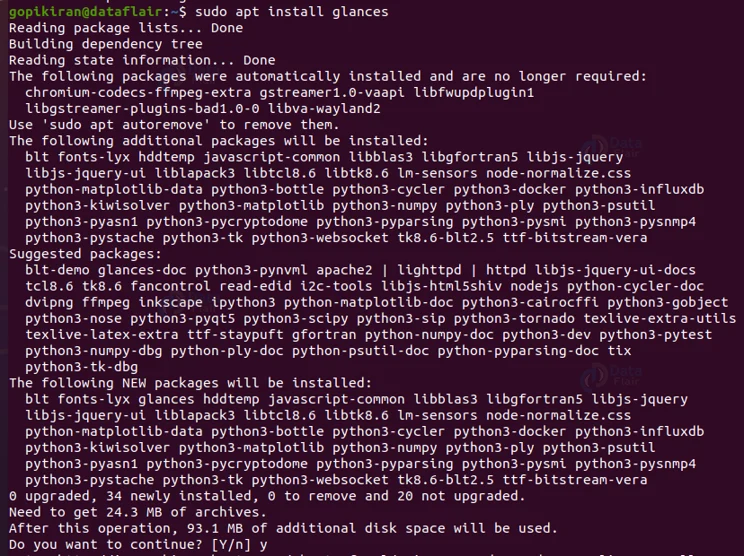
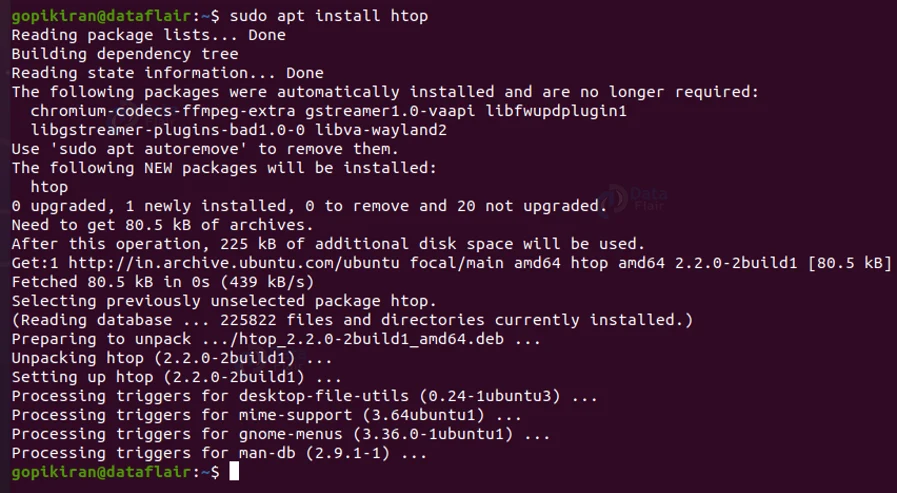
Apart from the commands ps and top, you also have other commands like glances and htop, which are more powerful tools and show more information about the process in real-time.
The only disadvantage of these tools is that you have to install them as they don’t come pre-packaged like top and ps commands. Let us
To download glances type the command: “sudo apt install glances”:
And to install htop, type the command: “sudo apt install htop”:
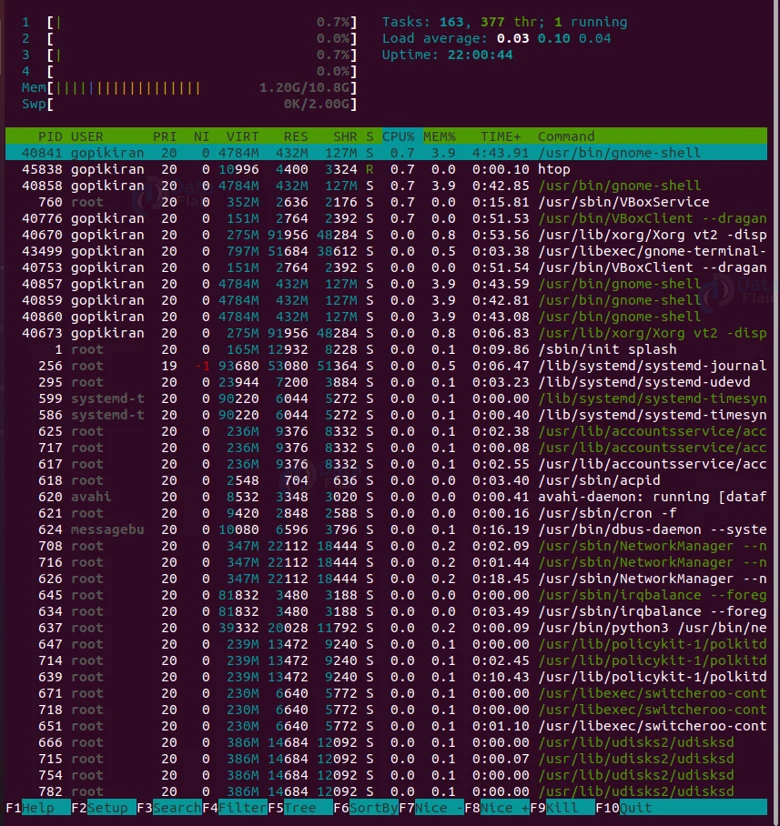
The output of htop looks like this:
And the output of the glances command looks like this:
Searching a process with the process name
If you want to search process by the name of the process, you can do so by using the pgrep command as follows:
pgrep <process name>
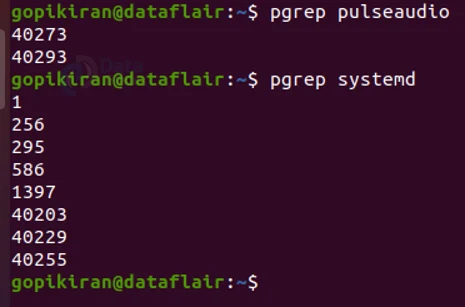
When executing this command, the output will be the PID or the process name. If a process name with the same name was run multiple times, then it will print all the PIDs.
Searching a process with the process ID
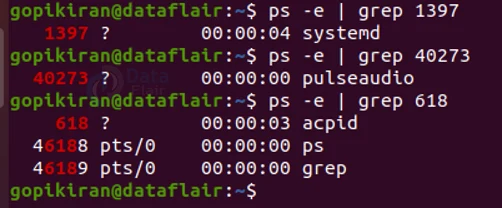
If you want to search process by the name of the process, you can do so by piping the ps command with the grep command followed by the PID number as follows:
ps -e | grep <PID>
Other process management commands in Linux
Now that we have seen the different ways and methods to list processes,
Let us look at some other commands that help us manage processes.
1. The bg command
Bg stands for background. This command is a process control command that resumes the stopped process while keeping them running in the background. The syntax of the bg command is: bg <job>
2. The fg command
This command is the opposite of the bg command. Fg stands for foreground and this command is a process control command that resumes the suspense processed while keeping them running in the foreground. The syntax of the fg command is: fg <job>
3. The nice command
This command starts a new process and assigns it a priority value simultaneously. Ths syntax of the nice command is: nice <-nice value>
4. The renice command
The renice command changes the priority value of an already running process. The syntax of the nice command is: renice <-nice value> <PID>
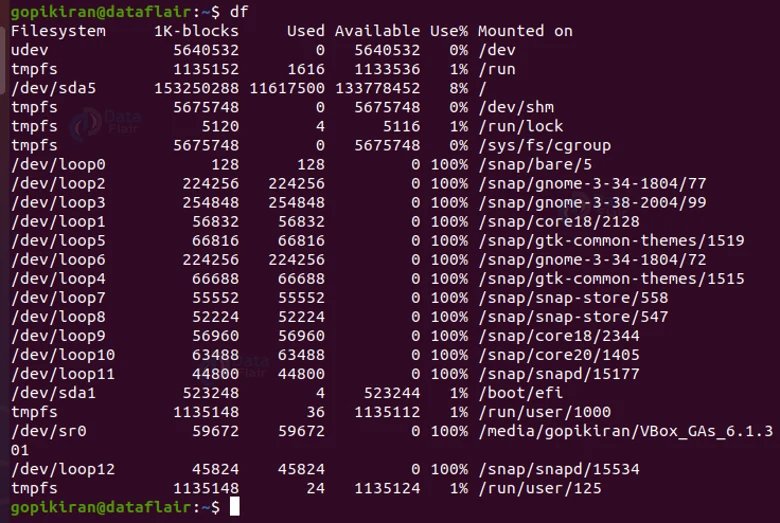
5. The df command
This command shows the amount of disk space available being used by the file systems. The following is the output of the df command
6. The free command
The free command shows the free space and used space of the memory in the system. This command also shows the buffers used by the kernel.

7. Top command
The top command displays the list of all the running processes in real-time with a 3 second refresh rate and in the decreasing order of the CPU usage as shown below:
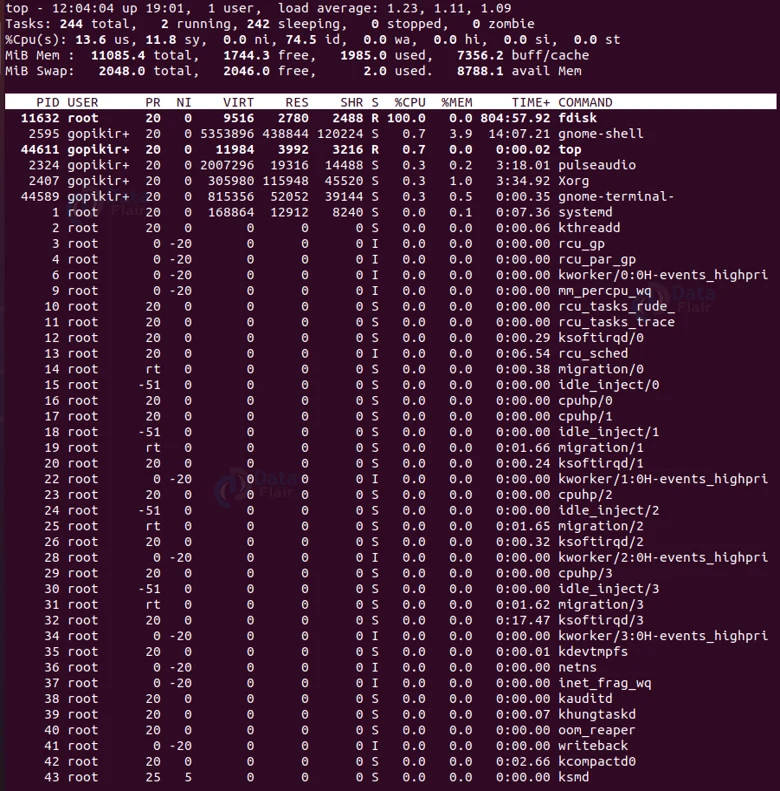
Before we go to the next command, let us understand the fields in the output of the top command:
1. PID – It shows the process identification number.
2. USER – It shows the name of the user running the process.
3. PR – It shows the scheduling priority for the process.
4. NI – It shows the nice value of the process,
5. VIRT – It shows the virtual memory amount used by the process.
6. ES – shows the resident’s (physical) memory amount used by the process.
7. RHR – It shows the total shared memory used by the process.
8. S – The status of the process – R means running and S means sleeping.
9. %CPU – It shows the percentage of CPU usage.
10. %MEM – It shows the memory usage percentage.
11. TIME+ – It shows the total CPU usage amount.
12. COMMAND – shows the name of the command that started the process.
8. Htop command
We have briefly touched on the topic of the htop command, let us look at it a little more thoroughly. The reason we use the htop command is that the output of it is very easy to understand and user-friendly. We have seen that the htop command does not come preinstalled.
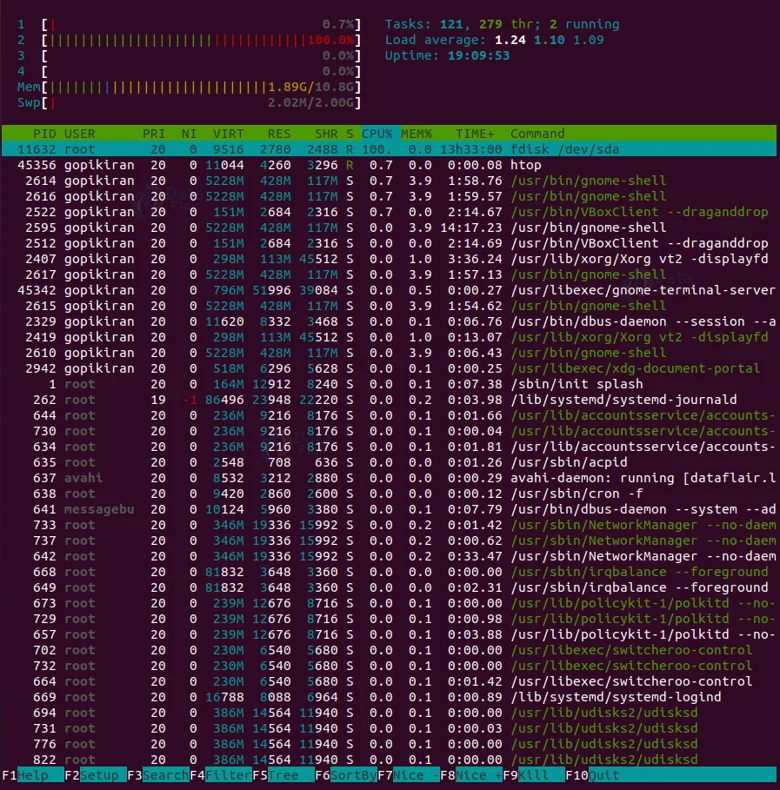
We can even interact with the htop output screen using the following keys:
1: This key opens the help window.
2: This key opens the htop command setup.
3: This key searches for a process by typing the name.
4: This key filters the process list by name.
5: This key switches between showing the process hierarchy.
6: This key sorts the processes by columns.
7: This key decreases the nice value (increase priority) of a process.
8: This key increases the nice value (decrease priority) of a process.
9: This key kills the selected process.
10: This key exits the command interface.
You can also use the directional (arrow) keys to scroll through the process list vertically and horizontally.
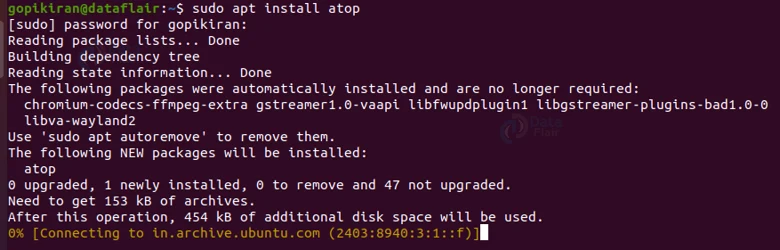
9. Atop command
The atop command provides a more comprehensive overview of the running processing on the system when compared with the top and htop commands. Just like the htop command, even the atop command does not come preinstalled, use the command shown below to install it:
sudo apt install atop
Let us understand the name of the columns that make the atop command really desirable and better than the top and htop commands:
1. PID – It shows the process identification number.
2. SYSCPU – It shows the CPU usage by the process while system handling.
3. USRCPU – The CPU usage by the process while running in user mode.
4. RUID – It shows the real user ID of the user that started the process.
5. ST – It shows the current process status.
6. EXC – It shows the exit code after the process terminates.
7. THR – It shows the number of threads the process is using.
8. S – It shows the current status of the primary thread of the process.
9. CPUNR – It shows the number of CPUs used by the process.
10. CPU – It shows the CPU percentage used by the process.
11. CMD – It shows the name of the command that started the process.
12. VGROW – It shows the amount of virtual memory the process has occupied since the last output update.
13. RGROW – It shows the amount of physical memory the process has occupied since the last output update.
Just like the htop command, we can also use the following keys to interact with the output of the atop command:
1. a- This key sorts by most active resources.
2. c – This key sorts by CPU consumption.
3. d – This key sorts by disk activity.
4. n – This key sorts by network activity.
5. m – This key sorts by memory usage.
10. Pgrep command
The prgrep command is not a robust tool like that of ps, top, or atop commands but is a handy tool for finding out quick information about the process. For example, if you want to find out the PID of the Firfox process, simply use the following command: pgrep firefox

Kill Process in Linux
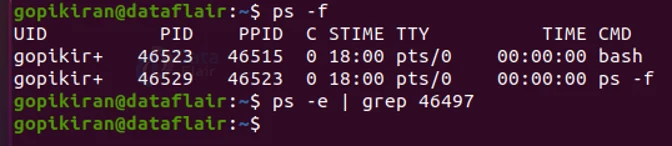
If you want to kill a process, you can use the kill command, with the following syntax: kill <PID>

In the above picture, I killed the process with PID ‘46497’. To check if the process is really terminated, you can run the ps -f command again, and you cannot find the same PID number in the table.
If you really want to confirm that the process is terminated, you can search for the process with its PID and you will get no result.
There are many different signals that can be sent (64 to be precise), out of which most users are interested in only 3 – SIGTERM, SIGKILL, and SIGHUP. If you don’t specify anything in the <signal> field in the syntax, the kill command will take the default value like 15 or SIGTERM.
Programs that handle the SIGTERM signal can do useful cleanup operations before quitting like saving configuration information to a file. The process can intercept all signals except SIGKILL and SIGSTOP. All the available signals have different names and have a corresponding numbers.
Note that the specific mapping between numbers and signals can vary between UNIX implementations.
Let us now look at the practical part of the signal, we saw that the 3 most used signals are SIGTERM, SIGKILL, and SIGHUP, let us take a closer look at them:
1. SIGHUP – 1 – Reload a process
2. SIGKILL – 9 – Kill a process
3. SIGTERM – 15 – terminate a process.
If you want to know more information about the kill command, feel free to read my article on it.
Job ID vs Process Id in Linux
We know by now that all the processes have a process identity, however, the background and suspended processes are usually handled through a JOB ID also known as a job number. Job ID is different from process ID and used because it is shorter.
A job number can consist of multiple processes running in series or parallelly. Tracking individual processes is easier using a job ID
Summary
Now you have learned what a process is, types of processes, states of a process, what are daemons, the creation of a process, how Linux identifies processes and so many more.
In the end, we have also seen many technical examples like the different commands and ways to list processes, searching for processes, terminating a process, and many other process management commands.
If you are Happy with DataFlair, do not forget to make us happy with your positive feedback on Google


