Pipes and Filters in Linux
Job-ready Online Courses: Dive into Knowledge. Learn More!
In this article, we will learn what pipes and filters are in Linux. We will learn in-depth of what pipes are and why they are used. We will also be looking into different filters that we use in Linux and go slightly deeper into some of the most commonly used filters.
What is a pipe in linux?
The pipe that we are referring to here has absolutely no similarity and has nothing to do with the pipes used to convey different substances. Instead, pipe here referred to a character on your keyboard: “|”. That’s right, this vertical line is called a pipe.
In the terminal, we use a pipe to connect 2 or more commands. Why do we connect? We connect them to provide a more specific or distinguished output.
In simpler words, the pipe symbol takes sed the output of the first command as the input to the subsequent command. When we pipe the main command with any of the filters in Linux, we can get very specific answers.
Since pipe helps you mash up many commands and run them at the same time, we can create really powerful and efficient commands that can handle really complex tasks in a flash.
Instead of understanding pipes separately by taking individual examples, let us also understand what filters are then directory combine pipes and filters to get a better understanding and save time.
What are filters in linux?
In Linux, filters are a set of various commands that take in standard input (say from the main command) and then perform different options like sorting trimming, finding, lengthening, and so many more.
By definition, filters take in standard input (stdin) and produce an output on standard output (stdout). Let us look at some of the filters in brief.
1. Linux cat command
The cat command on its own is a really powerful command which allows you to edit, create and manipulate files. But as a filter, it simply moves standard input to standard output.
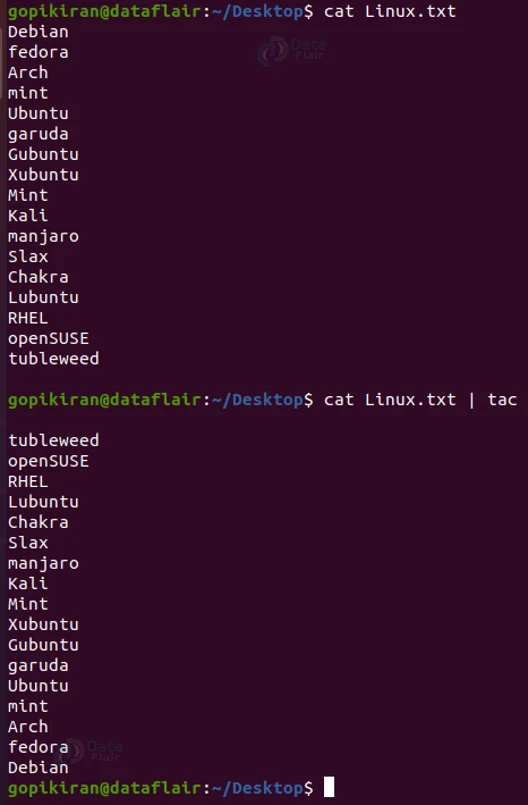
On piping the cat command with “tac” will print the data in your files in reverse order. If you are really interested in checking out the features of the cat command, feel free to check out my full-blown article on the command.
Syntax of Cat Command
cat <options> <filename>
2. Linux cut command
The cut command is a pretty simple command, as the name suggests, it cuts text from where you specify. After you chose to divide the text, you can even choose what to print.
Syntax of cut command:
cut <options> <byte position> <filename>
The cut command is a very versatile command as it lets you cut by various aspects like a hyphen (-), space, byte position, character or even a specific word or pattern
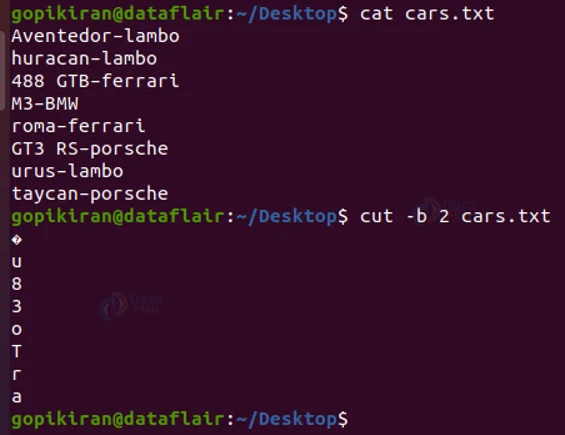
The above output is an example of cutting by the byte position. Let us take a look at some of the options that we can use with the cut command:
1. -c
This option lets you specify the character from where you want to cut.
2. -d
This option lets you select a specific section (like a hyphen or space) to cut.
3. -f
This option lets you specify the field you want to print after cutting.
4. -b
This option lets you specify the position of the byte you want to cut from.
5. –help
This option displays the help menu with all the options, uses and information regarding the command.
3. Linux grep command
Syntax of grep command
grep <options> <string pattern> <filename>
The grep command is one of the most used commands when paired with filtering. The grep command is used to search a file(s) for a word(s), sentence(s), or any pattern of words or characters and displays all the lines that contain the same.
We use the grep command both individually or by piping it:
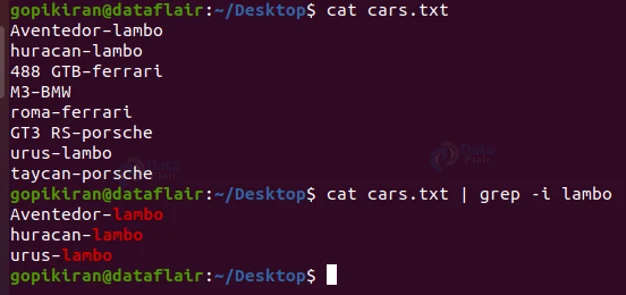
In the above output, grep was piped with the cat command, whereas in the below output, grep was run independently, yet produced the same output.
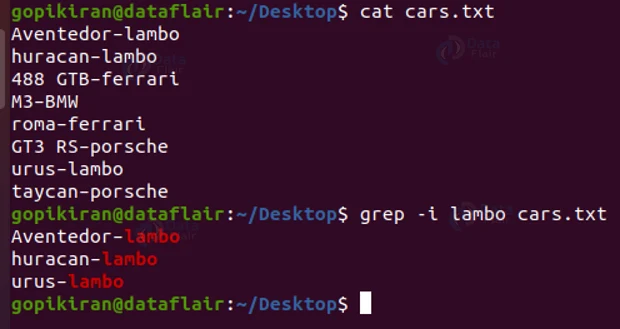
However, we cannot do this always. The grep command comes in really handy when we want to find something specific when searching in really long pieces of information, be it either text files or other pieces of data like environmental variables, network packets and so many more.
Let us look at some options used with the grep command:
1. -i
This option makes the grep case insensitive.
2. -n
This option prints out the line numbers.
3. -c
This option gives the line number of the result you searched is in.
4. -v
This makes grep work like an inverted filter.
5.-w
This option matches the whole word you want to search.
6. -o
This option prints only the word you searched for and not the sentence.
7. -h
This option displays the help menu with all the different options.
8. -v
This option displays the information about the grip you are using.
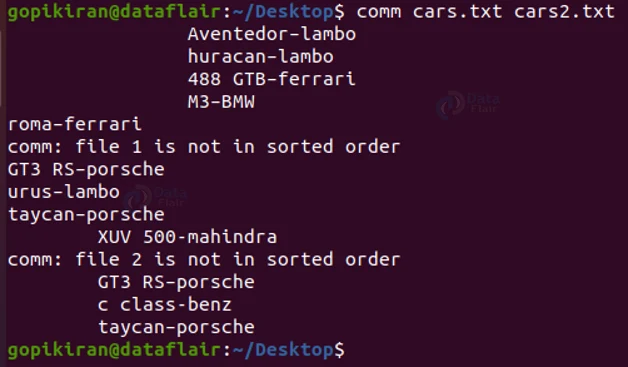
4. Linux comm command
The comm command is simply used to compare 2 files. By default, the output of the comm command will have 3 columns, the first one contains the similarities between both the items and the remaining 2 columns carry the left out items of each of the files.
Syntax of Comm Command
comm <options> <filname 1> <filename 2>
Let us take an example to understand the comm command better.
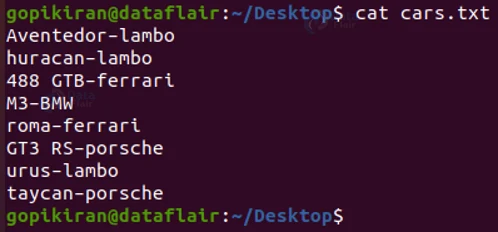
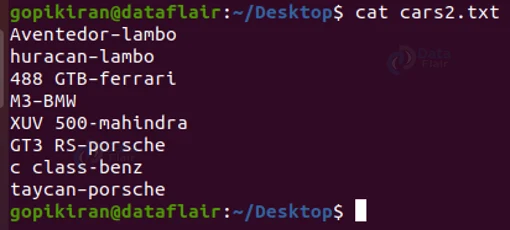
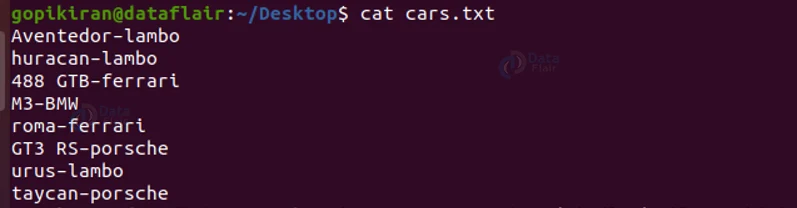
Let us take the below-given text files for example:
Now if I compare both these text files using the comm command, The output will be as follows:
We can also pipe the comm command to different pieces of information.
5. Linux sed command
The sed command is another file editing and a manipulating tool similar to cat. Sed stands for stream editor, or basically file editor. The main difference between sed with other file editing commands is that this editing is not permanent, the edits you make remain only on the display and the actual file contents remain the same.
Syntax of linux sed command
sed <options> <script> <filename>
Let us understand the sed command by taking a small example. Say I have the below-given text file:
If I pipe the sed command to the cat command, I get the following output:
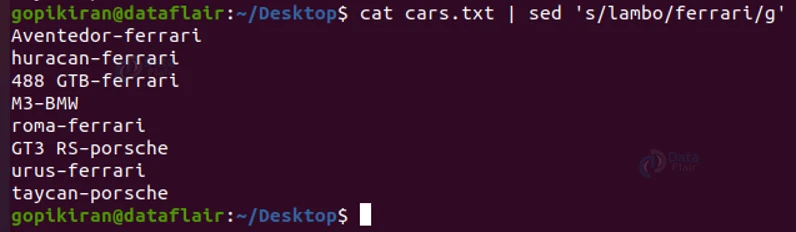
The following command I ran, replaced the word “Lambo” with “ferrari”. As mentioned earlier, the changes only apply on the screen, which means If I go to the file again, the content will be unchanged. Let us look at some of the options used long with the sed command:
1. -n
This option activates quiet mode.
2. -e
This option adds the script to the commands that are to be executed.
3. -f
This option adds the contents of the script file to the commands.
4. –sandbox
This option operates in sandbox mode.
5. -z
This option displays the help manual
6. -v
This option prints information about the version of the sed command
6. Linux tee command
The tees command just like sed, is very similar to the cat command, except 1 notch better. The tee command takes the standard input on standard output and also puts them in a file. We can use the tee command by piping it with other commands to make better use of it.
Syntax of tee command:
tee <options> <filename>
Let us understand the tees command better by taking an example. Let us consider the below-given text file:

If I pipe this command with a tee command:
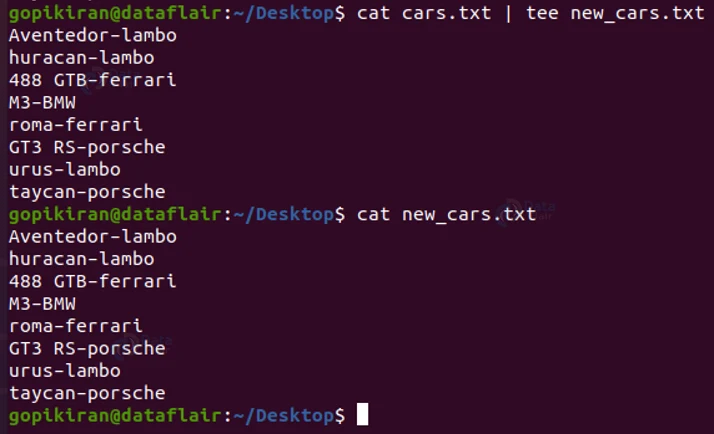
The above command copied the contents of the file into another file. I can do the same thing using the cp command also.
I can also add new content to a file by using the option “-a”
Since we are on the topic of options, let us look at some used with the tee command.
1. -a
This option appends the data to a given file.
2. -i
This option ignores the interrupt signals
3. -p
This option diagnoses errors while writing to non-pipes
4. –output-error=<mode>
This option sets the behavior in write error mode.
5. -v
This option displays the version information about the tee command
7. Linux tr command
The tr command is used to change the text from lower case to uppercase and vice versa. It cannot get any simpler or straightforward than that. Tr stands for translate. To use the tr command we follow the syntax:
tr <options> <old text> <new text> <filename>
Let us take an example to understand better:
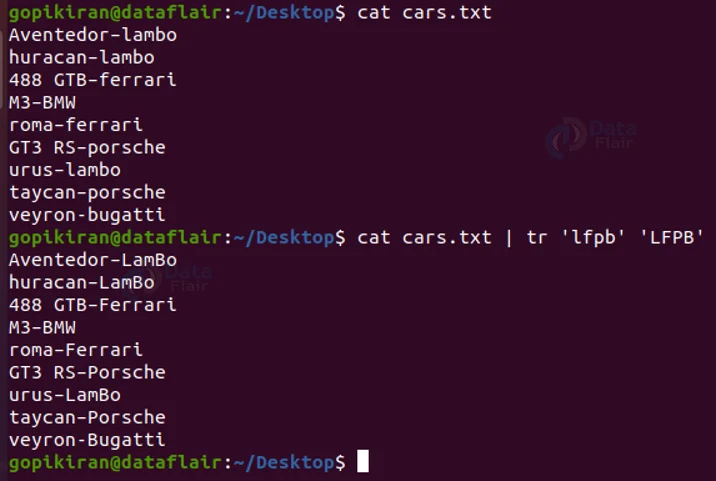
In the above example, I uppercased the previously lowercase l, f, p, and b.
Apart from just changing lower case letters to uppercase and vice versa, it can also do things like squeezing content into one single line, making it case sensitive and so many more with the help of the options available.
![]()
In the above output, I squeezed the content of the text file into a single line by using the command cat <filename> | tr ‘\n’ ‘ ’
Since we are on the topic of options, let us look at some used with the tr command.
1. -s
This option squeezes the occurrence of multiple characters into one.
2. rot13
This option encrypts the text. It is case-sensitive.
3. -d
this option is used to delete characters
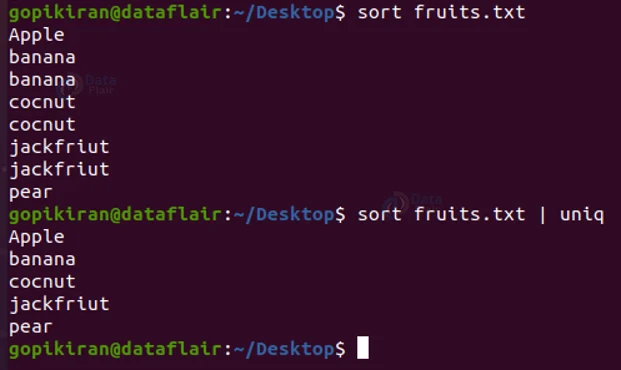
8. Linux uniq command
The uniq command is short for unique, and as the name suggests, it keeps only the unique contents of the file and removes the repeated lines.
Syntax of linux uniq command
uniq <options> <filename>
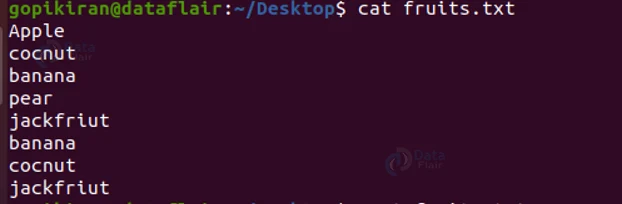
Let us understand this command better by taking an example. Let us consider the below-given text file:
Now If I want to remove the repeated entries, I need to pipe the uniq command with the sort command as follows:
Apart from suppressing duplicate entries in the file, the uniq command can also do different things like counting the occurrence of the word:
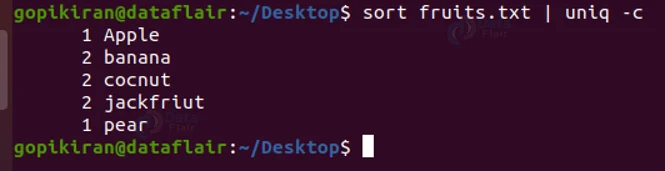
Or displaying the repeated lines in a file as shown below and so many more.

We can do many tasks using different available options like:
1. -c
This option counts the occurrence of a word.
2. -d
This option displays the repeated lines.
3. -u
This option displays the unique lines.
4. -s
This option ignores the characters in comparison.
5. -f
This option ignores fields in comparison.
9. Linux wc command
The wc command is a very handy and powerful tool that helps in the process of counting the lines, words and characters in a file. The wc command is usually used by piping it to some main command.
Syntax of wc command
wc <options> <filename>
By default, the wc command prints the number of lines, number of characters, and the number of words one after the other separated by a space
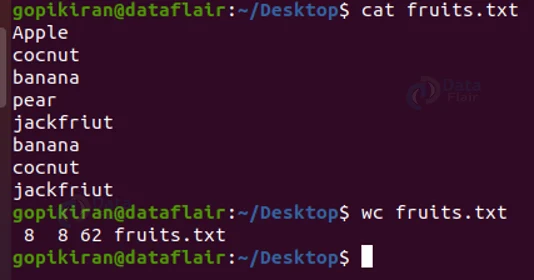
In the above output, there are 8 words, 8 lines and 62 characters.
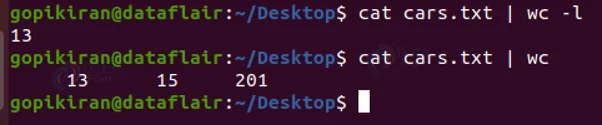
Remember when I told that the wc command was powerful? Well it can even tell you the count of lines, words and characters in multiple files.

You can also use the wc command by piping it, here’s an example:
Let us look at some of the options that are used with the wc command:
1. -c
This option prints the count of the bytes.
2. -m
This option prints the count so the characters.
3. -l
This option prints the count of the lines.
4. -w
This option prints the count of the words.
5. -L
This option prints the maximum display width.
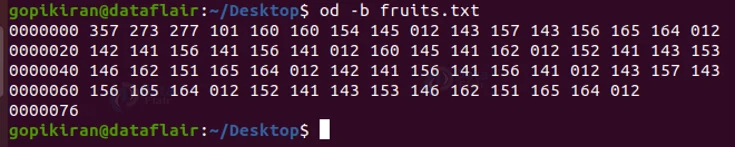
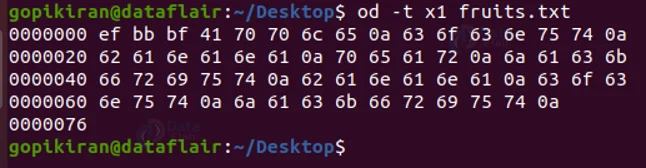
10. Linux od command
Syntax of od command
od <-b>/<-t x1>/<-c><filename>
The od command is short for Octal Dump. This command displays the contents of files in different forms like hexadecimal, octal, or ASCII characters. Let us see the different syntaxes we use for the different formats along with an example for each:
1. od -b <filename>
This syntax displays the contents of a file in octal format.
2. od -t x1 <filename>
This syntax displays the contents of a file in hexadecimal bytes format.
3. od -c <filename>
This syntax displays the contents of a file in ASCII format.

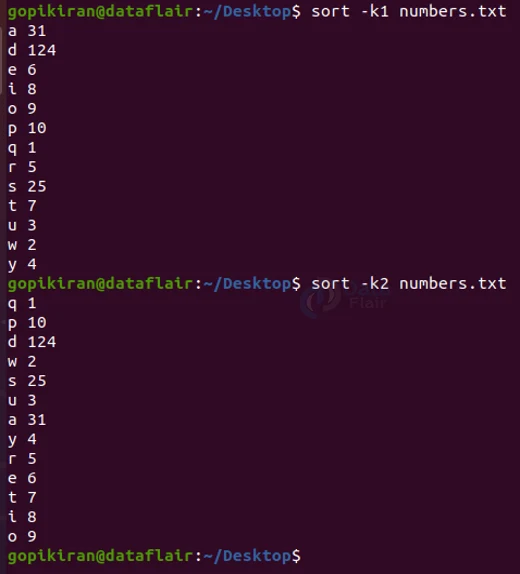
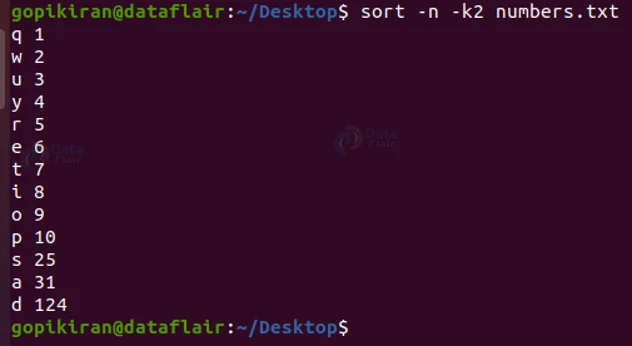
11. Linux sort command
Syntax of sort command
sort <options> <filename>
The name says it all, the sort command helps in sorting the contents of a file in different ways and methods. Let us take a look at some examples:
Normal sorting: This will sort the contents of a file alphabetically.

Sorting a column: this command will sort a specified column of the file.
Numeric sorting: you can sort content in a file numerically by using the option “-n”. You may also have to specify the column number.
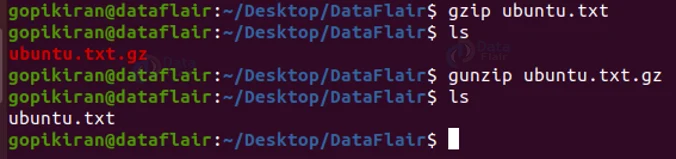
12. Linux gzip/gunzip commands
The gunzip and gzip commands are very similar to unzipping and zipping files. We follow the following commands to gzip and gunzip:
gzip <filename>
gunzip <filename>
Let us look at some of the commonly used options used with the command:
1. -a
This option converts end-of-lines using local conventions. This command can also be written as ‘–ascii’. Please note that this option is supported only on some non-Unix systems.
2. -c
This option writes output on standard output. It keeps original files unchanged.
3. -d
This command decompressed the files. It can also be written as ‘–decompress’ or ‘–uncompress’
4. -L
This option displays the information about the gunzip license.
5. -n
This option does not save the original file name and timestamp when decompressing it.
6. -N
This option is the exact opposite of the option ‘-n’, it saves the original file name and timestamp when decompressing it.
7. -q
This option suppresses all the warnings.
8. -S
This option uses the suffix ‘.suf’, instead of ‘.gz’ when decompressing.
9. -t
This option performs a test by checking the integrity of the decompressed file.
10. -v
This option provides a verbose to give a better understanding of what is happening.
12. -V
This option displays the information about the version of gunzip you are using.
13. -H
This option displays the help menu.
13. Linux less command
As the name suggests, this command shows less information for more lengthy pieces of information. It cut shorts the data and displays only the important data.
We can also improve the functionalities of the commands by using many other commands. For example, the option “-s” suppresses the blank lines, and the option “-<n>” displays only the number of lines you specified.
Syntax of less command
less <options> <filename>
14. Linux more command
The more command is exactly the same as the less command, with only one difference. The more command displays a part of the information, and if you wish to see more of it, just press the enter button on your keyboard.
Syntax of more command
more <options> <filename>
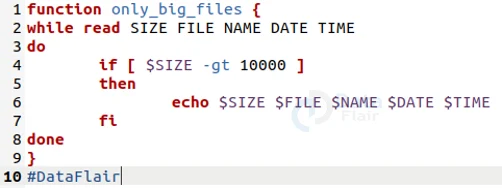
Creating your own filters in Linux
We have seen 15 beautiful examples of filters, but did you also know that we can create our own? Well, it is partially true, we cannot create our own commands (like grep, sed, sort, etc), but we can create shell programs that when run, act as filters.
For example, we can create a filter that catches files greater than a specific size and then perform some actions using the following syntax:
if [ $SIZE -gt <size> ]
then
<set of actions>
fi
Let us create a simple program that prints the name, size, date, and time of files greater than 10000:
Instead of writing such big programs, you can use the “awk” command to write simple yet effective 1 line programs that work very similar to filters. You can write the above shell program using the “awk” command as shown below:
![]()
Summary
In this article, you have learned what filters and pipes are in Linux. We have also seen a lot of filters along with practical examples like cat, cut, grep, comm, sed, tee, tr, uniq, wc, od, sort, gzip, Less, and More.
Your 15 seconds will encourage us to work even harder
Please share your happy experience on Google


