Linux FSCK Command with Examples
Job-ready Online Courses: Click for Success - Start Now!
In this article, you will learn what fsck in Linux is. You will also learn why it is used, the syntax, and how to check and repair filesystems using the fsck command.
What is Linux fsck command?
Fsck is a command-line-based utility in Linux-based operating systems that helps in checking the consistency of a file system. Fsck is the abbreviation for File System Consistency Check.
We know that file systems are responsible for organizing how data is organized and recovered. Eventually, someday, somehow these filesystems may become corrupted and cannot access some parts of it. This is exactly when fsck comes to help as it checks, fixes, and reports errors in the filesystems.
In simple words, fsck checks the filesystems for errors and outstanding issues. It is also used to fix potential and generate reports.
Generally, fsck is run either automatically during boot time or run manually by the system administrator. A system administrator can also run the fsck too manually if they believe there is a problem with the file system.
The command works directly on the data structures stored on the disk. The file system is normally checked while unmounted, mounted read-only, or with the system in a maintenance mode.
When do you use Linux fsck Command?
Talking with respect to time the tool can check automatically during reboot, or you can run it manually anytime you want. But talking with respect to the scenarios you need to use fsck, you can use the tool when
1. Files in the system get corrupt
2. System fails to boot
3. Attached drives like SD cards and flash drives don’t work as expected.
4. You can also use fsck to simply run a file system check as preventive maintenance.
Syntax of Linux fsck command
Before we learn how to practically use the fsck command, let us learn the syntax of how to write it in the terminal. The syntax is pretty easy:
fsck <options> <file systems>
There are 2 fields which we can, the options (which we will look at in detail later) and the filesystems. The filesystems can be a device, partition, mount point, or anything else.
Options used with the fsck command
The fsck command needs to be run with superuser privileges (sudo) or root. Let us look at the options we use along with fsck.
1. -A
This option checks all the filesystems
2. -a
This option tries to repair filesystems errors automatically. There ill be no prompts.
3. -C
This option shows the progress bar
4. -f
This option forces fsck to check a file system. Using this option memes fsck check even a clean filesystem
5. -l
This option locks the device to guarantee no other program will try to use the partition during the check.
6. -M
This option does not check the mounted filesystems
7. -N
This option only shows what would be done and no actual changes are made.
8. -P
This option checks the filesystems and root parallelly
9. -R
This option does not check the root filesystem.
10. -r
This option provides statistics for each device that is being checked.
11. -T
This option does not show the title.
12. -t
This option exclusively specifies the filesystem types to be checked. You can specify by separating them with a comma.
13. -y
This option tries to repair the filesystem type to check with fsck
14. -V
This option provides a description of what is being done.
Meaning of fsck exit codes
After running fsck, it will return an exit code, it is important to know the meaning of these exit codes:
a. 0
This exit code means that there are no errors.
b. 1
This exit code means that there were errors and fsck corrected them.
c. 2
This exit code means that the system should be rebooted.
d. 4
This exit code means that the errors in the filesystem were left uncorrected.
e. 8
This exit code means that there was an operational error.
f. 16
This exit code means that there is an error either in the usage or syntax.
g. 32
This exit code means that the fsck checking has been canceled by your request.
h. 128
This exit code means that there is a shared library error.
You can look up these options or exit code meanings anytime by typing “man fsck” in the terminal:
Running Linux fsck command on reboot (recovery mode)
Now that you know the syntax, options and how to read the exit code, let us see the steps to run fsck command on reboot:
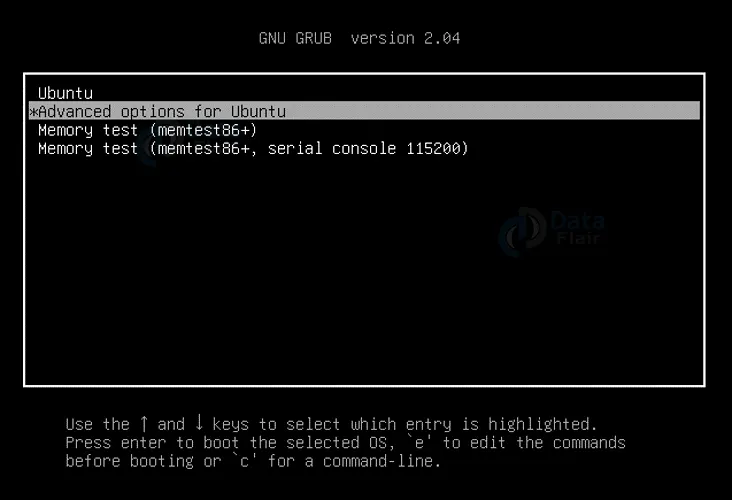
1: To reboot your Linux system, type reboot in the terminal, or you can just do it the lengthy traditional way.
2: While your system is rebooting, press and hold down the “shift” key to open up the grub menu. In the grub menu, select the “advanced options for ubuntu” option as shown in the figure:
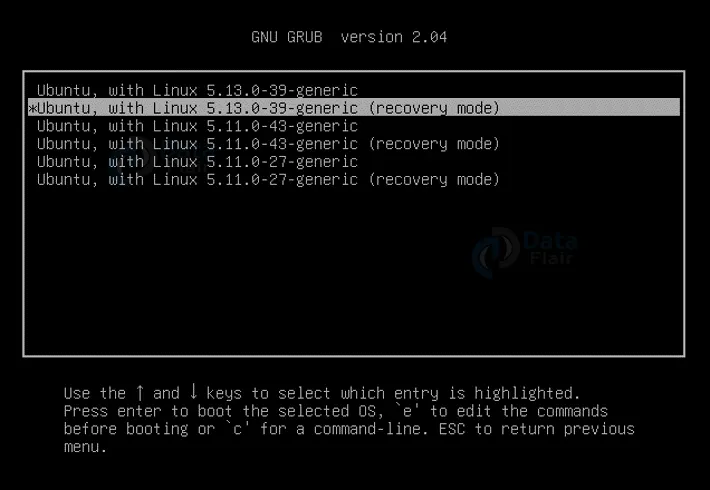
3. On the next screen select the “Ubuntu, with Linux 5.12.0-39-generic (recovery mode)” option as shown:
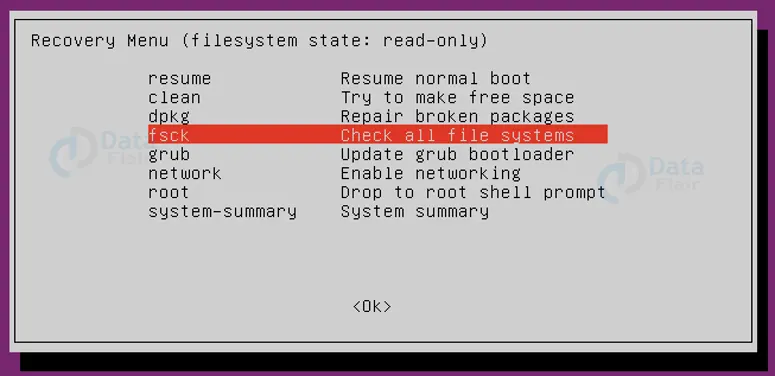
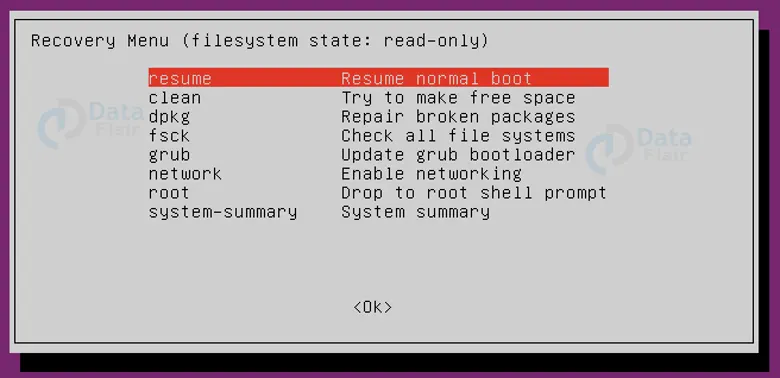
4. Next, the recovery menu will open, where you will find different options like grub, clean, dpkg, root, network, system summary, and many more
In the recovery menu navigate to the “fsck” option and press enter.
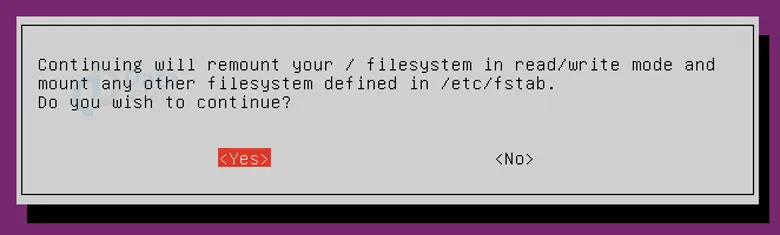
A pop-up will ask you to confirm if you want to continue with fsck checking all filesystems. Press yes.
On successful running of fcsk, you will see this screen:

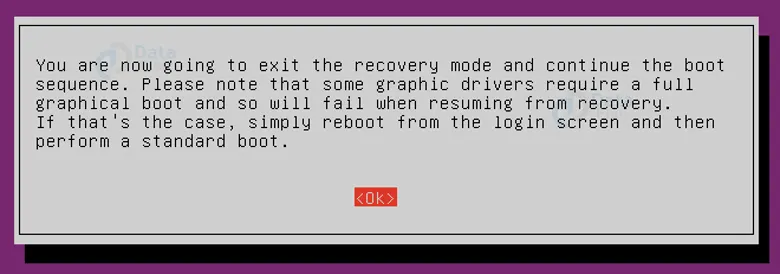
5. After successful checking, it will take you back to the previous screen, click on resume normal boot
And press on ok in the next popup to exit recovery mode and resume normal boot.
And done! You have successfully checked your files systems during your systems reboot from the recovery menu
Checking and repairing filesystems manually
Finding the disk to be checked
Before we start checking, we must first locate the disc you want to scan. You can do so by listing the filesystems disks with the “df” command.
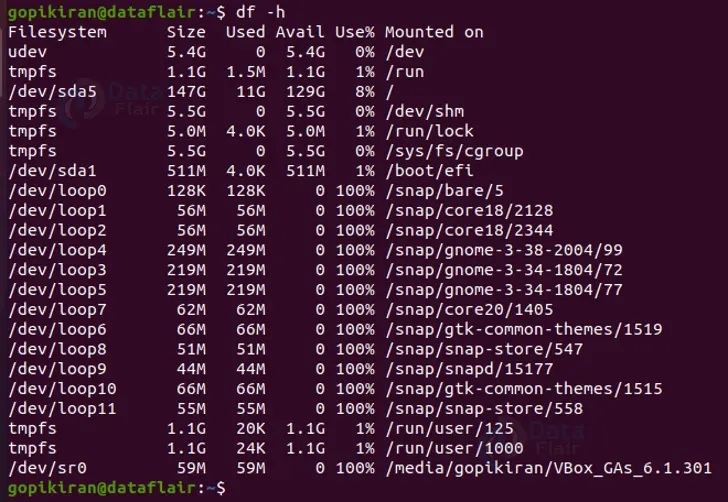
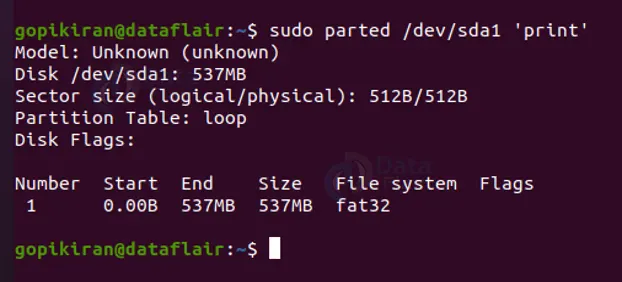
For the sake of an example, I am going to take the filesystem “/dev/sda1”. You can take any filesystem you want, just make sure there are not many with the same name. If you wish to check how many filesystems are there with that name, you can do so by using the command “sudo parted <filestystem name> ‘print’ ”
sda is how Linux refers to the first SCSI disk, if you have 2, the second one would be called sdb
Unmounting a disk
If you run fsck directly, you will get an error message saying that it cannot continue checking and it is aborting.
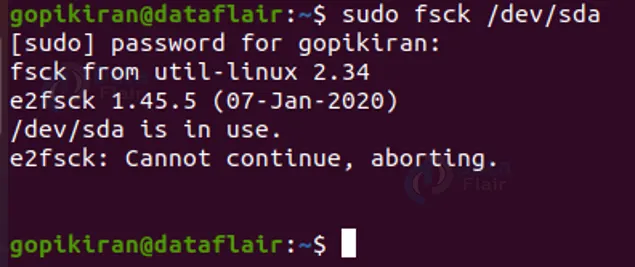
This happens because you did not unmount the disk, To unmount a disk use the command “sudo umount <disk name>”
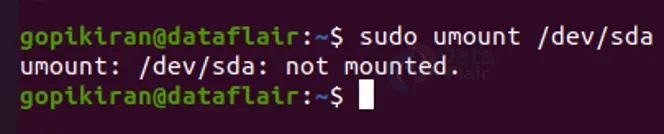
After unmounting the disc, try to run fsck again and you will not find any errors.
After running fsck, mount back the disk you have unmounted, you can mount a disk by using the command “mount <disk name>”
Performing a dry run with fsck
Before actually performing a proper check, let us do a dry run to ensure everything is in place.
We can perform a dry run by using the command “sudo fsck -N <dsik>”
The option “-N” as we discussed above will only print what is going to happen, and not actually do anything.
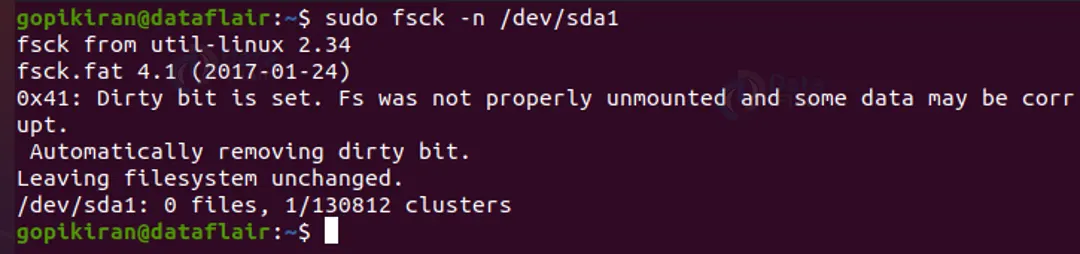
Skip repair but print error output
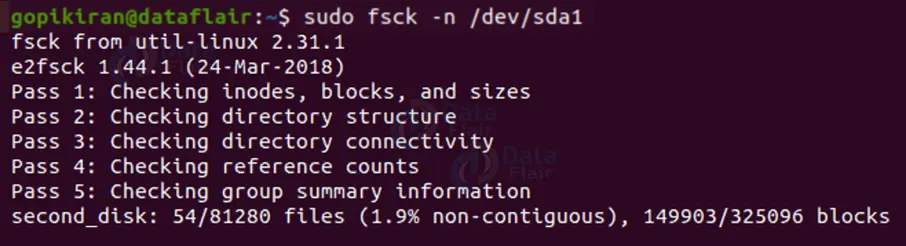
If you use the command “sudo fsck -n <file system name>”, fsck will print out the error message, if there is something wrong with the file system, but it will not repair it.
Skipping search on mounted filesystems
If you wish to perform a search only on unmounted filesystems and avoid mounted file systems, you can do so by using the command “sudo fsck -M <file system name>”
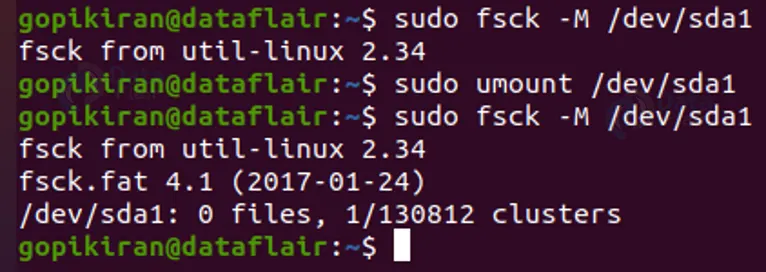
If you observe the above snippet, the command did not run when “/dev/sda1” was mounted but checked when it was unmounted.
Fix errors automatically
If you want fsck to fix errors automatically without prompting you to press y or n, you can use the command “sudo fsck -y <filesystem name>”
This command says yes to ‘try to fix all errors’ without being prompted every single time.
Forcing fsck to check a filesystem
Here forcing means to run a check even on a clean filesystem. By default, if you try performing an fsck check on a clean device, the tool skips the filesystem check.
Hence to perform a force fsck check on a filesystem, you use the command “sudo fsck -f <filesystem name>”
This command will scan the file and performs all 5 checks to search for corruption in the filesystem, even though it is a clean file.
Running fsck on all filesystems at once
To perform an fsck check on all the file systems, use the command
“sudo fsck -AR -y”
The option “-A” searches all the filesystems, the option “-R” unmounts all the filesystems, and the flag “-y” is to avoid fsck printing us every time.
Skipping fsck on a specific filesystem
If you want to skip fsck to search on a specific filesystem, you can do it by using the command “sudo fsck -AR -t <filesystem name> -y”
Repairing a corrupted filesystem
If you don’ know the name of the corrupted file system, you can either use the FDisk or DF commands. Once you find the corrupted file, the first thing you need to do in order to repair it is to unmount it using the following syntax: sudo unmount <filename>
After unmounting it, repair it using the option “-p” as shown:
sudo fsck -p <filename>
The option “-p” automatically repairs the problems in th corrupted file.
Once repairing is finished, mount back the file you unmounted earlier siding the following syntax and you are good to go: sudo mount <filename>
Repairing the root file system
We all know that the root directory is the “ground 0” of the Linux file systems, and it can not be unmounted. So how exactly do you check the root filesystem without unmounting it?
Well, if you want to check or repair the root directory, you actually have quite a number of options at hand. You can set fsck to run at boot time, you can boot the system in recovery mode or use a live CD
Since we have already looked at how to run fsck during boot time and recovery mode, let us look at how to run fsck from a live distribution.
First off, boot the live distribution and use the fdisk command to find the name of the root partition. Once you know the name of it, simply go to the terminal and use the option “-p” to repair it as shown below:
sudo fsck -p <partition name>
Once done, restart the live distribution and start your system.
Fstab options
Before we address the options related to fstab, let us see what fstab is in the first place. Fstab is a configuration file that tells the system where and how to mount the partitions.
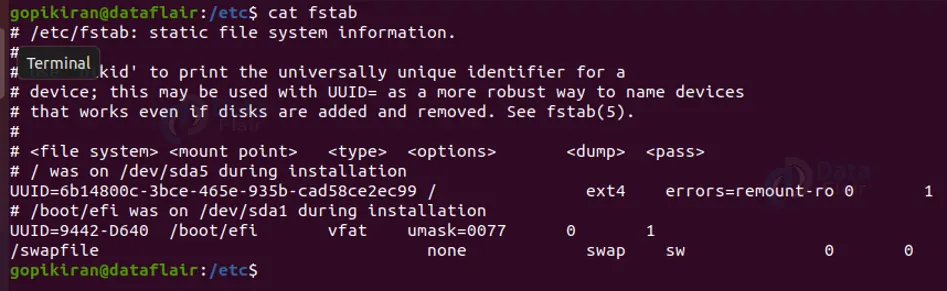
The last column in the fstab file controls the order in which the file system checks are done at reboot time. Let us take a look at what each option means:
- 0 – Do not check filesystems
- 1 – Check filesystems one at a time
- 2 – check filesystems later and check parallelly if possible
What to do if fsck is interrupted?
It is very important to note that ‘you’ must never interrupt the fsck utility while it is in progress. Nonetheless, if the inevitable happens and the princess is interrupted, fsck will automatically finish the ongoing process and only then stop.
If at all you find any error while the process or check was happening, fsck will not fix anything if it is interrupted. You can use the command again for fsck to check again and let it finish.
Summary
As you have seen, fsck is a really useful and powerful tool that helps in checking the consistency of a file system, it is also used to fix errors in files. Now you know what fsck is and when it is used. You also learned the syntax, options, exit codes, and how to run fsck checks both during reboot and manually.
Did you like our efforts? If Yes, please give DataFlair 5 Stars on Google


