Linux Diff Command with Examples
Expert-led Online Courses: Elevate Your Skills, Get ready for Future - Enroll Now!
In this article, you will learn all there is to the DIFF command in Linux-based operating systems. We will be going through, what DIFF is, a brief history of it, the syntax, and options used with the diff command. In the end, we will also be looking into different formats of the diff command and understand them line by line.
What is linux diff command?
Diff is a command-line-based utility in Linux-based operating systems that helps in comparing data in files and streams. Upon comparing, it displays the difference between the 2.
There will be many scenarios where we want to compare the data of 2 files and print out the difference between them. For such circumstances, Linux has various commands like cmp, diff, and comm.
Unlike the cmp and comm commands, which only show the differences between the 2 files, the diff command is far more powerful as it even shows you what to change, to make both files identical.
Yup! You read that right, the diff command uses symbols and instructions to show you want changes must be done in order to make the 2 files identical. Generally, it tells you how to change the first file to make it identical to the second.
History of the diff command
The diff command was developed on the UNIX operating system in the early 1970s. In 1974, the first version of the diff command was shipped with the 5th edition of Unix. It was developed designed and written by Douglas Mcllroy and James Hunt.
When this research was published in a research paper co-written with James W. Hunt in 1976, the algorithm behind the diff command came to be known as the Hunt-Syzmanski algorithm
Syntax of the diff command in Linux
The syntax of the diff command is extremely easy:
diff <options> <file1> <file2>
Let us look at the fields present in the syntax:
1. <options>
This field takes in a range of options that specify how the diff command should works and format the output.
2. <file1>
This field takes in the name of a file that you want to make identical with the file in the field <file2>
3. <file2>
This field takes in the name of the file you want to make the file in the field <field1> identical to.
Options used with the diff command
As we saw, the options specify how the diff command should function and print the output. Let us look at the options available with the diff command:
1. –normal
This option outputs a normal diff, which is already selected by default.
2. -q
This option produces the output only if the files are different, meaning if the files are exactly the same, the diff command will not display any output. You can also write this option as “–brief”
3. -s
This option reports when 2 files are the same. You can also write this option as “–report-identical-files”
4. -c
This option provides the specified number of lines of context. You can also write this option as “–context”
5. -u
This option provides the specified number of lines of unified context. You can also write this option as “–unified”
6. -e
This option prints the output in an ed script. You can also write this option as “–ed”
7. -n
This option prints the output in an RCS format. You can also write this option as “–rcs”
8. -y
This option prints the output in 2 columns. You can also write this option as “–side-by-side”
9. -W
This prints the output in an utmost specified number of columns. You can also write this option as “–width”
10. –left-column
This option prints the output only the left columns of common lines.
11. –suppress-common-line
This option does not output the lines common between the 2 files.
12. -p
This option shows each C function change in files that contains C code. You can also write this option as “–show-c-function”
13. -F
This option shows the most recent line matching a regular expression. You can also write this option as “–show-function-line”
14. –label
This option uses the label specified instead of the filename when displaying the output.
15. -t
This option expands tabs to spaces in the output. You can also write this option as “–expand-tabs”
16. -T
This option makes tabs line up by prepending a tab if necessary. You can also write this option as “–initial-tab”
17. –tabsize
This option specifies the columns as the tab stop.
18. –suppress-blank-empty
This option suppresses spaces or tabs before empty output lines.
19. -I
This option passes the output through pr to paginate
20. -r
This option recursively compares any subdirectories found. You can also write this option as “–recursive”
21. -N
This option performs the diff as if it is an empty file. You can also write this option as “–new-file”
22. –unidirectional-new-file
This option is the same as the option “-n”, but applies only to the first file.
23. –ignore-file-name-case
This option ignores the case when comparing the files.
24. –no-ignore-file-name-case
This option considers the case when comparing the files.
25. -x
This option excludes the files that match the specified file name pattern. You can also write this option as “–exclude”
26. -X
This option excluded files that match any file name pattern in the specified file. You can also write this option as “–exclude-from”
27. -S
This option starts with the file when comparing directories. You can also write this option as “–starting-file”
28. –from-file
This option compares the specified file to all operands. You can also specify a directory.
29. –to-file
This option compares all the operands to the file specified. You can also specify a directory.
30. -i
This option ignores the case differences in file contents. You can also write this option as “–ignore-case”
31. -E
This option ignores change due to a tab expansion. You can also write this option as “–ignore-tab-expansion”
32. -b
This option ignores the change in the amount of white space. You can also write this option as “–ignore-blank-lines”
33. -a
This option treats all the files as text. You can also write this option as “–text”
34. –line-fomat=LMFT
This option formats all the input lines with LMFT.
35. –strip-trailing-cr
This option strips trailing carriage return on input
Understanding the output of the diff command
Before we proceed further and look at some examples, we must first understand the putout of the diff command. We saw that the diff command gives us information on how to change the first file into the second file, well let us look at the symbols and their meanings:
- a – add
- c – change
- d -delete
- > – refers to the content of the second file
- < – refers to the content of the first file
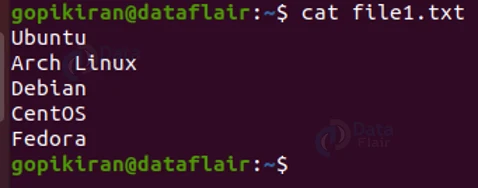
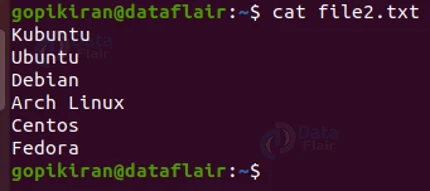
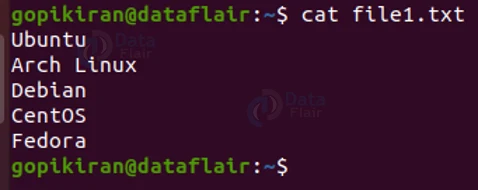
Apart from these 5 symbols, diff also prints the line number of both the first and second files. This section is better understood with an example, so let us consider the following 2 text files:
Upon comparing these 2 files using the diff command we get the following output:
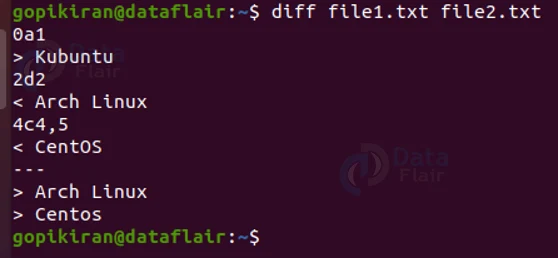
Let us analyze each line of the output and see what is supposed to be changed in order to make the 2 files identical:
- 0a1 – add the first line of the second file to the beginning of the first file
- >kubuntu – The line that has to be added (in the second file)
- 2d2 – delete the second line in the 1st file.
- <Arch Linux – the line that must be deleted (in the first file)
- 4c4,5 – replace the 5th line in the first file with the 4th and 5th lines from file 2
- <Centos – The line 5th line in file 1 (that is to be replaced)
- — – Separator
- >Arch Linux – the 4th line from file 2 (replacing line 5 in file 1)
- >Centos – the 4th line from file 2 (replacing line 5 in file 1)
Context format
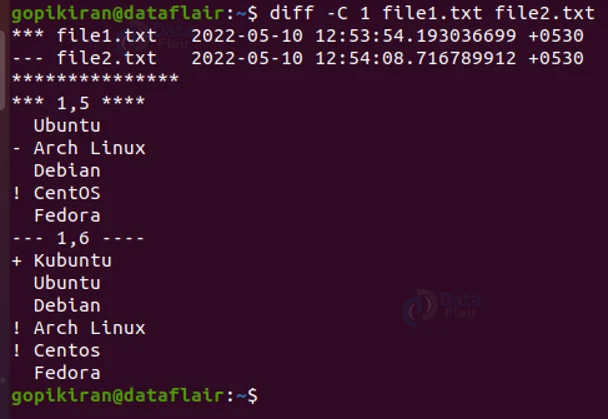
When we use the option “-c”, the diff command shows the output in the context format. When the context format is used, the diff command prints several lines of context around the lines that differ between the 2 files.
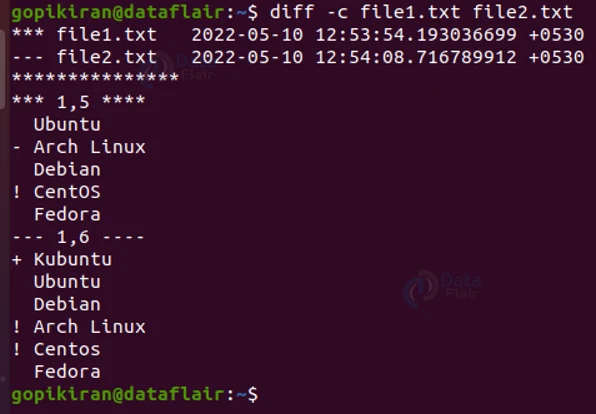
Here is the output of comparing the above 2 text file using the option “-c”:
diff -C <file1> <file2>
Before we analyze each line of the above output, let us look at the general form of the context format:
*** from-file-line-numbers ****
from-file-line…
— to-file-line-numbers —-
to-file-line…
Let us look at what each field denotes:
1. from-file-line-numbers and to-file-line-numbers
This field represents the line numbers or comma-separated range of lines in the first and second files.
2. from-file-line and to-file-line
This field represents the lines that differ and the lines of context. Under this section, we have a couple more symbols with different meanings:
a. The lines that start with two spaces are the lines that are the same in both files.
b. The lines that start with the minus symbol (-) are the lines that correspond to nothing in the second file. These are the lines missing in the second file.
c. the lines that start with the plus symbol (+) are the lines that correspond to nothing in the first file. These are the lines missing in the first file.
d. The lines that start with the exclamation mark (!) are the lines that are changed between two files.
Now that we know what the fields in the context format are, let us analyze each line of the output we got above:
- *** 1,5 **** and — 1,6 —-
This tells us the range of the lines from the first and second files that are included in this output. - Ubuntu, Debian, Fedora
These lines indicate the similar lines between both the files. (these are the slime starting with “Double space”). - -Arch Linux
This line corresponds to nothing in the second line. (This is the line that starts with the negative symbol) - +Kubuntu
This line from the second file corresponds to nothing in the first line. - ! CentOS
This line from the first line and the lines “! Arch Linux” and “! CentOS” from the second file is changed.
By default the option “-c” shows 3 lines of context. If you want to specify the number, use the option “C” followed by the number.
diff -C <n> <file1> <file2>
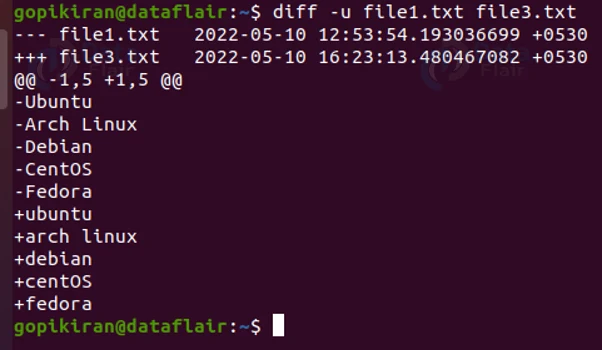
Unified format
The unified format is a new and improved version of the context format and produces a smaller output. To print the output in a unified format, use the option “-u” as shown below:
diff -u <file1> <file2>
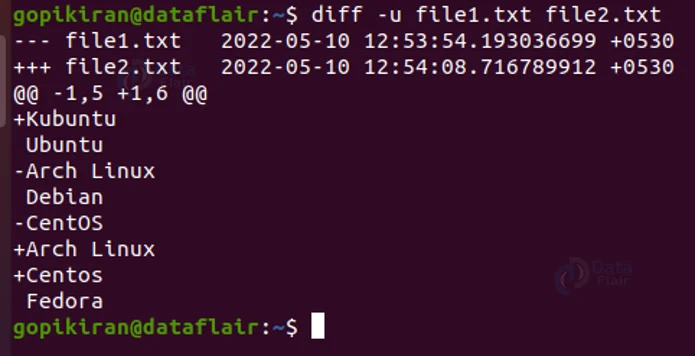
Again, before analyzing each line of the above output, let us look at the generalized form of the unified format:
1. @@ from-file-line-numbers to-file-line-numbers @@
This represents the line number or range of the lines from the first and second files shown in the output.
2. line-from-files
This represents the lines that differ and the lines of context. Just like the context format, even a unified format has a few symbols with different meanings:
a. The lines that start with two spaces are the lines that are the same in both files.
b. The lines that start with the minus symbol (-) are the lines that are removed from the first file.
c. the lines that start with the plus symbol (+) are the lines that are added to the first file.
Now let us analyze each line from the above youtube and understand its meaning:
1. @@ -1,5 +1,6@@
This is the range of the lines that are shown in this output.
2. Ubuntu, Debian Fedora
These are the lines that are the same in both files.
3. +Kubuntu, +Arch Linux, +CentOS
These lines represent the lines that are added to the first file.
4. -Arch Linux, -CentOS
These lines represent the lines that are removed from the first file.
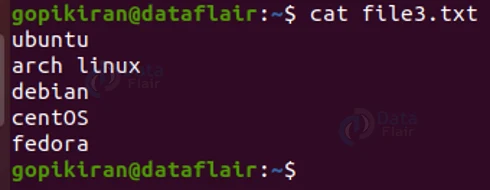
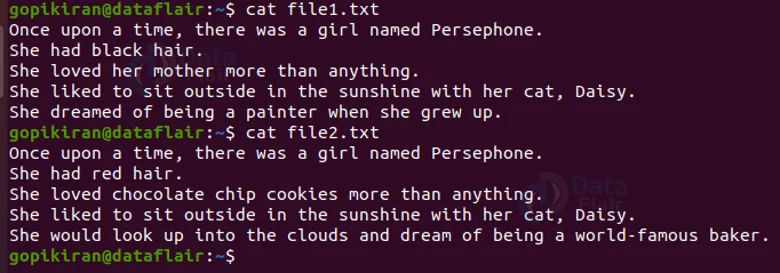
Ignoring case
We saw that, by default, the diff command is case sensitive, meaning, if I compare the following 2 files, I will get a message saying that I must change everything, even though they are all similar (except for the case of the first character):
By normally comparing the 2 files I get the following output:
The output is directing me to remove everything from file 1 and add everything from the other file to file 1. This happens as diff is case sensitive, to make it case insensitive, use the option “-i”
Output on comparing the 2 files and using the option “-i”:
diff -u -i <file 1> <file2>

Since both the files are the same the diff command will not print anything.
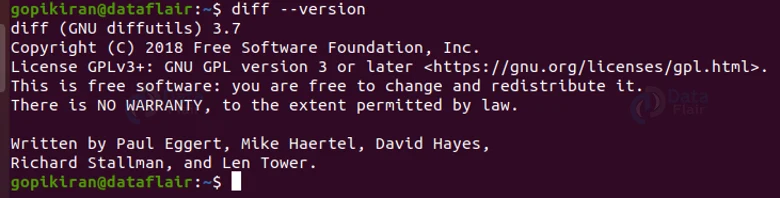
Displaying the version of the diff command
To show the information about the version of the diff command you are using on your computer, use the option “–version” as shown below
diff --version
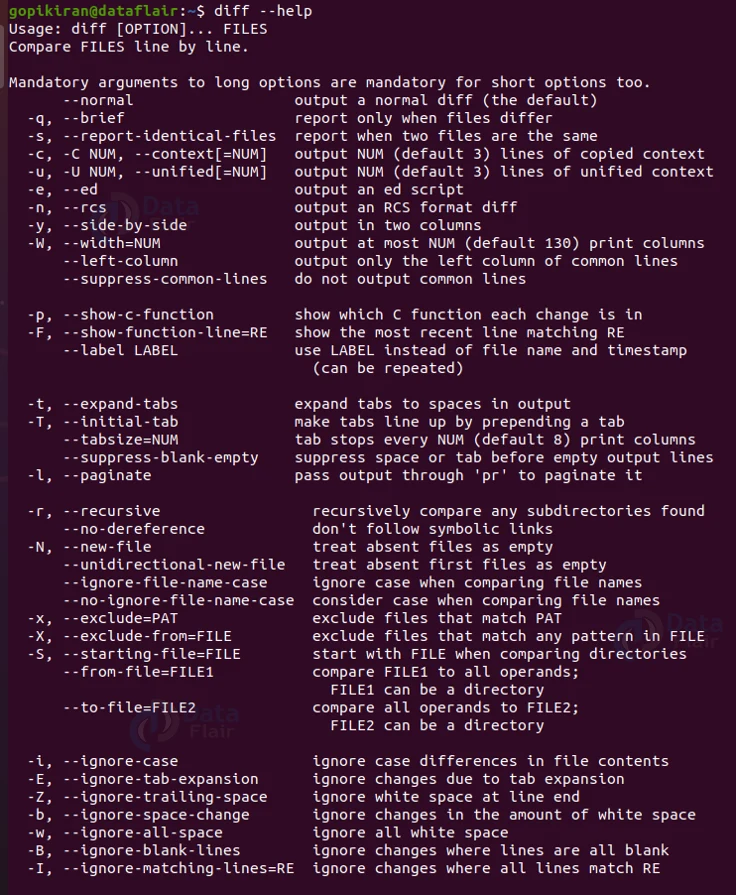
Using the help option
If you ever get stuck or need help while using the diff command, you can use the option “–option” help to display the help menu, which contains information about the usage and options of the diff command.
diff --help
Finding the differences between directories
Using the diff command we can also find the differences between any two directories. All you need to do is give the name of 2 directories instead of 2 files as shown:

Creating an editing script
We can use the diff command with the option “-e” to output a script which can be used by the editing programs ed or ex, containing a sequence of commands.
These commands are nothing but c (change), a (add), and d (delete) which, when executed by the editor, modify the contents of the first file so that it matches the contents of the second file. Let us look at an example to understand this concept better.
Let us consider 2 text files – “file1.txt” and “file2.txt” with the contents shown below:
If we then compare these 2 files by pairing the option “-e” with the diff command, we get the following output:
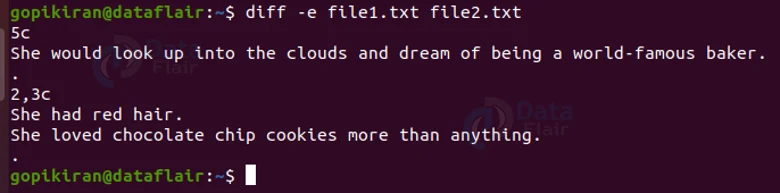
If you notice carefully, the changes are listed in reverse order (the changes closer to the end of the file are listed first, and changes closer to the beginning of the file are listed last.), unlike the one which we saw till now.
Now coming back to the differences between the 2 files, the script is telling us to change line 5 to (the following line), and change lines 2 through 3
To save the script to a file, use the redirector operator as shown below:
diff -e <file1> <file2> > <scriptfile>

Now you can check if the contents have been successfully logged or not by using the cat command. If they have we can carry on with the next phase, which is to append the command “w” into the text redirected file as shown:
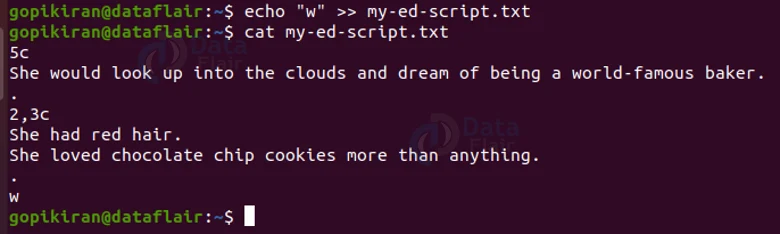
Now when you use the cat command again, you can see that the letter “w” has been appended at the end of the file.
Now, we can hand over this script to ed with the following command, telling it to overwrite our original file using the command shown below:
ed - file1.txt < my-ed-script.txt
The dash (-) in the command shown above tells ed to read from the standard input, and the < operator directs our script to that input.
And finally, when we use the cat command to open the first file, we will find that it magically got changed to match the contents of the second file!
Summary
As you have seen, the diff is a very simple yet very powerful tool that compares 2 files or directories, and not only displays the differences but also tells you what to change in order to make both the files identical. You have now learned what diff is, a brief history of it, the syntax options, and the different formats of the diff command.
If you are Happy with DataFlair, do not forget to make us happy with your positive feedback on Google


