File Security in Linux
Interactive Online Courses: Elevate Skills & Succeed Enroll Now!
In this article, we will learn how Linux keeps its files and directories safe and secure by using permissions or access rights. We will look at how to change ownerships, how to view permissions, how to change permissions, understand those permissions and so much more, so grab a snack, pay attention, and read right till the end.
How does the Linux operating system keep its file system safe?
If you have been following our articles till now, you will know 2 things – Everything in Linux is a file and Linux is extremely safe. We all know that security is Linux’s cup of coffee! It is so secure that you don’t even need an antivirus! It asks you for authentication in the form of a password before running an application or program.
Another thing to note is that every single thing in Linux is a file! Files in Linux are beautifully stored in a neatly organized tree structure that starts with the root directory. The root directory is divided into multiple directories that are meant for specific purposes.
Specific purpose here means that each directory is devoted to files related to a specific topic or job. For example, the /etc directory contains configuration files, the /lib file contains the shared library images and kernel modules, the /boot directory contains static boot files and many more. Linux also keeps separate directories for different user accounts.
So how does Linux safeguard this well-appreciated and beautiful file architecture? Well, its first line of defense is “file permissions” or “access rights”. Let us understand by taking a closer look at what they are.
What are file permissions in linux?
As the name suggests they are permissions to access a file, but for whom? Well for you, your group, and other users. In computer science engineering language, the owner, user group, and other users. Let us dive deeper and take a closer look at them:
User
The user is the owner of the file. By default, the person who creates the file or directory becomes the owner. Hence a user is also called the owner.
Group
A group can contain multiple users. For example, when you have a project and a number of people need access to a file. Instead of individually assigning permissions to each of them, you can simply add all the users in a group and assign the group permissions.
Other
As the name suggests, it is for any other user who has access to the file. This user has neither created a file nor do they belong to a group. So basically, when you set the other permissions, it applies to the rest of the world.
Ok, we now saw to whom these permissions apply, but what are these permissions? Are they a set of guidelines? Well not quite, they are actually a set of 9 characters. This set of 9 characters consists of 3 sets of 3 permissions which we will look at now.
The 3 permissions are:
- r = Read
- w = Write
- x = Execute
And if there is a hyphen “-” then it means that there is no permission or value.
How to view file permissions?
Before we go really deep into file permissions and how they work, it would be a good idea to first see how to look at file permission. Honestly, it is easier than you think! You simply use the “ls” command along with the option “-l” to enable long format listing a shown below:
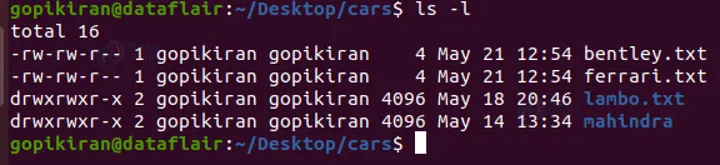
Before we proceed further, let us understand the output shown above as there is a lot of information in those lines:
1. The first column shows the permissions of the file
2. The second column shows the owner of the file
3. The third column shows the group of the file
4. The fourth column shows the size of the file in bytes
5. The fifth column shows the date and time the file was last modified
6. The last column shows the name of the file
Understanding file permissions in linux
If you look carefully at the contents of the output shown above, the directories “lambo.txt” and “mahindra” apart from the “x” in the permissions, there is one difference: “drwxrwxr-x”, the first hyphen was replaced with a d, indicating it is a directory and not a file: here is what each file type is denoted by:
- d = Directory
- – = Regular file
- l = Symbolic link
Now that we know what each set of permissions is for, let us now understand the terminology and how to use ‘r’, ‘w’, and ‘x’
As we say the first character represents the type of file. The remaining 9 bits in groups of 3 represent permissions for the user, group, and global. Each of the bits stands for:
- r = Read
- w = Write
- x = Execute
- – = No permission (no value)
Let us take a look at a few examples before proceeding further.
Let us first take the example of the file permissions in the screenshot above: “-rw-rw-r–”. On closer observation, we can see that this file permission is a combination of 3 specific sets of instructions as follows: ”rw-”, “rw-” and “r–”.
The first hyphen also gives us information regarding the file type, however, the subsequent hyphens simply act as null values (as in there is no permission). The 1st set of permissions is for the user, the 2nd set is for the group and the 3rd set is for others.
Therefore for the permission “-rw-rw-r–”, the user and the group have the o read and write in the file and the other users have the permission to only read the file (thpermission tey can’t write nor execute).
a. “-rwxrwxrwx”
This permission is for a normal file and the user, group, and others can read, write and execute it.
b. “dr-xr-xr-x”
This permission is for a directory and the user, group, and others can only read and execute it.
c. “-rwxrwxr-x”
This permission is for a regular file and the user and user group can read, write and execute but others can only read and execute it.
d. “-rwx-r-x—”
This permission is for a regular file and the user can read, write and execute, the user group can only read and execute, whereas others have no permissions at all.
Octal notation of file permission
Before we see how to change these file permissions, it is important to denote the permissions in the form of binary and octal forms. This notation will prove to be helpful while changing file permissions using the chmod command.
This way of representing is called octal notation because the binary numbers are converted to base – 8 by using the digits 0 to 7:
| Binary Notation | Octal Notation | Permission | meaning |
| 000 | 0 | – | No permission |
| 001 | 1 | –x | Only execute |
| 010 | 2 | -w- | Only write |
| 011 | 3 | -wx | Write and execute |
| 100 | 4 | r– | Only read |
| 101 | 5 | r-x | Read and execute |
| 110 | 6 | rw- | Read and write |
| 111 | 7 | rwx | Read write and execute |
Let us look at a few examples using octal notations:
a. 705
705 stands for “rwx—r-x”. This means that the user can read, write and execute, the user group has no instructions whatsoever and others can only read and execute.
b. 635
635 stands for “rw–wxr-x”. This means that the user can read and write, the user group can write and execute and the others can read and execute.
c. 721
721 stands for “rwx-w—x”. This means that the user can read, write and execute, the user group can only write and others can only execute the file.
d. 420
420 stands for “r—w—-”. This means that the user can only read, the user group can only write and others have no permissions at all.
Changing file permissions in linux
The best part of these file permissions is that we can change them! We either give or take permissions. To do so, we make use of the command called “chomd”. let us see how to use the chmod command to tinker with the permissions.
Let us start with the basics by understanding the syntax. The syntax for chmod is :
chmod <options> <permissions> <filename>
This is the most basic way of writing chmod commands, you can play with this command by using different things by using the syntax:
chmod <options> <u,g,o,a><-,+, =><permissions><filename>
First let us take look at the fields where we enter u, g, o, a and -, +, =, before we look at the options used with chmod.
The flags “u, g, o, a” define which user’s classes the permission to the files are changed.
- u – represents the owner/user
- g – represents the user group
- o – represents all the other users
- a – represents all the users: user + group + other users (same as ugo)
If this flag is omitted, the default value will be taken as ‘a’
The set of flags that deal with “-, +, =” defines the permissions are to be removed or added.
- + = Adds the permissions
- – = Removes the permissions
- = = Changes the current permissions to the specified permissions.
Let us look at some examples using the “u, g, o, a” and the “-, +, =” flags (yes, we don’t need options just yet!)
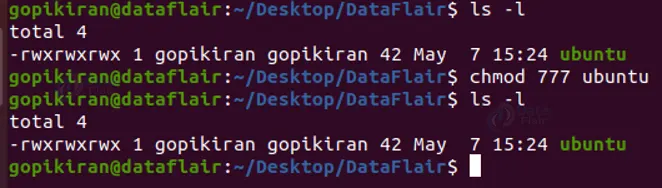
a. “rwxrwxrwx”
To give the permissions of reading, writing and executing to all the users, we can use the octal notation and simply write:
chmod 777 <filename>
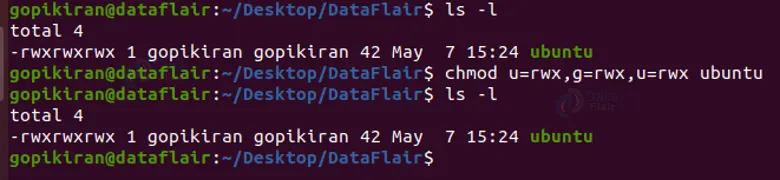
Or using the flags we just discussed you can write:
chmod u=rwx, g=rwx, u=rwx <filename>
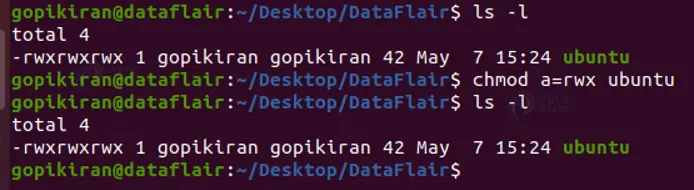
You can also write:
chmod a=rwx <filename>
As ‘a’ is the same as ‘ugo’
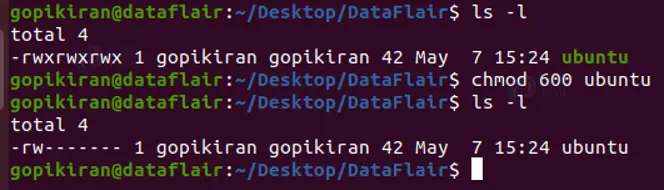
b. “rw——-”
To give only the user the permissions to read, write and execute, you can simply use the octal notation and write:
chmod 600 <filename>
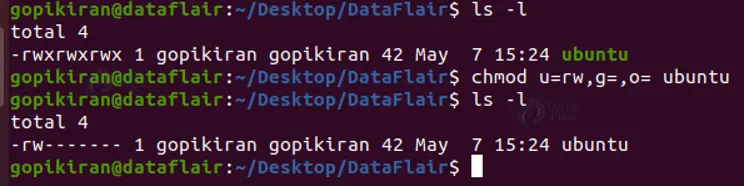
Or you can use the flags “u, g, o, a” and write:
chmod u = rw, g= , o= <filename>
You can also use the flags “-, +, =” and write:
chmod a+rwx, u-x, g-rwx, o-rwx <filename>
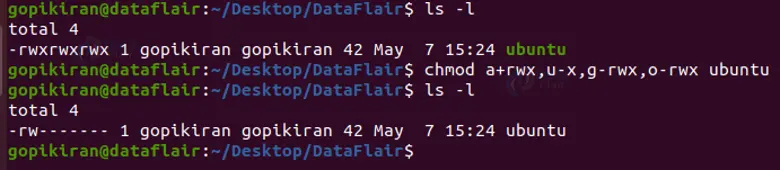
Let us take a look look at the last command in slightly more detail:
First, we assign the permissions to read, write and execute to all the users (a), then from the user we removed the command of executing by using the ‘-’ flag. We also removed the permissions of reading, writing, and executing from the user group and other users.
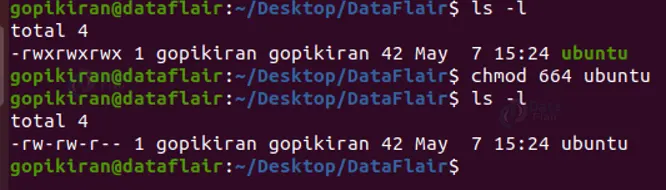
c. “rw-rw-r–”
To give the permissions of reading and writing to the user and user group and only reading to another user, you can use the octal notation and write:
chmod 664 <filename>
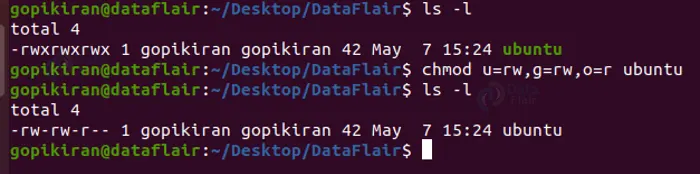
Or you can use the flags “u, g, o, a” and write:
chmod u = rw, g= rw, o=r <filename>
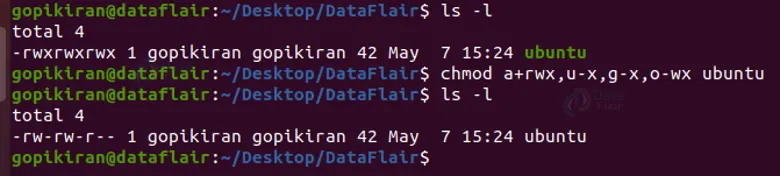
You can also use the flags “-, +, =” and write:
chmod a+rwx, u-x, g-x, o-wx <filename>
Now that we are comfortable using the chmod command let us explore a few examples:
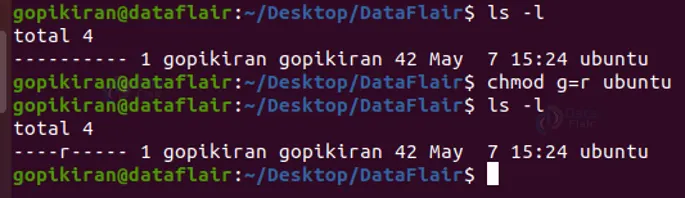
1. Giving user group permission to read
chmod g=r <filename>
This command gives the members of the group permission to only read the file and not to write or execute it.
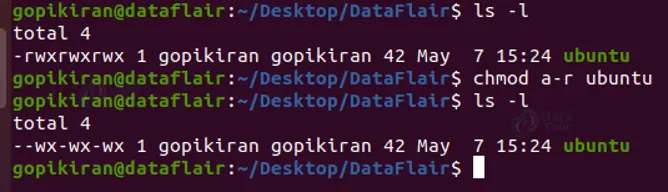
2. Removing executing permission for all of the users
chmod a-r <filename>
chmod 666 <filename>
This command removes the executing permission to all the users, including the owner.
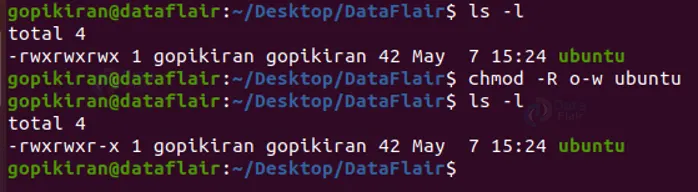
3. Recursively removing write permission for others
chmod -R o-w <filename>
This command recursively (-R) removes the writing permission to the other users.
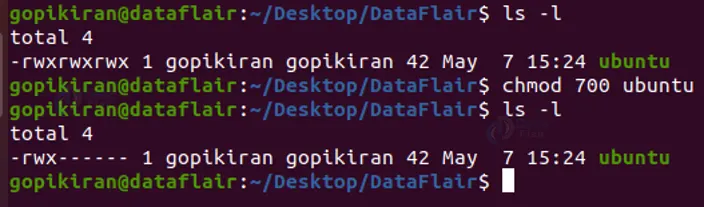
4. Removing ‘rwx’ for all users except owner
chmod og-rwx <filename>
chmod 700 <filename>
This command removes the permissions to read, write, and execute from the user group and other users (all except the user). This command can also be written as:
chmod og= filename
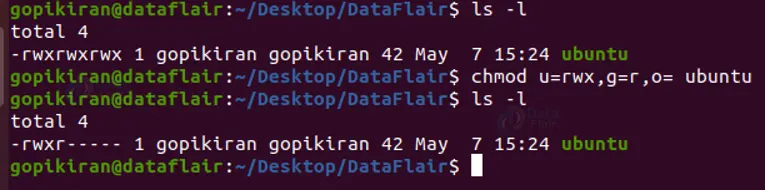
5. Giving ‘rwx’ to the user, ‘r’ to the group, and nothing to others
chmod u=rwx, g=r, o= <filename>
chmod 740 <filename>
This command gives the permission to read, write, and execute from the user. Gives the permission to read to the user group and other users get no permissions.
If you are really interested in finding out more information about the chmod command, feel free to check out my article on it!
Changing the ownership of a file in linux
As we saw earlier upon executing the command “ls -l” it also prints the owner of the specific file. We can even change this with the help of a command called “chown”.
To change the ownership of a specific file use the syntax shown below:
chown <username> <filename>
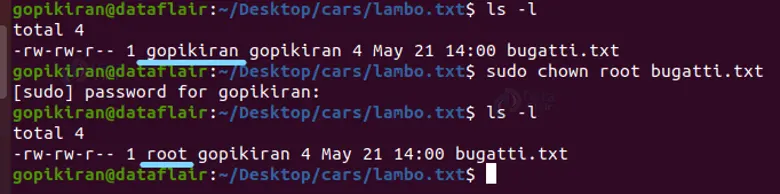
In the above command, I have given the ownership from “gopi Kiran” (myself) to the root user.
Changing the group of a file
Just like we used the command “chown” to change the ownership of the file, we use the command “chgrp” to change the froup of the file. To do so, use the following syntax:
chgrp <group name> <filename>
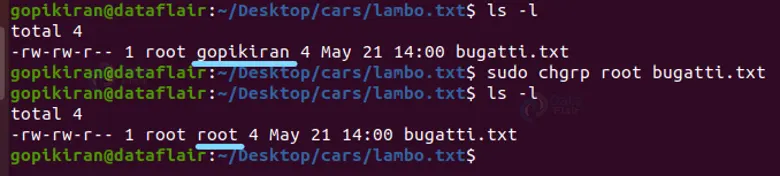
In the above command, I have changed the group from “gopi Kiran” (myself) to the root user.
How can ‘you’ keep your files safe in linux?
Linux on its own is enough to safeguard your files, as it has many amazing features like password authentication, file system discretionary access control, security auditing, and more, but we cannot completely hand over our valuable and sensitive information to a computer, here are some precautions you yourself can take to keep your file system safe:
1. Do a regular backup of your file, in this case, if your system crashes and does not open again, you will still have all of your data.
2. Use external hardware to store your files
3. Store your files in the cloud
4. Control access to your file
5. Encrypt your hardware
Summary
As you have seen, Linux takes a lot of measures like password authentication, file system discretionary access control, security auditing, and more to safeguard your files. You gave now learned how to view permissions, how to change permissions, group, and user. We have also seen some precautions that you can follow to keep your Linux filesystem safe.
You give me 15 seconds I promise you best tutorials
Please share your happy experience on Google


