Fdisk Command in Linux
Job-ready Online Courses: Knowledge Awaits – Click to Access!
In this article, you will learn what fdisk command is, and why it is used in linux. We shall also be looking into some useful commands of FDISK. Let’s start!!!
What is fdisk in Linux?
Fdisk is an acronym for “Fixed disk” or “Format disk”. It is a command-line-based tool that manipulates partition tables on the hard disk for Linux based operating system. Fdisk is also in MSDOS, Windows, IBM OS/2, Flex OS, and many more
In Linux, fdisk is already preinstalled in all the distributions, it is a standard package distributed by the Linux kernel. The first and original program of fdisk was written by Andries E.Brouwer and A.V Le Blanc. The code was later rewritten and modified in 2006 by Karel Zak and Davidlohr Bueso.
Fdisk is a very useful tool as it helps in organizing space for new drivers, creating space for new partitions, copying or moving data to new disks, reorganizing old drives and so many more.
Using the different commands of fdisk, we can resize, view, delete, copy, change and move partitions on a hard drive. Fdisk allows you to create a maximum of 4 new primary partitions and several logical partitions, based on the size of the hard disk you have in your system.
Why use Linux fdisk Command?
Fdisk is a really helpful tool that helps you manipulate your hard disk, using it, you can do tasks like:
1. Reorganizing old archives
2. Move or copy data to new disks
3. Creating space for new partitions
4. Organizing space for new drives
Linux Fdisk command
Fdisk commands help us in doing the tasks mentioned above. They provide a great number of options that help in organizing space for new drivers, creating space for new partitions, copying or moving data to new disks, reorganizing old drives and so many more.
First let us look at how to use fdisk. The syntax is simple:
fdisk <options> <disk>
Options used with fdisk command in Linux
Now let us look at the options used with fdisk before looking at the examples and command mode of fdisk.
1. -b
This option specifies the physical and logical sector size.
2. -B
This option prevents the erasing of boot bits when creating a new label.
3. -L
This option colorizes outputs.
4. -l
This option displays the disk partitions.
5. -o / –output <lists>
This option outputs the columns you specify.
6. -t
This option recognizes the specified partition table only.
7. -u
This option displays the units: ‘cylinders’ or ‘sectors’
8. -s
This option displays device size in 512-byte sectors.
9. -w
This option wipes the signatures
10. -W
This option wipes the signatures from the new partition.
11. -C
This option specifies the number of cylinders
12. -H
This option specifies the number of heads
13. -S
This option specifies the number of sectors per track.
14. -h
This option opens the help document about fdisk
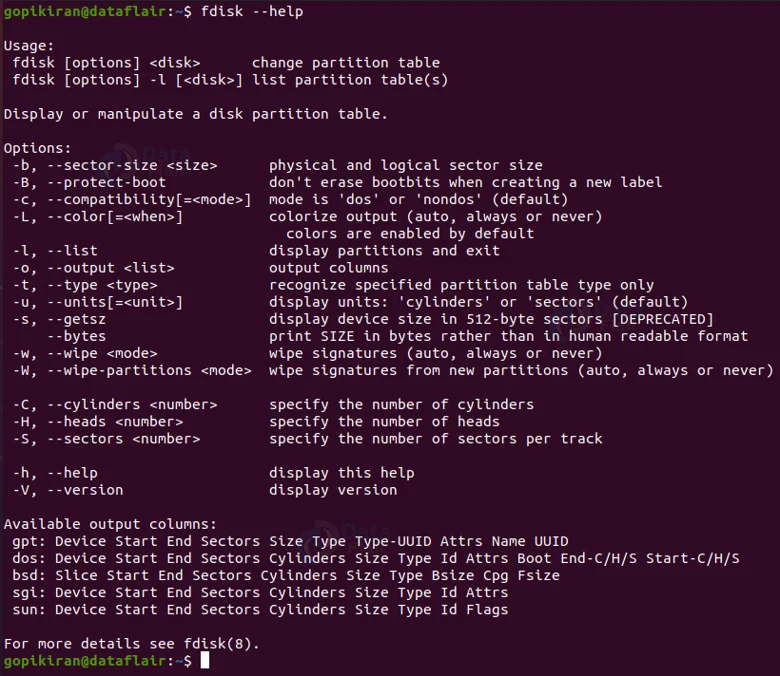
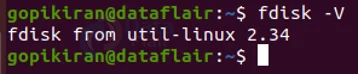
15. -V
This option displays the version of the fdisk you are using.
Now let us look at some of the commands of fdisk
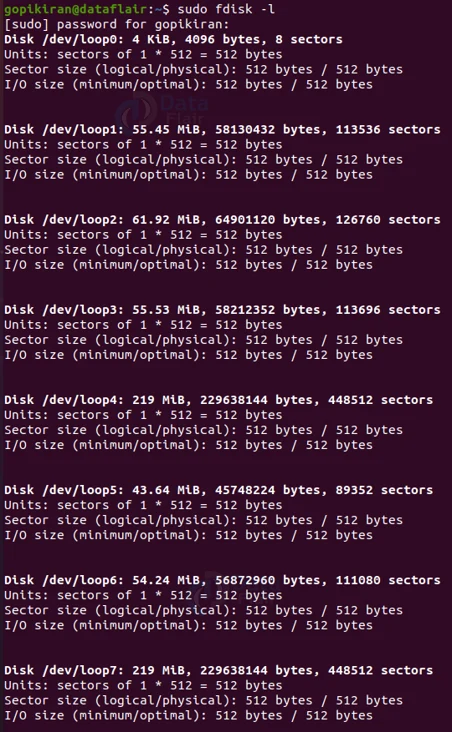
1. Viewing all the disk partitions
Before you even do anything with the disks like copying, resizing, and a lot more, better see all the disk partitions so that you can have a good idea and also dee their /dev names. You list all the disk partitions by simply typing the command
sudo fdisk - l
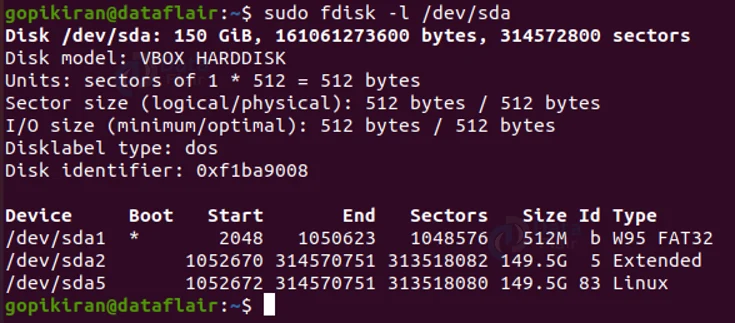
2. Viewing partitions of a specific disk
If you wish to view the disk partition of any specific disk, you can do so by typing the command:
sudo fdisk -l /dev/<name>
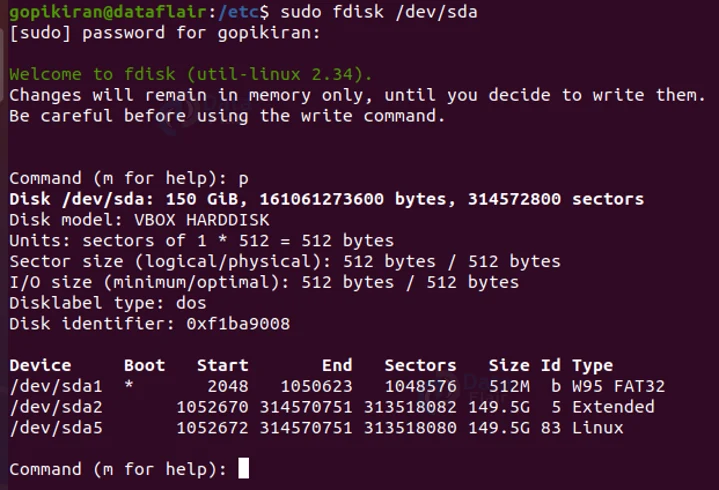
3. Entering command mode
If you want to work on the disk partition, like creating, copying, and more, you can do so from the command mode. If you wish to tinker with the disk name /dev/sda, you can do so by typing the command:
sudo fdisk /dev/sda

4. Command in the command mode
If you want help or which to see all the commands that are used in the command mode, you can do so by simply pressing the latter m while you are in the command mode.
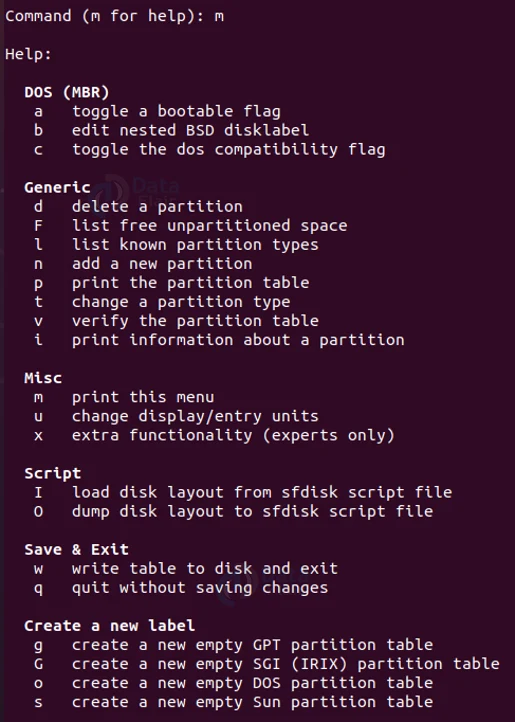
You can see all the various commands like printing, verifying, deleting, and many more that can be used in the command mode of fdisk.
5. Viewing a partition table
If you wish to see the partition table while still in the command mode, you can press the letter “p”
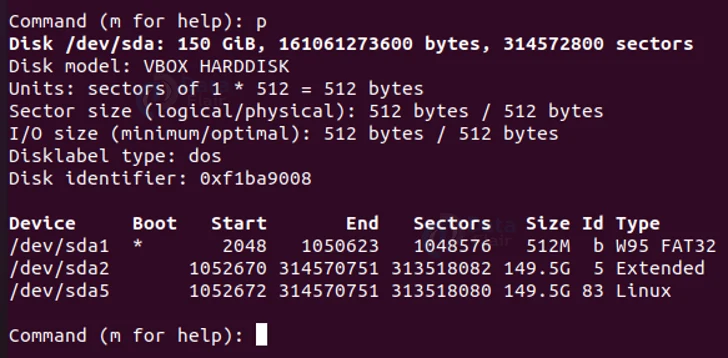
This command is exactly the same as the command “sudo fdisk – l /dev/sda”. If you notice carefully, even the output screen is the same.
6. Deleting a partition of the disk
If you wish to delete a partition of the disk you chose, you simply type the letter “d”.
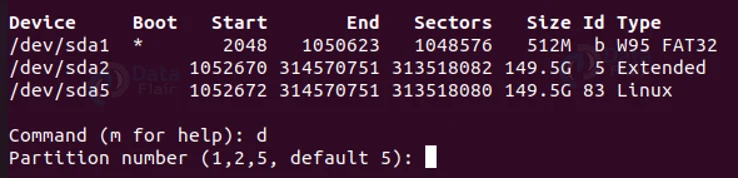
The system prompts you to enter which partition you want to delete. For example, if you type 5, it deletes the partition by the name “/dev/sd5”, if you type 1, it deletes the partition “/dev/sd1”.
7. Creating a new partition
If you wish to create a new partition in the specific disk you choose, you can do so by typing the command “n”
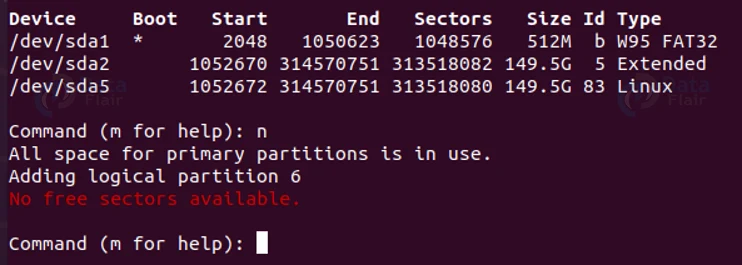
In the above picture, when I press “n”, it says that there are no free sectors available, this means that this particular disk (/dev/sda) can have only 3 partitions. If at all I delete the partition “/dev/sd5” using the “d” command followed by a 5, I then get this output screen:
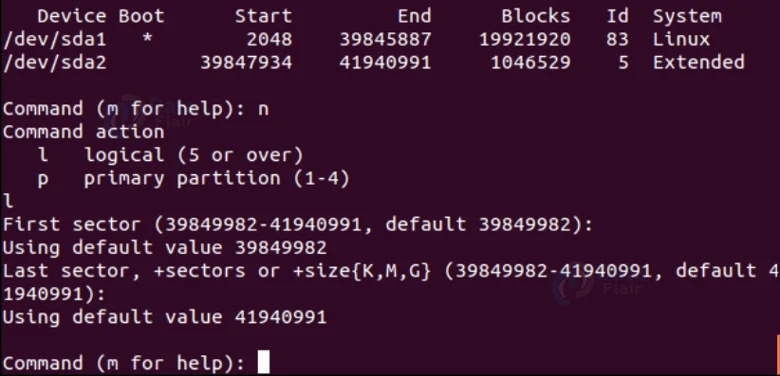
Since I deleted a partition, I now have a chance to create a partition. Now you can specify the sector of the disk (“l” or “p”). After that enter the size of the cylinder by adding “+5000M”. This means an addition of 5000MB.
Press the “w” command to write the new changes to the disk and exit.
8. Formatting a partition
Once you create a new partition and exit from the command mode, be sure to always format it by typing the command:
sudo mkfs.ext5 /dev/sda5
![]()
Note that I deleted and created the /dev/sda5, hence I am formatting the same, you must format the same partition you created.
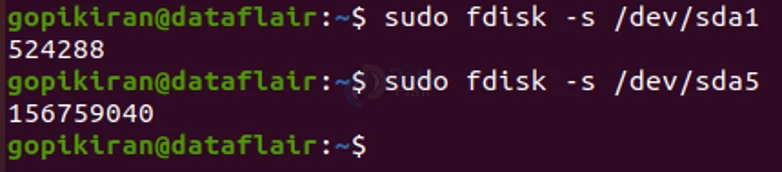
9. Checking the size of a partition
To check the size of a partition, you can do so by typing the command in the terminal:
sudo fdisk -s /dev/sda2
10. Printing all the partition tables
If you want to print the partition table use the command “p” in the command mode.
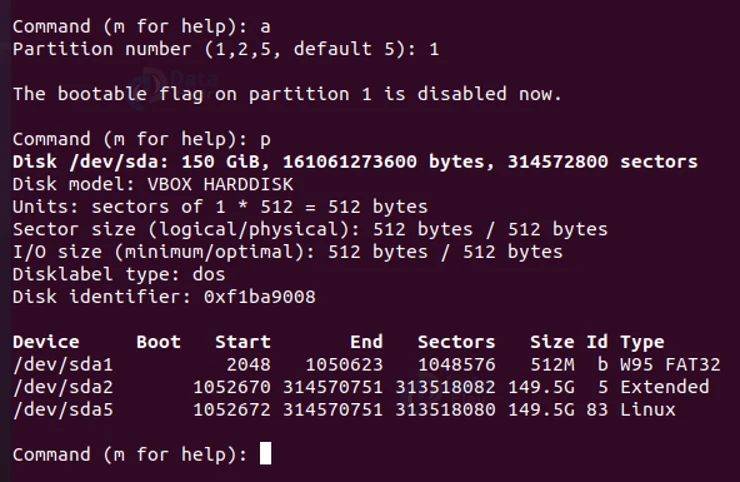
11. Disabling boot flag (*) of a partition
In the above output, when we were displaying the partition tables, in the column “Boot”, there was an asterisk (*). Fdisk shows the boot flag (*) on each partition.
If you want to disable this boot flag, press the command “a” in command mode, and the system will prompt you to enter the partition number. Since in my case the first partition has the boot flag, I entered the number “1”.
Now if I use the command “p” again to display the partition tables, the boot flag is not removed.
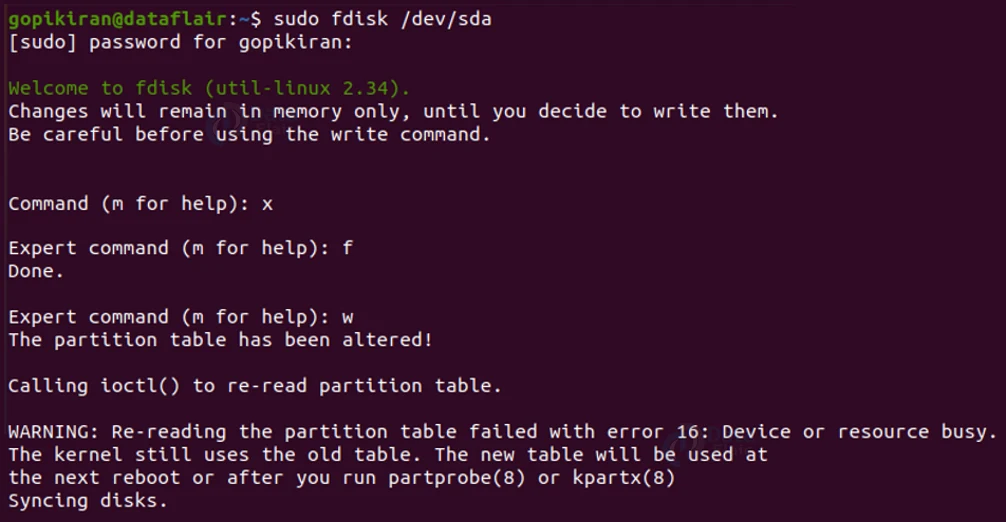
12. Fixing partition table order
If you have already created a logical disk partition and need to recreate it, you may notice the error message “partition out of order” or “partition table entries are not in disk order”. Why does this happen?
Well say that there are 3 logical disk partitions – sda4, sda5, and sda6 are deleted. When you create a new partition, you may name it as sda4, but the system will create it as sda5.
To fix such issues, enter the command “x” in command mode and then enter the expert command “f” to fix the order of the partition table. Upon successfully altering the table, use the “w” command to save and exit.
12. Manual of fdisk
If you get stuck any time anywhere and have doubts about how to use the fdisk command, instead of running the “sudo fdisk –help” command, you can simply run the command “man fdisk”. This command provides a full manual of the tool.
Devices
The device is usually /dev/sda, /dev/sdb, /dev/sdc and so on. The name of the device refers to the entire disk. The partition of a device is always followed by a number. For example /dev/sda1 is the first partition on the first hard disk in the system – /dev/dsa.
Disk labels
A BSD/SUN type disklabel can describe up to 8 partitions, the third partition being the “whole disk partition”. While creating a partition, do not start a partition that uses its first sector at the zeroth cylinder as it destroys the disklabel.
Another example of a disklabel is the IRIX/SGI type which can describe 16 partitions where partition number 11 should be an entire “volume partition” and partition number 9 should be labeled as a “volume header”. Use the IRIX/SGI type disklabels only when working with Linux IRIX/SGI machines or IRIX/SGI disks under Linux.
The most commonly used disk label is the DOS-type partition, as it can describe an unlimited number of partitions. In the zeroth sector, there is room for 4 primary partitions, out of which one may be an extended partition. These 4 primary partitions, even if they are present or not get the numbers 1 to 4 and the logical partitions start numbering from 5.
Whenever a partition table is printed out, we saw that a consistency check is performed on the entries. The role of this check is that the physical and logical start and endpoints are identical and that each partition starts and ends on a cylinder boundary except for partition number 1.
DOS 6.x format
The DOS 6.x format looks for some information in the first sector of the data area of the disk partition. This format treats this information as more reliable than the information in the partition table (the table that gets displayed upon using the option “p”).
The DOS format expects DOS FDISK to clear the first 512 bytes of the data area of a disk partition whenever there is a change in size. It then looks at this extra information even when you gove the flag “/U”, this is a bug in DOS FDISK and DOS FORMAT.
Summary
As you have seen, the fdisk command is very useful as it helps manipulates disk partitioning. You have seen what is fdisk, and its uses. You have also learned the different options of fdisk and how ti to manipulate partitions in the command mode of fdisk. Last but not least, you have learned a few disk partitioning commands which help in creating, formatting deleting, viewing, checking the size of the disk partition, and many more.
Did you like our efforts? If Yes, please give DataFlair 5 Stars on Google


