DF Command in Linux
Placement-ready Online Courses: Your Passport to Excellence - Start Now
In this article, you will learn all there is to the DF command in Linux-based operating systems. We will be going through, what DF is, a brief history of it, the syntax, and options used with the df command. We will also be looking at some practical examples of the df command in the terminal.
What is df command in Linux?
Df is the abbreviation for “Disk Free”. It is a command-line-based utility in Linux-based operating systems that displays the amount of available disk space for file systems.
When you are using any system, you would like to keep a track of the space that is available in it, and when it is nearing full, you will back it up to a hard drive. The df command comes in handy in exactly these kinds of situations.
The df command displays a lot of important information like the number of blocks used, the number of blocks available, the directory in which the file system is mounted, and many more. By default, the df command shows the space available in the disk in 1K blocks
Users without permissions cannot use the du command on a certain directory or file. In such cases, you either need to be the root user or have sudo privileges to gain access. This means that the user invoking the df command must have appropriate read access.
History of Linux df command
The df command made its first appearance in the first version of AT&T Unix. It was a part of the X/Open portability guide since the second issue of 1987. The df command was inherited into the first version of POSIX.
The df command bundled in the GNU Coreutils package was written, developed, and designed by Torbjorn Granlund, David MacKenzie, and Paul Eggert. This command is also available in Microsoft Windows as it comes in the UnxUtils package of the native Win32 ports.
Syntax of Linux df Command
The syntax of the df command is extremely simple:
df <options> <file>
Let us look at the 2 fields present in the syntax of the df command:
1. <options>
This field takes in the options available with the df command. These options specify how df should function and print the output.
2. <file>
This field takes in the name of the file. If you do not specify a file name then the df command shows the space available on all currently mounted file systems.
Options sussed with linux df command
We have seen that the options field specifies how ‘df’ should function and format the output. Let us look at the options available with the df command
1. -a
This option includes all the dummy files also in the output which are actually having zero block sizes. You can also write this option as “–all”
2. -B
This option scale sizes by SIZE. For example, the option “-BM” prints size in units of 1,048,576 bytes. You can also write this option as “–block-size”
3. –total
This option displays the grand total for size.
4. -h
This option prints the sizes in a human-readable format. You can also write this option as “–human-readable”
5. -H
This option is the same as the option “-h”, but uses the power of 1000, unlike option “-h” which uses the power of 1024. You can also write this option as “–si”
6. -i
This option displays the inode information instead of block usage. You can also write this option as “–inode”
7. -l
This option displays the disk usage of only local file systems. This option can also be written as “–local”
8. -P
This option uses the POSIX output format. You can also write this option as “–portability”
9. -t
This option shows only the output of file systems having the type you specified. You can also write this option as “–type”
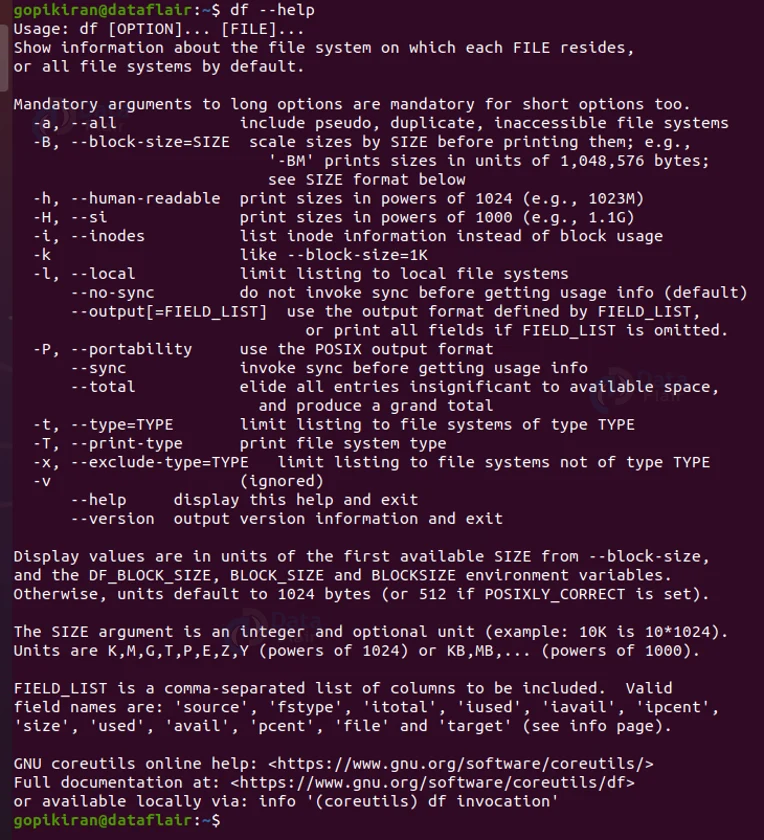
1o. –help
This option displays the help menu as shown below.
11. -x
This option excludes all the file systems having the type you specified from the output. You can also write this option as “–exclude-type”
12. –nosync
This option doe not invoke sync before getting usage info.
13. –sync
This option invokes a sync before getting usage info.
14. -T
This option prints the file system type shown in the output. You can also write this option as “–print-type”
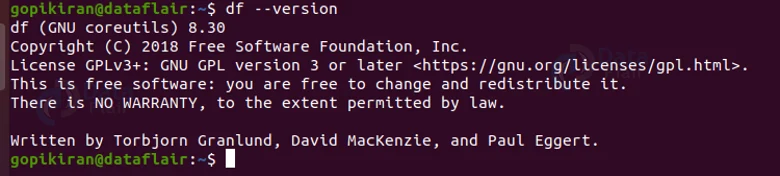
15. –version
This option prints the information about the df you are using.
Now that we have laid down the ground 0 fundamentals, let us look at some beautiful practical examples of the df command in the terminal.
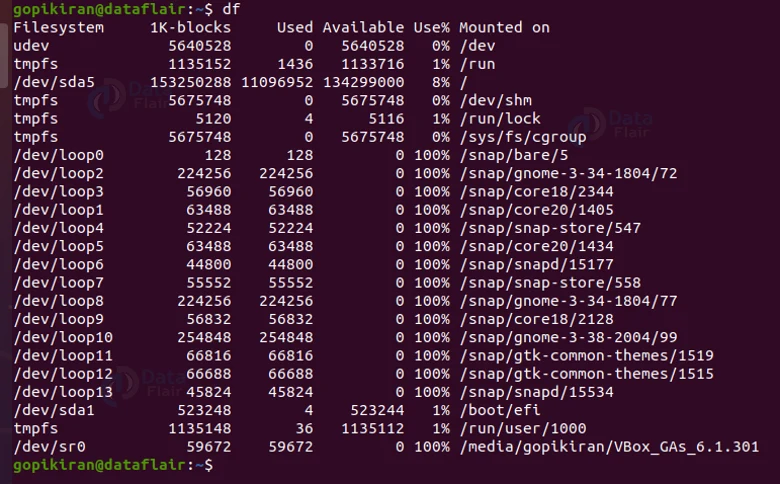
Checking disk space usage of file system
If you want to check the disk space usage of your Linux file system, simply use the df command with no options at all. The df command displays the information of device name, total blocks, total disk space, used disk space, available disk space, and mount points on a file system.
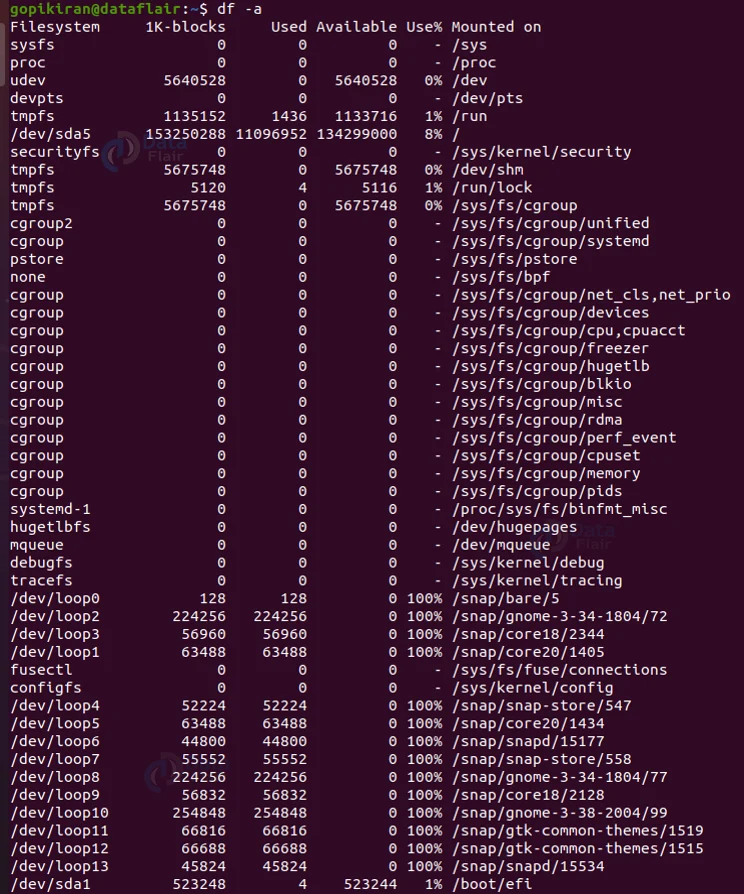
Displaying the information of all the file system disk space usage
To print information of all the filesystems’ disk usage pair the df command with the option “-a” or “–all”. This command is the same as the above command, except it shows you even the information of dummy file systems along with all the file system disk usage and their memory utilization.
Show the disk space in human-readable format
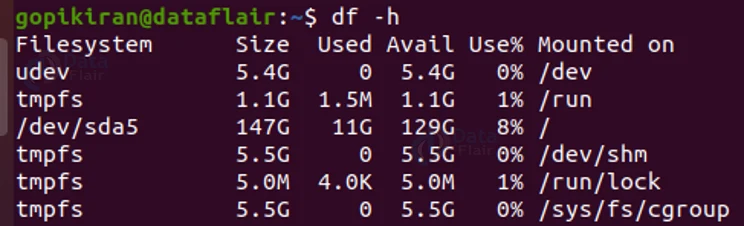
In the above outputs, we have absolutely no idea as to what the disk space is, as it is not in megabytes, kilobytes, gigabytes and so on, which are th units humans are comfortable with. Nonetheless, you can use the option “-h” to print in human-readable format, where K is Kilobytes, M is megabytes and G is Giga bytes.

Displaying information of the home directory
If you want to know the disk usage of a specific directory or filesystem, simply specify its name of it at the end of the command. Make sure you use the option “-h” so that the units are in a human-readable format.

Displaying information in bytes
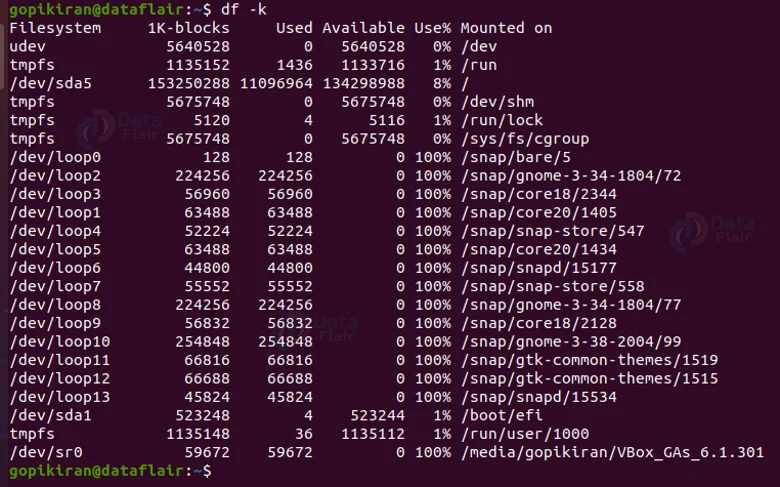
If you want to display all the information of the file system in 1024 byte blocks, use the option ‘k’
Displaying information in Megabytes
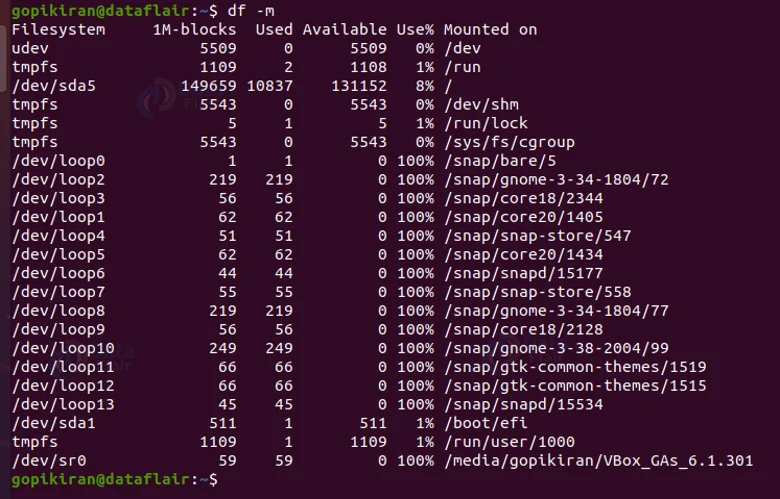
If you want to display all of the information of the filesystems in Megabytes, pair the df command with the option “-m”
Displaying information in Gigabytes
If you want to display all of the information of the filesystems in Megabytes, pair the df command with the option “-h”
Displaying filesystem inodes
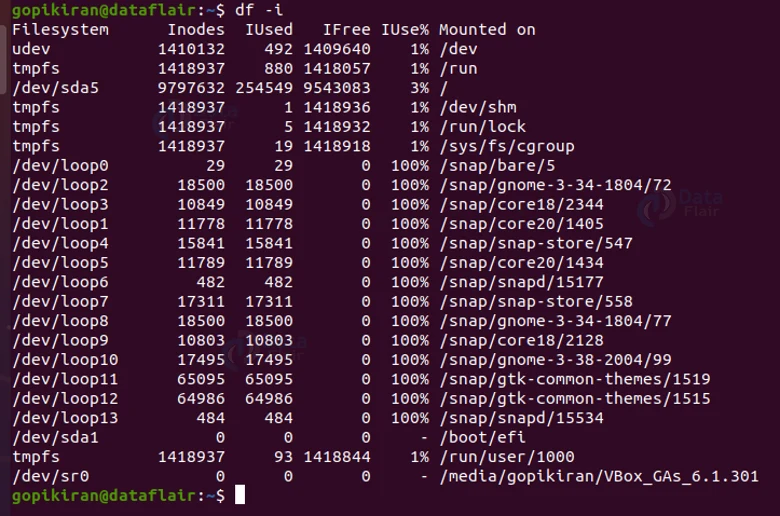
If you want to display the information of a number of used inodes and their percentage for the file system, use th df command along with the option “-i”
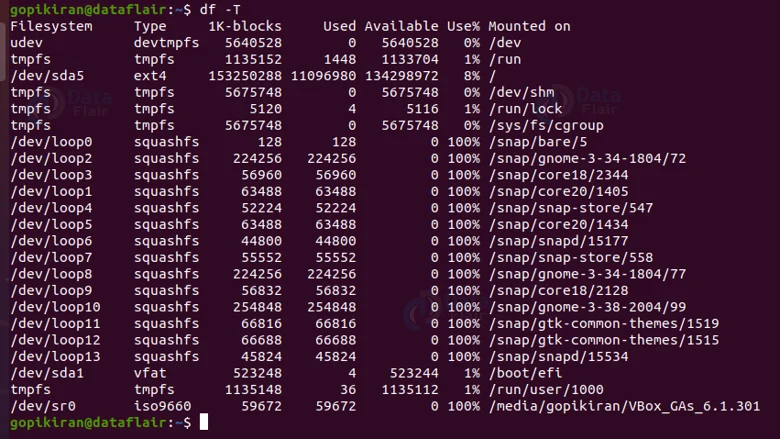
Displaying the type of the filesystem
If you notice carefully, in all the above outputs, there is no section called “Linux file system type”, if you want to print the type of the file system, use the option “T”
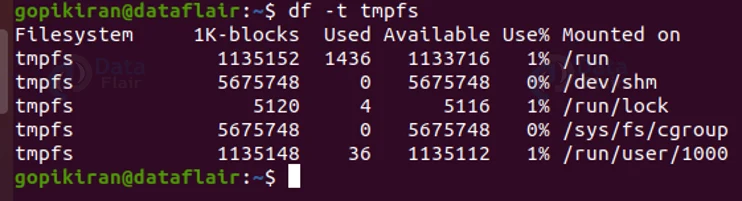
Including certain filesystem types
When printing the disk usage of a file system, if you want to print a certain type of filesystem, use the option “-t” followed by the type of the filesystem.
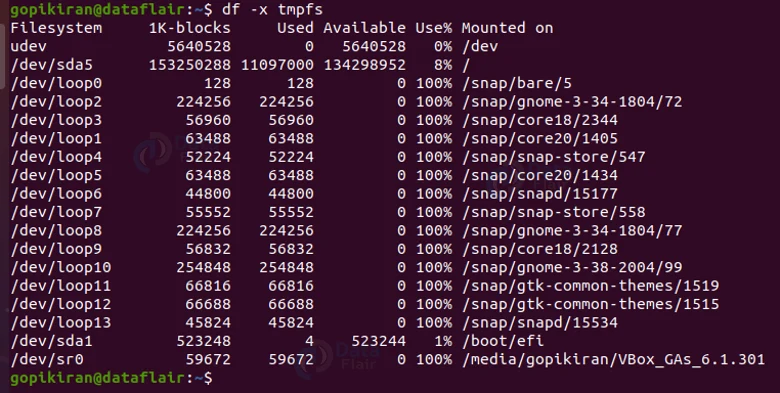
Excluding certain filesystem types
When printing the disk usage of a file system, if you want to exclude a certain type of filesystem, use the option “-x” followed by the type of the filesystem.
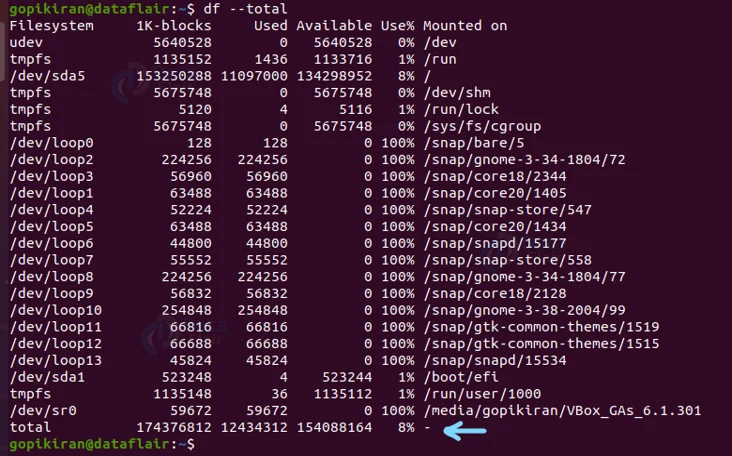
Displaying the grand total size
If you want to print the total of all the disk sizes in the column, pair the df command with the option “–total”.
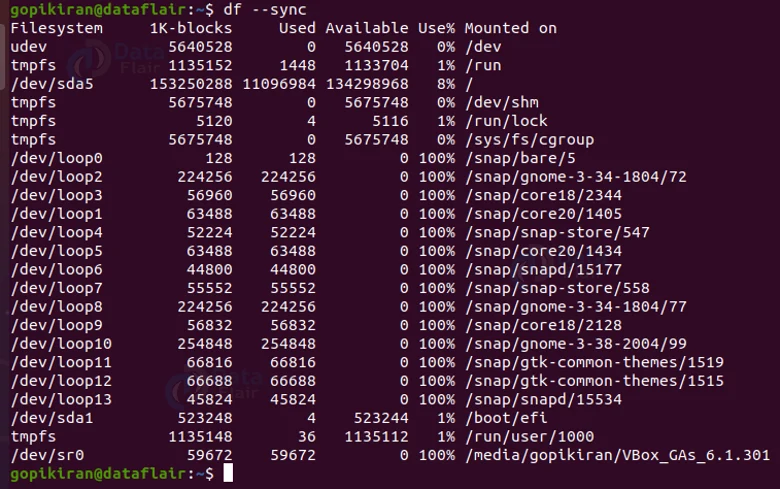
Performing a sync system call
Use the option “–sync” to perform the sync system call before reporting the disk usage of filesystem information. By default, the option “–no-sync” is selected as it does not perform a sync system call. However, we can force the system to sync using the “–sync” option.
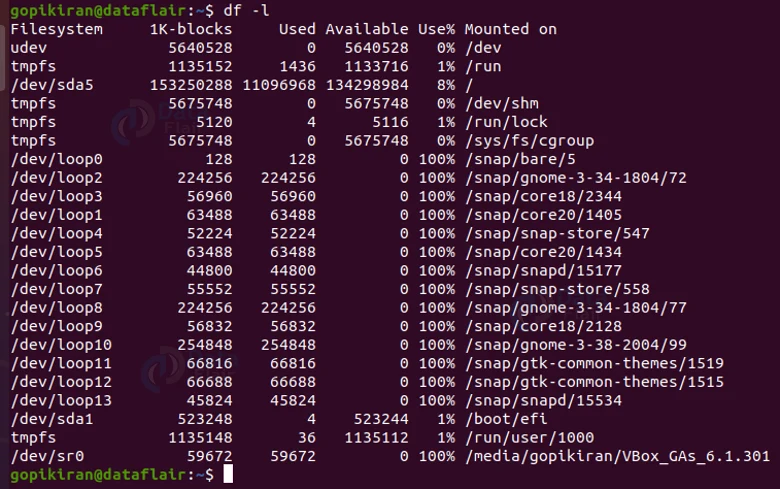
Hide information regarding external filesystems
By default, the df command shows externally mounted file systems which include those from external NFS or Samba servers. We can hide the info of these external file systems from the output with the option “-l “.
Summary
As you have seen, the df command is a really simple command that shows you information about the disk space utilized by the file systems in your operating system. You have now learned, what df is, a brief history of it, the syntax, options, and some practical examples of the df command in the terminal.
We work very hard to provide you quality material
Could you take 15 seconds and share your happy experience on Google


