Chage Command in Linux
Job-ready Online Courses: Click for Success - Start Now!
In this article, we will learn everything about the chage command in Linux. We will look at the free command, why it is used, and the syntax and option used with the chage command. In the end, we will look at some practical examples of the change command in the terminal of Ubuntu 20.04 to understand its working and outputs. So pay attention, take notes if you need, and read the entire article for the best benefits.
What is the chage command?
Chage is the abbreviation for CHange AGE. Chage is a command-line-based utility in Linux-based operating systems that modifies information like the duration when to change password, makes account status active or inactive, sets the account’s expiry date, and sets a reminder to change the password through an alarm before the user’s account will be inactive.
The change command is an excellent system management tool used by administrators to perform various commands like setting a password changing time, locking an account after a certain amount of time, and many more.
Syntax of Linux chage command
The syntax of the chage command is one of the simplest there us. See for yourself:
chage <options> <username>
Here are the fields present in the syntax of the chage command:
- <options>
This field takes in a range of options that specifies how the chage command must function and format the output.
- <username>
This field specifies the user’s login name on which you want to perform various tasks and operations.
Options used with Linux chage command
Unlike most of the commands in Linux, the chage command has only a few options associated with it. Let us take a brief look at each one of them:
1. -d
This option sets the last password change date to the date you specified. You can also write this option as “–lastday”.
2. -E
This option sets the account expiration date to the date you specified. You can also write this option as “–expiredate”.
3. -i
This option used the format of “YYYY-MM-DD” when printing the dates. You can also write this option as “–iso8601”.
4. -I <inactive>
This option sets the password inactive to the “inactive” you specified. You can also write this option as “–inactive”.
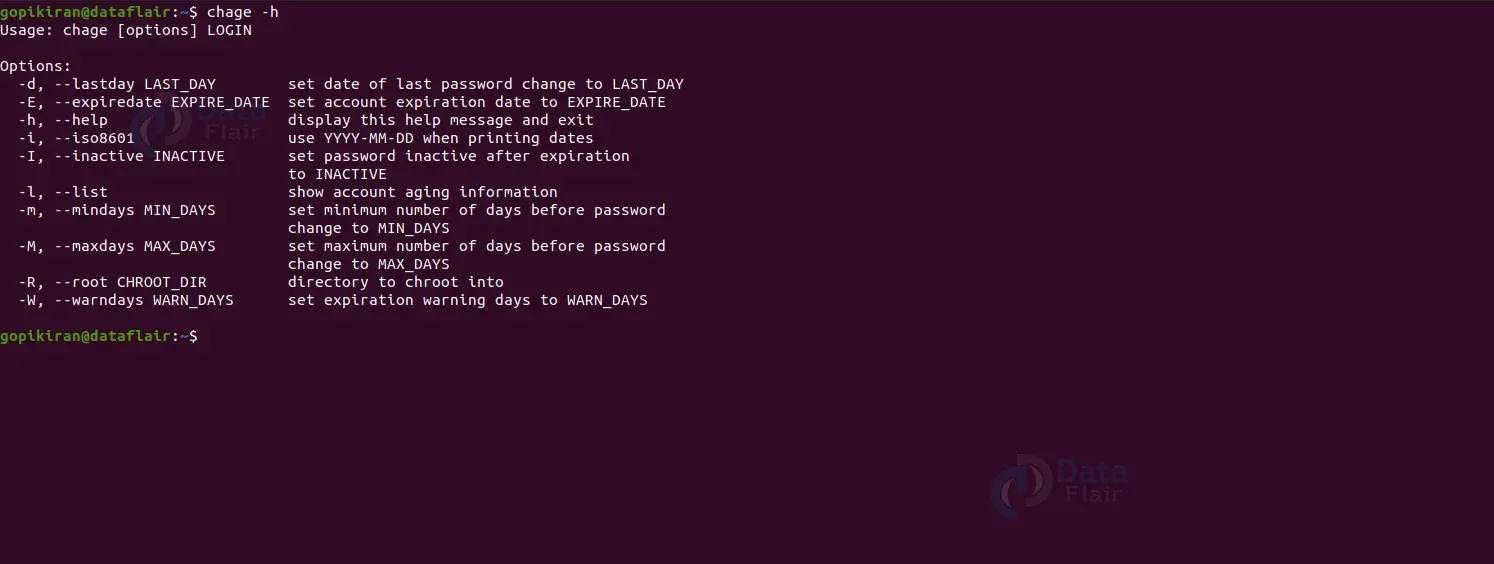
5. -h
This option displays the help menu of the chage command as shown below:
6. -m
This option sets the minimum number of days before the password changes. You can also write this option as “–mindays”.
7. -M
This option sets the maximum number of days before the password changes. You can also write this option as “–maxdays”.
8. -R
This option changes the directory to chroot. You can also write this option as “–root”.
9. -W
This option sets the expiration warning days to the number of days you specified. You can also write this option as “–warndays”.
10. -l
This option shows the information regarding the aging of user accounts. You can also write this option as “–list”.
Now, since we are done with the basics and theory of the chage command, let’s look at some cool practical commands of the chage command by pairing them with options to understand their function better.
I want to point out that the chage command does all kinds of sensitive tasks like setting a password changing, time, locking an account after a certain amount of time, and so many more. So you either need to be the root user or have elevated privileges (using sudo).
Showing the account aging information
To show the aging information of a specific user, pair the chage command with the option “-l” followed by the login name of the user as shown:
chage -l <user>

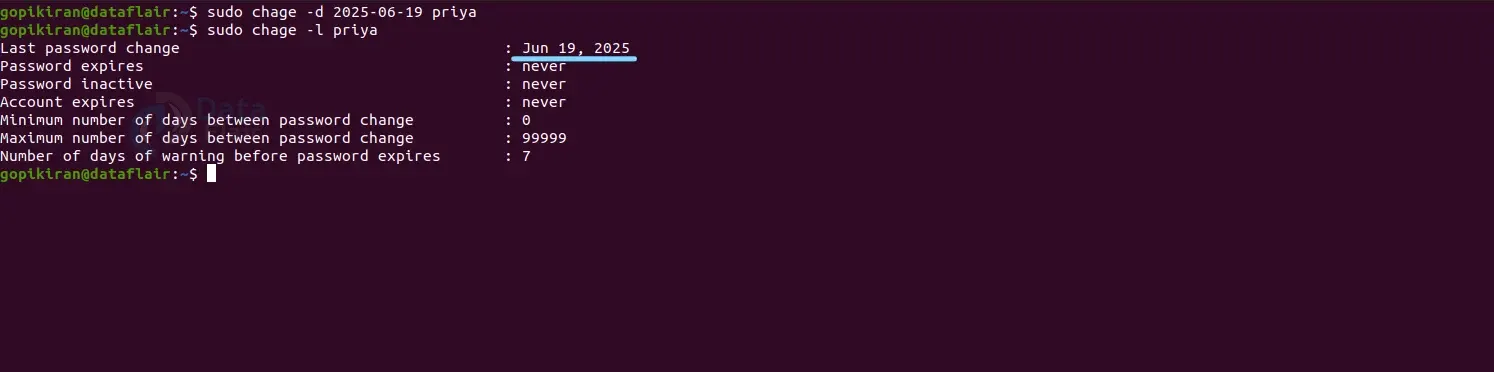
Modifying the last password change date
We can change the last password change date by pairing the chage command with the option “-d” followed by the date in the format YYYY-MM-DD as shown:
chage -d YYYY-MM-DD <user>
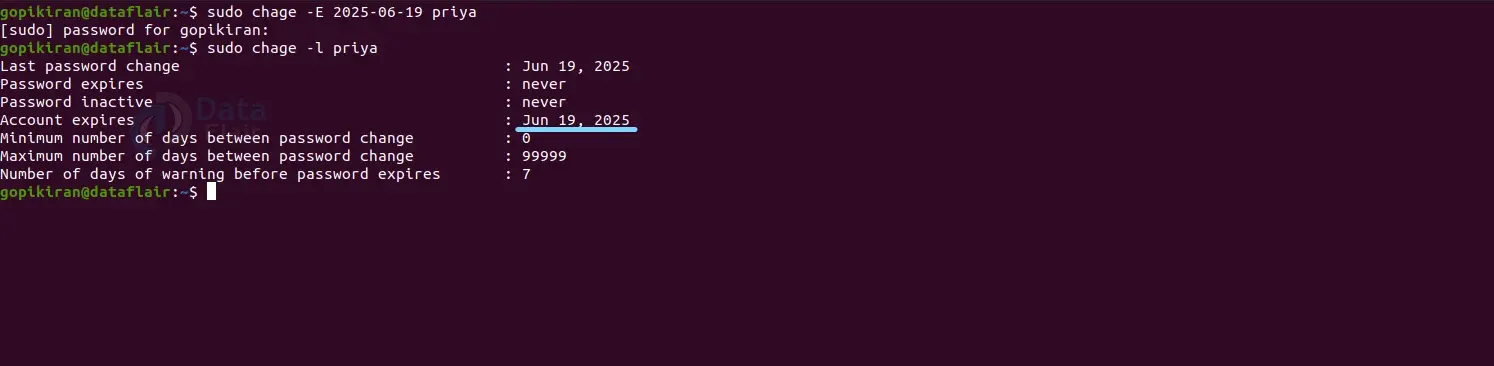
Seeing the date of account expiration
If you wish to set the account expiration date for a specific user, use the chage command with the option “-E” followed by the date in the format YYYY-MM-DD as shown:
chage -E YYYY-MM-DD <user>
Setting the minimum number of days between password change
To modify the minimum number of days between a password change, use the option “-m” followed by the number of days as shown:
chage -m <num> <user>
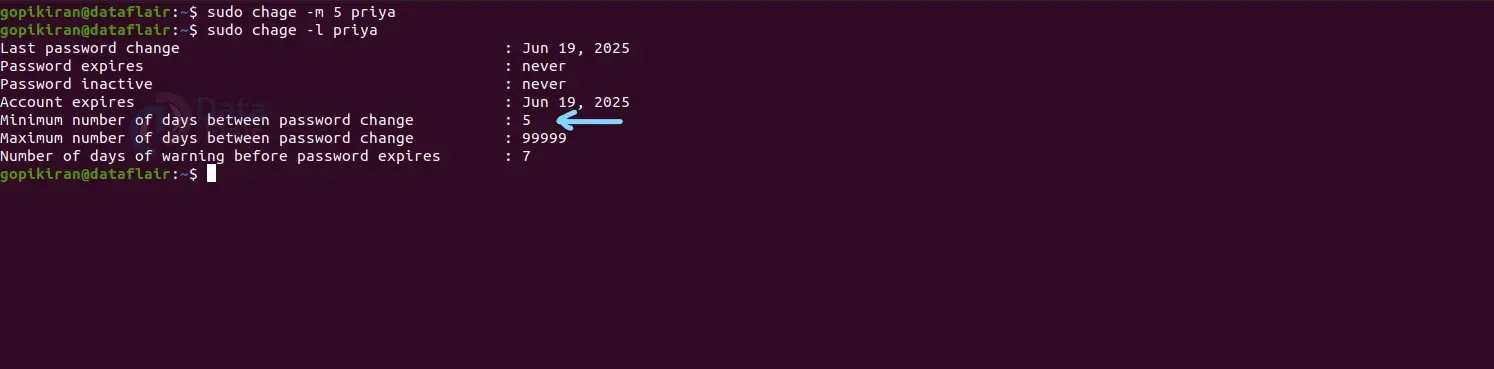
Once you set this date, the user will not have the privilege to change their password before the minimum number of days before the password change. If you specify the number “0” for the minimum number of days before the user can change the password, it indicates that the user can change their password anytime.
Setting the maximum number of days between password change
To modify the minimum number of days between a password change, use the option “-m” followed by the number of days as shown:
chage -M <num> <user>
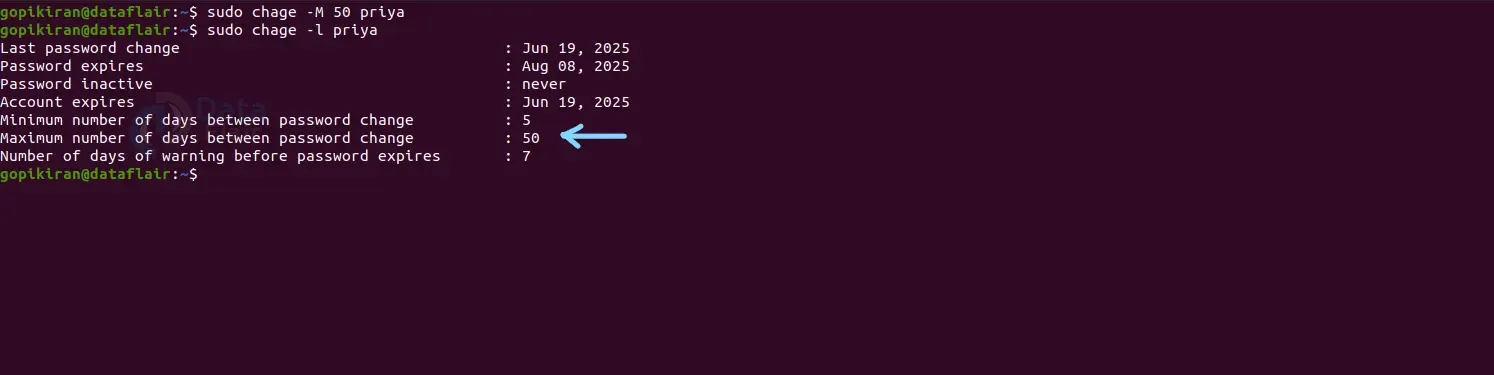
Once you set this date, the user will not have to change their password, as the password will expire on the specified date. If you specify the number of days as “-1”, it removes the password validity.
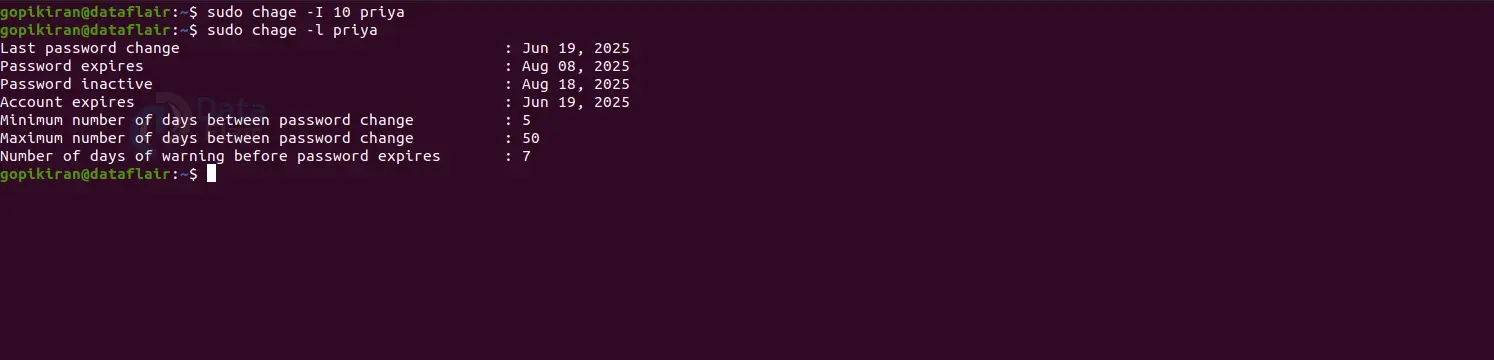
Setting the number of inactive days
If you want to set the number of days of inactivity, on which period the user’s account will be locked, use the option “-I” flowed by the number of days as shown:
chage -I <num> <user>
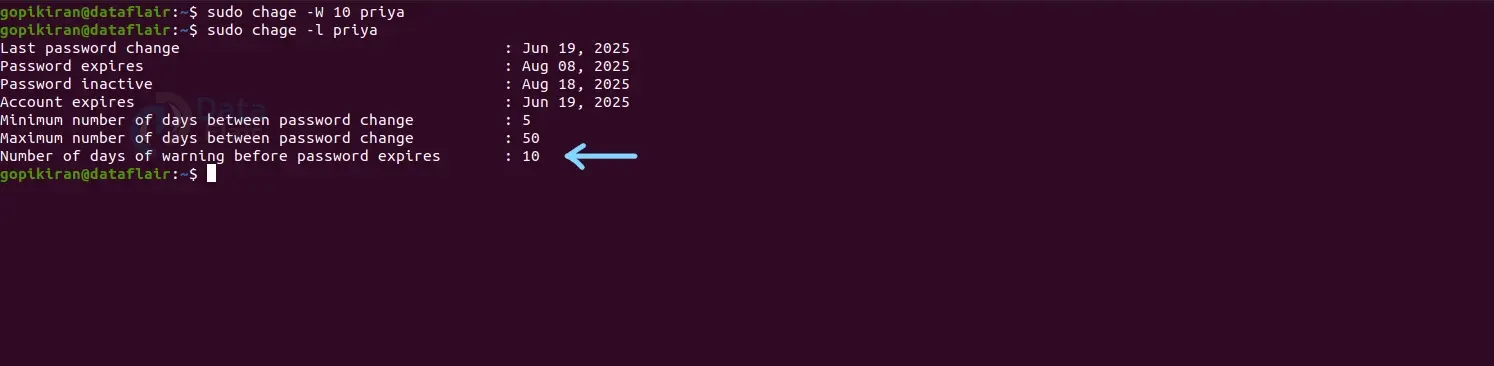
Setting the number of days before the password expires
If you have set an expiration date for the password of the user and want to give them a warning that their password will expire soon, use the option “-W” followed by the number of days as shown:
chage -W <num> <user>
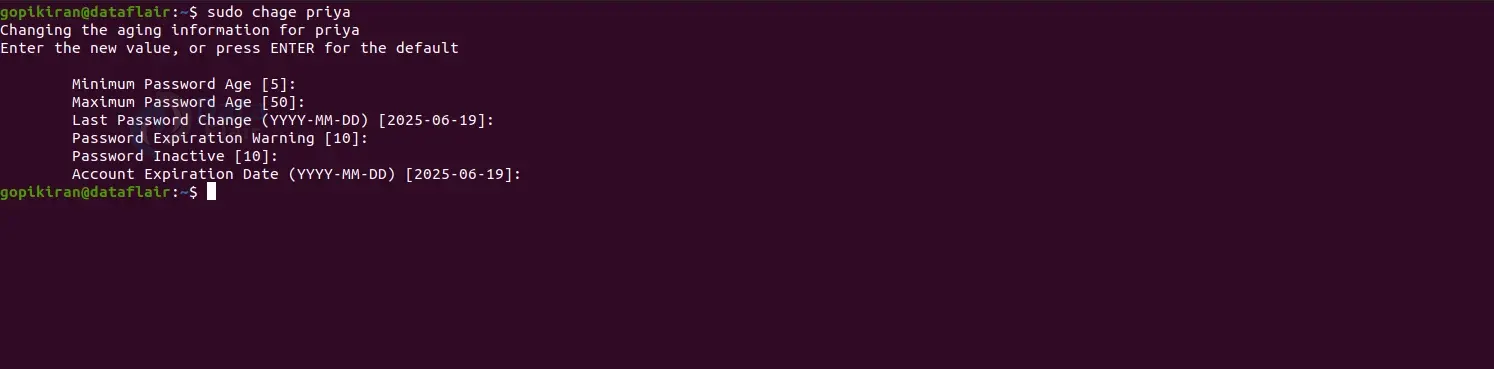
Using the chage command with no options
Have you ever wondered what will happen if you pass the username for the chage command and have no options? Well, it will ask you to either enter an option or hit the enter button for the default information. But the best part is that the chage command even gives you the list of options you can enter.
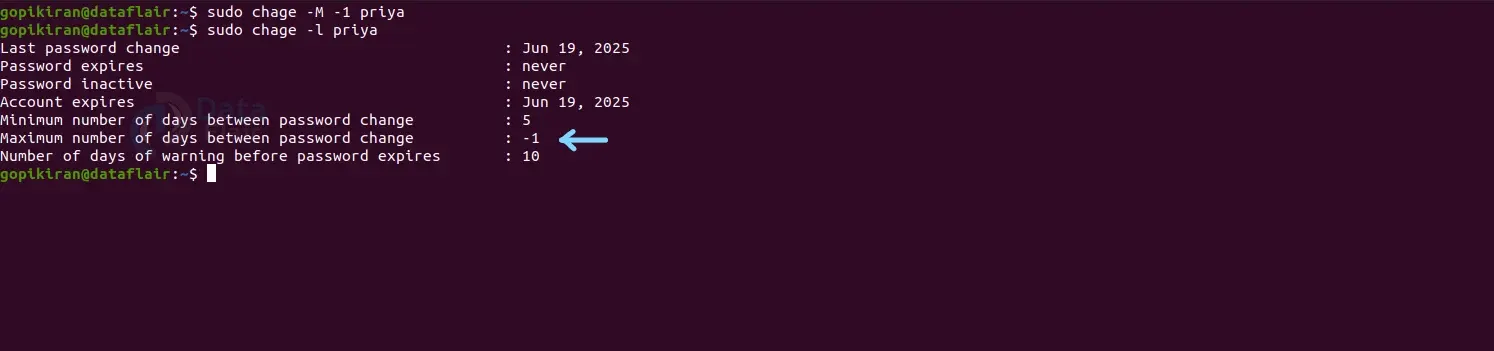
Setting the password expiry date to never
As discussed above, we modify the value of the maximum number of days between password modification to never by specifying the number “-1” after the option “-m” as shown:
change -M -1 <user>
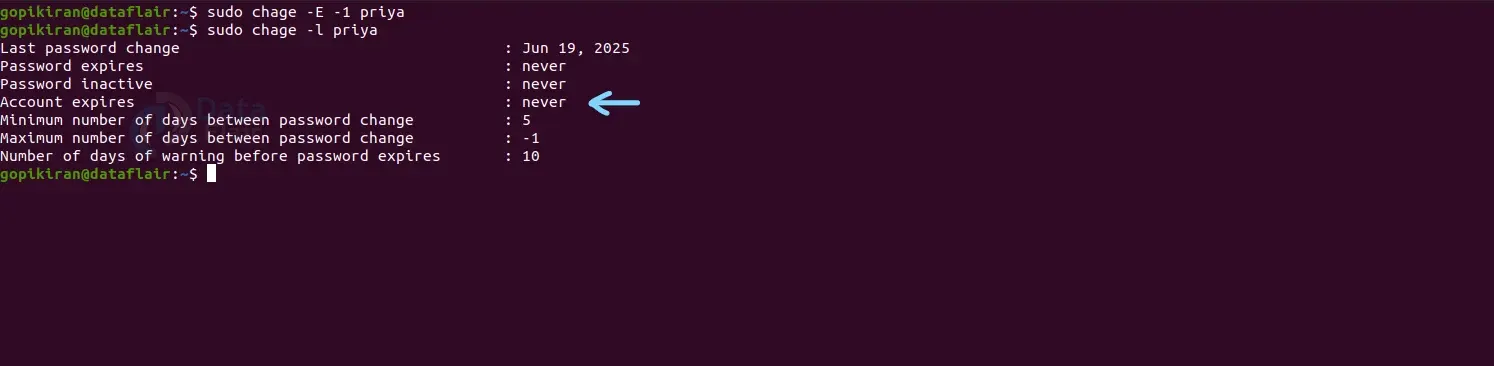
Removing the expiry date for a user account
If you want to remove an expiry date of a specific user account, use the option “-E” followed by the number “-1” as shown:
chage -E -1 <user>
Summary
As you have seen, the chage command is a simple yet efficient and advanced tool that allows you to perform various tasks like setting a password changing, time, locking an account after a certain amount of time, and more.
You have now learned what the chage command is, what it is used for, the syntax, and the options used with it. You have also learned ten practical examples of the chage command by pairing the various options used with it.
If you are Happy with DataFlair, do not forget to make us happy with your positive feedback on Google


